Flashcards are a great tool when you want to memorize a new topic or learn a new language. You write a question on the front of the card and the answer on the back of the card. Then you can test your memory by going through the flashcards. The more often you show a card to yourself, the better your chances of memorizing its content. With Django, you can build your own flashcards app.
By following this tutorial, you’ll build a Django flashcards app that replicates a spaced repetition system, which can boost your learning potential.
In this step-by-step project, you’ll learn how to:
- Set up a Django project
- Work with a SQLite database and the Django shell
- Create models and class-based views
- Structure and nest templates
- Create custom template tags
Along the way, you’ll get step-by-step guidance to create your final flashcards app. That means you’ll get all the code you need in separate, bite-size pieces. You can also find the full source code of the application by clicking on the link below:
Source Code: Click here to download the source code that you’ll use to build your Django flashcards app.
If you want to learn about a new topic while sharpening your Django and Python skills, then this project is the perfect match for you!
Demo: Your Django Flashcards App
In this tutorial, you’ll build a flashcards app. On the front page of your web app, you’ll see all your existing cards and be able to create new ones. On each flashcard, you can add a question and an answer, which you can later edit. When you want to test your knowledge, you can navigate to a box to review the cards that the box contains:
Once you’ve learned the answer to the card’s question, the card moves to the next box. If a flashcard moves to the next box, that doesn’t mean you’re done with it. You’ll still review it periodically to refresh your memory, and it’ll continue progressing through the boxes. Basically, the higher the box number, the more likely that you’ve mastered those concepts. If you don’t know the answer to a card’s question, then the card moves back to the first box.
Project Overview
Your work in this tutorial is divided into multiple steps. That way, you can take breaks and continue at your own pace. You’ll build a full-stack web app with a database connection that replicates the Leitner system:
In [the Leitner system], flashcards are sorted into groups according to how well the learner knows each one in Leitner’s learning box. The learners try to recall the solution written on a flashcard. If they succeed, they send the card to the next group. If they fail, they send it back to the first group. (Source)
By using spaced repetition, you’ll test your knowledge of the new or challenging topics in the first box more frequently, while you’ll check the cards from the other boxes in larger time intervals:
- You have five boxes that can contain flashcards.
- When you create a flashcard, you put it into the first box.
- To test your knowledge, you choose a box, pick a random flashcard, and check if you know the answer to the card’s question.
- If you know the answer, then you move the card to the next higher box.
- If you don’t know the answer, then you move the card back to the first box.
The higher the box number, the less frequently you check the flashcards in that box to test your knowledge.
Note: Flashcards are an excellent tool for learning a new language. In the examples throughout this tutorial, you’ll find translations of English and Spanish words. But the examples are kept minimal on purpose. That way, you can conveniently customize the questions and answers on your cards.
This project is a great starting point, and then you can enhance your Django project with more features. At the end of this tutorial, you’ll find ideas about what to build next.
Prerequisites
You don’t need any previous knowledge of Django or databases to complete this project. If you want to learn more about the topics that you encounter in this tutorial, you’ll find links to resources along the way.
However, you should be comfortable using the command line and have a basic knowledge of Python and classes. Although it helps to know about virtual environments and pip, you’ll learn how to set everything up as you work through the tutorial.
Step 1: Prepare Your Django Project
In this step, you’ll prepare the development environment for your Django flashcards project. First, you’ll create a virtual environment and install all dependencies that you need for your project. At the end of this step, you’ll create the Django project and verify that your project is set up correctly in the browser.
Create a Virtual Environment
In this section, you’ll create your project structure. You can name the root folder of your project any way you like. For example, you could name it flashcards_app/ and navigate into that folder:
$ mkdir flashcards_app
$ cd flashcards_app
In this case, you name the root folder of your project flashcards_app/.
The files and folders that you create will be located in either this folder or its subfolders.
After navigating to the project folder, it’s a good idea to create and activate a virtual environment. That way, you’re installing any project dependencies not system-wide but only in your project’s virtual environment.
Select your operating system below and use your platform-specific command to set up a virtual environment:
With the commands shown above, you create and activate a virtual environment named venv by using Python’s built-in venv module.
The parentheses (()) surrounding venv in front of the prompt indicate that you’ve successfully activated the virtual environment.
Add Dependencies
After you’ve created and activated your virtual environment, it’s time to install django with pip:
(venv) $ python -m pip install django==4.0.4
The Django web framework is the only direct dependency that your project requires.
Any other Python packages that Django needs to work were installed automatically when you ran the pip install command.
Initiate Your Django Project
Once you’ve created your virtual environment and installed Django, it’s time to initialize your Django project.
Use Django’s command-line utility to create the Django flashcards project in your project’s root directory:
(venv) $ django-admin startproject flashcards .
Don’t forget to add the dot (.) at the end of the command above.
The dot prevents Django from creating a nested project directory for your flashcards project.
Otherwise you’d end up with a flashcards/ folder that contains a flashcards/ subdirectory.
By running the startproject command as shown above, you’ve told Django to create one flashcards/ folder in your project’s root directory with a bunch of files, including manage.py.
The manage.py file will take over administrative tasks in the command line.
For example, it’ll run your development web server:
(venv) $ python manage.py runserver
You can specify the IP address and the port of your development server.
By default, the server runs on port 8000 on 127.0.0.1 and is only accessible on your computer.
With the server running, you can visit your Django project in your browser by using either http://127.0.0.1:8000 or http://localhost:8000:
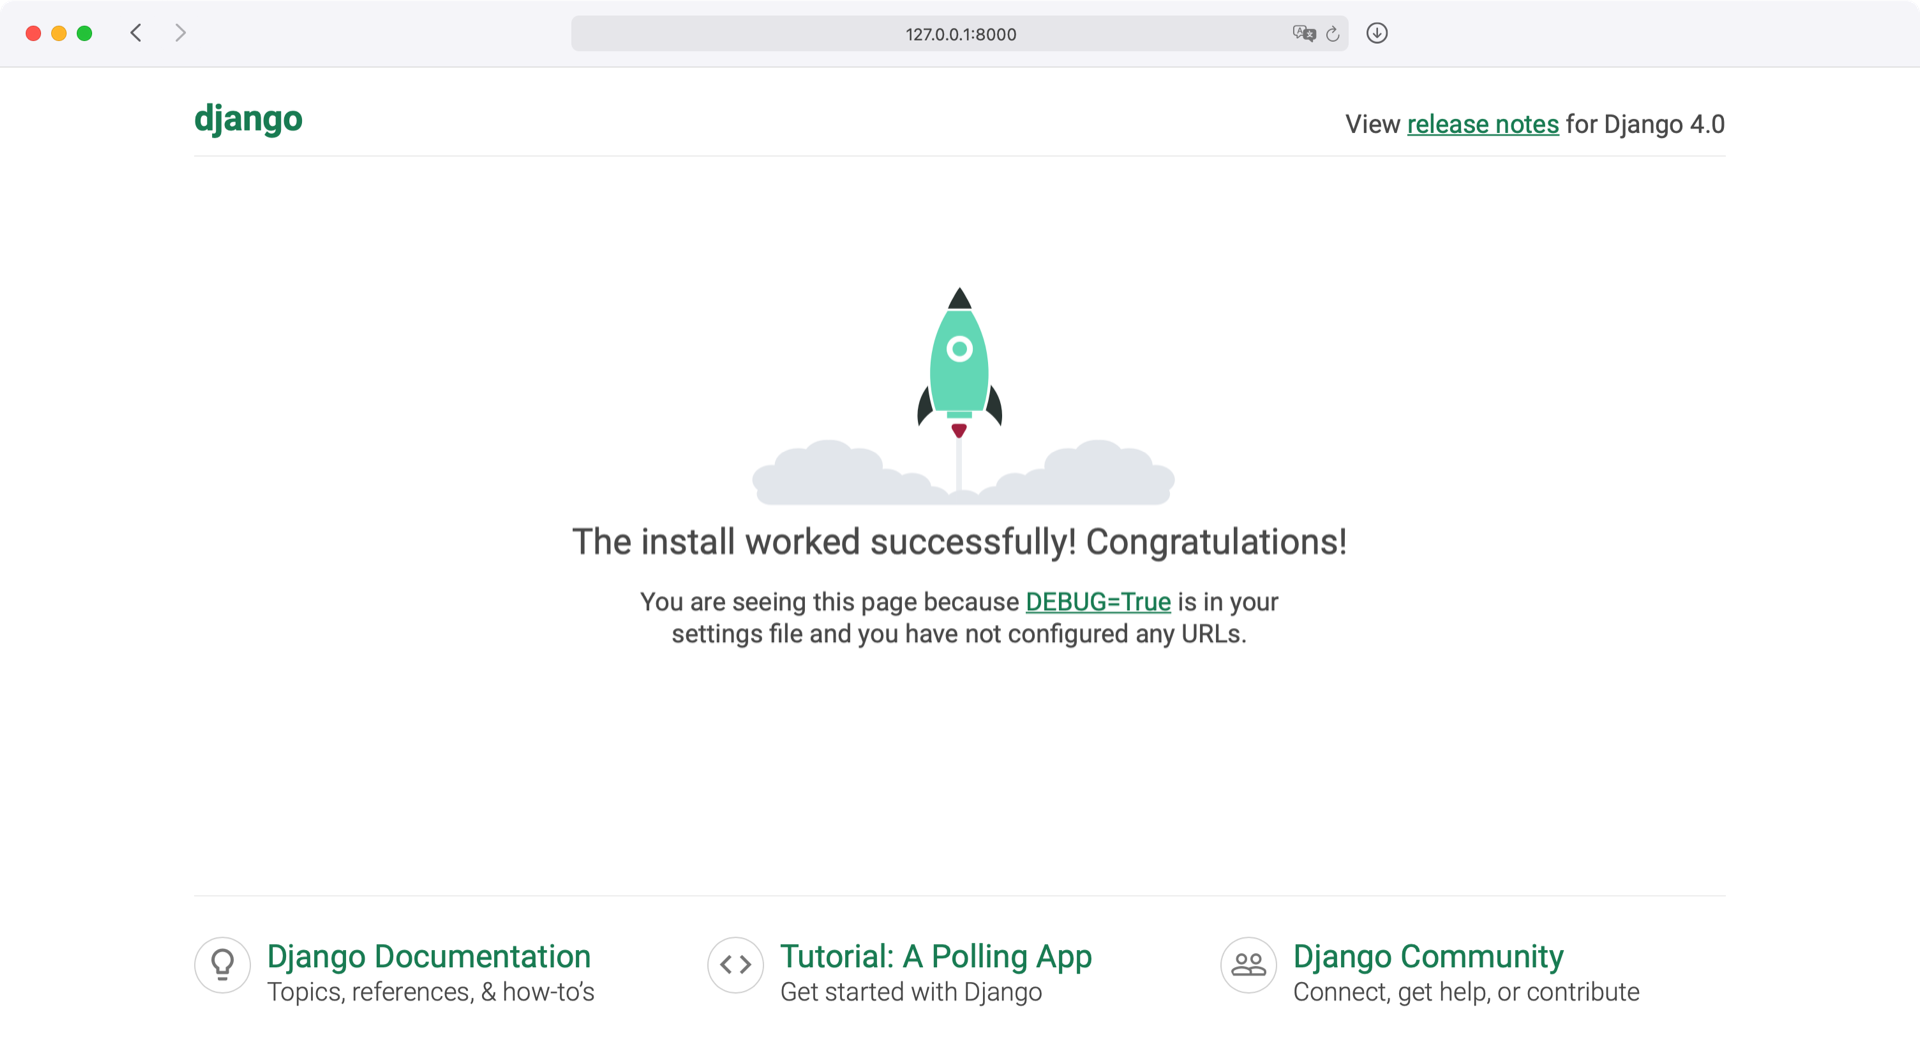
This is the home page of your Django project. So far, there’s only a jiggling rocket to see. That means the installation was successful, and you can continue to create your flashcards app.
Step 2: Set Up Your Flashcards App
In the previous step, you prepared your development environment.
Now it’s time to set up your flashcards app, which you’ll name cards.
The cards app will contain all the code to create your learning cards.
Create Your Django Flashcards App
A Django project contains one or more applications. The scope of an app should be limited. In the beginning, differentiating between a project and apps can be confusing. But in big Django projects, this separation of concerns keeps the codebase clean. Another advantage of this structure is that you can reuse apps for other projects.
In this tutorial, you need only one app besides your project.
The primary purpose of that app is to handle your app’s cards, so you can call the app cards.
Run the command to create the cards app:
(venv) $ python manage.py startapp cards
This command creates a cards/ folder in your project, with some predefined files.
To connect the cards app to the flashcards project, add it to INSTALLED_APPS in flashcards/settings.py:
# flashcards/settings.py

# ...

INSTALLED_APPS = [
    "django.contrib.admin",
    "django.contrib.auth",
    "django.contrib.contenttypes",
    "django.contrib.sessions",
    "django.contrib.messages",
    "django.contrib.staticfiles",
    "cards.apps.CardsConfig",
]

# ...
Now the configuration class of your cards app is plugged into the flashcard Django project.
Next, you’ll make sure that you can navigate to your cards app in the browser.
Launch Your Landing Page
So far, Django still shows the jiggling rocket on the landing page of your flashcards project. In this section, you’ll implement your custom landing page by using a base template.
First, you need to tell Django that your cards app takes care of the root URL of your project now.
Open urls.py in your flashcards/ folder and include your cards URLs:
 1# flashcards/urls.py
 2
 3from django.contrib import admin
 4from django.urls import path, include
 5
 6urlpatterns = [
 7    path("admin/", admin.site.urls),
 8    path("", include("cards.urls")),
 9]
In line 8, you’re adding path() with an empty route string pattern to the urlpatterns list as the first positional argument.
As the second argument, you pass in include(), which informs the flashcards project that the cards app will take care of all routes that match the string pattern.
The empty string pattern ("") is indeed empty, so cards listens to all of your root URLs from now on.
With this URL pattern in place, Django passes on any URLs of your project, except admin/, to your cards app.
To handle this, your cards app needs its own urls.py file, which takes over the responsibility of dispatching URLs:
# cards/urls.py

from django.urls import path
from django.views.generic import TemplateView

urlpatterns = [
    path(
        "",
        TemplateView.as_view(template_name="cards/base.html"),
        name="home"
    ),
]
In your new urls.py file, you’re working with a urlpatterns list, just like before.
Again, you pass in an empty route string pattern.
This time you serve a TemplateView to the root URL.
You also pass in name="home" as an optional argument.
With a name, you can reference views conveniently in your Django project.
So even if you decide to change the URL pattern at some point, you don’t have to update any templates.
To serve the template that you’re referencing to, create base.html in cards/templates/cards/:
 1<!-- cards/templates/cards/base.html -->
 2
 3<!DOCTYPE html>
 4<html lang="en">
 5
 6<head>
 7    <title>Flashcards</title>
 8</head>
 9
10<body>
11    <header>
12        <h1>Flashcards App</h1>
13    </header>
14    <main>
15        {% block content %}
16            <h2>Welcome to your Flashcards app!</h2>
17        {% endblock content %}
18    </main>
19</body>
20
21</html>
Your base template contains the basic structure of your website. In line 15, you define a template block that child templates can override. If no child template overrides the content block, then the content in the block will show.
Note: Usually, your Django development web server restarts on its own. If you want to stop the server manually, then you can press Ctrl+C in the terminal.
To start the server again, run the following:
(venv) $ python manage.py runserver
Remember that you need to run this command in your activated virtual environment.
Hop over to your browser and visit http://127.0.0.1:8000:
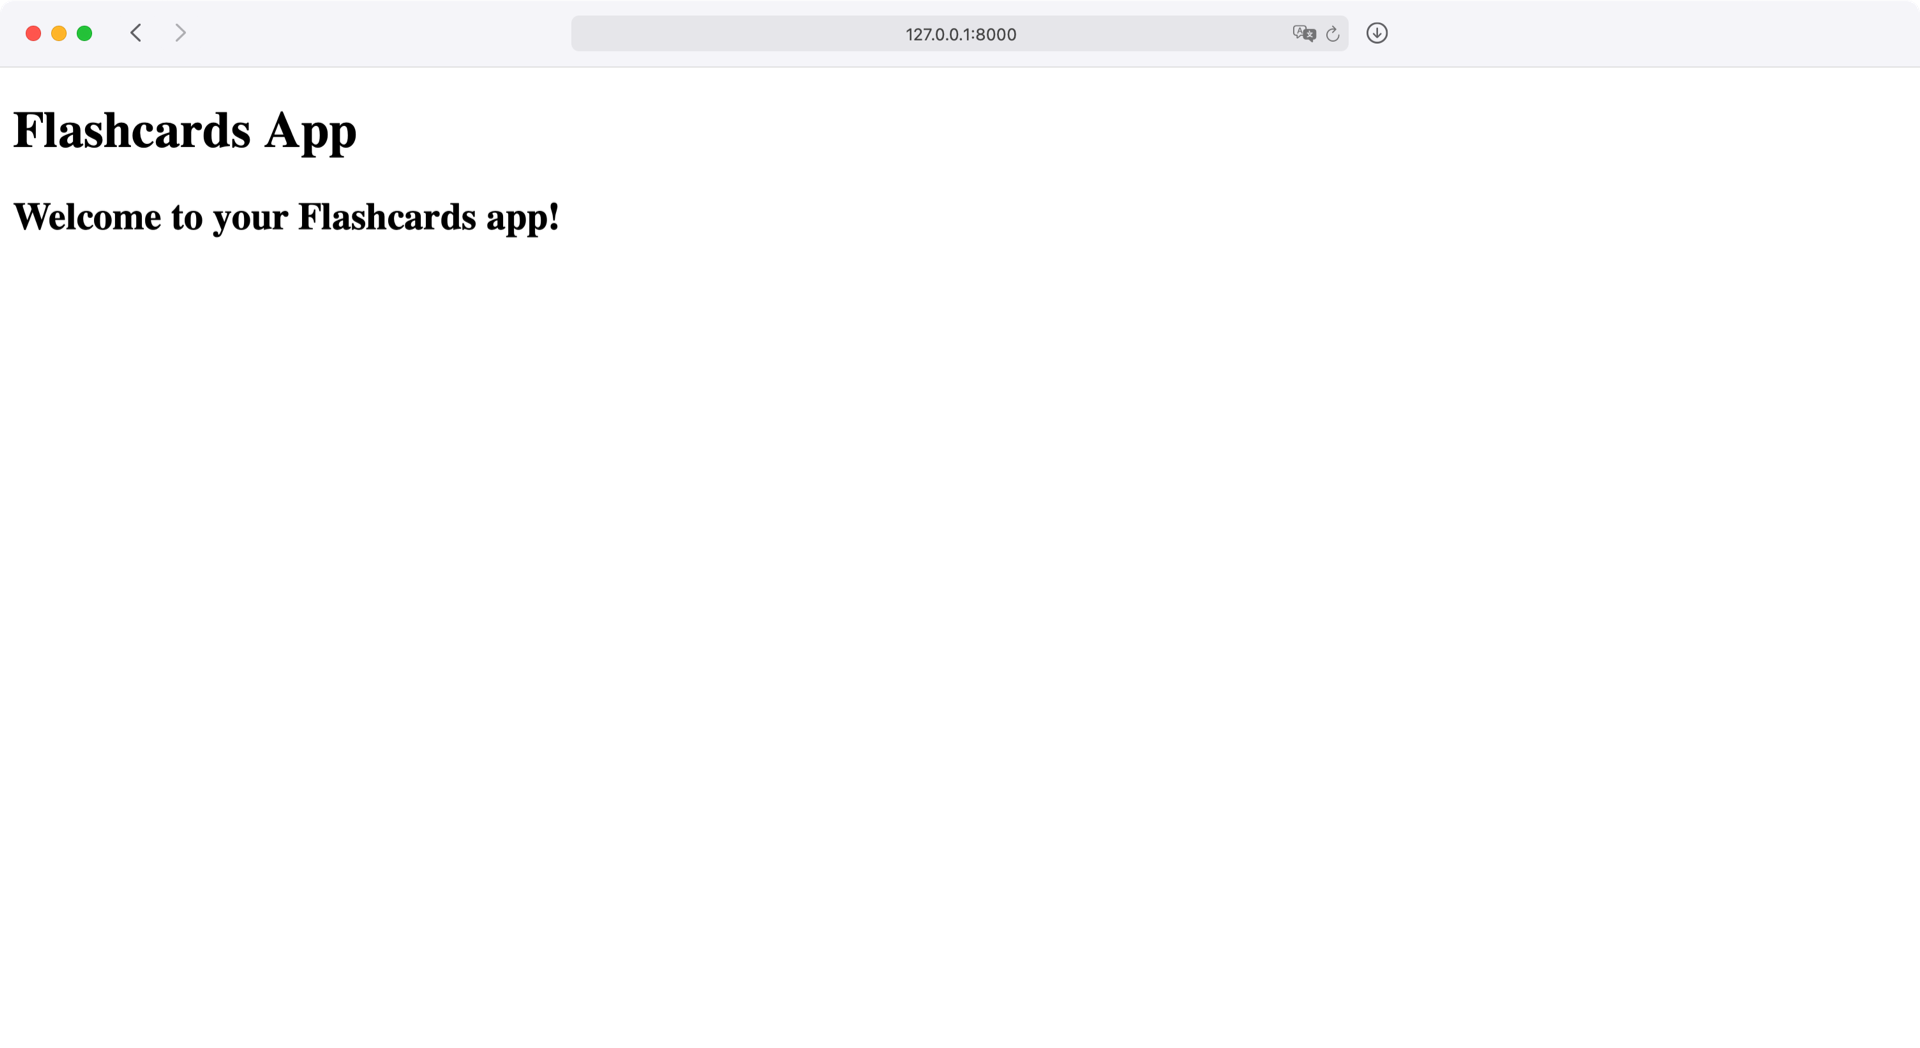
Fantastic, your project now shows the home page of cards!
You serve the base template that you just created with your welcome message.
However, your landing page looks a bit bland.
Read on to learn how to add some styling to your website.
Sprinkle in Some Style
For many people, a pleasing design is an essential part of a positive learning experience. You can add design to your HTML pages by using CSS. Instead of writing all the CSS code yourself, you can import an external CSS file:
 1<!-- cards/templates/cards/base.html -->
 2
 3<!DOCTYPE html>
 4<html lang="en">
 5
 6<head>
 7    <title>Flashcards</title>
 8    <link rel="stylesheet" href="https://cdn.simplecss.org/simple.min.css">
 9</head>
10
11<!-- ... -->
Similar to the Python import technique, you can import an external CSS library to your website. In line 8, you’re loading the Simple.css framework. This external CSS file provides styling without needing you to add any classes to your HTML elements.
You can customize your CSS code even more by adding some additional CSS styling. Copy and paste the marked CSS code from the collapsible below:
<!-- cards/templates/cards/base.html -->

<!DOCTYPE html>
<html lang="en">

<head>
    <title>Flashcards</title>
    <link rel="stylesheet" href="https://cdn.simplecss.org/simple.min.css">
</head>

<style>
    /* Custom CSS */

    :root {
        --accent: #6e48ad;
        --accent-bg: white;
        --bg: #fff;
        --text: #212121;
        --text-light: #585858;
        --border: #d8dae1;
        --code: #d81b60;
        --preformatted: #444;
    }

    article {
        background-color: var(--marked);
        border: 1px solid var(--border);
        border-radius: 5px;
        padding: 1em;
        margin: 1em 0;
    }

    h2 {
        text-align: center;
    }

    h2, h4 {
        margin-top: 0;
    }

    hr {
        background: var(--accent);
        border-color: var(--accent);
    }

    button,
    a[role="button"] {
        color: white;
        text-decoration: none;
    }

    input, select, textarea {
        width: 100%;
    }
</style>

<!-- ... -->
Go ahead and restart your development web server.
Then, visit your flashcards app at http://127.0.0.1:8000:
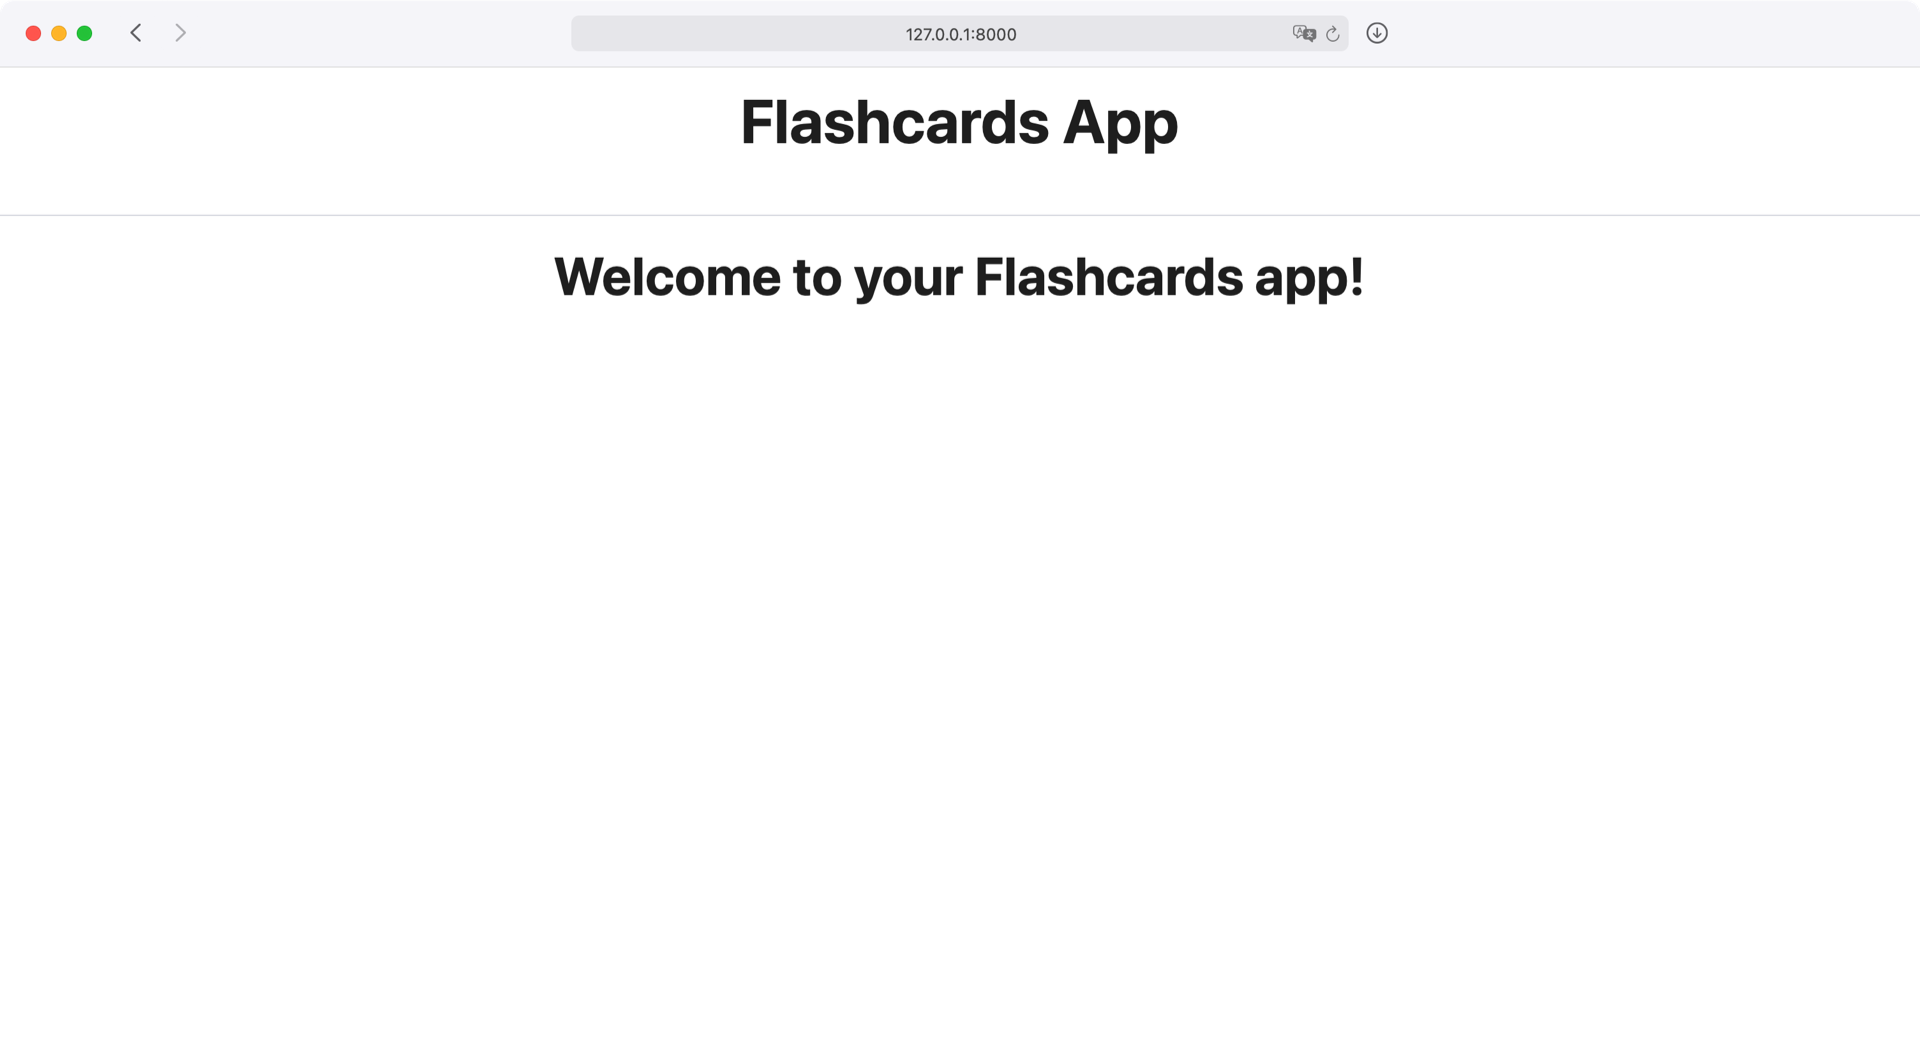
Awesome, your flashcards app now teases a proper design with a fancy font and centered text. If you know some CSS, then you can take your time and adjust the design of your flashcards app even more. Once you’re happy with the look of your front end, continue reading to take care of some back-end matters.
Step 3: Reveal Your Cards
Now that your app is up and running, you can define how the tables of your SQLite database should look.
You do this by adding a Card model.
You’ll also create your first flashcards in the Django shell and list your cards in the browser.
Connect the SQLite Database
On flashcards, the front is usually where you state a question.
The back of the card contains the answer.
You can replicate the attributes of a card in the model of your cards app:
 1# cards/models.py
 2
 3from django.db import models
 4
 5NUM_BOXES = 5
 6BOXES = range(1, NUM_BOXES + 1)
 7
 8class Card(models.Model):
 9    question = models.CharField(max_length=100)
10    answer = models.CharField(max_length=100)
11    box = models.IntegerField(
12        choices=zip(BOXES, BOXES),
13        default=BOXES[0],
14    )
15    date_created = models.DateTimeField(auto_now_add=True)
16
17    def __str__(self):
18        return self.question
Before you take a closer look at the contents of the Card class, notice the NUM_BOXES variable in line 5.
The value of NUM_BOXES defines how many boxes you want in your app.
With five boxes, you have a solid baseline to implement spaced repetition in your language learning.
In line 6, you’re creating the BOXES variable, which contains an iterable range that starts with 1 and stops at NUM_BOXES + 1—in other words, 6.
That way, you can loop through your boxes with a user-friendly numbering from one to five, instead of using the zero-based numbering that the range would have otherwise defaulted to.
Lines 8 to 18 define your Card class.
You’ll use word-to-word translations in your flashcards app, so it’s sufficient to use models.CharField for your question field in line 9 and your answer field in line 10.
Also, the maximum length of a hundred characters should be enough if you want to memorize short sentences, too.
Note: You can also set a larger maximum length. But keep in mind that flashcards are generally most useful if you keep them short and sweet.
With the box field in lines 11 to 14, you’ll keep track of the box number where your card sits.
By default, you create your flashcard in the first box.
With choices, you make sure that the models.IntegerField must contain a number that’s within your BOXES range.
In line 15, you’re adding a models.DateTimeField that’ll automatically contain a timestamp of your card’s date and time of creation.
With the date_created field, you’ll be able to show the newest cards first in your card overview.
To control the string representation of your Card objects, you define .__str__() in lines 17 and 18.
When you return the question string of your card instance, then you can conveniently spot which card you’re working with.
Your Card model defines that your database should contain a table, which stores your cards.
The fields of your Card model will be fields in your database.
To update your database, you must create migrations and migrate the changes to apply them:
(venv) $ python manage.py makemigrations
Migrations for 'cards':
  cards/migrations/0001_initial.py
    - Create model Card

(venv) $ python manage.py migrate
Operations to perform:
  Apply all migrations: admin, auth, cards, contenttypes, sessions
Running migrations:
  Applying cards.0001_initial... OK
  ...
After you apply the changes to your database, you need to add data to your database. For this, you’re going to use the Django shell to put some cards into your database. Head over to your terminal and start the Django shell:
(venv) $ python manage.py shell
The Django shell is similar to your interactive Python interpreter. But the Django shell allows you to work directly from the root folder of a Django project because it has your Django settings already imported.
Within the shell, you can now interact directly with your flashcards project. Go ahead and create three cards:
>>> from cards.models import Card
>>> c1 = Card(question="Hello", answer="Hola")
>>> c1.save()
>>> c2 = Card(question="Please", answer="Por favor")
>>> c2.save()
>>> c3 = Card(question="Sorry", answer="Lo siento", box=2)
>>> c3.save()
>>> Card.objects.all()
<QuerySet [<Card: Hello>, <Card: Please>, <Card: Sorry>]>
After you import the Card model, you create three cards.
You initialize the Card class with a question and an answer argument.
Remember that your card’s box and date_created attributes have default values.
So you don’t need to provide them.
Once you invoke .save(), you commit the card to the database.
Note: Feel free to create as many cards as you like. However, make sure that you create at least three cards before continuing with the tutorial.
Use the box argument to put some of the cards into different boxes.
This will simulate an ongoing learning session and help you develop your front end to reflect a realistic scenario.
With Cards.objects.all(), you retrieve all the cards that your database contains at the moment.
The QuerySet representation indicates that you’ve successfully added some cards to the database.
In the next section, you’ll display your cards on your front end.
List Your First Flashcards
In the last section, you added some flashcards to the database. Now it’s time to list your cards in the front end.
Start by writing a class-based view that lists all the cards:
 1# cards/views.py
 2
 3from django.views.generic import (
 4    ListView,
 5)
 6
 7from .models import Card
 8
 9class CardListView(ListView):
10    model = Card
11    queryset = Card.objects.all().order_by("box", "-date_created")
Django provides many generic views out of the box. The class-based view that you create in line 9 is a subclass of Django’s ListView.
The only attribute that you must set in a ListView is the model that your view refers to.
You do this in line 10.
By defining queryset in line 11, you gain more control over the items that your database returns.
Not only do you want to get all cards, but they should also be ordered by box and date_created.
That means you’ll receive a Django QuerySet with cards first ordered by their box in ascending order, then by their creation date in descending order.
The descending order of the creation date is thanks to the dash (-) prefix in "-date_created".
Before you can look at your cards in the browser, you must define a template.
Django expects the templates for class-based views to be in a specific location with a particular name.
For your CardListView, you need a template named card_list.html in cards/templates/cards/:
 1<!-- cards/templates/cards/card_list.html -->
 2
 3{% extends "cards/base.html" %}
 4
 5{% block content %}
 6    <h2>
 7        All Cards
 8    </h2>
 9    {% for card in card_list %}
10        <h3>🗃 {{ card.box }} Box</h3>
11        <article>
12            {{ card }}
13        </article>
14    {% endfor %}
15{% endblock content %}
In your card_list.html template, you’re extending your base.html template with the built-in extends template tag.
Remember that your base.html template also had a {% block content %} template tag.
You’re overriding the body of this code block with your {% block content %} code in lines 6 to 14.
Instead of showing a Welcome message, you now list all your flashcards.
In line 9, you’re looping through all your cards.
Inside the card_list loop, you can access the fields of the Card model for each individual Card instance.
It makes sense for a flashcards app to list all the flashcards on your home page.
Replace the former landing page with a URL to your new CardListView, and rename it to card-list:
 1# cards/urls.py
 2
 3from django.urls import path
 4# Removed: from django.views.generic import TemplateView
 5
 6from . import views
 7
 8urlpatterns = [
 9    path(
10        "",
11        views.CardListView.as_view(),
12        name="card-list"
13    ),
14]
You don’t need the former TemplateView in line 4 anymore, so you’ve removed this line and imported views in line 6.
Instead of serving a TemplateView in line 11, you’re now serving your CardListView as a view.
Consequently, you rename your route’s name to card-list.
Restart your development web server and visit http://127.0.0.1:8000:
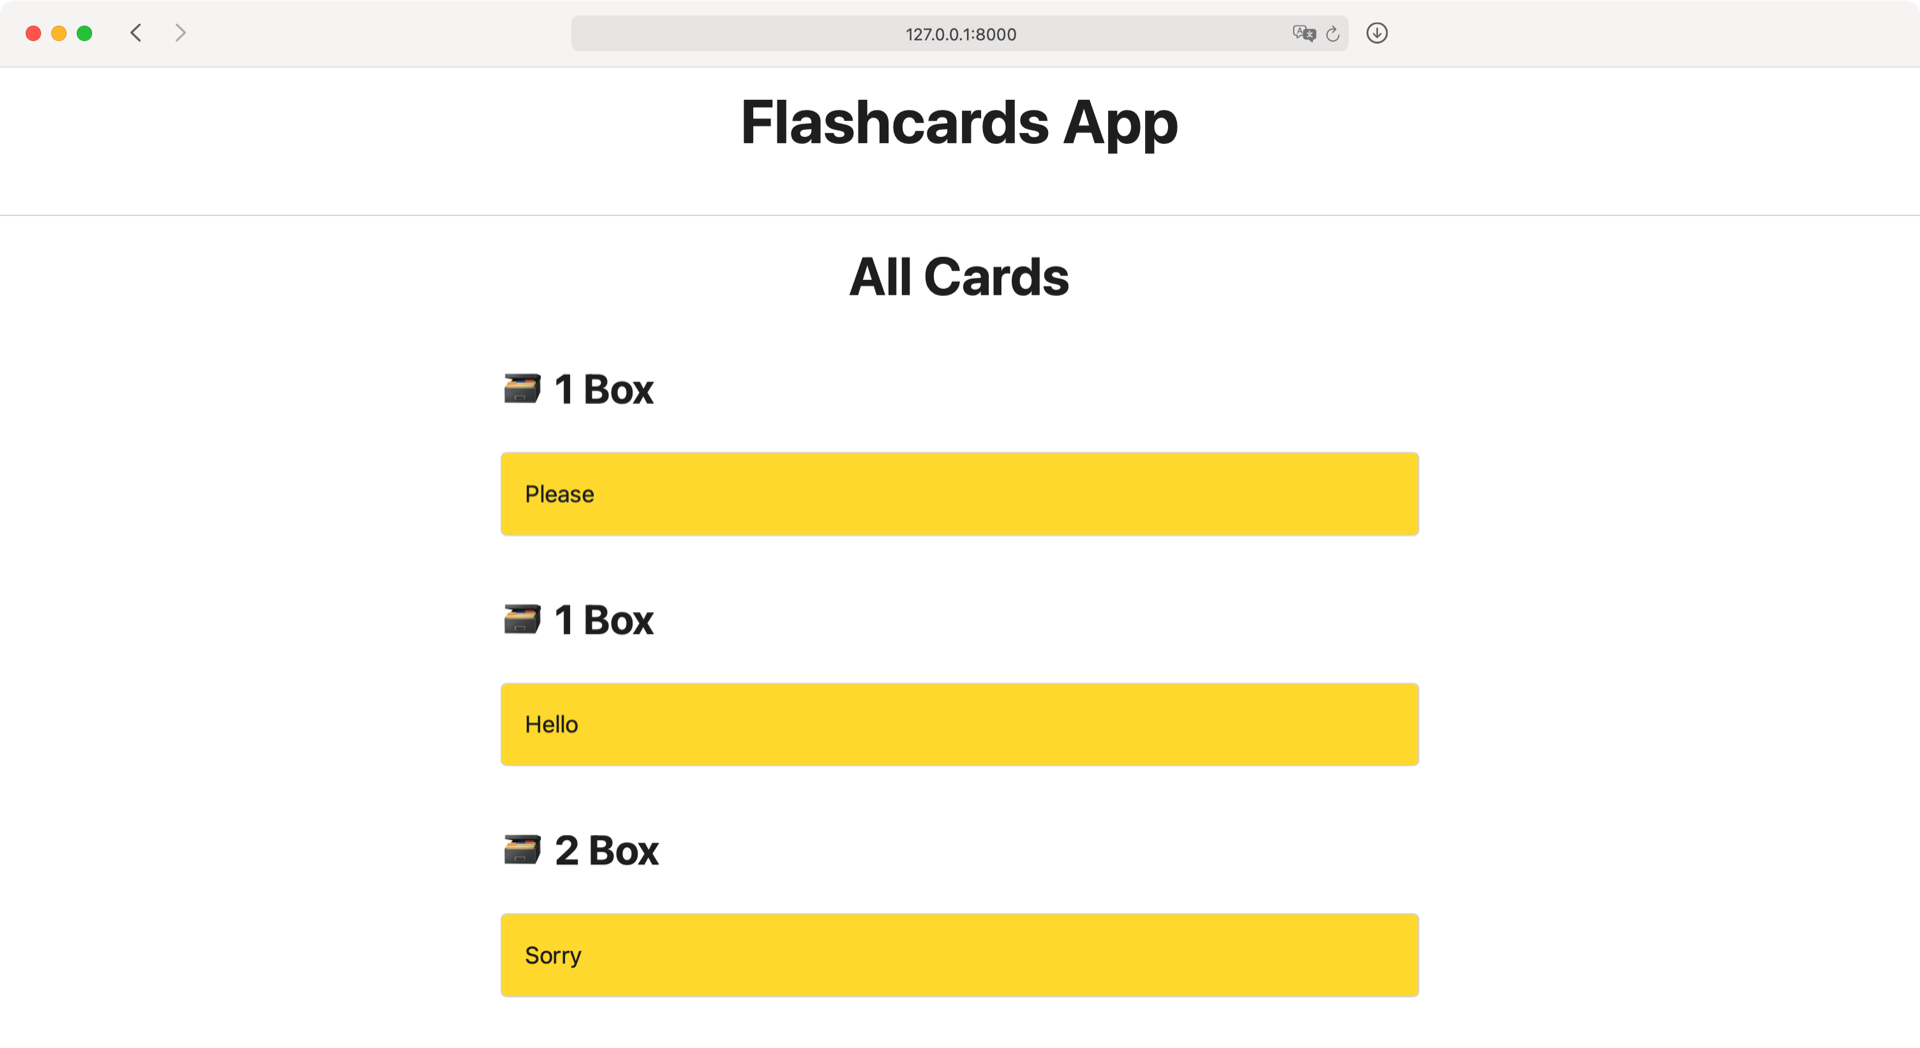
You’re now listing all your cards on your flashcard app’s home page, neatly ordered by box and creation date. You’re also inheriting the header and the styling from your base template. But the box numbering looks a bit repetitive, and it’d be nice to use ordinal numbers—like 1st, 2nd, and 3rd—to list the boxes.
Adjust Your Templates
Currently, you’re listing your boxes as 1 Box, 2 Box, and so on. This looks a bit technical. Instead, it’d be much more friendly to list your boxes ordinally as 1st Box, 2nd Box, and so on.
You can achieve this ordinal numbering with Django’s humanize template filters.
This set of filters helps make data in your template more human-readable.
To use it, you must add django.contrib.humanize to your INSTALLED_APPS:
# flashcards/settings.py

# ...


INSTALLED_APPS = [
    "django.contrib.admin",
    "django.contrib.auth",
    "django.contrib.contenttypes",
    "django.contrib.sessions",
    "django.contrib.messages",
    "django.contrib.staticfiles",
    "django.contrib.humanize",
    "cards.apps.CardsConfig",
]

# ...
After you’ve adjusted your Django settings, you can load the humanize template filter in your card_list.html template:
<!-- cards/templates/cards/card_list.html -->

{% extends "cards/base.html" %}
{% load humanize %}

<!-- ... -->
Later on in your code, you’ll use the humanize filter set to apply the ordinal filter when you show the box headlines.
Stay in card_list.html and wrap your <h3> headline in an ifchanged template tag to show your new box headlines only once:
 1<!-- cards/templates/cards/card_list.html -->
 2
 3<!-- ... -->
 4
 5{% for card in card_list %}
 6    {% ifchanged %}
 7        <h3>🗃 {{ card.box | ordinal }} Box</h3>
 8    {% endifchanged %}
 9    <article>
10        {{ card }}
11    </article>
12{% endfor %}
13
14<!-- ... -->
With {% ifchanged %} in line 6 and {% endifchanged %} in line 8, you’re only showing the box headline in line 7 if the headline value changes.
That way, you’re showing the box number once, then all the cards in the box.
Only when you reach the next box and the headline changes do you show the new headline.
In line 7, you’re using the pipe symbol (|) to apply the ordinal filter of the humanize filter set.
Filters are like small functions that modify data in place before Django renders it.
In this case, you use the ordinal filter to convert integers to their ordinal counterparts as strings.
There’s another opportunity to optimize your card_list.html template.
Currently, you’re showing your card’s representation with the {{ card }} variable.
Later you’ll show your flashcards in other places of your app, too.
Therefore, it makes sense to create a separate template for your flashcards.
You’ll create your new template in a moment.
First, adjust card_list.html to include the upcoming card.html template:
<!-- cards/templates/cards/card_list.html -->

<!-- ... -->

{% for card in card_list %}
    {% ifchanged %}
        <h3>🗃 {{ card.box | ordinal }} Box</h3>
    {% endifchanged %}
    {% include "cards/card.html" %}
{% endfor %}

<!-- ... -->
Now your card_list.html template will load a subtemplate named card.html.
This template doesn’t exist yet.
Go on and create card.html:
 1<!-- cards/templates/cards/card.html -->
 2
 3<article>
 4   <h4>{{ card.question }}</h4>
 5   <p>{{ card.answer }}</p>
 6</article>
Later in the tutorial, you’ll add more data to card.html.
For now, you display the card’s question in line 4 and the answer in line 5.
Restart your development web server and visit http://127.0.0.1:8000:
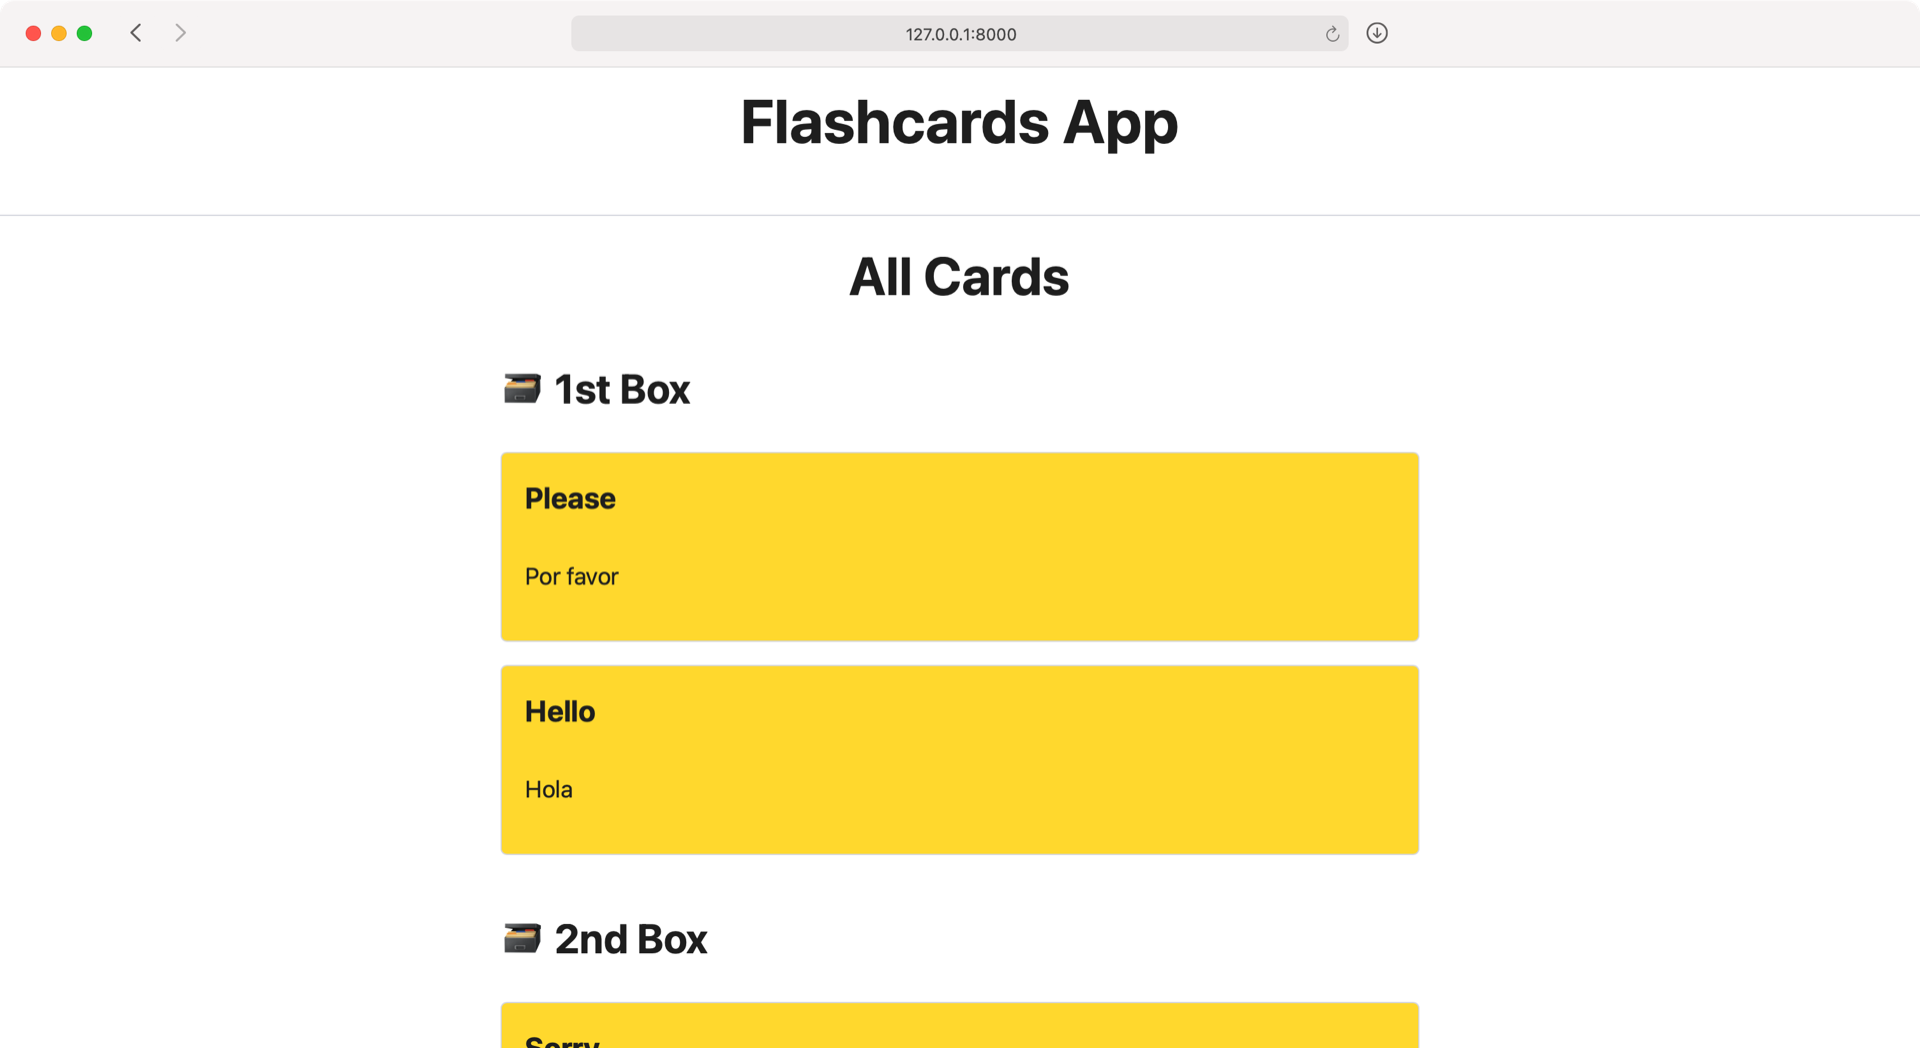
The ordinally numbered headlines of your boxes appear only one time for each box. The cards below also show the translations of your words now.
In the next step, you’ll enhance your Django flashcards app to create and edit your flashcards comfortably over your app’s front end.
Step 4: Get Into the Card Details
In the previous step, you connected your flashcards app with the database and listed your cards. You leveraged the Django shell to create your first cards.
In this step, you’ll use forms to create and update your cards from the comfort of your browser.
Create a New Card
Currently, you need to hop into the Django shell whenever you want to create more flashcards. That’s a somewhat disruptive process while using the app, especially when you get the idea for a new card during a learning session. You can improve the process of creating a new card!
Implementing the feature of creating a new card in the front end is similar to the process that you followed to list your cards. First, you create a view, add a route, and finally, create a template.
You’re using one of Django’s generic views again for the view.
This time you import a CreateView to subclass your CardCreateView from:
 1# cards/views.py
 2
 3from django.urls import reverse_lazy
 4from django.views.generic import (
 5    ListView,
 6    CreateView,
 7)
 8
 9from .models import Card
10
11class CardListView(ListView):
12    model = Card
13    queryset = Card.objects.all()
14
15class CardCreateView(CreateView):
16    model = Card
17    fields = ["question", "answer", "box"]
18    success_url = reverse_lazy("card-create")
The web page where you create a new card will contain a form with fields that you must fill out.
So, in addition to connecting the model in your CardCreateView, you also need to define the fields that your form should show in line 17.
When you send the form, Django will check the form and return your request to the URL that you set for success_url in line 18.
In this case, it’s the same view again.
That way, you can create one card after another without navigating back and forth.
You use Django’s reverse_lazy(), which you imported in line 3, to refer to your card-create route by its name.
But the route to your CardCreateView doesn’t exist yet.
Go on and create it:
# cards/urls.py

# ...

urlpatterns = [
    # ...
    path(
        "new",
        views.CardCreateView.as_view(),
        name="card-create"
    ),
]
With this new path, your flashcards app has a new route that connects to CardCreateView.
When you now visit http://127.0.0.1:8000/new, Django serves you the CardCreateView but can’t find a corresponding template.
Django looks for a template named card_form.html.
This template doesn’t exist yet, so you need to create it:
 1<!-- cards/templates/cards/card_form.html -->
 2
 3{% extends "cards/base.html" %}
 4
 5{% block content %}
 6    <h2>✨ Create New Card</h2>
 7    <form method="post">
 8        {% csrf_token %}
 9        {{ form.as_p }}
10        <input type="submit" value="Save Card">
11    </form>
12    <a href="{% url 'card-list' %}">
13        Cancel
14    </a>
15{% endblock %}
With {{ form.as_p }} in line 9, Django will display the form fields wrapped in paragraphs.
Whenever you post content in Django forms, you must also provide a {% csrf_token %} template tag.
This is a security measure to prevent cross-site request forgery.
In lines 12 to 14, you’re adding the option to cancel the creation of a new card.
When you decide not to save the card, you can click the Cancel link, which brings you to your card-list URL, discarding the form data.
To try out your new form to create new cards in the front end of your flashcards app, restart your development web server and visit http://127.0.0.1:8000/new:
When you create a new card, you stay on the same page, so you can conveniently create another one. When you click Cancel, you go back to your card list.
Update an Existing Card
Neat, creating new cards works! But what if you want to update an existing card? Take a moment to think about what the edit page for a flashcard should look like.
Chances are, you thought of a layout similar to your creation page, only the form is filled out with the editable content of your card.
Create CardUpdateView, which takes advantage of this similarity:
 1# cards/views.py
 2
 3from django.urls import reverse_lazy
 4from django.views.generic import (
 5    ListView,
 6    CreateView,
 7    UpdateView,
 8)
 9
10from .models import Card
11
12# ...
13
14class CardUpdateView(CardCreateView, UpdateView):
15    success_url = reverse_lazy("card-list")
Your CardUpdateView in line 14 is another generic class-based view.
This time you subclass your view from Django’s UpdateView, which you import in line 7.
But UpdateView isn’t the only view that your CardUpdateView is based on.
You take advantage of Python’s multiple class inheritance to create a subclass of CardCreateView and UpdateView.
By doing this, you inherit the class attributes from both parent classes and modify the attributes that you want to be different.
Instead of returning to the same page as you do in card-create, you’ll return to the card-list page after editing a card.
Create a new route to access a card’s edit page:
# cards/urls.py

# ...

urlpatterns = [
    # ...
    path(
        "edit/<int:pk>",
        views.CardUpdateView.as_view(),
        name="card-update"
    ),
]
Note the <int:pk> pattern in the route that points to your CardUpdateView.
Since you’re editing an existing card, you need a primary key (pk) to identify which card you want to update.
Note: The primary key is a database entry’s unique identifier, which Django adds automatically at the entry’s creation. You don’t need to remember any primary keys for your cards, but you’ll use this identifier later when linking to a card’s edit page.
The <int:pk> part of the URL allows a primary key as an integer, and CardUpdateView will return the data for the corresponding card.
When you visit http://127.0.0.1:8000/edit/2, Django understands that you want to edit the card with the primary key 2, and it’ll serve you the view for this card.
Now you need to adjust card_form.html to cater to both conditions, creating a new card and editing an existing card:
 1<!-- templates/cards/card_form.html -->
 2
 3{% extends "cards/base.html" %}
 4
 5{% block content %}
 6    {% if card %}
 7        <h2>✏️ Edit Card</h2>
 8    {% else %}
 9        <h2>✨ Create New Card</h2>
10    {% endif %}
11    <form method="post">
12        {% csrf_token %}
13        {{ form.as_p }}
14        <input type="submit" value="Save Card">
15    </form>
16    <a href="{% url 'card-list' %}">
17        Cancel
18    </a>
19{% endblock %}
You use Django’s {% if %} to wrap your conditional statement in lines 6 to 10.
If your card_form.html template receives card data, then you show the Edit Card headline.
Otherwise, you display Create New Card.
When card data is present, Django will fill out your form with your card’s data without the need for any adjustments in the template.
Connect Your Pages
With your new routes in place, it’s time to connect your pages.
Start by adding a link that leads to your card-create page from your card_list.html template:
 1<!-- templates/cards/card_list.html -->
 2
 3{% extends "cards/base.html" %}
 4{% load humanize %}
 5
 6{% block content %}
 7    <h2>
 8        All Cards
 9    </h2>
10    <a href="{% url 'card-create' %}" role="button">
11        ✨ Create New Card
12    </a>
13    {% for card in card_list %}
14        {% ifchanged %}
15            <h3>🗃 {{ card.box | ordinal }} Box</h3>
16        {% endifchanged %}
17        {% include "cards/card.html" %}
18    {% endfor %}
19{% endblock content %}
With the link that you’re adding in lines 10 to 12, you can now conveniently jump to the card-create URL when you want to add a new flashcard to your app.
Next, show an Edit button for each card.
Open your card.html template and add a link at the bottom:
 1<!-- templates/cards/card.html -->
 2
 3<article>
 4    <h4>{{ card.question }}</h4>
 5    <p>{{ card.answer }}</p>
 6    <hr>
 7    <a href="{% url 'card-update' card.id %}" role="button">
 8        ✏️ Edit Card
 9    </a>
10</article>
Remember that you added the <int:pk> pattern in the route to your card-update URL in cards/urls.py.
That’s why you need to pass in card.id as a parameter in your {% url %} tag in line 7.
As your project grows, navigating between your pages becomes more and more important. So, another improvement to your flashcards app is a navigation menu.
Start by creating the navigation.html template with a link to your card-list page:
<!-- cards/templates/cards/navigation.html -->

<nav>
    <a href="{% url 'card-list' %}">🗂 All Cards</a>
</nav>
Your navigation menu only links to your card list for now. Later, you’ll also create links to the boxes that your flashcards are in.
Again, you use an emoji to fancy up the link. Here you prefix the All Cards link with the Card Index Dividers emoji (🗂). Of course, you can use any other emoji or no emoji at all for your app’s links and headlines.
Include navigation.html in your base template to display it on all your pages:
<!-- cards/templates/cards/base.html -->

<!--  ... -->

<header>
    <h1>Flashcards App</h1>
    {% include "cards/navigation.html" %}
</header>

<!--  ... -->
With your navigation in place, it’s time to click around in your Django flashcards app.
Open your browser and visit http://127.0.0.1:8000:
You can now create and edit cards implemented in your flashcards app. In the next step, you’ll enhance your app to check if you know the answer to the question that your card holds.
Step 5: Check Your Cards
In this step, you’ll implement the functionality to check if you know the answer to a card’s question. When you’ve memorized it correctly, you can move the card into the next box. If you don’t know the answer, then you move the card to the first box.
After implementing this vital feature, you’ll use the Django shell to see it in action. That way, you can verify that everything works as expected before writing your front-end code.
Make Your Cards Move
Before you continue writing code, take a moment to think about how the spaced repetition system of your flashcards app should work. You can head back to the project overview if you need a refresher.
In short, you move a card to the next box if you recall its answer. If you don’t know the answer, you put the card back into the first box.
To replicate the behavior of moving a card between boxes, add a .move() method to your Card model:
 1# cards/models.py
 2
 3# ...
 4
 5class Card(models.Model):
 6
 7    # ...
 8
 9    def move(self, solved):
10        new_box = self.box + 1 if solved else BOXES[0]
11
12        if new_box in BOXES:
13            self.box = new_box
14            self.save()
15
16        return self
Your .move() method takes solved as an additional argument.
The value of solved will be True when you know the answer and False when you don’t.
In line 10, you’re evaluating whether you want to move the card forward into the next box or move the card back to the first box.
Your new_box variable will be your current box number plus one if you knew the answer to your card.
If solved was False, then new_box will be 1, which is the value of BOXES[0].
Note that new_box could even be 6 if you knew the answer to a card that resided in your fifth box.
That’s why you only go ahead and save the new self.box value in line 14 when new_box is a number from 1 to 5.
If you know the answer for a card in the fifth box, then the card stays in the fifth box and doesn’t move.
In the next section, you’ll test this behavior.
Simulate a Card Check Session
Now that you’ve added .move() to your Card model, you can check if moving the cards works as expected.
As you did earlier in this tutorial, use the Django shell:
(venv) $ python manage.py shell
You can now interact directly with your flashcards project and simulate a check session within the shell.
First, import your Card model:
>>> from cards.models import Card
With the Card model imported, you can query your database to get all the cards from the first and second boxes:
>>> box1_cards = Card.objects.filter(box=1)
>>> box1_cards
<QuerySet [<Card: Hello>, <Card: Please>]>

>>> box2_cards = Card.objects.filter(box=2)
>>> box2_cards
<QuerySet [<Card: Sorry>]>
At the moment, box1_cards contains two cards, and box2_cards contains one card.
Select the first card of box1_cards and move it to the next box:
>>> check_card = box1_cards.first()
>>> check_card.move(solved=True)
<Card: Hello>

>>> box2_cards
<QuerySet [<Card: Hello>, <Card: Sorry>]>
When you call check_card.move() with solved set to True, then your card moves to the next box.
The QuerySet of box2_cards now also contains your check_card.
For testing purposes, move the card further:
>>> check_card.move(solved=True)
<Card: Hello>

>>> box2_cards
<QuerySet [<Card: Sorry>]>

>>> check_card.box
3
As before, your check_card moves on when you solve it.
Your box2_cards remains with one card.
Now, test what happens when you don’t know the answer to your card’s question:
>>> check_card.move(solved=False)
<Card: Hello>

>>> check_card.box
1
When you call .move() with solved set to False, the card moves back to box one.
Perfect, your card’s round-trip worked!
In the next step, you’ll show your boxes in the front end. Then you’ll implement the functionality to check if you know the answer to a question and move your cards between the boxes accordingly in the front end.
Step 6: Put Your Cards in Boxes
At the end of the previous step, you verified that the cards moved between the boxes as expected. In this final step of the tutorial, you’ll implement all the missing features of your flashcards app. You’ll start by listing all your boxes.
Show a Box
So far, you have a page that lists all your flashcards, and you have pages to create or update a card. To test your knowledge, you need to be able to pick a box for a learning session. That means you need a view for a single box, a route to navigate to, and a template to show the box.
Start by creating the view for a single box:
 1# cards/views.py
 2
 3# ...
 4
 5class BoxView(CardListView):
 6    template_name = "cards/box.html"
 7
 8    def get_queryset(self):
 9        return Card.objects.filter(box=self.kwargs["box_num"])
10
11    def get_context_data(self, **kwargs):
12        context = super().get_context_data(**kwargs)
13        context["box_number"] = self.kwargs["box_num"]
14        return context
You’re creating BoxView as a subclass of CardListView.
Django would serve the card_list.html template for a CardListView by default.
So you need to overwrite template_name in line 6 and point to the box.html template, which you’ll create in a moment.
The other difference between BoxView and CardListView is that you don’t want to list all your cards.
Instead of listing all your cards, you can use .get_queryset() to adjust the query set that your BoxView returns.
In line 9, you only return the cards where the box number matches the box_num value.
You pass in the value of box_num as a keyword argument in your GET request.
To use the box number in your template, you use .get_context_data() and add box_num as box_number to your view’s context in line 13.
Note: You use the variable name box_number to differentiate it from the box_num keyword argument.
Add the new route to your urls.py file to accept box_num in the URL pattern:
# cards/urls.py

# ...

urlpatterns = [
    # ...
    path(
        "box/<int:box_num>",
        views.BoxView.as_view(),
        name="box"
    ),
]
By adding <int:box_num> into your URL pattern, Django hands over this box_num as a keyword argument to your view.
That’s exactly what you want.
Next, you create the box.html template that your view is expecting:
 1<!-- templates/cards/box.html -->
 2
 3{% extends "cards/base.html" %}
 4{% load humanize %}
 5
 6{% block content %}
 7    <h2>🗃 {{ box_number | ordinal }} Box</h2>
 8    <mark>{{ object_list | length }}</mark> Card{{ object_list | pluralize }} left in box.
 9    <hr>
10    {% for card in object_list %}
11        {% include "cards/card.html" %}
12    {% endfor %}
13{% endblock content %}
In your box.html template, you use humanize again to show the box number in line 7 as an ordinal number.
The object_list variable contains your cards as objects. In line 8, you’re using two more filters on object_list:
- With the
lengthfilter, you show the number of cards that are currently in the box. - With the
pluralizefilter, you assure the grammatical correctness of your message. If there is only one card left, then the word Card stays singular. But when there are either more or zero cards, then Django pluralizes the word Card by adding an s at the end.
In lines 10 to 12, you loop through the cards of the box and show them by including the card.html template.
You can visit your boxes directly by entering their URL in the browser’s address bar. But it’d be much more convenient to have links to your boxes in the navigation menu of your flashcards app.
List Your Boxes
To list your boxes, you first have to overcome an obstacle in your app’s logic. Your navigation template doesn’t know how many boxes your flashcards app contains. You could add the number of boxes to every view’s context, but that would create unnecessary overhead just for this piece of data.
Luckily, Django has a system in place for when you want to inject code data into your templates. To list your boxes in your navigation, you can implement a custom template tag. More precisely, you’ll create an inclusion tag.
With custom inclusion tags, you can return a template that contains the context data that a function provides. In this case, you’ll return a dictionary with the number of boxes.
Once you’ve created and registered the inclusion tag, you can use it like any other loaded tag in Django.
First, create the template that you want to load:
 1<!-- cards/templates/box_links.html -->
 2
 3{% load humanize %}
 4
 5{% for box in boxes %}
 6    <a href="{% url 'box' box_num=box.number %}">
 7        🗃 {{ box.number | ordinal }} Box <mark>{{ box.card_count }}</mark>
 8    </a>
 9{% endfor %}
The box_links.html template doesn’t look much different from any other template that you’ve created.
A template works with the provided data.
The template itself doesn’t care where the data is coming from.
To make your box_links.html happy, you need to feed it with a dictionary that contains a boxes key that you iterate over in line 5.
You can pass over a dictionary with an inclusion tag that works with box_links.html.
To do so, create a folder named templatetags/ next to your templates/ folder.
Then, create cards_tags.py inside the templatetags/ folder:
 1# cards/templatetags/cards_tags.py
 2
 3from django import template
 4
 5from cards.models import BOXES, Card
 6
 7register = template.Library()
 8
 9@register.inclusion_tag("cards/box_links.html")
10def boxes_as_links():
11    boxes = []
12    for box_num in BOXES:
13        card_count = Card.objects.filter(box=box_num).count()
14        boxes.append({
15            "number": box_num,
16            "card_count": card_count,
17        })
18
19    return {"boxes": boxes}
This is how your custom template tag works:
- Line 3 imports Django’s
templatemodule. - Line 5 imports your
Cardmodel and theBOXESvariable. - Line 7 creates an instance of
Libraryused for registering your template tags. - Line 9 uses the
Libraryinstance’s.inclusion_tag()as a decorator. This tells Django thatboxes_as_linksis an inclusion tag. - Line 12 loops over your
BOXES. - Line 13 defines
card_countto keep track of the number of cards in the current box. - Lines 14 to 17 append a dictionary with the box number as key and the number of cards in the box as the value to the
boxeslist. - Line 19 returns a dictionary with your
boxesdata.
Hop over to navigation.html, then load your new template tag and include it:
 1<!-- cards/templates/navigation.html -->
 2
 3{% load cards_tags %}
 4
 5<nav>
 6    <a href="{% url 'card-list' %}">🗂 All Cards</a>
 7    {% boxes_as_links %}
 8</nav>
First, you need to load your card_tags template tags in line 3.
After loading your custom tags, you can refer to your tags as any other Django tag.
In line 7, you include the boxes_as_links tag, which you just created.
Note: When you add custom template tags to your Django project, you must restart your server manually. Otherwise you’ll get an error because your custom tag isn’t registered yet.
Restart your development web server manually and visit http://127.0.0.1:8000:

No matter which view you’re currently loading, your navigation has access to your boxes and can display the current number of cards in a box.
Now that your boxes are listed in the navigation menu, you can focus on improving the box pages themselves.
Pick a Random Card
When you visit the page of a box, you want to start a new card check session. Your flashcards app should therefore present you with a random card right away so you can test your knowledge.
Currently, you’re showing all your cards in a list on your box page.
Enhance your BoxView to pick a random card and add it to your context:
 1# cards/views.py
 2
 3import random
 4
 5# ...
 6
 7class BoxView(CardListView):
 8    template_name = "cards/box.html"
 9
10    def get_queryset(self):
11        return Card.objects.filter(box=self.kwargs["box_num"])
12
13    def get_context_data(self, **kwargs):
14        context = super().get_context_data(**kwargs)
15        context["box_number"] = self.kwargs["box_num"]
16        if self.object_list:
17            context["check_card"] = random.choice(self.object_list)
18        return context
In line 3, you import the random module to generate random data.
Note that there could be no cards in a box.
That’s why you need to check that self.object_list isn’t empty.
If there’s at least one card in your object list, then you use random.choice() to pick one card.
This randomly selected card will be the card that you present in a learning session in your box.html template.
With check_card added to the context of BoxView, you can adjust box.html:
 1<!-- templates/cards/box.html -->
 2
 3{% extends "cards/base.html" %}
 4{% load humanize %}
 5
 6{% block content %}
 7    <h2>🗃 {{ box_number | ordinal }} Box</h2>
 8    <mark>{{ object_list | length }}</mark> Card{{ object_list | pluralize }} left in box.
 9    <hr>
10    {% if check_card %}
11        {% include "cards/card.html" with card=check_card %}
12    {% endif %}
13{% endblock content %}
Instead of looping through all cards in object_list, you can now directly refer to check_card.
Similar to the conditional statement in your BoxView, you only include card.html when a card is present.
You use with inside the include tag to pass additional context to the included template.
Since card.html doesn’t know your check_card variable, you need to pass card=check_card into the subtemplate.
To properly test if you know the answer to the question, you need to hide the answer first. Also, you want to focus on the learning experience and not show the Edit button during a learning session.
Remember that you use card.html in your card list.
In your card list overview, it makes sense that you also see the answers to your questions at a glance.
So you need to be thoughtful about how to accomplish hiding the answer on the box page and still showing it in your overview.
When you include a template, the template has access to all available variables in the context dictionary.
Therefore, you can take advantage of check_card, which you only have in your BoxView context.
Adjust card.html to take check_card into consideration:
 1<!-- templates/cards/card.html -->
 2
 3<article>
 4    <h4>{{ card.question }}</h4>
 5    {% if not check_card %}
 6        <p>{{ card.answer }}</p>
 7        <hr>
 8        <a href="{% url 'card-update' card.id %}" role="button">
 9            ✏️ Edit Card
10        </a>
11    {% else %}
12        <details>
13            <summary>Reveal Answer</summary>
14            <p>{{ card.answer }}</p>
15        </details>
16    {% endif %}
17</article>
When check_card is present, you don’t show the Edit button, and you hide the answer.
Otherwise, the card template shows the answer and the Edit button, just as before.
Restart your development web server and visit http://127.0.0.1:8000 to verify that your card.html template behaves as expected:
Perfect! The card list overview shows your answers and displays the Edit button. The randomly selected card hides the answer behind a dropdown menu when you click on a box.
In the upcoming section, you’ll use forms to move your cards with the click of a button.
If you know the answer, then you want to move the card to the next box.
You already built the functionality in the back end.
Next, you’ll also implement the functionality on the front end.
Check a Card
During a check session, you want to tell your flashcards app if you knew the answer or not. You’ll do this by sending a POST request that contains a form to your back end.
Create a new file named forms.py to define your Django form:
 1# cards/forms.py
 2
 3from django import forms
 4
 5class CardCheckForm(forms.Form):
 6    card_id = forms.IntegerField(required=True)
 7    solved = forms.BooleanField(required=False)
The structure of a Django form is similar to a Django model.
In lines 5 to 7, you’re creating your forms.Form class named CardCheckForm.
Your form schema contains two fields:
card_id, the primary key of the card you’re checkingsolved, the Boolean value set toTrueif you know the answer andFalseif you don’t
A form field can have a required argument to define if the field needs to contain data to make the form valid.
At first glance, it’d make sense to set both fields to required=True.
But in this case, you can leave your forms.BooleanField unchecked if you don’t know the answer.
Therefore, you need to set the required argument to False in line 7.
Note: Agreeing to the terms and conditions during signup is a typical Boolean field that a user must check to make the form valid.
In a case like this, you’d set required to True.
Before you create the form on the front end, add some code to card.html:
 1<!-- templates/cards/card.html -->
 2
 3<article>
 4    <h4>{{ card.question }}</h4>
 5    {% if not check_card %}
 6        <p>{{ card.answer }}</p>
 7        <hr>
 8        <a href="{% url 'card-update' card.id %}" role="button">
 9            ✏️ Edit Card
10        </a>
11    {% else %}
12        <details>
13            <summary>Reveal Answer</summary>
14            <p>{{ card.answer }}</p>
15        </details>
16        <hr>
17        {% include "cards/card_check_form.html" with solved=True %}
18        {% include "cards/card_check_form.html" with solved=False %}
19    {% endif %}
20</article>
You include card_check_form.html twice.
In line 17, you include the form with the solved=True argument.
In line 18, you do the same with solved=False.
Again, you use with inside the include tag to pass additional context to the included template.
In this case, you’re passing over the solved Boolean.
To continue, create the card_check_form.html template, which contains your form.
The form contains conditional formatting based on the value of the provided solved variable:
 1<!-- cards/templates/card_check_form.html -->
 2
 3<form method="post">
 4    {% csrf_token %}
 5    <input type="hidden" name="card_id" value="{{ card.id }}">
 6    <input type="hidden" name="solved" value="{{ solved }}">
 7    {% if solved %}
 8        <input type="submit" value="✅ I know"/>
 9    {% else %}
10        <input type="submit" value="❌ I don't know"/>
11    {% endif %}
12</form>
Your form template only contains the HTML form.
Just like you did in the form to create a new card, you submit a csrf_token in line 4.
Lines 5 and 6 refer to your CardCheckForm fields with the name attribute.
The card_id field contains the primary key of your card.
Depending on the Boolean value of your provided solved variable, the checkbox is either checked or not.
The card_id field and the solved field are hidden because you don’t need to fill them out manually. The code logic you wrote will take care of that for you.
However, they must be present to be submitted to the back end and make the form valid.
In lines 7 to 11, you’re showing the Submit button with either an I know or I don’t know label. The two buttons are the only fields of the form that you actually show.
Finally, you need to adjust the BoxView class to handle the POST request:
 1# cards/views.py
 2
 3# ...
 4
 5from django.shortcuts import get_object_or_404, redirect
 6
 7# ...
 8
 9from .forms import CardCheckForm
10
11# ...
12
13class BoxView(CardListView):
14    template_name = "cards/box.html"
15    form_class = CardCheckForm
16
17    def get_queryset(self):
18        return Card.objects.filter(box=self.kwargs["box_num"])
19
20    def get_context_data(self, **kwargs):
21        context = super().get_context_data(**kwargs)
22        context["box_number"] = self.kwargs["box_num"]
23        if self.object_list:
24            context["card"] = random.choice(self.object_list)
25        return context
26
27    def post(self, request, *args, **kwargs):
28        form = self.form_class(request.POST)
29        if form.is_valid():
30            card = get_object_or_404(Card, id=form.cleaned_data["card_id"])
31            card.move(form.cleaned_data["solved"])
32
33        return redirect(request.META.get("HTTP_REFERER"))
You connect CardCheckForm with form_class to your BoxView in line 15.
In lines 27 to 33, you define the .post() method.
As the name suggests, this method handles incoming POST requests.
Ideally, your post to BoxView contains a valid form in the POST request.
Usually, your browser checks if all required fields of your form are filled out.
But it’s good practice to check your forms in the back end in any case.
You do this in line 29 with .is_valid().
If your form is valid, then you’re trying to get the Card object from the database by its card_id value.
You imported get_object_or_404() in line 5 and use it in line 30 to either get a card or raise an HTTP 404 error.
With a card to work with, you’re calling .move() with solved, which is either True or False.
As tested before, .move() promotes the card to the next box if you knew the answer.
If you didn’t know the answer, then solved is False.
In that case, you put the card back into your first box.
In the end, you redirect the request to the same page from which you posted the request.
The information about the URL that sent the request is stored as HTTP_REFERER in the .META object of your request.
In your case, the HTTP_REFERER is the URL of the box for your current check session.
To check how the process works, restart your development web server and visit http://127.0.0.1:8000.
Navigate to a box that contains cards, and test your knowledge:
When you visit a box with cards, your flashcard app shows you a random card from the current box. After reading the question, you can reveal the answer to yourself. Then you click the button below it accordingly. If you knew the answer, then the card moves to the next box. In the case that you didn’t know the answer, your card moves to the first box.
Well done! You’ve finished creating your own Django flashcards app. Now you can test your knowledge of all the cards in the box until the box is empty:
The flashcards app doesn’t limit you in how you design your learning sessions. So, when the box is empty, you can move on to the next box. Or you can honor the space in your spaced repetition method and give yourself the break you deserve.
Conclusion
You did it! Not only did you start learning a new topic by checking your flashcards, but you also leveled yourself up as a Python developer by building a full-stack web app with Django.
Over the course of this tutorial, you’ve built your own Django flashcards app to replicate a spaced repetition system. You can now create cards with questions and answers, and can test your knowledge about a topic of your choice.
In this tutorial, you’ve learned how to:
- Set up a Django project
- Work with a SQLite database and the Django shell
- Create models and class-based views
- Structure and nest templates
- Create custom template tags
Traditionally, flashcards are used in language learning for vocabulary. But you can use your flashcards app for any other topic that you want to learn, for example Python keywords or Basic Data Types in Python.
If you want to use the source code of this tutorial as a starting point for further expansion, then you can access the source code by clicking below:
Source Code: Click here to download the source code that you’ll use to build your Django flashcards app.
You’ll find the final version of the Django flashcards project in the directory source_code_final.
What are you going to learn with your new flashcards app? Share your ideas in the comments below!
Next Steps
Throughout this tutorial, you’ve built a full-stack web app with a database connection. That’s a great starting point for enhancing your Django project with more features.
Here are some ideas for additional features:
- Archive: Add the option to archive cards that you don’t want to check anymore.
- Success Messages: Show success messages when you create a new card or when a card moves to a new box.
- Spaced Repetition: Enhance your
Cardmodel to keep track of the last time when a card was checked, or create reminders to your boxes to schedule your next learning session. - Flashcard Sets: Expand your app to deal with different sets of flashcards. For instance, you could have a set for your Spanish class, another for biology, and so on.
Can you think of other features that should be part of a flashcards app? Feel free to share your improvements in the comments section.


