Introduction
Linked lists are one of the most commonly used data structures in any programming language since they offer dynamic memory allocation that arrays often simply can't provide.
Note: While Python, with its robust built-in data types, doesn't natively support linked lists as in languages like C or Java, their conceptual importance is undiminished.
A linked list in Python can be envisioned as a chain of nodes, where each node contains a data element and a reference to the next node in the sequence. This structure allows for efficient insertions and deletions, as one only needs to update a handful of references, rather than shifting multiple elements as in an array. Nevertheless, the direct access performance of linked lists is slower when compared to arrays.
Note: Python lists are implemented as dynamic arrays under the hood. However, having a solid understanding of linked lists offers you invaluable insights into more advanced topics and their applications in other programming environments.
In this article, we will study linked lists in detail. We will see what are the different types of linked lists, how to traverse a linked list, how to insert and remove elements from a linked list, what are the different techniques to sort a linked list, how to reverse a linked list, and so on.
After reading this article, you should be able to crack all the linked list interview questions.
What is a Linked List?
Before we study what are linked lists, let's first briefly review how arrays store data. In arrays, the data is stored at contiguous memory locations. For instance, if the first item in the array is stored at index 10 of the memory and is of size 15 bytes, the second item will be stored at index 10+15+1 - 26th index. Therefore, it is straightforward to traverse an array.
To find the third item in an array, you can simply use the starting index of the first item, plus the size of the first item, plus the size of the second item, plus 1.
How Linked Lists Store Data
Linked lists, on the other hand, are different. Linked lists, do not store data at contiguous memory locations. For each item in the memory location, the linked list stores the value of the item and the reference (or pointer) to the next item. One pair of the linked list item and the reference to the next item constitutes a node.
For instance, if a node consists of 34|10, it means that the value of the node is 30, while the next item is stored at the memory location "10". In order to traverse a linked list, you just need to know the memory location or reference of the first node, the rest of the nodes can be sequentially traversed using the reference to the next element in each node.
The reference to the first node is also known as the start node.
Linked Lists vs. Arrays
A linked list is a dynamic data structure which means that the memory reserved for the link list can be increased or reduced at runtime. No memory is allocated for a linked list data structure in advance. Whenever a new item is required to be added to the linked list, the memory for the new node is created at run time. On the other hand, in the case of the array, memory has to be allocated in advance for a specific number of items. In cases where sufficient items are not available to fill all array indexes, memory space is wasted.
Since arrays require contiguous memory locations, it is very difficult to remove or insert an item in an array since the memory locations of a large number of items have to be updated. On the other hand, linked list items are not stored in a contiguous memory location, therefore you can easily update linked lists.
Owing to its flexibility, a linked list is more suitable for implementing data structures like stacks, queues, and lists.
However, there are some downsides to the linked list as well:
- Since each linked list item has to store the reference to the next item, some extra memory is required.
- Unlike arrays, where you can directly access an item, you cannot access a linked list item directly since the only information you have is the reference to the first item. In Big O terms, the worst-case access time is O(n).
Note: This article is part of a 3-part series we produced on the topic of linked lists in Python. In this series of articles, we studied the following types of linked lists along with their different functionalities.
- Single Linked List
- Doubly Linked List
- Circular Linked List
- Linked List with Header
- Sorted Linked List
In this article, we will focus on a single linked list and its different operations.
Our 3-part series about linked lists in Python:
Single Linked List
A single linked list is the simplest of all the variants of linked lists. Every node in a single linked list contains an item and a reference to the next item and that's it. In this section, we will see how to create a node for the single linked list along with the methods for different types of insertion, traversal, and deletion.
Creating the Node Class
The first thing that you need to do is to create a class for the nodes. The objects of this class will be the actual nodes that we will insert into our linked list. We know that a node for a single linked list contains the item and the reference to the next node. Therefore, our node class will contain two member variables item and ref. The value of the item will be set by the value passed through the constructor, while the reference will be initially set to None:
class Node:
    def __init__(self, data):
        self.item = data
        self.ref = None
Note: Additionally, you can define other methods besides the __init__()in the Node class, as we did in the "Linked Lists in Python" article.
Creating the Single Linked List Class
Next, we need to create a class for the linked list. This class will contain the methods to insert, remove, traverse, and sort the list. Initially, the class will only contain one member start_node that will point to the starting or first node of the list. The value of start_node will be set to None using the constructor since the linked list will be empty at the time of creation:
class LinkedList:
    def __init__(self):
        self.start_node = None
Now we have created a class for our single list. The next step is to add an insertion method to insert items into the linked list. But before that, we will add a method to traverse a linked list. This method will help us read the data in our list.
Traversing Linked List Items
To enable us to iterate over our linked list, we should add the method below to the LinkedList class that we created in the last section:
def traverse_list(self):
    if self.start_node is None:
        print("List has no element")
        return
    else:
        n = self.start_node
        while n is not None:
            print(n.item , " ")
            n = n.ref
Let's see what is happening in the above method. The method has two main parts. First, it checks whether the linked list is empty or not:
  if self.start_node is None:
        print("List has no element")
        return
If the linked list is empty, that means there is no item to iterate. In such cases, the traverse_list() method simply prints the statement that the list has no item. Otherwise, if the list has an item, the following piece of code will execute:
    n = self.start_node
        while n is not None:
            print(n.item , " ")
            n = n.ref
As we said earlier, the start variable will contain a reference to the first nodes. Therefore, we initialize a variable n with the start variable. Next, we execute a loop that executes until n becomes none. Inside the loop, we print the item stored at the current node and then set the value of n variable to n.ref, which contains the reference to the next node. The reference of the last node is None since there is no node after that. Therefore, when n becomes None, the loop terminates.
Now, that we have a method to traverse a linked list, let's see how we can add items to a single linked list.
Inserting Items
Depending upon the location where you want to insert an item, there are different ways to insert items in a single linked list.
Inserting Items at the Beginning
The simplest way to insert an item in a single linked list is to add an item at the start of the list. Let's see how to insert an item at the start of the list. Add this method to the LinkedList class that we created earlier:
    def insert_at_start(self, data):
        new_node = Node(data)
        new_node.ref = self.start_node
        self.start_node= new_node
In the script above, we create a method insert_at_start(), the method accepts one parameter, which is basically the value of the item that we want to insert. Inside the method, we simply create an object of the Node class and set its reference to the start_node since start_node was previously storing the first node, which after insertion of a new node at the start will become the second node.
Therefore, we add the reference of start_node to the ref variable of the new node. Now since the new_node is the first node, we set the value of the start_node variable to new_node.
Inserting Items at the End
Now, let's create a method insert_at_end(), which inserts the element at the end of the linked list:
  def insert_at_end(self, data):
        new_node = Node(data)
        if self.start_node is None:
            self.start_node = new_node
            return
        n = self.start_node
        while n.ref is not None:
            n= n.ref
        n.ref = new_node;
The value of the item that we want to insert is passed as an argument to the method. The method consists of two parts. First, we check if the linked list is empty or not, if the linked list is empty, all we have to do is set the value of the start_node variable to the new_node object.
On the other hand, if the list already contains some nodes. We initialize a variable n with the start node. We then iterate through all the nodes in the list using a while loop as we did in the case of the traverse_list method. The loop terminates when we reach the last node. We then set the reference of the last node to the newly created new_node.
Add the insert_at_end() method to the LinkedList class.
Inserting an Item After Another Item
We may need to add an item after another item in a single linked list. To do so, we'll create the insert_after_item() method:
    def insert_after_item(self, x, data):

        n = self.start_node
        print(n.ref)
        while n is not None:
            if n.item == x:
                break
            n = n.ref
        if n is None:
            print("item not in the list")
        else:
            new_node = Node(data)
            new_node.ref = n.ref
            n.ref = new_node
The insert_after_item() method accepts two parameters: x and data. The first parameter is the item after which you want to insert the new node while the second parameter contains the value for the new node.
We start by creating a new variable n and assigning a start_node variable to it. Next, we traverse through the linked list using a while loop. The while loop executes until n becomes None. During each iteration, we check if the value stored in the current node is equal to the value passed by the x parameter. If the comparison returns true, we break the loop.
Next, if the item is found, the n variable will not be None. The reference of the new_node is set to reference stored by n and the reference of n is set to new_node. Add the insert_after_item() method to the LinkesList class.
Inserting an Item Before Another Item
Now, let's create the insert_before_item() method that inserts an item before another item in a linked list:
    def insert_before_item(self, x, data):
        if self.start_node is None:
            print("List has no element")
            return

        if x == self.start_node.item:
            new_node = Node(data)
            new_node.ref = self.start_node
            self.start_node = new_node
            return

        n = self.start_node
        print(n.ref)
        while n.ref is not None:
            if n.ref.item == x:
                break
            n = n.ref
        if n.ref is None:
            print("item not in the list")
        else:
            new_node = Node(data)
            new_node.ref = n.ref
            n.ref = new_node
The method has three parts. Let's look at each part in detail:
     if self.start_node is None:
        print("List has no element")
        return
In the script above, we check if the list is empty. If it is actually empty, we simply print that the list has no element and return from the method.
Next, we check if the element is located at the first index:
     if x == self.start_node.item:
        new_node = Node(data)
        new_node.ref = self.start_node
        self.start_node = new_node
        return
If the element after which we want to insert a new node is located at the first index. We simply set the reference of the newly inserted node to the start_node and then set the value of start_node to new_node.
Finally, if the list is not None and the element is not found at the first index, we create a new variable n and assign a start_node variable to it. Next, we traverse through the linked list using a while loop. It executes until n.ref becomes None. During each iteration, we check if the value stored in the reference of the current node is equal to the value passed by the x parameter. If the comparison returns True, we break the loop.
Next, if the item is found, the n.ref variable will not be None. The reference of the new_node is set to the reference of n and the reference of n is set to `new_node:
    if n.ref is None:
        print("item not in the list")
    else:
        new_node = Node(data)
        new_node.ref = n.ref
        n.ref = new_node
As usual, add the insert_before_item() method to the LinkedList class.
Inserting an Item at Specific Index
Sometimes, we need to insert an item at a specific index. Let's define a method that helps us achieve that:
    def insert_at_index (self, index, data):
        if index == 1:
            new_node = Node(data)
            new_node.ref = self.start_node
            self.start_node = new_node
        i = 1
        n = self.start_node
        while i < index-1 and n is not None:
            n = n.ref
            i = i+1
        if n is None:
            print("Index out of bound")
        else:
            new_node = Node(data)
            new_node.ref = n.ref
            n.ref = new_node
We first check if the index that we want to store the item to is 1, then simply assign start_node to the reference of the new_node and then set the value of start_node to new_node.
Next, execute a while loop which executes until the counter i becomes greater than or equal to the index-1. For instance, if you want to add a new node to the third index. During the first iteration of the while loop, i will become 2 and the currently iterated node will be 2. The loop will not execute again since i is now 2 which is equal to index 1 (3-1=2). Therefore, the loop will break. Next, we add a new node after the currently iterated node (which is node 2), hence the new node is added at the index.
Note: It is important to mention that if the index or the location passed as an argument is greater than the size of the linked list, a message will be displayed to the user that the index is out of range or out of bounds.
Testing Insertion Methods
Now we have defined all our insertion methods, let's test them. First, create an object of the linked list class:
new_linked_list = LinkedList()
Next, let's first call the insert_at_end() method to add three elements to the linked list:
new_linked_list.insert_at_end(5)
new_linked_list.insert_at_end(10)
new_linked_list.insert_at_end(15)
To see, if the items have actually been inserted, let's traverse through the linked list using the traverse method:
new_linked_list.traverse_list()
You should see the following output:
5
10
15
Next, let's add an element at the start:
Check out our hands-on, practical guide to learning Git, with best-practices, industry-accepted standards, and included cheat sheet. Stop Googling Git commands and actually learn it!
new_linked_list.insert_at_start(20)
Now, if you traverse the list, you should see the following output:
20
5
10
15
Let's add a new item 17 after item 10:
new_linked_list.insert_after_item(10, 17)
Traversing the list returns the following output now:
20
5
10
17
15
You can see 17 inserted after 10.
Let's now insert another item 25 before item 17 using the insert_before_item() method:
new_linked_list.insert_before_item(17, 25)
Now the list will contain the following elements:
20
5
10
25
17
15
Finally, let's add an element at the third location, which is currently occupied by 10. You will see that 10 will move one location forward and the new item will be inserted in its place. The insert_at_index() method can be used for this purpose. The following script inserts item 8 at index the third index of the list:
new_linked_list.insert_at_index(3,8)
Now if you traverse the list, you should see the following output:
20
5
8
10
25
17
15
And with that, we have tested all of our insertion methods. We currently have 7 elements in our list. Let's write a method that returns the number of elements in a linked list.
Counting Elements
Now, let's create a get_count() method which counts the number of elements in the linked list. The method simply traverses through all the nodes in the array and increments a counter using a while loop. At the end of the loop, the counter contains the total number of elements in the loop:
    def get_count(self):
        if self.start_node is None:
            return 0;
        n = self.start_node
        count = 0;
        while n is not None:
            count = count + 1
            n = n.ref
        return count
Add the above method to the LinkedList class, compile the LinkedList class, and then insert some elements in the LinkedList as we did in the last section. We had 7 items in our linked list, by the end of the last section.
Let's use the get_count() method to get the total number of items in the list:
new_linked_list.get_count()
You should see the number of items in your linked list in the output.
Alternatively, another way to get the "count" of the list would be to track the number of items inserted and removed from the list in a simple counter variable belonging to the LinkedList class. This works well and is faster than the get_count method above if the underlying list data structure can not be manipulated from outside the class.
Searching Elements
Searching for an element is quite similar to counting or traversing a linked list, all you have to do is to compare the value to be searched with the value of the node during each iteration. If the value is found, print that the value is found and break the loop. If the element is not found after all the nodes are traversed, simply print that the element is not found:
    def search_item(self, x):
        if self.start_node is None:
            print("List has no elements")
            return
        n = self.start_node
        while n is not None:
            if n.item == x:
                print("Item found")
                return True
            n = n.ref
        print("item not found")
        return False
Add the above method to the LinkedList class. Let's search for an element in the previously created list:
new_linked_list.search_item(5)
Since we inserted 5 in our linked list, the above method will return True:
Item found
True
Method for Creating a Linked List
Though we can add items one by one using any of the insertion methods. Let's create a method that asks the user to enter the number of elements in the node and then the individual element and enters that element in the linked list:
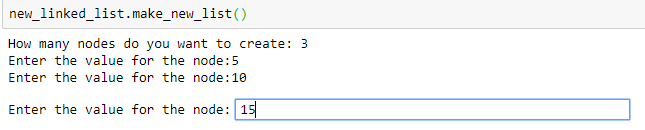
    def make_new_list(self):
        nums = int(input("How many nodes do you want to create: "))
        if nums == 0:
            return
        for i in range(nums):
            value = int(input("Enter the value for the node:"))
            self.insert_at_end(value)
The make_new_list() method first asks the user for the number of items in the list. Next using a for loop, the user is prompted to enter the value for each node, which is then inserted into the linked list using the insert_at_end() method.
The following screenshot shows the make_new_list() method in action.
Deleting Elements
In this section, we will see the different ways to delete an element from a single linked list.
Deletion from the Start
Deleting an element or item from the start of the linked list is straightforward. We have to set the reference of the start_node to the second node which we can do by simply assigning the value of the reference of the start node (which is pointing to the second node) to the start node:
    def delete_at_start(self):
        if self.start_node is None:
            print("The list has no element to delete")
            return
        self.start_node = self.start_node.ref
We first check if the list is empty or not. If the list is empty we display the message that the list has no element to delete. Otherwise, we assign the value of the start_node.ref to the start_node. The start_node will now point towards the second element.
Add the delete_at_start() method to the LinkedList class.
Deletion at the End
To delete an element from the end of the list, we simply have to iterate through the linked list till the second last element, and then we need to set the reference of the second last element to None, which will convert the second last element to last element:
    def delete_at_end(self):
        if self.start_node is None:
            print("The list has no element to delete")
            return

        n = self.start_node
        while n.ref.ref is not None:
            n = n.ref
        n.ref = None
Add the above script to the LinkedList() class.
Deletion by Item Value
To delete the element by value, we first have to find the node that contains the item with the specified value and then delete the node. Finding the item with the specified value is pretty similar to searching for the item. Once the item to be deleted is found, the reference of the node before the item is set to the node that exists after the item is deleted:
  def delete_element_by_value(self, x):
    if self.start_node is None:
        print("The list has no element to delete")
        return

    # Deleting first node
    if self.start_node.item == x:
        self.start_node = self.start_node.ref
        return

    n = self.start_node
    while n.ref is not None:
        if n.ref.item == x:
            break
        n = n.ref

    if n.ref is None:
        print("item not found in the list")
    else:
        n.ref = n.ref.ref
As usual, we first check if the list is empty. Next, we check if the element to be deleted is located at the start of the linked list. If the element is found at the start, we delete it by setting the first node to the reference of the first node (which basically refers to the second node).
Finally, if the element is not found at the first index, we iterate through the linked list and check if the value of the node being iterated is equal to the value to be deleted. If the comparison returns True, we set the reference of the previous node to the node that exists after the node that is being deleted.
Testing Deletion Methods
Let's test the deletion methods that we just created. But before that add some dummy data to our linked list:
new_linked_list.insert_at_end(10)
new_linked_list.insert_at_end(20)
new_linked_list.insert_at_end(30)
new_linked_list.insert_at_end(40)
new_linked_list.insert_at_end(50)
The above script inserts 5 elements into a linked list. If you traverse the list, you should see the following items:
10
20
30
40
50
Let's first delete an item from the start:
new_linked_list.delete_at_start()
Now if you traverse the list, you should see the following output:
20
30
40
50
Let's delete an element from the end now:
new_linked_list.delete_at_end()
The list now contains the following items:
20
30
40
Finally, let's delete an element by value, say 30.
new_linked_list.delete_element_by_value(30)
Now if you traverse the list, you should not see item 30.
Reversing a Linked List
To reverse a linked list, you need to have three variables, prev, n, and next. The prev will keep track of the previous node, the next will keep track of the next node, and the n will correspond to the current node.
We start a while loop by assigning the starting node to the variable n and the prev variable is initialized to None. The loop executes until n becomes None. Inside the while loop, you need to perform the following:
- Assign the value of the reference of the current node to
next - Set the value of reference of the current node
nto theprev - Set
prevvariable to current noden - Set current node
nto the value ofnextnode
At the end of the loop, the prev variable will point to the last node, we need to make it the first node so we set the value self.start_node variable to prev. The while loop will make each node point to its previous node, resulting in a reversed linked list:
    def reverse_linkedlist(self):
        prev = None
        n = self.start_node
        while n is not None:
            next = n.ref
            n.ref = prev
            prev = n
            n = next
        self.start_node = prev
Add the above method to the LinkedList class. Create a linked list of random numbers and then see if you can reverse it using the reverse_linkedlist() method.
Conclusion
In this article, we started our discussion about a single linked list. We saw what are the different methods that can be performed on the linked list such as traversing a linked list, inserting items to a linked list, searching and counting linked list items, deleting items from a linked list, and reversing a single linked list.
This is Part 1 of the series of articles on the linked list. In the next part, we will see how to sort a single linked list, how to merge sorted linked lists, and how to remove cycles from a single linked list.