Watch Now This tutorial has a related video course created by the Real Python team. Watch it together with the written tutorial to deepen your understanding: Speed Up Python With Concurrency
If you’ve heard lots of talk about asyncio being added to Python but are curious how it compares to other concurrency methods or are wondering what concurrency is and how it might speed up your program, you’ve come to the right place.
In this article, you’ll learn the following:
- What concurrency is
- What parallelism is
- How some of Python’s concurrency methods compare, including
threading,asyncio, andmultiprocessing - When to use concurrency in your program and which module to use
This article assumes that you have a basic understanding of Python and that you’re using at least version 3.6 to run the examples. You can download the examples from the Real Python GitHub repo.
Free Bonus: 5 Thoughts On Python Mastery, a free course for Python developers that shows you the roadmap and the mindset you’ll need to take your Python skills to the next level.
Take the Quiz: Test your knowledge with our interactive “Python Concurrency” quiz. Upon completion you will receive a score so you can track your learning progress over time:

Interactive Quiz
Python Concurrency
This is a quiz that will review topics covered in our Speed Up Your Python Program With Concurrency tutorial.
What Is Concurrency?
The dictionary definition of concurrency is simultaneous occurrence. In Python, the things that are occurring simultaneously are called by different names (thread, task, process) but at a high level, they all refer to a sequence of instructions that run in order.
I like to think of them as different trains of thought. Each one can be stopped at certain points, and the CPU or brain that is processing them can switch to a different one. The state of each one is saved so it can be restarted right where it was interrupted.
You might wonder why Python uses different words for the same concept. It turns out that threads, tasks, and processes are only the same if you view them from a high level. Once you start digging into the details, they all represent slightly different things. You’ll see more of how they are different as you progress through the examples.
Now let’s talk about the simultaneous part of that definition. You have to be a little careful because, when you get down to the details, only multiprocessing actually runs these trains of thought at literally the same time. Threading and asyncio both run on a single processor and therefore only run one at a time. They just cleverly find ways to take turns to speed up the overall process. Even though they don’t run different trains of thought simultaneously, we still call this concurrency.
The way the threads or tasks take turns is the big difference between threading and asyncio. In threading, the operating system actually knows about each thread and can interrupt it at any time to start running a different thread. This is called pre-emptive multitasking since the operating system can pre-empt your thread to make the switch.
Pre-emptive multitasking is handy in that the code in the thread doesn’t need to do anything to make the switch. It can also be difficult because of that “at any time” phrase. This switch can happen in the middle of a single Python statement, even a trivial one like x = x + 1.
Asyncio, on the other hand, uses cooperative multitasking. The tasks must cooperate by announcing when they are ready to be switched out. That means that the code in the task has to change slightly to make this happen.
The benefit of doing this extra work up front is that you always know where your task will be swapped out. It will not be swapped out in the middle of a Python statement unless that statement is marked. You’ll see later how this can simplify parts of your design.
What Is Parallelism?
So far, you’ve looked at concurrency that happens on a single processor. What about all of those CPU cores your cool, new laptop has? How can you make use of them? multiprocessing is the answer.
With multiprocessing, Python creates new processes. A process here can be thought of as almost a completely different program, though technically they’re usually defined as a collection of resources where the resources include memory, file handles and things like that. One way to think about it is that each process runs in its own Python interpreter.
Because they are different processes, each of your trains of thought in a multiprocessing program can run on a different core. Running on a different core means that they actually can run at the same time, which is fabulous. There are some complications that arise from doing this, but Python does a pretty good job of smoothing them over most of the time.
Now that you have an idea of what concurrency and parallelism are, let’s review their differences, and then we can look at why they can be useful:
| Concurrency Type | Switching Decision | Number of Processors |
|---|---|---|
Pre-emptive multitasking (threading) |
The operating system decides when to switch tasks external to Python. | 1 |
Cooperative multitasking (asyncio) |
The tasks decide when to give up control. | 1 |
Multiprocessing (multiprocessing) |
The processes all run at the same time on different processors. | Many |
Each of these types of concurrency can be useful. Let’s take a look at what types of programs they can help you speed up.
When Is Concurrency Useful?
Concurrency can make a big difference for two types of problems. These are generally called CPU-bound and I/O-bound.
I/O-bound problems cause your program to slow down because it frequently must wait for input/output (I/O) from some external resource. They arise frequently when your program is working with things that are much slower than your CPU.
Examples of things that are slower than your CPU are legion, but your program thankfully does not interact with most of them. The slow things your program will interact with most frequently are the file system and network connections.
Let’s see what that looks like:

In the diagram above, the blue boxes show time when your program is doing work, and the red boxes are time spent waiting for an I/O operation to complete. This diagram is not to scale because requests on the internet can take several orders of magnitude longer than CPU instructions, so your program can end up spending most of its time waiting. This is what your browser is doing most of the time.
On the flip side, there are classes of programs that do significant computation without talking to the network or accessing a file. These are the CPU-bound programs, because the resource limiting the speed of your program is the CPU, not the network or the file system.
Here’s a corresponding diagram for a CPU-bound program:
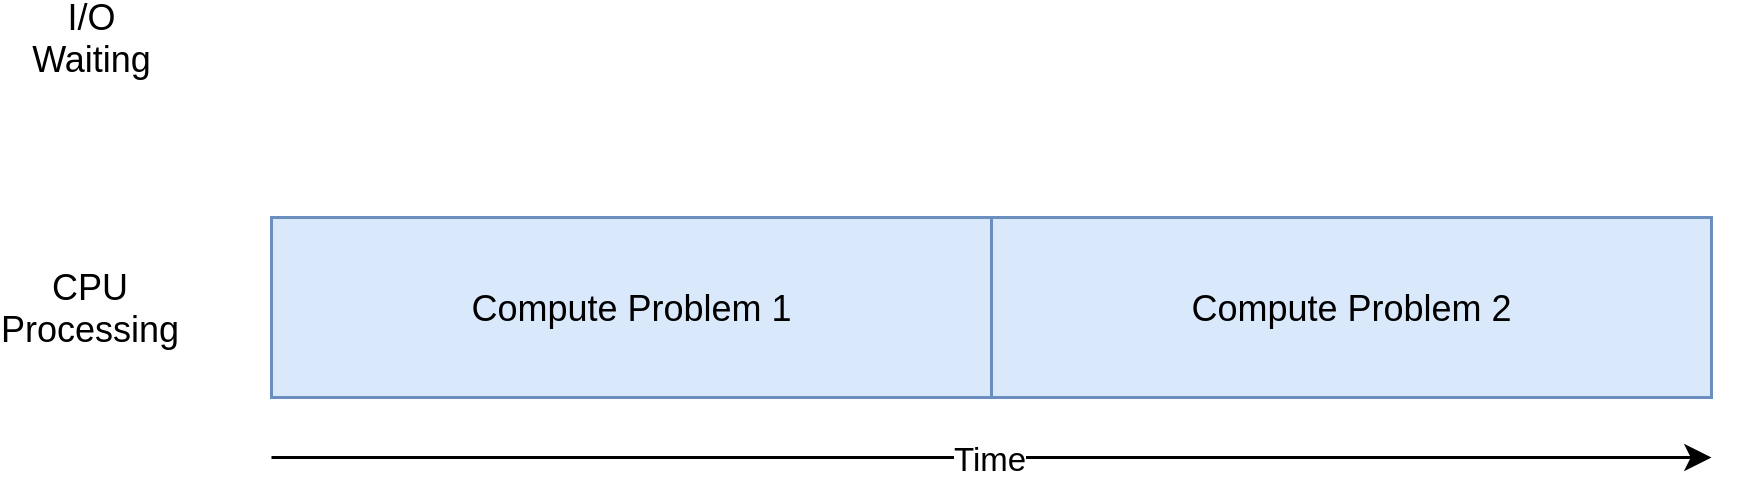
As you work through the examples in the following section, you’ll see that different forms of concurrency work better or worse with CPU-bound and I/O-bound programs. Adding concurrency to your program adds extra code and complications, so you’ll need to decide if the potential speed up is worth the extra effort. By the end of this article, you should have enough info to start making that decision.
Here’s a quick summary to clarify this concept:
| I/O-Bound Process | CPU-Bound Process |
|---|---|
| Your program spends most of its time talking to a slow device, like a network connection, a hard drive, or a printer. | You program spends most of its time doing CPU operations. |
| Speeding it up involves overlapping the times spent waiting for these devices. | Speeding it up involves finding ways to do more computations in the same amount of time. |
You’ll look at I/O-bound programs first. Then, you’ll get to see some code dealing with CPU-bound programs.
How to Speed Up an I/O-Bound Program
Let’s start by focusing on I/O-bound programs and a common problem: downloading content over the network. For our example, you will be downloading web pages from a few sites, but it really could be any network traffic. It’s just easier to visualize and set up with web pages.
Synchronous Version
We’ll start with a non-concurrent version of this task. Note that this program requires the requests module. You should run pip install requests before running it, probably using a virtualenv. This version does not use concurrency at all:
import requests
import time


def download_site(url, session):
    with session.get(url) as response:
        print(f"Read {len(response.content)} from {url}")


def download_all_sites(sites):
    with requests.Session() as session:
        for url in sites:
            download_site(url, session)


if __name__ == "__main__":
    sites = [
        "https://www.jython.org",
        "http://olympus.realpython.org/dice",
    ] * 80
    start_time = time.time()
    download_all_sites(sites)
    duration = time.time() - start_time
    print(f"Downloaded {len(sites)} in {duration} seconds")
As you can see, this is a fairly short program. download_site() just downloads the contents from a URL and prints the size. One small thing to point out is that we’re using a Session object from requests.
It is possible to simply use get() from requests directly, but creating a Session object allows requests to do some fancy networking tricks and really speed things up.
download_all_sites() creates the Session and then walks through the list of sites, downloading each one in turn. Finally, it prints out how long this process took so you can have the satisfaction of seeing how much concurrency has helped us in the following examples.
The processing diagram for this program will look much like the I/O-bound diagram in the last section.
Note: Network traffic is dependent on many factors that can vary from second to second. I’ve seen the times of these tests double from one run to another due to network issues.
Why the Synchronous Version Rocks
The great thing about this version of code is that, well, it’s easy. It was comparatively easy to write and debug. It’s also more straight-forward to think about. There’s only one train of thought running through it, so you can predict what the next step is and how it will behave.
The Problems With the Synchronous Version
The big problem here is that it’s relatively slow compared to the other solutions we’ll provide. Here’s an example of what the final output gave on my machine:
$ ./io_non_concurrent.py
   [most output skipped]
Downloaded 160 in 14.289619207382202 seconds
Note: Your results may vary significantly. When running this script, I saw the times vary from 14.2 to 21.9 seconds. For this article, I took the fastest of three runs as the time. The differences between the methods will still be clear.
Being slower isn’t always a big issue, however. If the program you’re running takes only 2 seconds with a synchronous version and is only run rarely, it’s probably not worth adding concurrency. You can stop here.
What if your program is run frequently? What if it takes hours to run? Let’s move on to concurrency by rewriting this program using threading.
threading Version
As you probably guessed, writing a threaded program takes more effort. You might be surprised at how little extra effort it takes for simple cases, however. Here’s what the same program looks like with threading:
import concurrent.futures
import requests
import threading
import time


thread_local = threading.local()


def get_session():
    if not hasattr(thread_local, "session"):
        thread_local.session = requests.Session()
    return thread_local.session


def download_site(url):
    session = get_session()
    with session.get(url) as response:
        print(f"Read {len(response.content)} from {url}")


def download_all_sites(sites):
    with concurrent.futures.ThreadPoolExecutor(max_workers=5) as executor:
        executor.map(download_site, sites)


if __name__ == "__main__":
    sites = [
        "https://www.jython.org",
        "http://olympus.realpython.org/dice",
    ] * 80
    start_time = time.time()
    download_all_sites(sites)
    duration = time.time() - start_time
    print(f"Downloaded {len(sites)} in {duration} seconds")
When you add threading, the overall structure is the same and you only needed to make a few changes. download_all_sites() changed from calling the function once per site to a more complex structure.
In this version, you’re creating a ThreadPoolExecutor, which seems like a complicated thing. Let’s break that down: ThreadPoolExecutor = Thread + Pool + Executor.
You already know about the Thread part. That’s just a train of thought we mentioned earlier. The Pool portion is where it starts to get interesting. This object is going to create a pool of threads, each of which can run concurrently. Finally, the Executor is the part that’s going to control how and when each of the threads in the pool will run. It will execute the request in the pool.
Helpfully, the standard library implements ThreadPoolExecutor as a context manager so you can use the with syntax to manage creating and freeing the pool of Threads.
Once you have a ThreadPoolExecutor, you can use its handy .map() method. This method runs the passed-in function on each of the sites in the list. The great part is that it automatically runs them concurrently using the pool of threads it is managing.
Those of you coming from other languages, or even Python 2, are probably wondering where the usual objects and functions are that manage the details you’re used to when dealing with threading, things like Thread.start(), Thread.join(), and Queue.
These are all still there, and you can use them to achieve fine-grained control of how your threads are run. But, starting with Python 3.2, the standard library added a higher-level abstraction called Executors that manage many of the details for you if you don’t need that fine-grained control.
The other interesting change in our example is that each thread needs to create its own requests.Session() object. When you’re looking at the documentation for requests, it’s not necessarily easy to tell, but reading this issue, it seems fairly clear that you need a separate Session for each thread.
This is one of the interesting and difficult issues with threading. Because the operating system is in control of when your task gets interrupted and another task starts, any data that is shared between the threads needs to be protected, or thread-safe. Unfortunately requests.Session() is not thread-safe.
There are several strategies for making data accesses thread-safe depending on what the data is and how you’re using it. One of them is to use thread-safe data structures like Queue from Python’s queue module.
These objects use low-level primitives like threading.Lock to ensure that only one thread can access a block of code or a bit of memory at the same time. You are using this strategy indirectly by way of the ThreadPoolExecutor object.
Another strategy to use here is something called thread local storage. threading.local() creates an object that looks like a global but is specific to each individual thread. In your example, this is done with thread_local and get_session():
thread_local = threading.local()


def get_session():
    if not hasattr(thread_local, "session"):
        thread_local.session = requests.Session()
    return thread_local.session
local() is in the threading module to specifically solve this problem. It looks a little odd, but you only want to create one of these objects, not one for each thread. The object itself takes care of separating accesses from different threads to different data.
When get_session() is called, the session it looks up is specific to the particular thread on which it’s running. So each thread will create a single session the first time it calls get_session() and then will simply use that session on each subsequent call throughout its lifetime.
Finally, a quick note about picking the number of threads. You can see that the example code uses 5 threads. Feel free to play around with this number and see how the overall time changes. You might expect that having one thread per download would be the fastest but, at least on my system it was not. I found the fastest results somewhere between 5 and 10 threads. If you go any higher than that, then the extra overhead of creating and destroying the threads erases any time savings.
The difficult answer here is that the correct number of threads is not a constant from one task to another. Some experimentation is required.
Why the threading Version Rocks
It’s fast! Here’s the fastest run of my tests. Remember that the non-concurrent version took more than 14 seconds:
$ ./io_threading.py
   [most output skipped]
Downloaded 160 in 3.7238826751708984 seconds
Here’s what its execution timing diagram looks like:
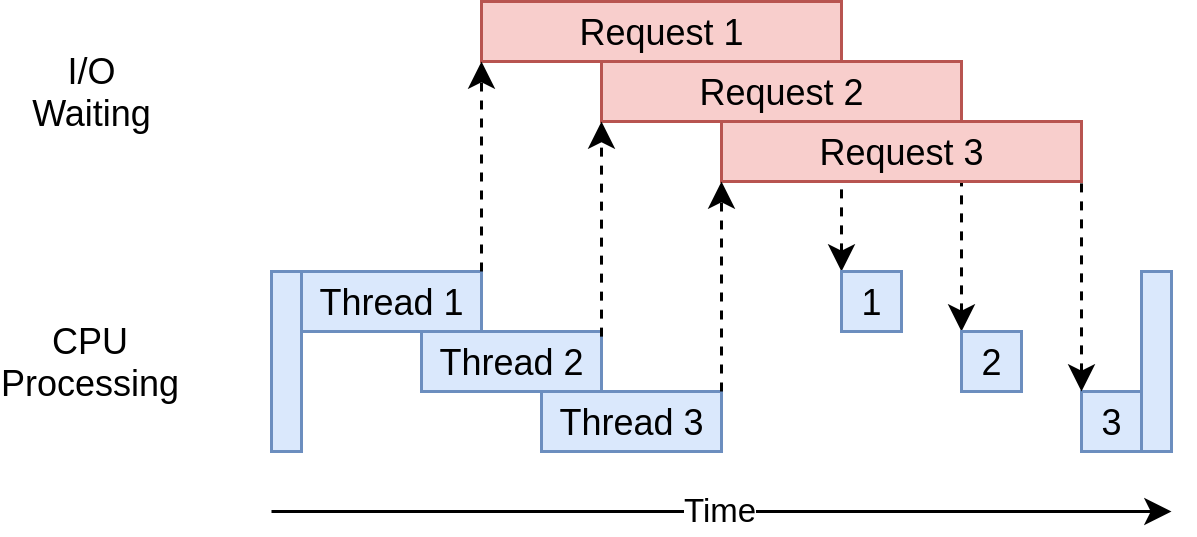
It uses multiple threads to have multiple open requests out to web sites at the same time, allowing your program to overlap the waiting times and get the final result faster! Yippee! That was the goal.
The Problems with the threading Version
Well, as you can see from the example, it takes a little more code to make this happen, and you really have to give some thought to what data is shared between threads.
Threads can interact in ways that are subtle and hard to detect. These interactions can cause race conditions that frequently result in random, intermittent bugs that can be quite difficult to find. Those of you who are unfamiliar with the concept of race conditions might want to expand and read the section below.
Race conditions are an entire class of subtle bugs that can and frequently do happen in multi-threaded code. Race conditions happen because the programmer has not sufficiently protected data accesses to prevent threads from interfering with each other. You need to take extra steps when writing threaded code to ensure things are thread-safe.
What’s going on here is that the operating system is controlling when your thread runs and when it gets swapped out to let another thread run. This thread swapping can occur at any point, even while doing sub-steps of a Python statement. As a quick example, look at this function:
import concurrent.futures


counter = 0


def increment_counter(fake_value):
    global counter
    for _ in range(100):
        counter += 1


if __name__ == "__main__":
    fake_data = [x for x in range(5000)]
    counter = 0
    with concurrent.futures.ThreadPoolExecutor(max_workers=5000) as executor:
        executor.map(increment_counter, fake_data)
This code is quite similar to the structure you used in the threading example above. The difference is that each of the threads is accessing the same global variable counter and incrementing it. Counter is not protected in any way, so it is not thread-safe.
In order to increment counter, each of the threads needs to read the current value, add one to it, and the save that value back to the variable. That happens in this line: counter += 1.
Because the operating system knows nothing about your code and can swap threads at any point in the execution, it’s possible for this swap to happen after a thread has read the value but before it has had the chance to write it back. If the new code that is running modifies counter as well, then the first thread has a stale copy of the data and trouble will ensue.
As you can imagine, hitting this exact situation is fairly rare. You can run this program thousands of times and never see the problem. That’s what makes this type of problem quite difficult to debug as it can be quite hard to reproduce and can cause random-looking errors to show up.
As a further example, I want to remind you that requests.Session() is not thread-safe. This means that there are places where the type of interaction described above could happen if multiple threads use the same Session. I bring this up not to cast aspersions on requests but rather to point out that these are difficult problems to resolve.
asyncio Version
Before you jump into examining the asyncio example code, let’s talk more about how asyncio works.
asyncio Basics
This will be a simplified version of asyncio. There are many details that are glossed over here, but it still conveys the idea of how it works.
The general concept of asyncio is that a single Python object, called the event loop, controls how and when each task gets run. The event loop is aware of each task and knows what state it’s in. In reality, there are many states that tasks could be in, but for now let’s imagine a simplified event loop that just has two states.
The ready state will indicate that a task has work to do and is ready to be run, and the waiting state means that the task is waiting for some external thing to finish, such as a network operation.
Your simplified event loop maintains two lists of tasks, one for each of these states. It selects one of the ready tasks and starts it back to running. That task is in complete control until it cooperatively hands the control back to the event loop.
When the running task gives control back to the event loop, the event loop places that task into either the ready or waiting list and then goes through each of the tasks in the waiting list to see if it has become ready by an I/O operation completing. It knows that the tasks in the ready list are still ready because it knows they haven’t run yet.
Once all of the tasks have been sorted into the right list again, the event loop picks the next task to run, and the process repeats. Your simplified event loop picks the task that has been waiting the longest and runs that. This process repeats until the event loop is finished.
An important point of asyncio is that the tasks never give up control without intentionally doing so. They never get interrupted in the middle of an operation. This allows us to share resources a bit more easily in asyncio than in threading. You don’t have to worry about making your code thread-safe.
That’s a high-level view of what’s happening with asyncio. If you want more detail, this StackOverflow answer provides some good details if you want to dig deeper.
async and await
Now let’s talk about two new keywords that were added to Python: async and await. In light of the discussion above, you can view await as the magic that allows the task to hand control back to the event loop. When your code awaits a function call, it’s a signal that the call is likely to be something that takes a while and that the task should give up control.
It’s easiest to think of async as a flag to Python telling it that the function about to be defined uses await. There are some cases where this is not strictly true, like asynchronous generators, but it holds for many cases and gives you a simple model while you’re getting started.
One exception to this that you’ll see in the next code is the async with statement, which creates a context manager from an object you would normally await. While the semantics are a little different, the idea is the same: to flag this context manager as something that can get swapped out.
As I’m sure you can imagine, there’s some complexity in managing the interaction between the event loop and the tasks. For developers starting out with asyncio, these details aren’t important, but you do need to remember that any function that calls await needs to be marked with async. You’ll get a syntax error otherwise.
Back to Code
Now that you’ve got a basic understanding of what asyncio is, let’s walk through the asyncio version of the example code and figure out how it works. Note that this version adds aiohttp. You should run pip install aiohttp before running it:
import asyncio
import time
import aiohttp


async def download_site(session, url):
    async with session.get(url) as response:
        print("Read {0} from {1}".format(response.content_length, url))


async def download_all_sites(sites):
    async with aiohttp.ClientSession() as session:
        tasks = []
        for url in sites:
            task = asyncio.ensure_future(download_site(session, url))
            tasks.append(task)
        await asyncio.gather(*tasks, return_exceptions=True)


if __name__ == "__main__":
    sites = [
        "https://www.jython.org",
        "http://olympus.realpython.org/dice",
    ] * 80
    start_time = time.time()
    asyncio.get_event_loop().run_until_complete(download_all_sites(sites))
    duration = time.time() - start_time
    print(f"Downloaded {len(sites)} sites in {duration} seconds")
This version is a bit more complex than the previous two. It has a similar structure, but there’s a bit more work setting up the tasks than there was creating the ThreadPoolExecutor. Let’s start at the top of the example.
download_site()
download_site() at the top is almost identical to the threading version with the exception of the async keyword on the function definition line and the async with keywords when you actually call session.get(). You’ll see later why Session can be passed in here rather than using thread-local storage.
download_all_sites()
download_all_sites() is where you will see the biggest change from the threading example.
You can share the session across all tasks, so the session is created here as a context manager. The tasks can share the session because they are all running on the same thread. There is no way one task could interrupt another while the session is in a bad state.
Inside that context manager, it creates a list of tasks using asyncio.ensure_future(), which also takes care of starting them. Once all the tasks are created, this function uses asyncio.gather() to keep the session context alive until all of the tasks have completed.
The threading code does something similar to this, but the details are conveniently handled in the ThreadPoolExecutor. There currently is not an AsyncioPoolExecutor class.
There is one small but important change buried in the details here, however. Remember how we talked about the number of threads to create? It wasn’t obvious in the threading example what the optimal number of threads was.
One of the cool advantages of asyncio is that it scales far better than threading. Each task takes far fewer resources and less time to create than a thread, so creating and running more of them works well. This example just creates a separate task for each site to download, which works out quite well.
__main__
Finally, the nature of asyncio means that you have to start up the event loop and tell it which tasks to run. The __main__ section at the bottom of the file contains the code to get_event_loop() and then run_until_complete(). If nothing else, they’ve done an excellent job in naming those functions.
If you’ve updated to Python 3.7, the Python core developers simplified this syntax for you. Instead of the asyncio.get_event_loop().run_until_complete() tongue-twister, you can just use asyncio.run().
Why the asyncio Version Rocks
It’s really fast! In the tests on my machine, this was the fastest version of the code by a good margin:
$ ./io_asyncio.py
   [most output skipped]
Downloaded 160 in 2.5727896690368652 seconds
The execution timing diagram looks quite similar to what’s happening in the threading example. It’s just that the I/O requests are all done by the same thread:
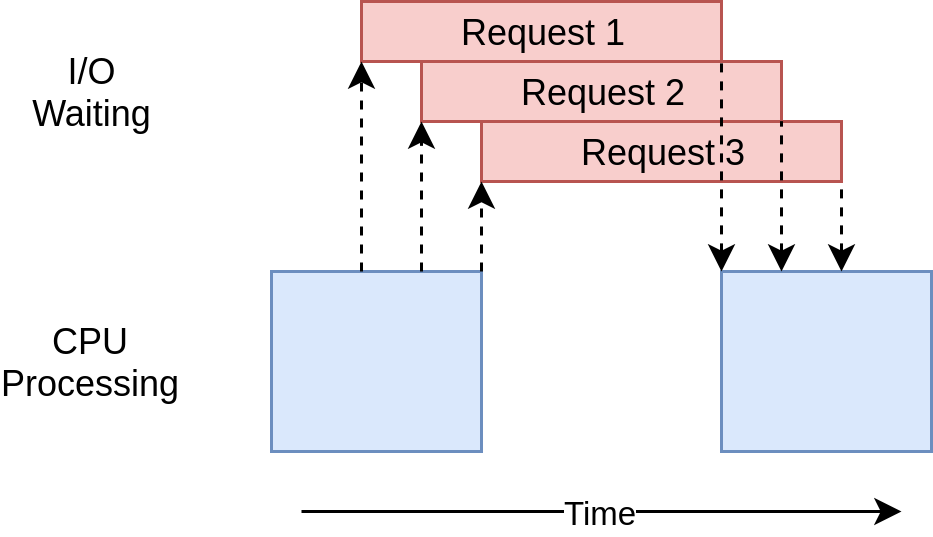
The lack of a nice wrapper like the ThreadPoolExecutor makes this code a bit more complex than the threading example. This is a case where you have to do a little extra work to get much better performance.
Also there’s a common argument that having to add async and await in the proper locations is an extra complication. To a small extent, that is true. The flip side of this argument is that it forces you to think about when a given task will get swapped out, which can help you create a better, faster, design.
The scaling issue also looms large here. Running the threading example above with a thread for each site is noticeably slower than running it with a handful of threads. Running the asyncio example with hundreds of tasks didn’t slow it down at all.
The Problems With the asyncio Version
There are a couple of issues with asyncio at this point. You need special async versions of libraries to gain the full advantage of asyncio. Had you just used requests for downloading the sites, it would have been much slower because requests is not designed to notify the event loop that it’s blocked. This issue is getting smaller and smaller as time goes on and more libraries embrace asyncio.
Another, more subtle, issue is that all of the advantages of cooperative multitasking get thrown away if one of the tasks doesn’t cooperate. A minor mistake in code can cause a task to run off and hold the processor for a long time, starving other tasks that need running. There is no way for the event loop to break in if a task does not hand control back to it.
With that in mind, let’s step up to a radically different approach to concurrency, multiprocessing.
multiprocessing Version
Unlike the previous approaches, the multiprocessing version of the code takes full advantage of the multiple CPUs that your cool, new computer has. Or, in my case, that my clunky, old laptop has. Let’s start with the code:
import requests
import multiprocessing
import time

session = None


def set_global_session():
    global session
    if not session:
        session = requests.Session()


def download_site(url):
    with session.get(url) as response:
        name = multiprocessing.current_process().name
        print(f"{name}:Read {len(response.content)} from {url}")


def download_all_sites(sites):
    with multiprocessing.Pool(initializer=set_global_session) as pool:
        pool.map(download_site, sites)


if __name__ == "__main__":
    sites = [
        "https://www.jython.org",
        "http://olympus.realpython.org/dice",
    ] * 80
    start_time = time.time()
    download_all_sites(sites)
    duration = time.time() - start_time
    print(f"Downloaded {len(sites)} in {duration} seconds")
This is much shorter than the asyncio example and actually looks quite similar to the threading example, but before we dive into the code, let’s take a quick tour of what multiprocessing does for you.
multiprocessing in a Nutshell
Up until this point, all of the examples of concurrency in this article run only on a single CPU or core in your computer. The reasons for this have to do with the current design of CPython and something called the Global Interpreter Lock, or GIL.
This article won’t dive into the hows and whys of the GIL. It’s enough for now to know that the synchronous, threading, and asyncio versions of this example all run on a single CPU.
multiprocessing in the standard library was designed to break down that barrier and run your code across multiple CPUs. At a high level, it does this by creating a new instance of the Python interpreter to run on each CPU and then farming out part of your program to run on it.
As you can imagine, bringing up a separate Python interpreter is not as fast as starting a new thread in the current Python interpreter. It’s a heavyweight operation and comes with some restrictions and difficulties, but for the correct problem, it can make a huge difference.
multiprocessing Code
The code has a few small changes from our synchronous version. The first one is in download_all_sites(). Instead of simply calling download_site() repeatedly, it creates a multiprocessing.Pool object and has it map download_site to the iterable sites. This should look familiar from the threading example.
What happens here is that the Pool creates a number of separate Python interpreter processes and has each one run the specified function on some of the items in the iterable, which in our case is the list of sites. The communication between the main process and the other processes is handled by the multiprocessing module for you.
The line that creates Pool is worth your attention. First off, it does not specify how many processes to create in the Pool, although that is an optional parameter. By default, multiprocessing.Pool() will determine the number of CPUs in your computer and match that. This is frequently the best answer, and it is in our case.
For this problem, increasing the number of processes did not make things faster. It actually slowed things down because the cost for setting up and tearing down all those processes was larger than the benefit of doing the I/O requests in parallel.
Next we have the initializer=set_global_session part of that call. Remember that each process in our Pool has its own memory space. That means that they cannot share things like a Session object. You don’t want to create a new Session each time the function is called, you want to create one for each process.
The initializer function parameter is built for just this case. There is not a way to pass a return value back from the initializer to the function called by the process download_site(), but you can initialize a global session variable to hold the single session for each process. Because each process has its own memory space, the global for each one will be different.
That’s really all there is to it. The rest of the code is quite similar to what you’ve seen before.
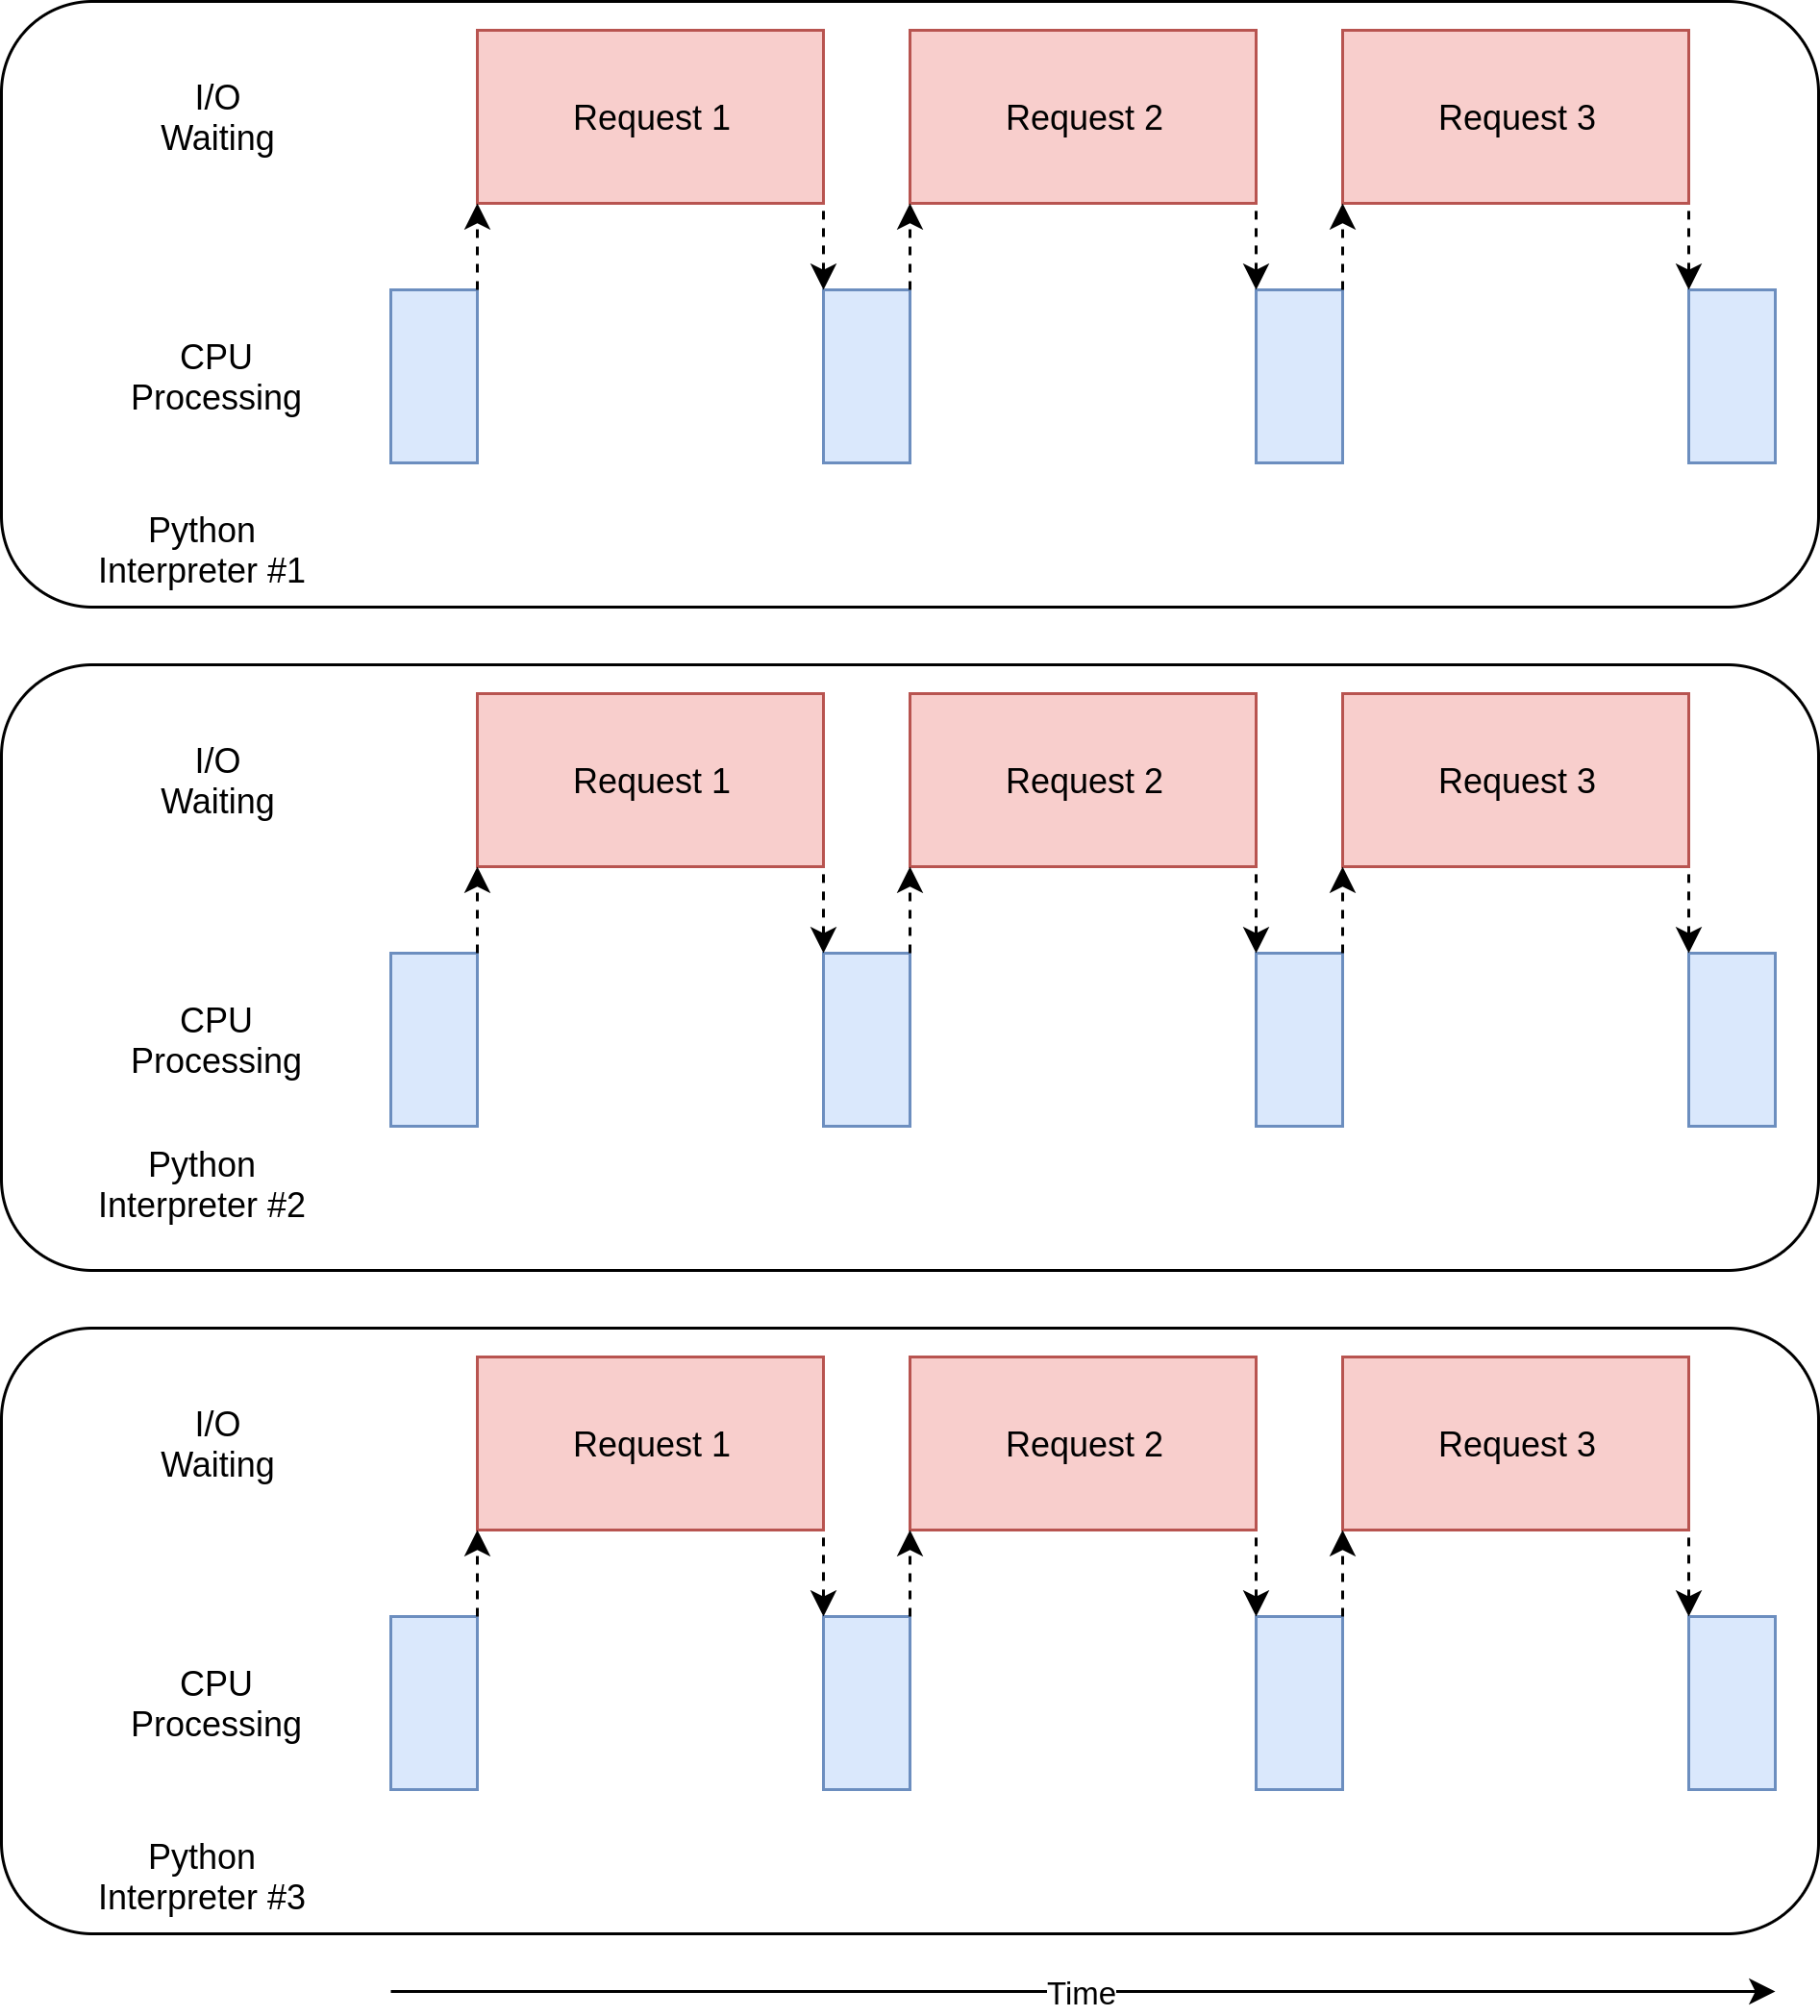
Why the multiprocessing Version Rocks
The multiprocessing version of this example is great because it’s relatively easy to set up and requires little extra code. It also takes full advantage of the CPU power in your computer. The execution timing diagram for this code looks like this:
The Problems With the multiprocessing Version
This version of the example does require some extra setup, and the global session object is strange. You have to spend some time thinking about which variables will be accessed in each process.
Finally, it is clearly slower than the asyncio and threading versions in this example:
$ ./io_mp.py
    [most output skipped]
Downloaded 160 in 5.718175172805786 seconds
That’s not surprising, as I/O-bound problems are not really why multiprocessing exists. You’ll see more as you step into the next section and look at CPU-bound examples.
How to Speed Up a CPU-Bound Program
Let’s shift gears here a little bit. The examples so far have all dealt with an I/O-bound problem. Now, you’ll look into a CPU-bound problem. As you saw, an I/O-bound problem spends most of its time waiting for external operations, like a network call, to complete. A CPU-bound problem, on the other hand, does few I/O operations, and its overall execution time is a factor of how fast it can process the required data.
For the purposes of our example, we’ll use a somewhat silly function to create something that takes a long time to run on the CPU. This function computes the sum of the squares of each number from 0 to the passed-in value:
def cpu_bound(number):
    return sum(i * i for i in range(number))
You’ll be passing in large numbers, so this will take a while. Remember, this is just a placeholder for your code that actually does something useful and requires significant processing time, like computing the roots of equations or sorting a large data structure.
CPU-Bound Synchronous Version
Now let’s look at the non-concurrent version of the example:
import time


def cpu_bound(number):
    return sum(i * i for i in range(number))


def find_sums(numbers):
    for number in numbers:
        cpu_bound(number)


if __name__ == "__main__":
    numbers = [5_000_000 + x for x in range(20)]

    start_time = time.time()
    find_sums(numbers)
    duration = time.time() - start_time
    print(f"Duration {duration} seconds")
This code calls cpu_bound() 20 times with a different large number each time. It does all of this on a single thread in a single process on a single CPU. The execution timing diagram looks like this:
Unlike the I/O-bound examples, the CPU-bound examples are usually fairly consistent in their run times. This one takes about 7.8 seconds on my machine:
$ ./cpu_non_concurrent.py
Duration 7.834432125091553 seconds
Clearly we can do better than this. This is all running on a single CPU with no concurrency. Let’s see what we can do to make it better.
threading and asyncio Versions
How much do you think rewriting this code using threading or asyncio will speed this up?
If you answered “Not at all,” give yourself a cookie. If you answered, “It will slow it down,” give yourself two cookies.
Here’s why: In your I/O-bound example above, much of the overall time was spent waiting for slow operations to finish. threading and asyncio sped this up by allowing you to overlap the times you were waiting instead of doing them sequentially.
On a CPU-bound problem, however, there is no waiting. The CPU is cranking away as fast as it can to finish the problem. In Python, both threads and tasks run on the same CPU in the same process. That means that the one CPU is doing all of the work of the non-concurrent code plus the extra work of setting up threads or tasks. It takes more than 10 seconds:
$ ./cpu_threading.py
Duration 10.407078266143799 seconds
I’ve written up a threading version of this code and placed it with the other example code in the GitHub repo so you can go test this yourself. Let’s not look at that just yet, however.
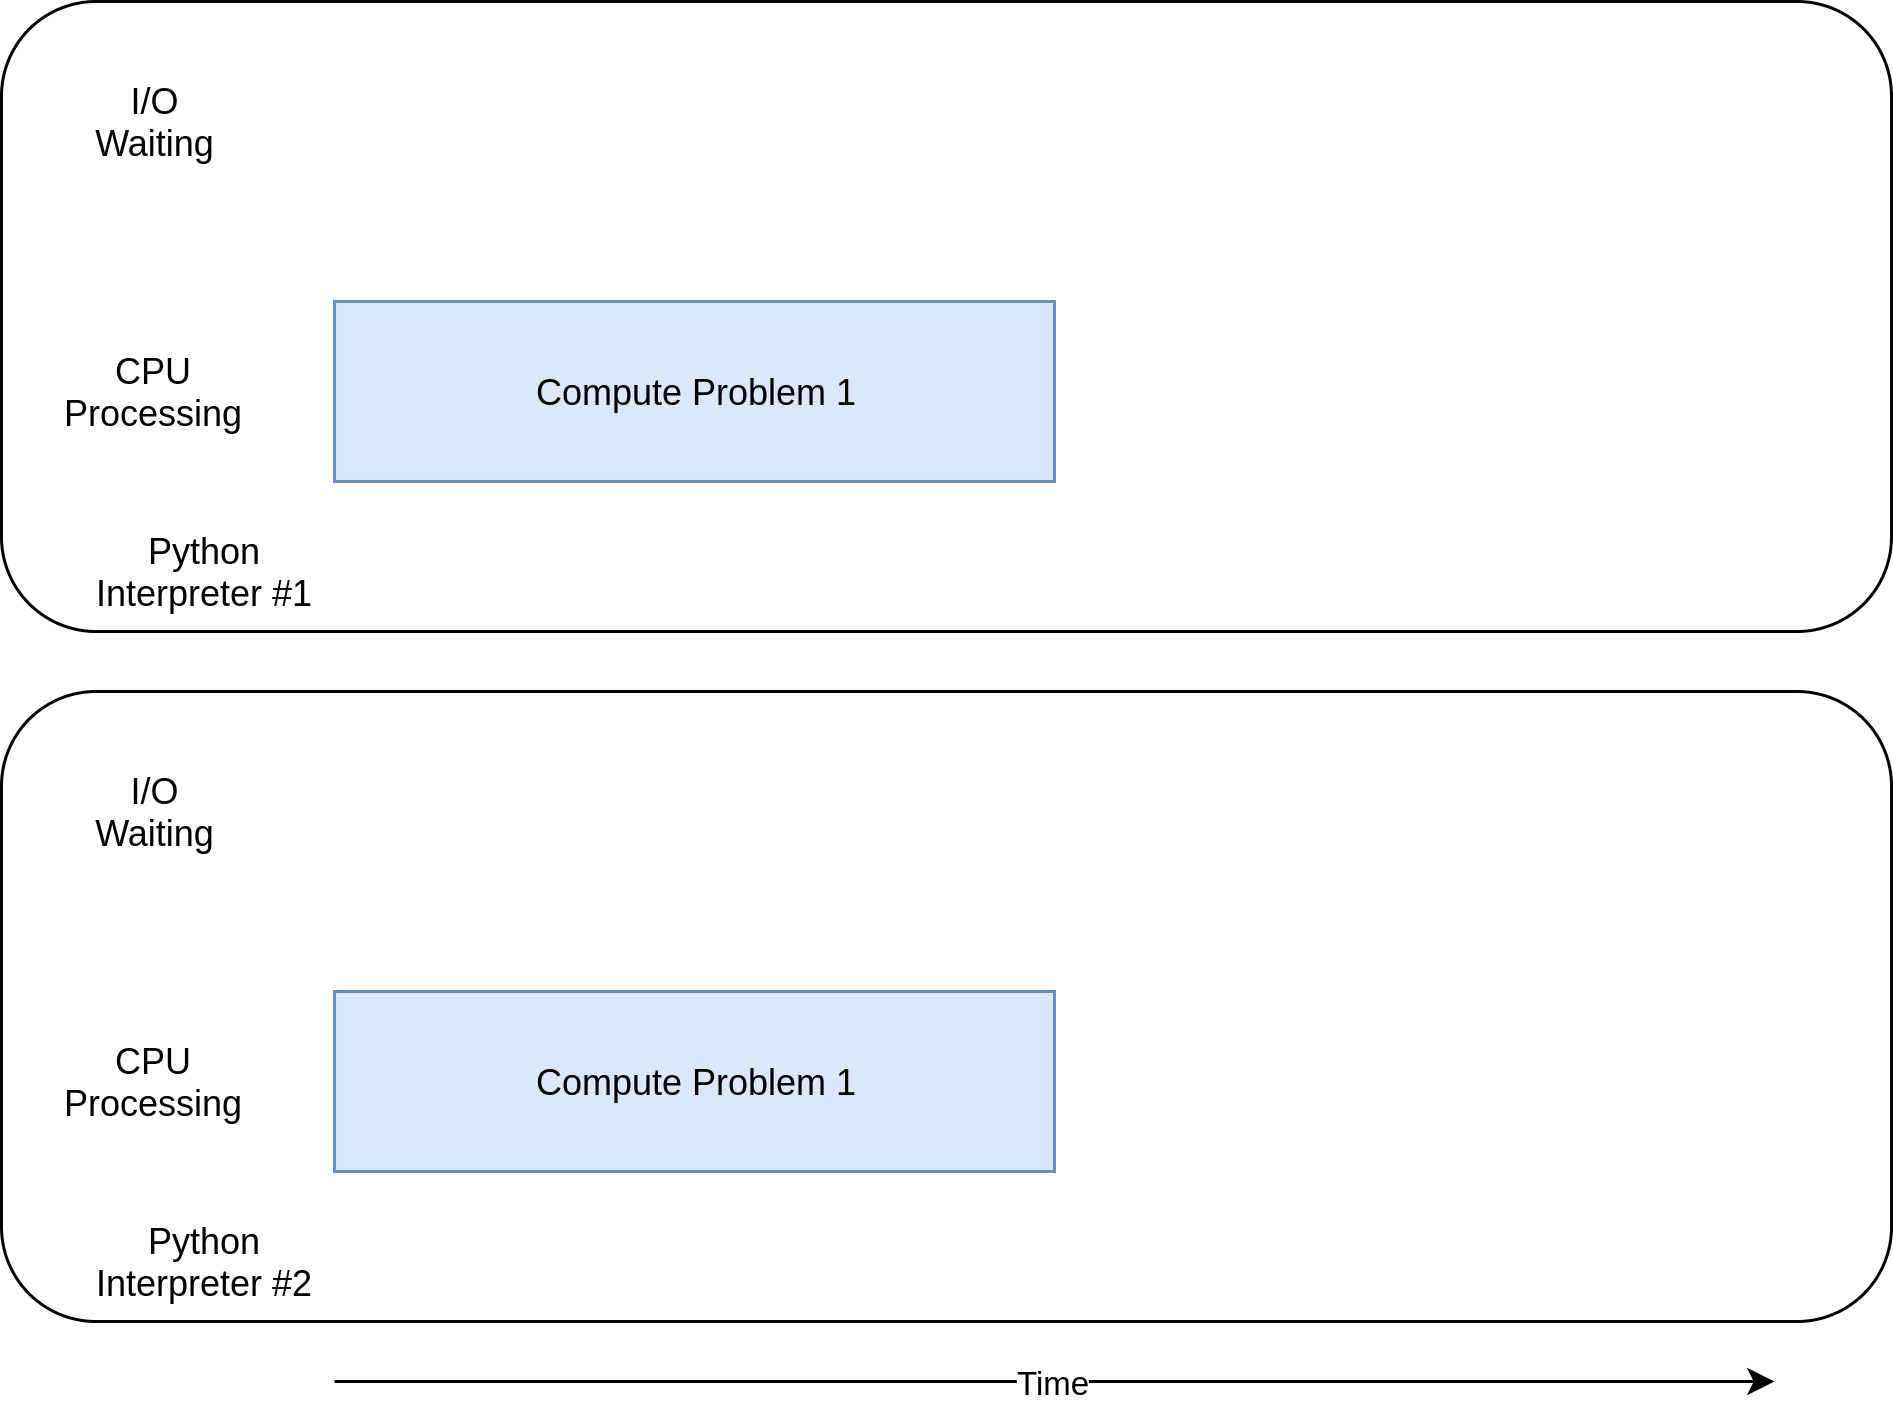
CPU-Bound multiprocessing Version
Now you’ve finally reached where multiprocessing really shines. Unlike the other concurrency libraries, multiprocessing is explicitly designed to share heavy CPU workloads across multiple CPUs. Here’s what its execution timing diagram looks like:
Here’s what the code looks like:
import multiprocessing
import time


def cpu_bound(number):
    return sum(i * i for i in range(number))


def find_sums(numbers):
    with multiprocessing.Pool() as pool:
        pool.map(cpu_bound, numbers)


if __name__ == "__main__":
    numbers = [5_000_000 + x for x in range(20)]

    start_time = time.time()
    find_sums(numbers)
    duration = time.time() - start_time
    print(f"Duration {duration} seconds")
Little of this code had to change from the non-concurrent version. You had to import multiprocessing and then just change from looping through the numbers to creating a multiprocessing.Pool object and using its .map() method to send individual numbers to worker-processes as they become free.
This was just what you did for the I/O-bound multiprocessing code, but here you don’t need to worry about the Session object.
As mentioned above, the processes optional parameter to the multiprocessing.Pool() constructor deserves some attention. You can specify how many Process objects you want created and managed in the Pool. By default, it will determine how many CPUs are in your machine and create a process for each one. While this works great for our simple example, you might want to have a little more control in a production environment.
Also, as we mentioned in the first section about threading, the multiprocessing.Pool code is built upon building blocks like Queue and Semaphore that will be familiar to those of you who have done multithreaded and multiprocessing code in other languages.
Why the multiprocessing Version Rocks
The multiprocessing version of this example is great because it’s relatively easy to set up and requires little extra code. It also takes full advantage of the CPU power in your computer.
Hey, that’s exactly what I said the last time we looked at multiprocessing. The big difference is that this time it is clearly the best option. It takes 2.5 seconds on my machine:
$ ./cpu_mp.py
Duration 2.5175397396087646 seconds
That’s much better than we saw with the other options.
The Problems With the multiprocessing Version
There are some drawbacks to using multiprocessing. They don’t really show up in this simple example, but splitting your problem up so each processor can work independently can sometimes be difficult.
Also, many solutions require more communication between the processes. This can add some complexity to your solution that a non-concurrent program would not need to deal with.
When to Use Concurrency
You’ve covered a lot of ground here, so let’s review some of the key ideas and then discuss some decision points that will help you determine which, if any, concurrency module you want to use in your project.
The first step of this process is deciding if you should use a concurrency module. While the examples here make each of the libraries look pretty simple, concurrency always comes with extra complexity and can often result in bugs that are difficult to find.
Hold out on adding concurrency until you have a known performance issue and then determine which type of concurrency you need. As Donald Knuth has said, “Premature optimization is the root of all evil (or at least most of it) in programming.”
Once you’ve decided that you should optimize your program, figuring out if your program is CPU-bound or I/O-bound is a great next step. Remember that I/O-bound programs are those that spend most of their time waiting for something to happen while CPU-bound programs spend their time processing data or crunching numbers as fast as they can.
As you saw, CPU-bound problems only really gain from using multiprocessing. threading and asyncio did not help this type of problem at all.
For I/O-bound problems, there’s a general rule of thumb in the Python community: “Use asyncio when you can, threading when you must.” asyncio can provide the best speed up for this type of program, but sometimes you will require critical libraries that have not been ported to take advantage of asyncio. Remember that any task that doesn’t give up control to the event loop will block all of the other tasks.
Conclusion
You’ve now seen the basic types of concurrency available in Python:
threadingasynciomultiprocessing
You’ve got the understanding to decide which concurrency method you should use for a given problem, or if you should use any at all! In addition, you’ve achieved a better understanding of some of the problems that can arise when you’re using concurrency.
I hope you’ve learned a lot from this article and that you find a great use for concurrency in your own projects! Be sure to take our “Python Concurrency” quiz linked below to check your learning:
Take the Quiz: Test your knowledge with our interactive “Python Concurrency” quiz. Upon completion you will receive a score so you can track your learning progress over time:
Interactive Quiz
Python Concurrency
This is a quiz that will review topics covered in our Speed Up Your Python Program With Concurrency tutorial.
Watch Now This tutorial has a related video course created by the Real Python team. Watch it together with the written tutorial to deepen your understanding: Speed Up Python With Concurrency


