
Watch Now This tutorial has a related video course created by the Real Python team. Watch it together with the written tutorial to deepen your understanding: Python REST APIs With FastAPI
Creating APIs, or application programming interfaces, is an important part of making your software accessible to a broad range of users. In this tutorial, you will learn the main concepts of FastAPI and how to use it to quickly create web APIs that implement best practices by default.
By the end of it, you will be able to start creating production-ready web APIs, and you will have the understanding needed to go deeper and learn more for your specific use cases.
In this tutorial, you’ll learn how to:
- Use path parameters to get a unique URL path per item
- Receive JSON data in your requests using pydantic
- Use API best practices, including validation, serialization, and documentation
- Continue learning about FastAPI for your use cases
This tutorial is written by the author of FastAPI. It contains a careful selection of fragments from the official documentation, avoiding getting lost in technical details while helping you get up to speed as fast as possible.
To get the most out of this tutorial, it would be helpful for you to know the basics of what HTTP is and how it works, what JSON is, and Python type hints. You will also benefit from using a virtual environment, as is the case for any Python project.
Free Bonus: 5 Thoughts On Python Mastery, a free course for Python developers that shows you the roadmap and the mindset you’ll need to take your Python skills to the next level.
What Is FastAPI?
FastAPI is a modern, high-performance web framework for building APIs with Python based on standard type hints. It has the following key features:
- Fast to run: It offers very high performance, on par with NodeJS and Go, thanks to Starlette and pydantic.
- Fast to code: It allows for significant increases in development speed.
- Reduced number of bugs: It reduces the possibility for human-induced errors.
- Intuitive: It offers great editor support, with completion everywhere and less time debugging.
- Straightforward: It’s designed to be uncomplicated to use and learn, so you can spend less time reading documentation.
- Short: It minimizes code duplication.
- Robust: It provides production-ready code with automatic interactive documentation.
- Standards-based: It’s based on the open standards for APIs, OpenAPI and JSON Schema.
The framework is designed to optimize your developer experience so that you can write simple code to build production-ready APIs with best practices by default.
Install FastAPI
As with any other Python project, it would be best to start by creating a virtual environment. If you are not familiar with how to do that, then you can check out the Primer on Virtual Environments.
The first step is to install FastAPI and Uvicorn using pip:
$ python -m pip install fastapi uvicorn[standard]
With that, you have FastAPI and Uvicorn installed and are ready to learn how to use them. FastAPI is the framework you’ll use to build your API, and Uvicorn is the server that will use the API you build to serve requests.
First Steps
To get started, in this section, you will create a minimal FastAPI app, run it with a server using Uvicorn, and then learn all the interacting parts. This will give you a very quick overview of how everything works.
Create a First API
A basic FastAPI file looks like this:
# main.py

from fastapi import FastAPI

app = FastAPI()

@app.get("/")
async def root():
    return {"message": "Hello World"}
Copy the code above to a file named main.py, and just like that, you have a fully functional API application with some best practices like automatic documentation and serialization built in. You will learn more about those features next.
This code defines your application, but it won’t run on itself if you call it with python directly. To run it, you need a server program. In the steps above, you already installed Uvicorn. That will be your server.
Run the First API App With Uvicorn
Run the live server using Uvicorn:
$ uvicorn main:app --reload

INFO:     Uvicorn running on http://127.0.0.1:8000 (Press CTRL+C to quit)
INFO:     Started reloader process [28720]
INFO:     Started server process [28722]
INFO:     Waiting for application startup.
INFO:     Application startup complete.
The highlighted line in the output shows the URL where your app is being served in your local machine. Since you used --reload for development, when you update your application code, the server will reload automatically.
Check the Response
Open your browser to http://127.0.0.1:8000, which will make your browser send a request to your application. It will then send a JSON response with the following:
{"message": "Hello World"}
That JSON message is the same dictionary that you returned from the function in your application. FastAPI takes care of serializing the Python dict into a JSON object and setting the appropriate Content-Type.
Check the Interactive API Documentation
Now open http://127.0.0.1:8000/docs in your browser.
You will see the automatic interactive API documentation provided by Swagger UI:

The browser-based user interface documenting your API is provided and integrated by default. You don’t have to do anything else to take advantage of it with FastAPI.
Check the Alternative Interactive API Documentation
Now, go to http://127.0.0.1:8000/redoc in your browser.
You’ll see the alternative automatic documentation provided by ReDoc:

As FastAPI is based on standards like OpenAPI, there are many alternative ways to show the API documentation. FastAPI provides these two alternatives by default.
The First API, Step by Step
Now let’s analyze that code step by step and understand what each part does.
Step 1 is to import FastAPI:
# main.py

from fastapi import FastAPI

app = FastAPI()

@app.get("/")
async def root():
    return {"message": "Hello World"}
FastAPI is a Python class that provides all the functionality for your API.
Step 2 is to create a FastAPI instance:
# main.py

from fastapi import FastAPI

app = FastAPI()

@app.get("/")
async def root():
    return {"message": "Hello World"}
Here the app variable will be an instance of the class FastAPI. This will be the main point of interaction to create your API.
This app is the same one you referred to above in the command to run the live server with uvicorn :
$ uvicorn main:app --reload

INFO:     Uvicorn running on http://127.0.0.1:8000 (Press CTRL+C to quit)
Before continuing with step 3, it’s worth taking a moment to get familiar with a couple of terms. Path refers to the last part of the URL starting from the first forward slash character (/). So, in a URL like https://example.com/items/foo, the path would be /items/foo.
A path is also commonly called an endpoint or a route, but the term path will be used in this tutorial. When you’re building an API, the path is the main way you can separate resources.
Another important term to know is operation, which is used in reference to any of the HTTP request methods:
POSTGETPUTDELETEOPTIONSHEADPATCHTRACE
With HTTP, you can communicate with each path using one (or more) of these operations. Knowing what those two terms mean, you’re ready to continue with step three.
Step 3 is to define a path operation decorator:
# main.py

from fastapi import FastAPI

app = FastAPI()

@app.get("/")
async def root():
    return {"message": "Hello World"}
The @app.get("/") tells FastAPI that the function right below is in charge of handling requests that go to the path / using a get operation. This is a decorator related to a path operation, or a path operation decorator. If you want to learn a bit more about decorators, then check out the Primer on Python Decorators.
You can also use the other operations mentioned above:
@app.post()@app.put()@app.delete()@app.options()@app.head()@app.patch()@app.trace()
In each case, you would use the appropriate path operation decorator above a function that is in charge of handling those requests.
Tip: You are free to use each operation (HTTP method) as you wish.
FastAPI doesn’t enforce any specific meaning. The information here is presented as a guideline, not a requirement.
For example, when using GraphQL, you normally perform most of the actions using only POST operations.
Step 4 is to define the path operation function, or the function that goes below the path operation decorator:
# main.py

from fastapi import FastAPI

app = FastAPI()

@app.get("/")
async def root():
    return {"message": "Hello World"}
This function will be called by FastAPI whenever it receives a request to the specified URL (/) using a GET operation. In this case, it is an async function.
You could also define it as a normal function instead of using async def:
# main.py

from fastapi import FastAPI

app = FastAPI()

@app.get("/")
def root():
    return {"message": "Hello World"}
If you don’t know the difference between normal functions and async functions and when to use them, check out Concurrency and async/await in the FastAPI documentation.
Step 5 is to return the content:
# main.py

from fastapi import FastAPI

app = FastAPI()

@app.get("/")
async def root():
    return {"message": "Hello World"}
You can return a dictionary, list, or singular values as strings, integers, and so on. You can also return pydantic models, which you’ll learn more about later.
There are many other objects and models that will be automatically converted to JSON, including object-relational mappers (ORMs) and others. Try using your favorite ones—it’s highly probable that they are already supported.
Path Parameters: Get an Item by ID
You can declare path parameters or variables with the same syntax used by Python formatted strings:
# main.py

from fastapi import FastAPI

app = FastAPI()

@app.get("/items/{item_id}")
async def read_item(item_id):
    return {"item_id": item_id}
The value of the path parameter item_id will be passed to your function as the argument item_id.
So, if you run this example and go to http://127.0.0.1:8000/items/foo, you will see this response:
{"item_id":"foo"}
The response contains "foo", which is what was passed in the item_id path parameter and then returned in a dictionary.
Path Parameters With Types
You can declare the type of a path parameter in the function using standard Python type hints:
# main.py

from fastapi import FastAPI

app = FastAPI()

@app.get("/items/{item_id}")
async def read_item(item_id: int):
    return {"item_id": item_id}
In this case, you declare item_id to be an int.
Declaring the type of a path parameter will give you editor support inside of your function, with error checks, completion, and so on.
Data Conversion
If you run the above example and navigate your browser to http://127.0.0.1:8000/items/3, then you will see the following response:
{"item_id":3}
Notice that the value your function received and then returned is 3, which is a Python int, not a string ("3"). So, with that type declaration, FastAPI gives you automatic request parsing.
Data Validation
If you point your browser to http://127.0.0.1:8000/items/foo, then you’ll see a nice HTTP error:
{
    "detail": [
        {
            "loc": [
                "path",
                "item_id"
            ],
            "msg": "value is not a valid integer",
            "type": "type_error.integer"
        }
    ]
}
This is because the path parameter item_id has a value of "foo", which is not an int.
The same error would appear if you provided a float instead of an int, such as if you opened http://127.0.0.1:8000/items/4.2 in your browser. So, with the same Python type hint, FastAPI gives you both data parsing and data validation.
Also notice that the error clearly states the exact point where the validation didn’t pass. This is incredibly helpful while developing and debugging code that interacts with your API.
Documentation
When you open your browser at http://127.0.0.1:8000/docs, you will see an automatic, interactive API documentation:

Again, with that same Python type declaration, FastAPI gives you automatic, interactive documentation integrating Swagger UI. Notice that the path parameter is declared to be an integer.
Because FastAPI is built on top of the OpenAPI standard, it also provides an alternative API documentation using ReDoc, which you can access at http://127.0.0.1:8000/redoc:

There are many other compatible tools, including code-generation tools for many languages.
Data Handling With pydantic
All the data validation is performed under the hood by pydantic, so you get all the benefits from it, and you know you are in good hands.
You can use the same type declarations with str, float, bool and many other complex data types.
Order Matters: Put Fixed Paths First
When creating path operations, you may find situations where you have a fixed path, like /users/me. Let’s say that it’s to get data about the current user. You might also have the path /users/{user_id} to get data about a specific user by some user ID.
Because path operations are evaluated in order, you need to make sure that the path for /users/me is declared before the one for /users/{user_id}:
# main.py

from fastapi import FastAPI

app = FastAPI()

@app.get("/users/me")
async def read_user_me():
    return {"user_id": "the current user"}

@app.get("/users/{user_id}")
async def read_user(user_id: str):
    return {"user_id": user_id}
Otherwise, the path for /users/{user_id} would also match for /users/me, thinking that it’s receiving the parameter user_id with a value of "me".
Request Body: Receiving JSON Data
When you need to send data from a client to your API, you send it as a request body.
A request body is data sent by the client to your API. A response body is the data your API sends to the client. Your API almost always has to send a response body. But clients don’t necessarily need to send request bodies all the time.
Note: To send data, you should use POST (the most common approach), PUT, DELETE, or PATCH. Sending a body with a GET request has undefined behavior in the specifications.
Nevertheless, using a GET request is supported by FastAPI, though only for very complex or extreme use cases. As it is discouraged, the interactive documentation with Swagger UI won’t show the documentation for the body when using GET, and proxies in the middle might not support it.
To declare a request body, you use pydantic models, with all their power and benefits. You’ll learn more about them below.
Use pydantic to Declare JSON Data Models (Data Shapes)
First, you need to import BaseModel from pydantic and then use it to create subclasses defining the schema, or data shapes, you want to receive.
Next, you declare your data model as a class that inherits from BaseModel, using standard Python types for all the attributes:
# main.py

from typing import Optional

from fastapi import FastAPI
from pydantic import BaseModel

class Item(BaseModel):
    name: str
    description: Optional[str] = None
    price: float
    tax: Optional[float] = None

app = FastAPI()

@app.post("/items/")
async def create_item(item: Item):
    return item
When a model attribute has a default value, it is not required. Otherwise, it is required. To make an attribute optional, you can use None.
For example, the model above declares a JSON object (or Python dict) like this:
{
    "name": "Foo",
    "description": "An optional description",
    "price": 45.2,
    "tax": 3.5
}
In this case, since description and tax are optional because they have a default value of None, this JSON object would also be valid:
{
    "name": "Foo",
    "price": 45.2
}
A JSON object that omits the default values is also valid.
Next, add the new pydantic model to your path operation as a parameter. You declare it the same way you declared path parameters:
# main.py

from typing import Optional

from fastapi import FastAPI
from pydantic import BaseModel

class Item(BaseModel):
    name: str
    description: Optional[str] = None
    price: float
    tax: Optional[float] = None

app = FastAPI()

@app.post("/items/")
async def create_item(item: Item):
    return item
The parameter item has a type hint of Item, which means that item is declared as an instance of the class Item.
With that Python type declaration, FastAPI will:
- Read the body of the request as JSON
- Convert the corresponding types if needed
- Validate the data and return a clear error if it is invalid
- Give you the received data in the parameter
item—since you declared it to be of typeItem, you will also have all the editor support, with completion and type checks for all the attributes and their types - Generate JSON Schema definitions for your model that you can also use anywhere else that makes sense for your project
By using standard type hints with pydantic, FastAPI helps you build APIs that have all these best practices by default, with little effort.
Automatic Documentation With pydantic
The JSON Schemas of your pydantic models will be part of the OpenAPI generated for your application and will be shown in the interactive API documentation:
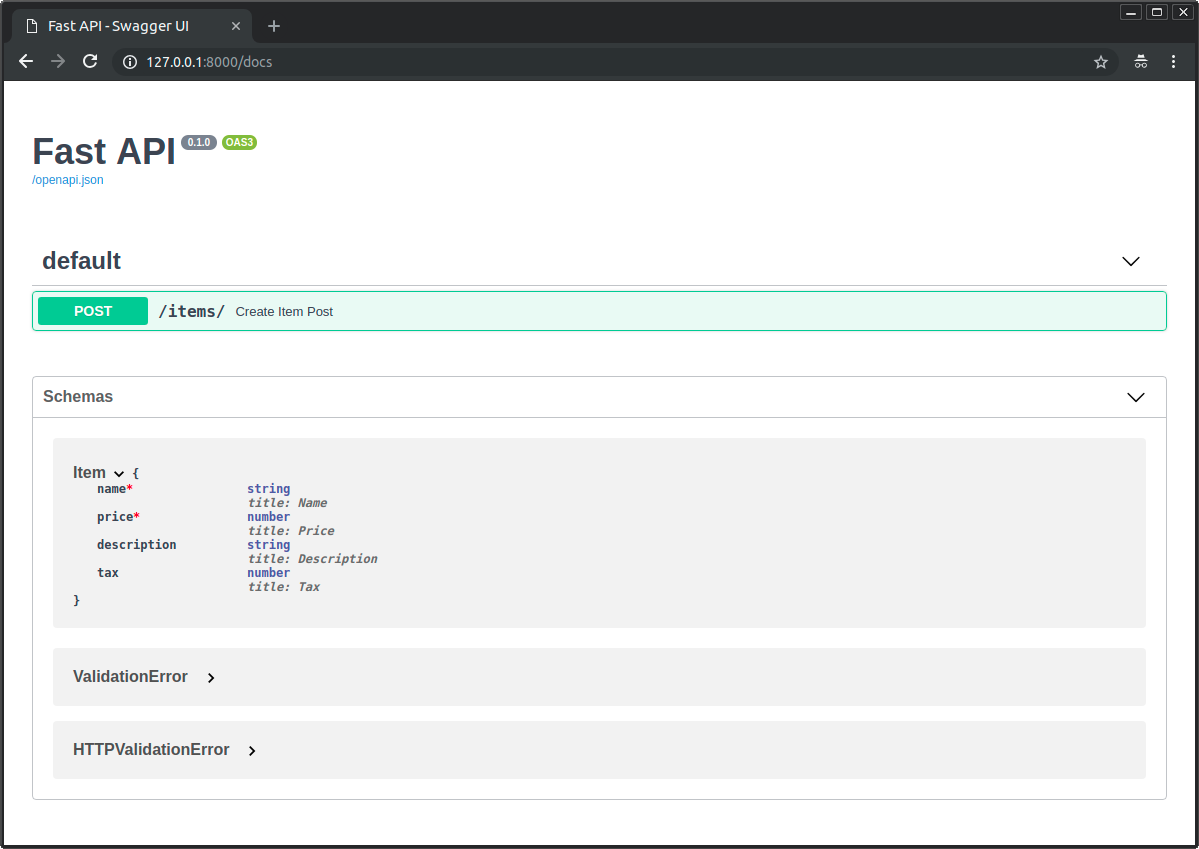
You can see that the attributes of Item in the API documentation are exactly the ones you declared with your pydantic model.
These JSON Schemas will also be used in the API documentation inside each path operation that needs them:

Notice that all this automatic documentation is based on your data, using your pydantic models.
Editor Support, Autocompletion, and Type Checks
In your editor, inside your function, you will get type hints and completion everywhere. This wouldn’t happen if you received a dict instead of a pydantic model:
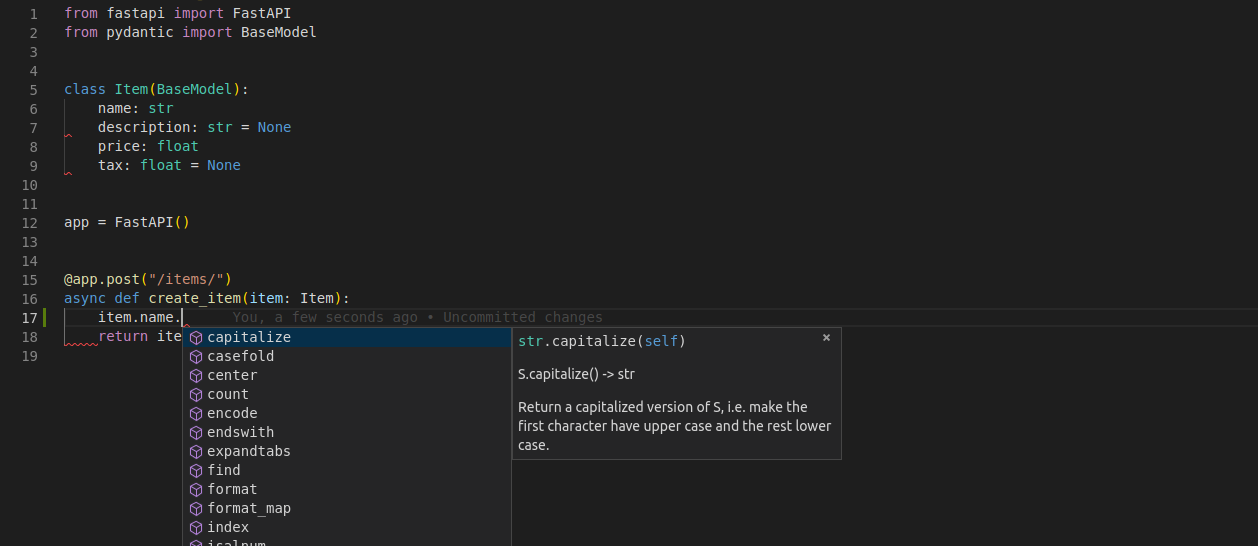
This way you can trigger autocompletion for all your data.
You also get error checks for incorrect type operations:

In this case, you cannot sum a str with a float, and as the editor knows those types, it can warn you that you have an error in your code. This is not by chance: The whole framework was built around that design. It was thoroughly tested at the design phase, before any implementation, to ensure it would work with all the editors. There were even some changes to pydantic itself to support this feature.
The previous screenshots were taken with Visual Studio Code. But you would get the same editor support with PyCharm and most of the other Python editors:

If you use PyCharm as your editor, then you can use the pydantic PyCharm plugin to improve your editor support. And if you use VS Code, then you will get the best developer experience with Pylance.
Use the pydantic Model
Inside the function, you can access all the attributes of the model object directly:
# main.py

from typing import Optional

from fastapi import FastAPI
from pydantic import BaseModel

class Item(BaseModel):
    name: str
    description: Optional[str] = None
    price: float
    tax: Optional[float] = None

app = FastAPI()

@app.post("/items/")
async def create_item(item: Item):
    item_dict = item.dict()
    if item.tax:
        price_with_tax = item.price + item.tax
        item_dict.update({"price_with_tax": price_with_tax})
    return item_dict
The parameter item is declared as an instance of the class Item, and FastAPI will make sure that you receive exactly that in your function instead of a dictionary or something else.
Request Body and Path Parameters
You can declare path parameters and a request body at the same time.
FastAPI will recognize that the function parameters that match path parameters should be taken from the path and that function parameters that are declared to be pydantic models should be taken from the request body:
# main.py

from typing import Optional

from fastapi import FastAPI
from pydantic import BaseModel

class Item(BaseModel):
    name: str
    description: Optional[str] = None
    price: float
    tax: Optional[float] = None

app = FastAPI()

@app.put("/items/{item_id}")
async def create_item(item_id: int, item: Item):
    return {"item_id": item_id, **item.dict()}
This way, you can declare path parameters and JSON request bodies, and FastAPI will take care of doing all the data validation, serialization, and documentation for you. You could verify it by going to the same API documentation at /docs or by using other tools like Postman with a graphical interface or Curl in the command line.
In a similar way, you can declare more complex request bodies, like lists, and other types of request data, like query parameters, cookies, headers, form inputs, files, and so on.
Learn More About FastAPI
By this point, you already know a lot about FastAPI and how to use it to create robust and production-ready APIs.
But there’s a lot more that you could learn:
- Query parameters to customize a request
- Dependency injection to handle reusable logic for permissions, database sessions, and others
- Security utilities to integrate authentication and authorization based on standards
- Background tasks for simple operations like sending an email notification
asyncandawaitto support concurrency and improve performance- WebSockets for advanced use cases that require real-time communication
- Bigger applications in multiple files
FastAPI can cover most of the use cases required for back-end frameworks, even the ones that are not strictly APIs. You can dive deeper into the documentation to solve your specific use case.
FastAPI is based on modern Python features, and you can take full advantage of FastAPI by learning more about those features, too. Check out Getting Started With Async Features in Python and Async IO in Python: A Complete Walkthrough to learn more about asyncronous programming. You can also check out Python Type Checking (Guide) to get all the traditional benefits from type hints in your code.
Conclusion
In this tutorial, you learned about FastAPI and how to use it to create production-ready APIs that have best practices by default while providing the best developer experience possible. You learned how to:
- Use path parameters to get a unique URL path per item
- Receive JSON data in your requests using pydantic
- Use API best practices like validation, serialization, and documentation
- Continue learning about FastAPI and pydantic for different use cases
You’re now ready to start creating your own highly performant APIs for your projects. If you want to dive deeper into the world of FastAPI, then you can follow the official User Guide in the FastAPI documentation.
Watch Now This tutorial has a related video course created by the Real Python team. Watch it together with the written tutorial to deepen your understanding: Python REST APIs With FastAPI


