For many video game players, the lure of writing games is a prime reason to learn computer programming. However, building a 2D platform game such as Lode Runner, Pitfall!, or Super Mario Bros. without proper tools or guidance can leave you frustrated. Fortunately, the Python arcade library makes creating a 2D game in Python accessible for many programmers!
If you haven’t already heard about it, the arcade library is a modern Python framework for crafting games with compelling graphics and sound. Object oriented and built for Python 3.6 and above, arcade provides you with a modern set of tools for crafting great game experiences, including platform games.
By the end of this tutorial, you’ll be able to:
- Install the Python
arcadelibrary - Create a basic 2D game structure
- Find usable game artwork and other assets
- Build platform maps using the Tiled map editor
- Define player actions, game rewards, and obstacles
- Control your player with keyboard and joystick input
- Play sound effects for game actions
- Scroll the game screen with viewports to keep your player in view
- Add title, instruction, and pause screens
- Move nonplayer game elements on the screen
This tutorial assumes you have a basic understanding of writing Python programs. You should also be comfortable using the arcade library and familiar with object-oriented Python, which is used extensively in arcade.
You can download all the code, images, and sounds for this tutorial by clicking the link below:
Get the Source Code: Click here to get the source code you’ll use to build a platform game with Python Arcade in this tutorial.
Installing Python arcade
You can install arcade and its dependencies using pip:
$ python -m pip install arcade
Complete installation instructions are available for Windows, Mac, and Linux. You can even install arcade directly from source if you’d prefer.
This tutorial uses Python 3.9 and arcade 2.5.5 throughout.
Designing the Game
Before you begin writing any code, it’s beneficial to have a plan in place. Since your goal is to write a 2D platform game, it would be a good idea to define exactly what makes a game a platformer.
What Is a Platform Game?
There are a few characteristics that separate platform games from other types of games:
- The player jumps and climbs between various platforms on the game field.
- The platforms often feature uneven terrain and uneven height placements.
- Obstacles are placed in the player’s path and must be overcome to reach a goal.
These are just the minimum requirements for a platform game, and you’re free to add other features as you see fit, including:
- Multiple levels of increasing difficulty
- Rewards available throughout the game
- Multiple player lives
- Ability to destroy game obstacles
The game plan developed in this tutorial includes increasing difficulty and rewards.
Game Story
All good games have some backstory to them, even if it’s a simple one:
- The miner in Lode Runner has to collect all the gold.
- Pitfall Harry has to collect thirty-two different treasures in a set amount of time.
- Mario is tasked with rescuing Princess Toadstool.
Your game benefits from a story that connects the actions taken by the player to some overarching goal.
For this tutorial, the game story concerns a space traveler named Roz, who has crash-landed on an alien world. Before their craft crashed, Roz was thrown clear and now needs to find their space ship, fix it, and return home.
To do this, Roz must travel from their current location to the exit of each level, which brings them closer to the ship. Along the way, Roz can collect coins, which are used to fix the damaged craft. Since Roz was ejected from the ship, they don’t have any weapons and so must avoid any dangerous obstacles in the way.
While this story may seem silly, it serves the important purpose of informing the design of your levels and characters. This helps you make decisions as you implement features:
- Since Roz has no weapons, there is no way to shoot enemies that may appear.
- Roz crashed on an alien world, so enemies can be anywhere and anything.
- Because the planet is alien, gravity can be different, which may affect Roz’s jump and movement abilities.
- Roz needs to fix their damaged spaceship, which requires collecting items to do so. Right now, coins are available, but other items may be available later.
When designing a game, you can make the story as simple or involved as you like.
Game Mechanics
With a rough design in mind, you can also begin planning how you will control gameplay. Moving Roz around the game field requires a way to control several different movements:
- Left and Right to move on a platform
- Up and Down to climb ladders between platforms
- Jump to collect coins, avoid enemies, or move between platforms
Traditionally, players are controlled using the four arrow keys for directional movement, along with Space for jumping. You can also use keys such as IJKL, IJKM, or WASD if you’d like.
You aren’t limited to just keyboard input, either. The arcade library includes support for joysticks and game controllers, which you’ll explore later. Once a joystick is connected to your computer, you can move Roz by checking the position of the X- and Y-axis of the stick and jump by checking for specific button presses.
Game Assets
Now that you have an idea of how the game should work, you need to make some decisions about how the game will look and sound. The images, sprites, sounds, and even text used to display the score are collectively known as assets. They define your game in the eyes of your players. Creating them can be a challenge, taking as much time, if not more, than writing the actual game code.
Rather than create your own assets, you can download free or low-cost assets to use in your game. Many artists and designers provide sprites, backgrounds, fonts, sounds, and other content for game makers to use. Here are some sources for music, sound, and art that you can search for useful content:
| Source | Sprites | Artwork | Music | Sound Effects |
|---|---|---|---|---|
| OpenGameArt.org | X | X | X | X |
| Kenney.nl | X | X | X | X |
| Game Art 2D | X | X | ||
| ccMixter | X | X | ||
| Freesound | X | X |
For the game outlined in this tutorial, you’ll use freely available map tile images and sprites created by Kenney.nl. Sound effects provided in the downloadable source code were created by the author using MuseScore and Audacity.
Note: If you decide to use game assets that are owned or created by someone else, be sure to read, understand, and comply with any licensing requirements the owner has specified. The license may require the payment of fees or adding proper attribution, and it may impose licensing restrictions on your game. If you have any questions, consult a legal professional.
The final step before you can begin writing code is deciding how you will structure and store everything.
Defining the Program Structure
Because video games consist of graphic and sound assets as well as code, it’s important to organize your project. Keeping game assets and code properly organized will allow you to make targeted changes to the design or behavior of your game while minimizing the impact to other game aspects.
The project uses the following structure:
arcade_platformer/
|
├── arcade_platformer/
|
├── assets/
|   |
│   ├── images/
|   |   |
│   │   ├── enemies/
|   |   |
│   │   ├── ground/
|   |   |
│   │   ├── HUD/
|   |   |
│   │   ├── items/
|   |   |
│   │   ├── player/
|   |   |
│   │   └── tiles/
|   |
│   └── sounds/
|
└── tests/
Under the root folder of the project are the following subfolders:
arcade_platformerholds all the Python code for the game.assetsconsists of all your game images, fonts, sounds, and tile maps.testscontains any tests you may choose to write.
While there are some other gameplay decisions to be made, this is enough to begin writing code. You’ll get started by defining the basic arcade code structure in which you can build your platform game!
Defining the Game Structure in Python arcade
Your game uses the full object-oriented capabilities of arcade. To do so, you define a new class based on arcade.Window, then override methods in that class to update and render your game graphics.
Here’s a basic skeleton of what a finished game might look like. You will build on this skeleton as the game progresses:
 1"""
 2Arcade Platformer
 3
 4Demonstrating the capabilities of arcade in a platformer game
 5Supporting the Arcade Platformer article
 6at https://realpython.com/platformer-python-arcade/
 7
 8All game artwork from www.kenney.nl
 9Game sounds and tile maps by author
10"""
11
12import arcade
13
14class Platformer(arcade.Window):
15    def __init__(self):
16        pass
17
18    def setup(self):
19        """Sets up the game for the current level"""
20        pass
21
22    def on_key_press(self, key: int, modifiers: int):
23        """Processes key presses
24
25        Arguments:
26            key {int} -- Which key was pressed
27            modifiers {int} -- Which modifiers were down at the time
28        """
29
30    def on_key_release(self, key: int, modifiers: int):
31        """Processes key releases
32
33        Arguments:
34            key {int} -- Which key was released
35            modifiers {int} -- Which modifiers were down at the time
36        """
37
38    def on_update(self, delta_time: float):
39        """Updates the position of all game objects
40
41        Arguments:
42            delta_time {float} -- How much time since the last call
43        """
44        pass
45
46    def on_draw(self):
47        pass
48
49if __name__ == "__main__":
50    window = Platformer()
51    window.setup()
52    arcade.run()
This basic structure provides almost everything you need to construct a 2D platformer game:
-
Line 12 imports the
arcadelibrary. -
Line 14 defines the class used to run the entire game. Methods of this class are called to update game state, process user input, and draw items on the screen.
-
Line 15 defines
.__init__(), which initializes the game object. You add code here to handle actions that should only be taken when the game first starts. -
Line 18 defines
.setup(), which sets up the game to begin playing. You add code to this method that may need to be repeated throughout the game. For example, this a great place to initialize new levels on success or reset the current level on failure. -
Lines 22 and 30 define
.on_key_press()and.on_key_release(), which allow you to process keyboard input independently.arcadetreats key presses and key releases separately, which helps avoid problems with keyboard auto-repeat. -
Line 38 defines
.on_update(), where you update the state of your game and all the objects in it. This is where collisions between objects are handled, most sound effects are played, scores are updated, and sprites are animated. This method is where everything in your game actually happens, so there is usually a lot of code here. -
Line 46 defines
.on_draw(), where everything displayed in your game is drawn. In contrast to.on_update(), this method usually contains only a few lines of code. -
Lines 49 to 52 define the main entry point for your game. This is where you:
- Create the game object
windowbased on your class defined on line 13 - Set up the game by calling
window.setup() - Kick off the game loop by calling
arcade.run()
- Create the game object
This basic structure works well for most Python arcade games.
Note: In the downloadable materials, this basic code outline is found under arcade_platformer/01_game_skeleton.py.
As you progress through this tutorial, you’ll flesh out each of these methods and add new ones to implement your game’s functionality.
Adding Initial Game Functionality
The first thing to do when starting the game is to open the game window. By the end of this section, your game will look something like this:
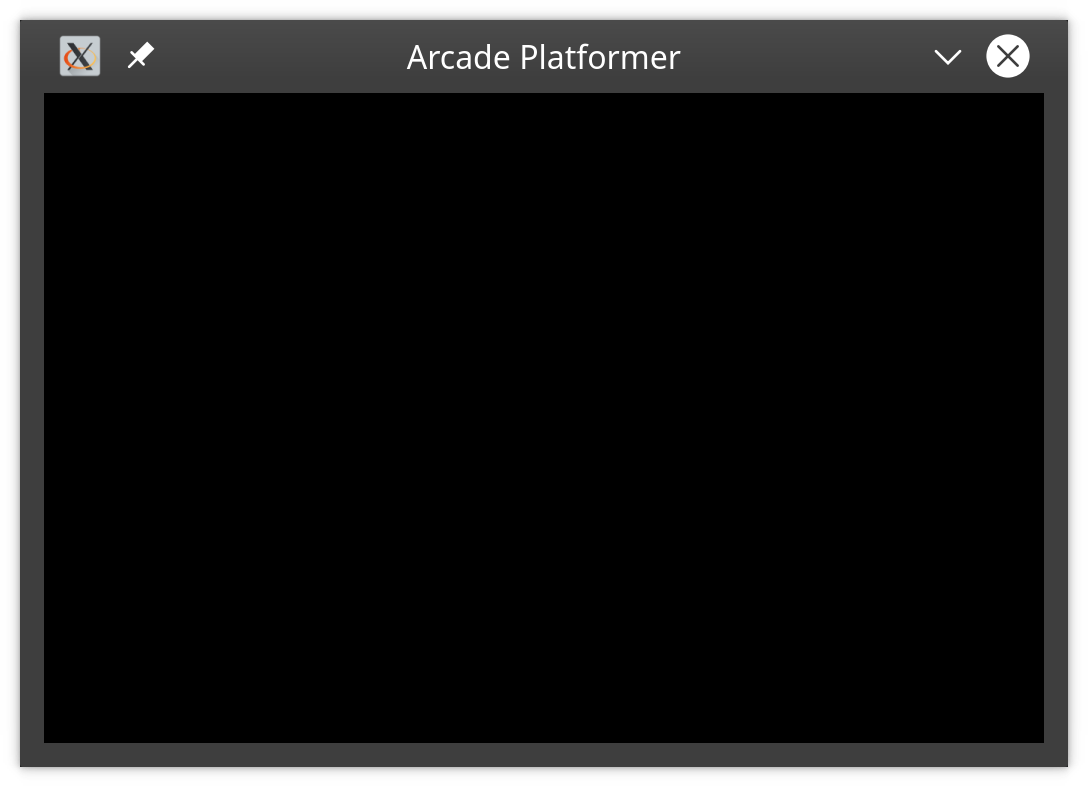
You can see the changes to your game skeleton in arcade_platformer/02_open_game_window.py:
11import arcade
12import pathlib
13
14# Game constants
15# Window dimensions
16SCREEN_WIDTH = 1000
17SCREEN_HEIGHT = 650
18SCREEN_TITLE = "Arcade Platformer"
19
20# Assets path
21ASSETS_PATH = pathlib.Path(__file__).resolve().parent.parent / "assets"
22
23class Platformer(arcade.Window):
24    def __init__(self) -> None:
25        super().__init__(SCREEN_WIDTH, SCREEN_HEIGHT, SCREEN_TITLE)
26
27        # These lists will hold different sets of sprites
28        self.coins = None
29        self.background = None
30        self.walls = None
31        self.ladders = None
32        self.goals = None
33        self.enemies = None
34
35        # One sprite for the player, no more is needed
36        self.player = None
37
38        # We need a physics engine as well
39        self.physics_engine = None
40
41        # Someplace to keep score
42        self.score = 0
43
44        # Which level are we on?
45        self.level = 1
46
47        # Load up our sounds here
48        self.coin_sound = arcade.load_sound(
49            str(ASSETS_PATH / "sounds" / "coin.wav")
50        )
51        self.jump_sound = arcade.load_sound(
52            str(ASSETS_PATH / "sounds" / "jump.wav")
53        )
54        self.victory_sound = arcade.load_sound(
55            str(ASSETS_PATH / "sounds" / "victory.wav")
56        )
Here’s a breakdown:
-
Lines 11 and 12 import the
arcadeandpathliblibraries you need. -
Lines 16 to 18 define several game window constants that are used to open the game window later.
-
Line 21 saves the path to your
assetsfolder, using the path of the current file as a base. Since you will be using these assets throughout the game, knowing where they are is vital. Usingpathlibensures your paths will work correctly on Windows, Mac, or Linux. -
Line 25 sets up your game window by calling the parent class’
.__init__()method usingsuper()and the constants defined above on lines 16 to 18. -
Lines 28 to 33 define six different sprite lists to hold the various sprites used in the game. It’s not strictly necessary to declare and define these here, as they will be properly and fully defined later in
.setup(). Declaring object properties is a holdover from languages like C++ or Java. Each level will have a different set of objects, which are populated in.setup():-
coinsare collectible objects Roz can find throughout the game. -
backgroundobjects are presented for visual interest only and don’t interact with anything. -
wallsare objects that Roz can’t move through. These include actual walls and the platforms on which Roz walks and jumps. -
laddersare objects that allow Roz to climb up or down. -
goalsare objects Roz must find to move to the next level. -
enemiesare objects Roz must avoid throughout the game. Contact with an enemy will end the game.
-
-
Line 36 declares the player object, which will be properly defined in
.setup(). -
Line 39 declares a physics engine that is used to manage movement and collisions.
-
Line 42 defines a variable to track the current score.
-
Line 45 defines a variable to track the current game level.
-
Lines 48 to 56 use the
ASSETS_PATHconstant defined earlier to locate and load the sound files used for collecting coins, jumping, and finishing each level.
You can add more here if you wish, but remember that .__init__() is only run when the game first starts.
Note: The sounds referenced above are provided in the downloadable materials. You can use them as provided or substitute your own sounds as you wish.
Roz needs to be able to walk, jump, and climb around the game world. Managing when and how that happens is the job of the physics engine.
What Is a Physics Engine?
In most platformers, the user moves the player using a joystick or the keyboard. They might make the player jump or walk the player off a platform. Once the player is in midair, the user doesn’t need to do anything else to make them fall to a lower platform. Controlling where a player can walk and how they fall after they jump or walk off a platform is handled by the physics engine.
In a game, the physics engine provides an approximation of the physical forces that act on players and other game objects. These forces may impart or impact the movement of game objects, including jumping, climbing, falling, and blocking movement.
There are three physics engines included in Python arcade:
-
arcade.PhysicsEngineSimpleis a very basic engine that handles the movement and interactions of a single player sprite and a sprite list of walls. This is useful for top-down games, where gravity is not a factor. -
arcade.PhysicsEnginePlatformeris a more complex engine tailored for use in platform games. In addition to basic movement, it provides a gravity force that pulls objects to the bottom of the screen. It also provides the player a way to jump and climb ladders. -
arcade.PymunkPhysicsEngineis built on top of Pymunk, a 2D physics library that uses the Chipmunk library. Pymunk makes extremely realistic physics calculations available toarcadeapplications.
For this tutorial you will use the arcade.PhysicsEnginePlatformer.
In order to properly set up the arcade.PhysicsEnginePlatformer, you must provide the player sprite as well as two sprite lists containing the walls and ladders with which the player interacts. Since the walls and ladders vary based on the level, you can’t define the physics engine formally until the level is set up, which happens in .setup().
Speaking of levels, how do you define those anyway? As with most things, there’s more than one way to get the job done.
Building Game Levels
Back when video games were still distributed on floppy disks, it was difficult to store all the game level data needed for a game. Many game makers resorted to writing code to create levels. While this method saves disk space, using imperative code to generate game levels limits your ability to modify or augment them later.
As storage space became less expensive, games took advantage by storing more of their assets in data files, which were read and processed by the code. Game levels could now be created and modified without changing the game code, which allowed artists and game designers to contribute without needing to understand the underlying code. This declarative method of level design allows for more flexibility when designing and developing games.
The disadvantage to declarative game level design is the need to not only define the data but store it as well. Fortunately, there’s a tool available that can do both, and it works extremely well with arcade.
Tiled is an open source 2D game level editor that produces files that can be read and used by Python arcade. Tiled allows you to create a collection of images called a tileset, which is used to create a tile map defining each level of your game. You can use Tiled to create tile maps for top-down, isometric, and side-scrolling games, including the levels for your game:
Tiled comes with a great set of docs and a great intro tutorial as well. To get you started and hopefully whet your appetite for more, next you’ll walk through the steps to create your first map level.
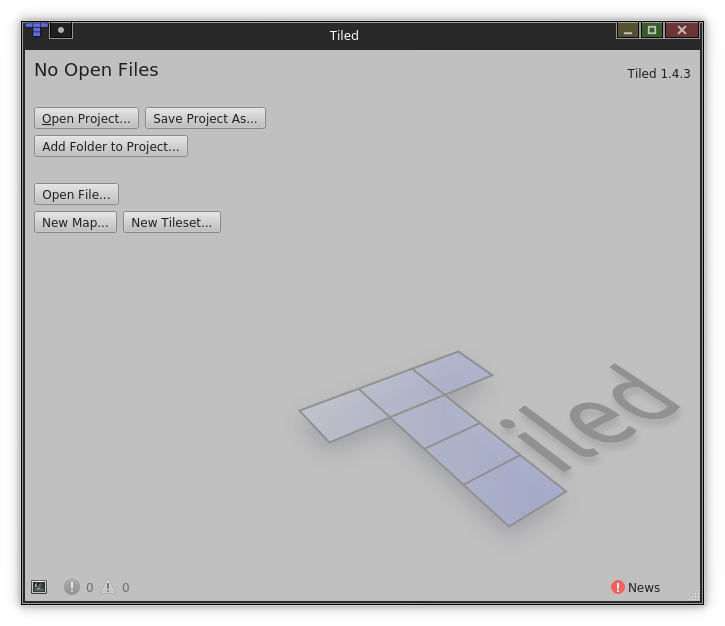
Downloading and Starting Tiled
Before you run Tiled, you need to download it. The current version at the time of writing was Tiled version 1.4.3, which was available for Windows, Mac, and Linux in a variety of formats. When downloading, consider supporting its continued maintenance by making a donation as well.
Once you’ve downloaded Tiled, you can start it for the first time. You’ll see the following window:
Click New Map to create the tile map for your first level. The following dialog will appear:
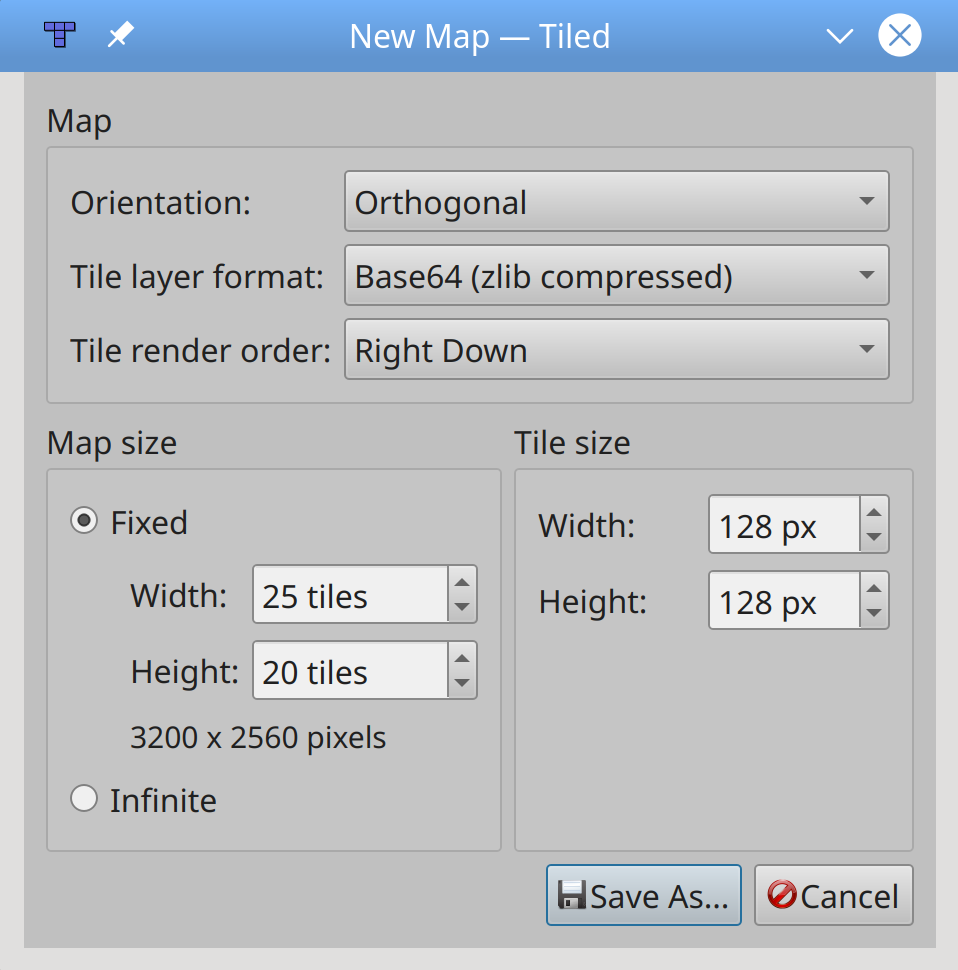
These default tile map properties are great for platform games and represent the best options for an arcade game. Here’s a quick breakdown of other options you can select:
- Orientation specifies how the map is displayed and edited.
- Orthogonal maps are square and are used for top-down and platform games.
arcadeworks best with orthogonal maps. - Isometric maps shift the viewpoint to be a nonsquare angle to the game field, providing a pseudo-3D view of the 2D world. Staggered isometric maps specify that the top edge of the map is the top edge of the view.
- Hexagonal maps use hexagons rather than squares for each map tile (although Tiled displays squares in the editor).
- Orthogonal maps are square and are used for top-down and platform games.
- Tile layer format specifies how the map is stored on disk. Compression using zlib helps conserve disk space.
- Tile render order specifies how tiles are stored in the file and ultimately how they’re rendered by the game engine.
- Map size sets the size of the map to be stored, in tile units. Specifying the map as Infinite tells Tiled to determine the final size based on the edits made.
- Tile size specifies the size of each tile in pixels. If you’re using artwork from an external source, set this to the size of the tiles in that set. The artwork provided for this tutorial uses square sprites that measure 128 × 128 pixels. This means that every tile consists of around 16,000 pixels and that they can be stored on disk and in memory in a way that can increase game performance if necessary.
Click Save As to save the level. Since this is a game asset, save it as arcade_platformer/assets/platform_level_01.tmx.
Tile maps consist of a set of tiles that are placed on specific map layers. To begin defining a tile map for a level, you must first define the tileset to use and the layers on which they appear.
Creating a Tileset
The tiles used to create your level are contained in a tileset. The tileset is associated with the tile map and provides all the sprite images required to define the level.
You define and interact with a tileset using the Tilesets view, located in the lower-right corner of the Tiled window:
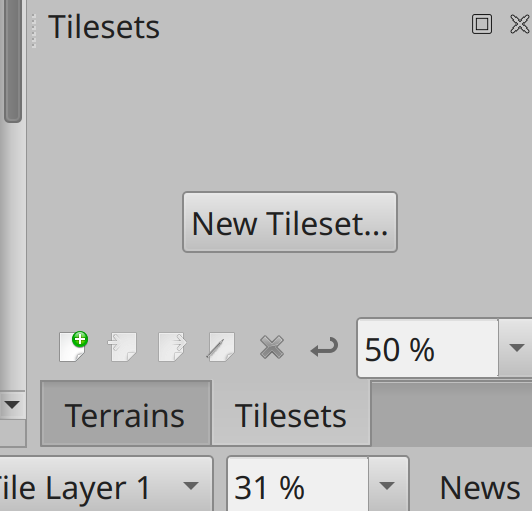
Click the New Tileset button to define the tileset for this level. Tiled presents a dialog asking for some information about the new tileset to create:
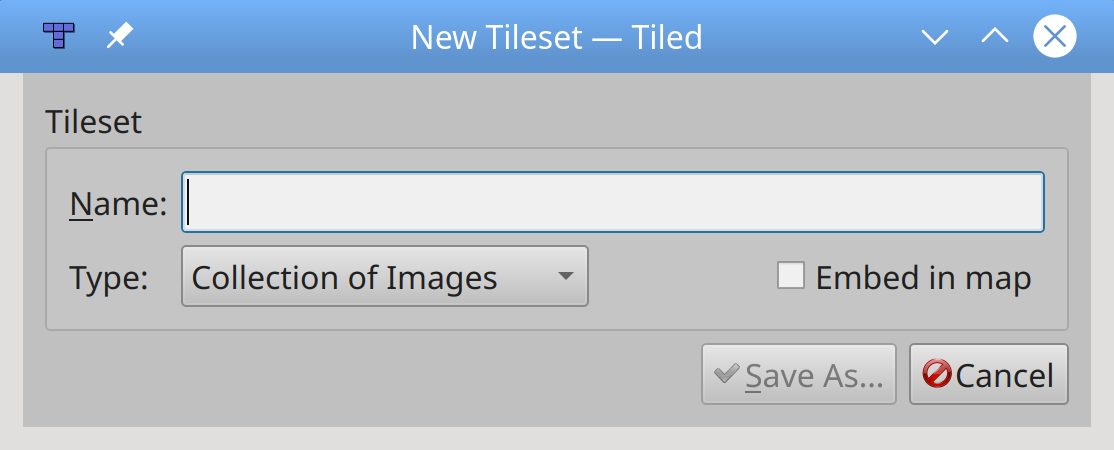
You have the following options for your new tileset:
- Name is the name of your tileset. Call this one
arcade_platformer. - Type specifies how the tileset will be defined:
- Collection of Images indicates that each tile is contained in a single, separate image on disk. You should select this option, as
arcadeworks best with individual tile images. - Based on Tileset Image indicates that all the tiles are combined into one single large image that Tiled needs to process to locate each individual image. Only select this option if the assets you are using require it.
- Collection of Images indicates that each tile is contained in a single, separate image on disk. You should select this option, as
- Embed in Map tells Tiled to store the tileset in the tile map. Keep this unchecked, as you will save and use the tileset as a separate resource in multiple tile maps.
Click Save As and save it as assets/arcade_platformer.tsx. To reuse this tileset on future tile maps, select Map → Add External Tileset to include it.
Defining the Tileset
Your new tileset is initially empty, so you need to populate it with tiles. You do this by locating your tile images and adding them to the set. Each image should be the same dimensions as the Tile size you defined when you created the tile map.
This example assumes you have downloaded the game assets for this tutorial. You can do so by clicking the link below:
Get the Source Code: Click here to get the source code you’ll use to build a platform game with Python Arcade in this tutorial.
Alternatively, you can download the Platformer Pack Redux (360 Assets) and move the contents of the PNG folder to your arcade-platformer/assets/images folder. Recall that your tile map is located under arcade-platformer/assets, as this will be important later.
On the toolbar, click the blue plus sign (+) or select Tileset → Add Tiles to begin the process. You will be presented with the following dialog:
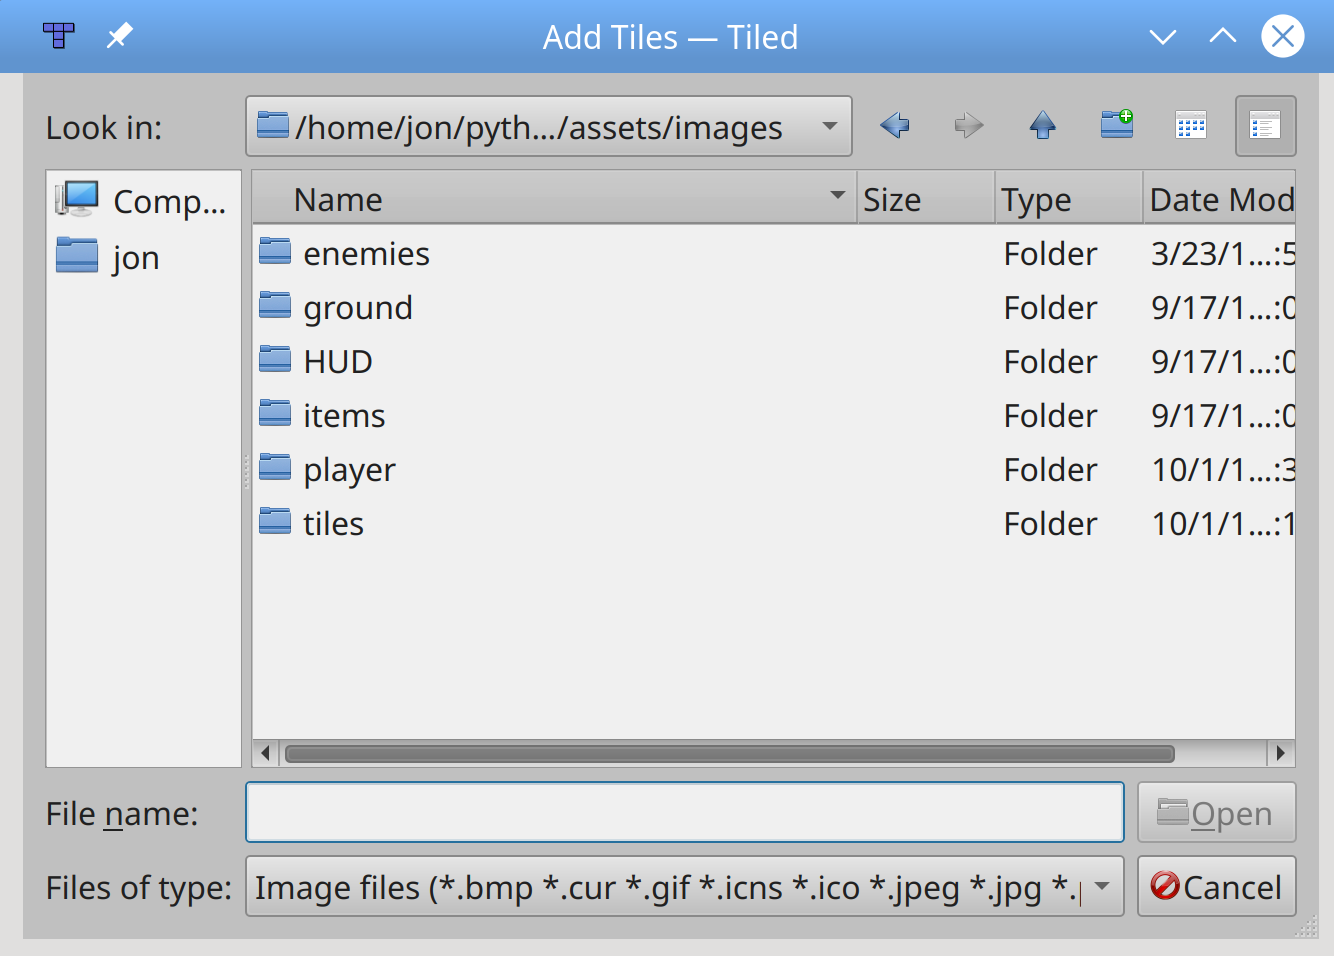
From here, navigate to the folders listed below to add the specified resources to your tileset:
| Folder | File |
|---|---|
arcade-platformer/assets/images/ground/Grass |
All Files |
arcade-platformer/assets/images/HUD |
hudHeart_empty.png |
hudHeart_full.png |
|
hudHeart_half.png |
|
hudX.png |
|
arcade-platformer/assets/images/items |
coinBronze.png |
coinGold.png |
|
coinSilver.png |
|
flagGreen_down.png |
|
flagGreen1.png |
|
flagGreen2.png |
|
arcade-platformer/assets/images/tiles |
doorOpen_mid.png |
doorOpen_top.png |
|
grass.png |
|
ladderMid.png |
|
ladderTop.png |
|
signExit.png |
|
signLeft.png |
|
signRight.png |
|
torch1.png |
|
torch2.png |
|
water.png |
|
waterTop_high.png |
|
waterTop_low.png |
When you’re done adding files, your tileset should look like this:
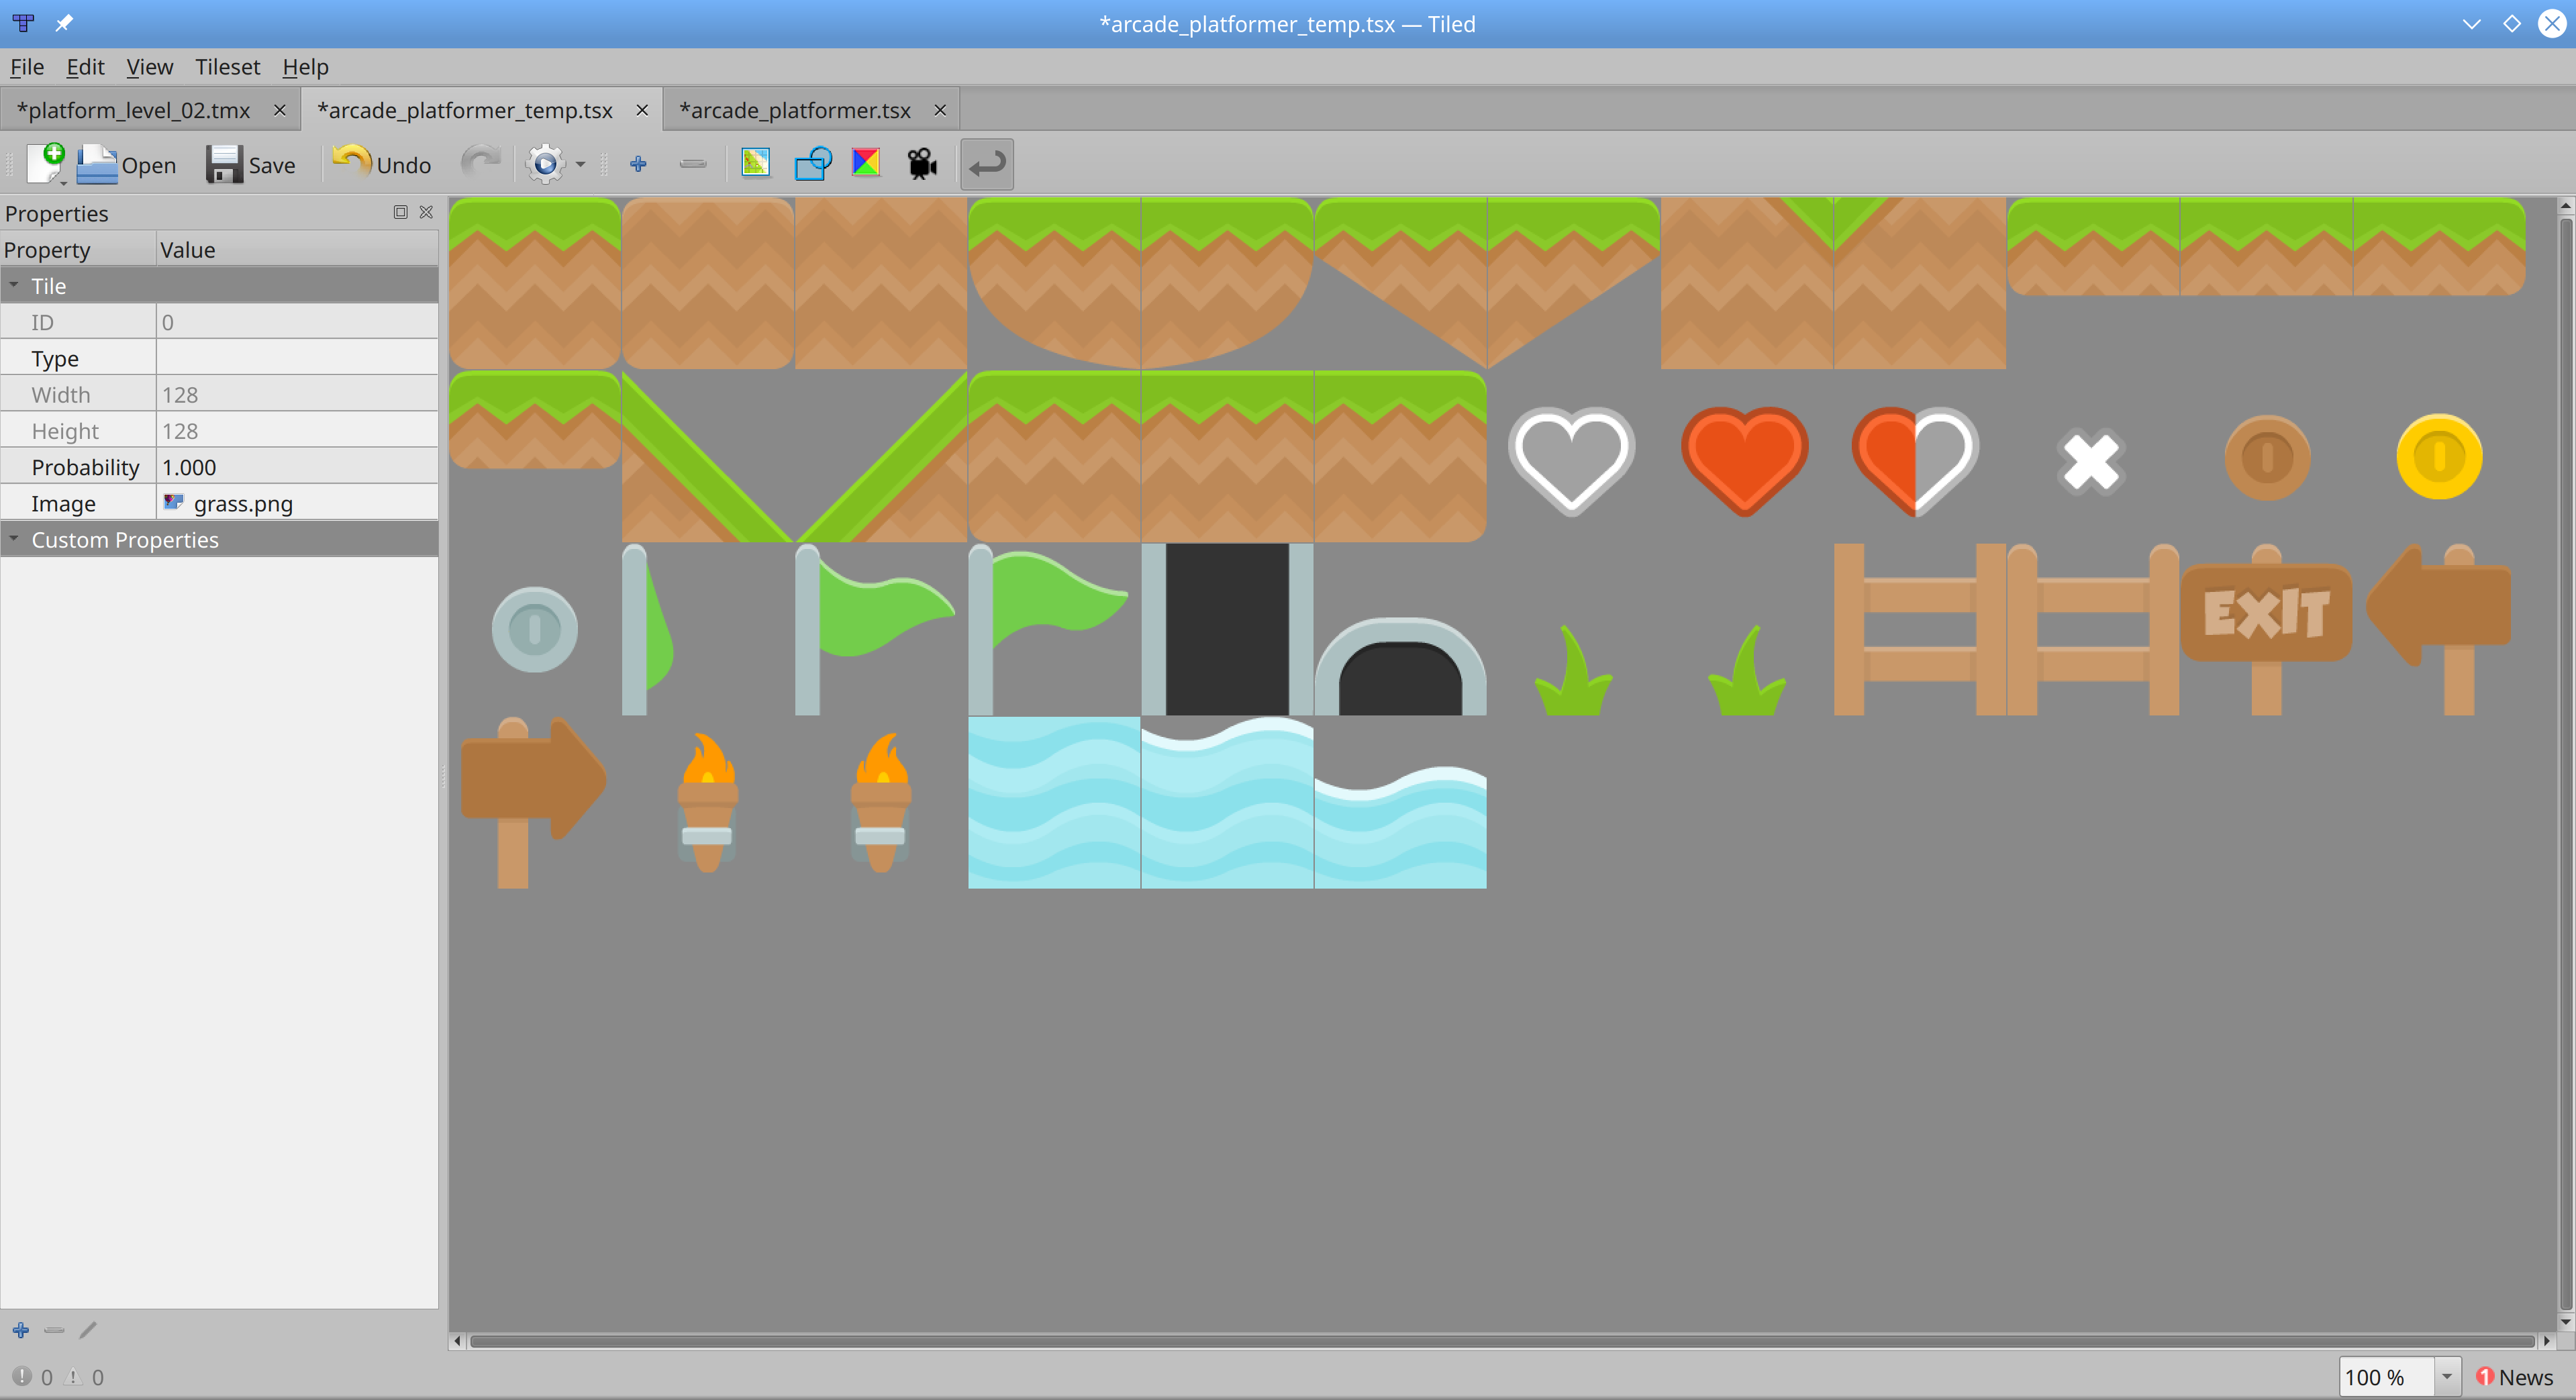
If you don’t see all your tiles, click the Dynamically Wrap Tiles button on the toolbar to show them all.
Save your new tileset using Ctrl+S or File → Save from the menu and return to your tile map. You’ll see the new tileset in the lower right of the Tiled interface, ready for use in defining your tile map!
Defining Map Layers
Every item in a level serves a specific purpose:
- Ground and walls define where and how your player can move.
- Coins and other collectible items score points and unlock achievements.
- Ladders allow the player to climb to new platforms but don’t otherwise block movement.
- Background items provide visual interest and may provide information.
- Enemies provide obstacles for the player to avoid.
- Goals provide a reason to move around the level.
Each of these different item types requires different handling in arcade. Therefore, it makes sense to keep them separate when defining them in Tiled. Tiled allows you to do just that by using map layers. By placing different item types on different map layers and processing each layer separately, you can track and handle each type of sprite differently.
To define a layer, first open the Layers view in the upper-right corner of the Tiled screen:
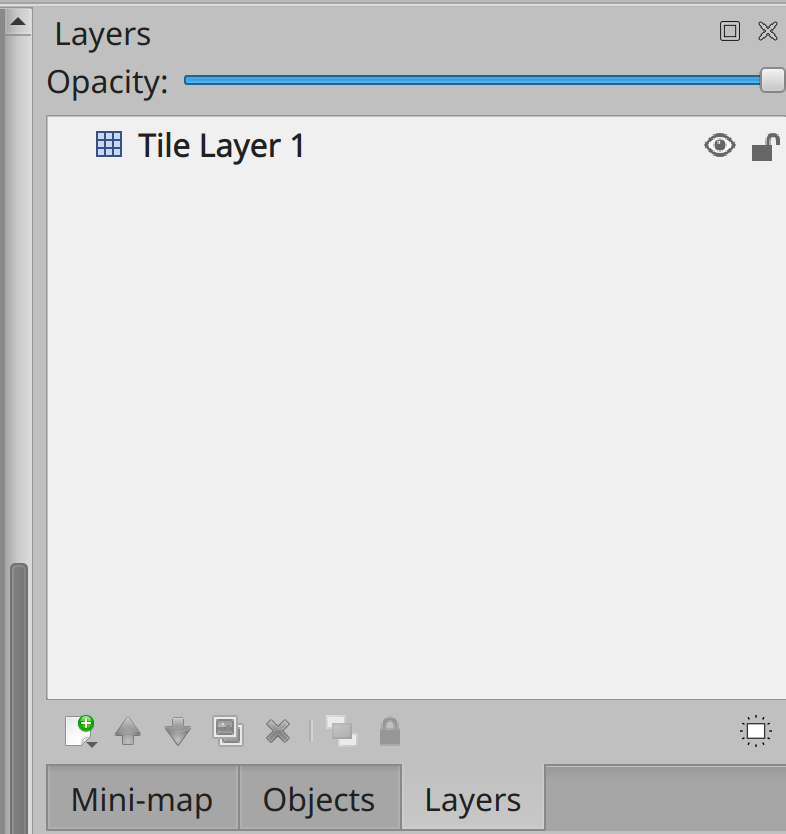
The default layer is already set and selected. Rename this layer as ground by clicking the layer, then changing the Name in the Properties view on the left. Alternatively, you can double-click the name to edit it directly in the Layers panel:

This layer will contain your ground tiles, including walls through which the player can’t walk.
Creating new layers requires you to define not only the layer name but also the layer type. Tiled provides four types of layers:
- Tile layers allow you to place tiles from your tileset onto the map. Placement is restricted to grid locations, and tiles must be placed as defined.
- Object layers allow you to place objects such as collectibles or triggers on the map. Objects may be tiles from the tile map or freely drawn shapes, and they may be visible or not. Each object can be freely positioned, scaled, and rotated.
- Image layers allow you to place images onto the map for use as background or foreground imagery.
- Group layers allow you to gather layers into groups for easier map management.
For this tutorial, you’ll use an object layer to place coins on the map and tile layers for everything else.
To create the new tile layers, click New Layer in the Layers view, then select Tile Layer:
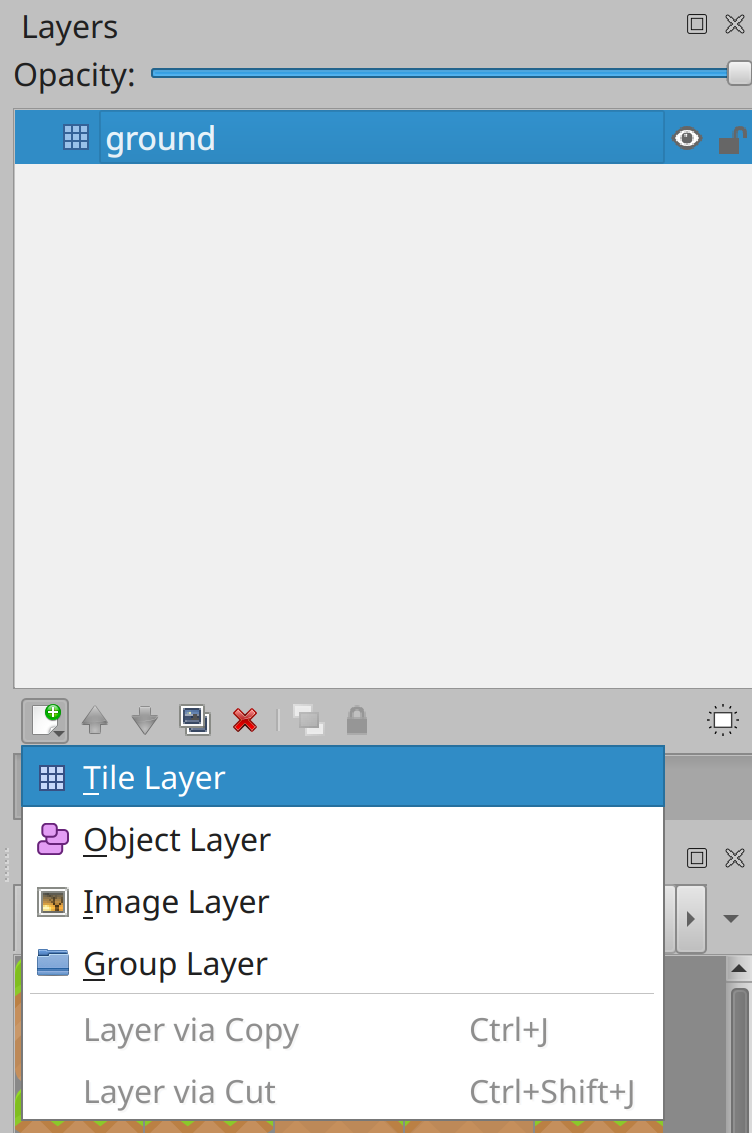
Create three new tile layers named ladders, background, and goal.
Next, create a new object layer called coins to hold your collectibles:
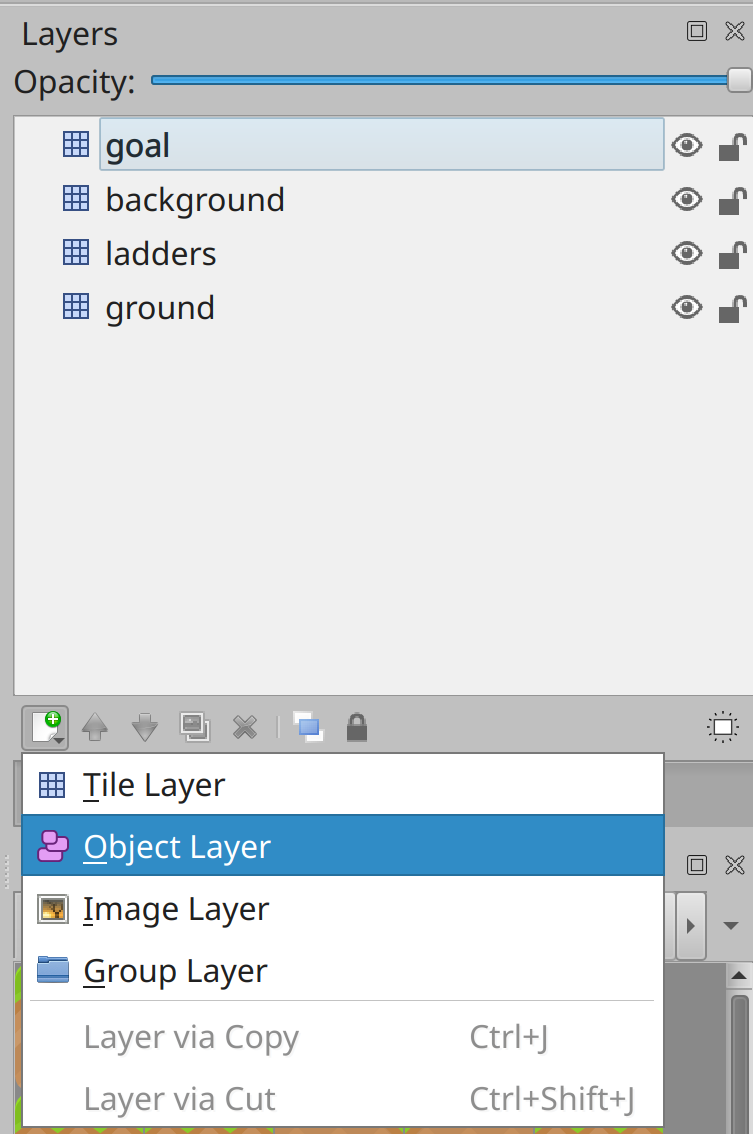
You can arrange the layers in any order you like using the arrow buttons at the bottom of the layer view. Now you can start laying out your level!
Designing a Level
In the book Classic Game Design, author and game developer Franz Lanzinger defines eight rules for classic game design. Here are the first three rules:
- Keep it simple.
- Start gameplay immediately.
- Ramp difficulty from easy to hard.
Similarly, veteran game developer Steve Goodwin talks about balancing games in his book Polished Game Development. He stresses that good game balance starts with level 1, which “should be the first one developed and the last one finished.”
With these ideas in mind, here are some guidelines for designing your platformer levels:
- The first level of the game should introduce the user to basic game features and controls.
- Make the initial obstacles easy to overcome.
- Make the first collectibles impossible to miss and later ones more difficult to obtain.
- Don’t introduce obstacles that require finesse to overcome until the user has learned to navigate the world.
- Don’t introduce enemies until the user has learned to overcome obstacles.
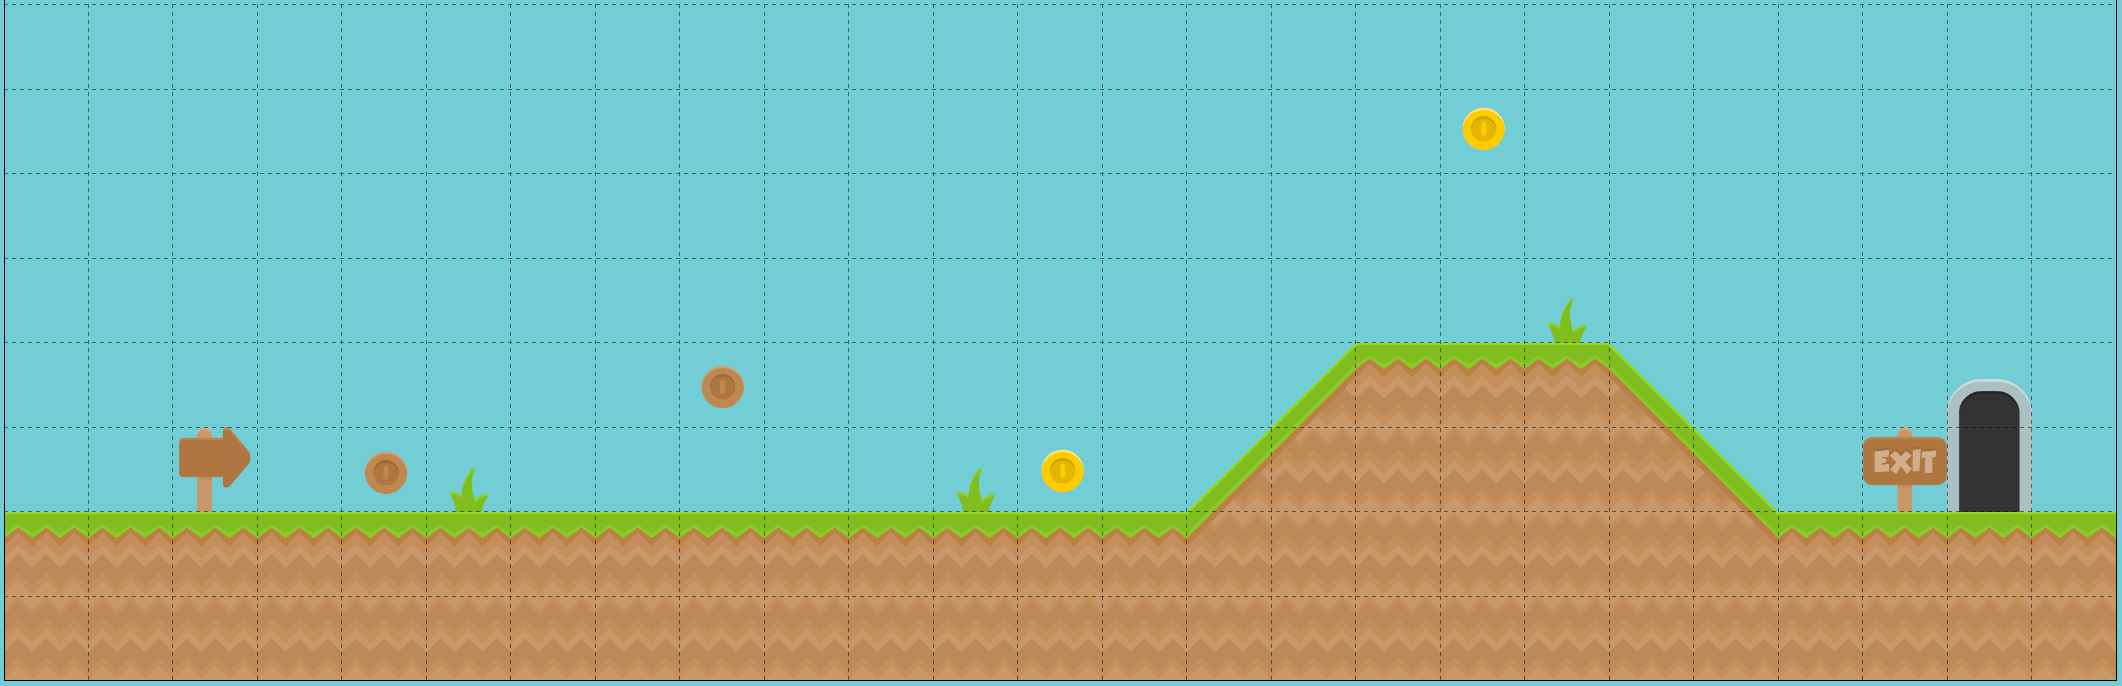
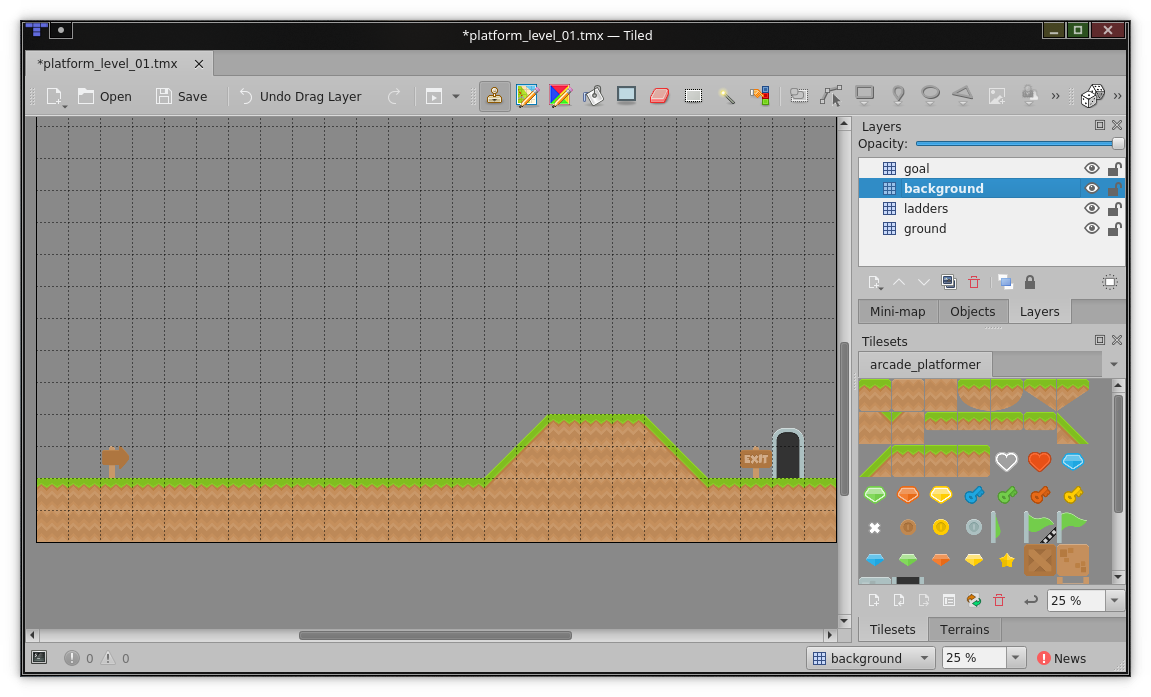
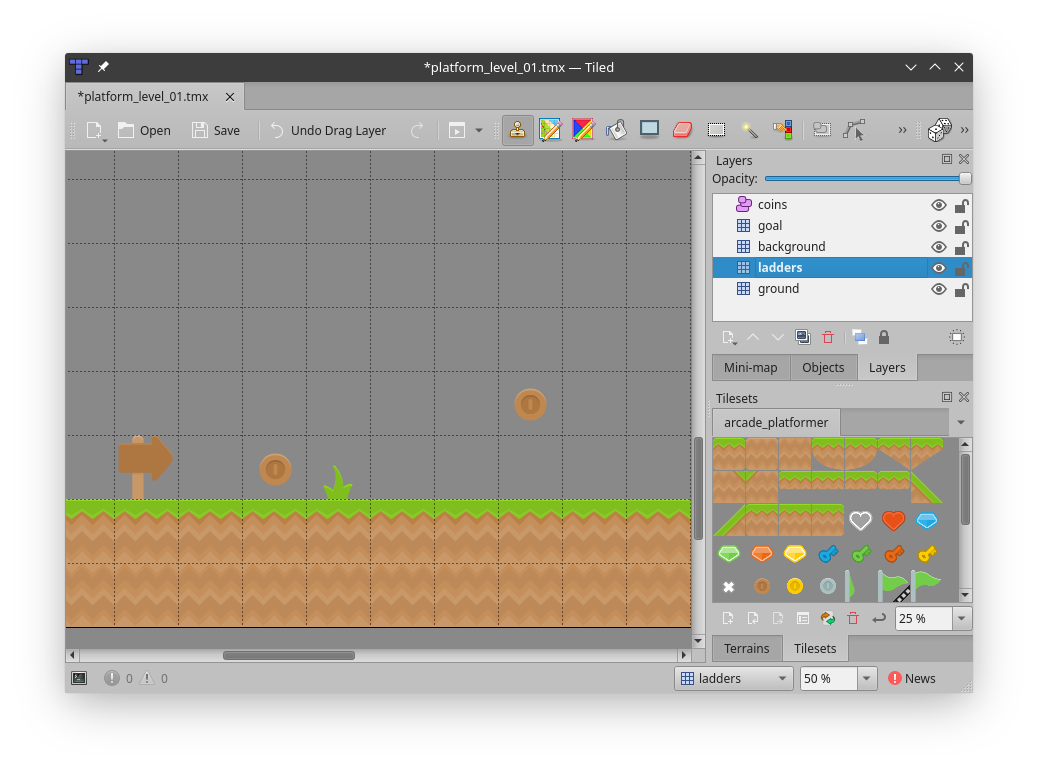
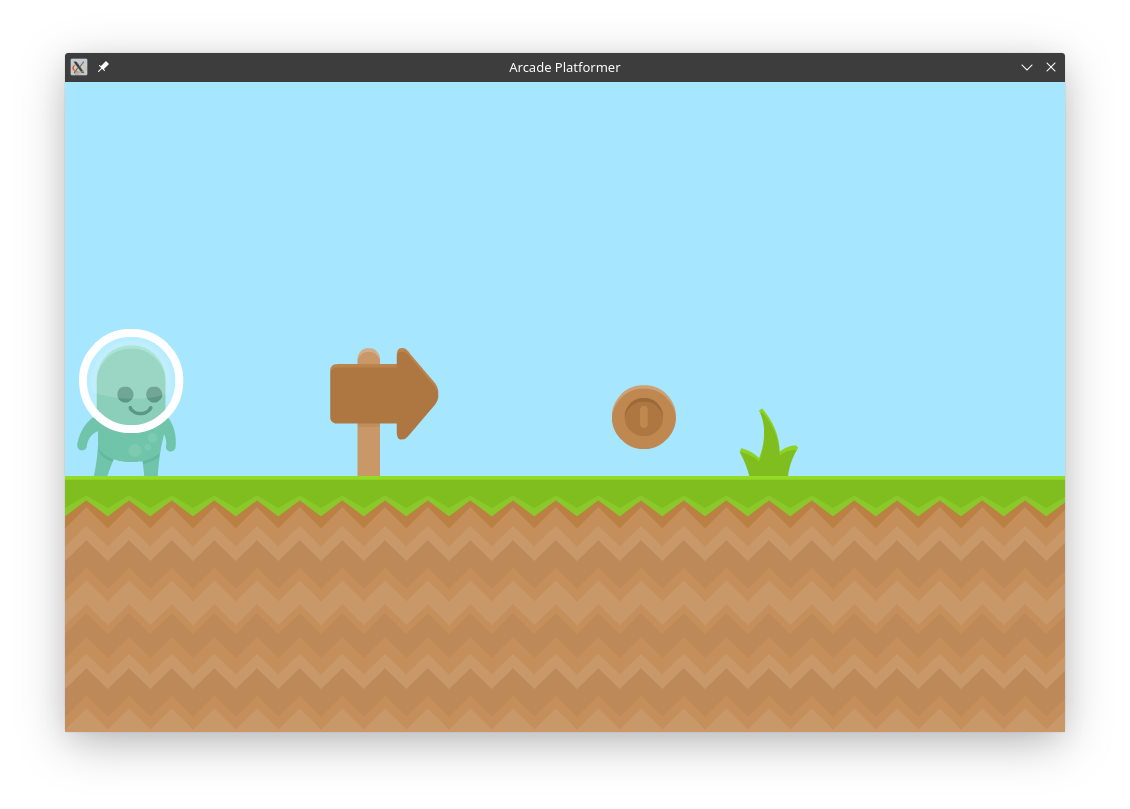
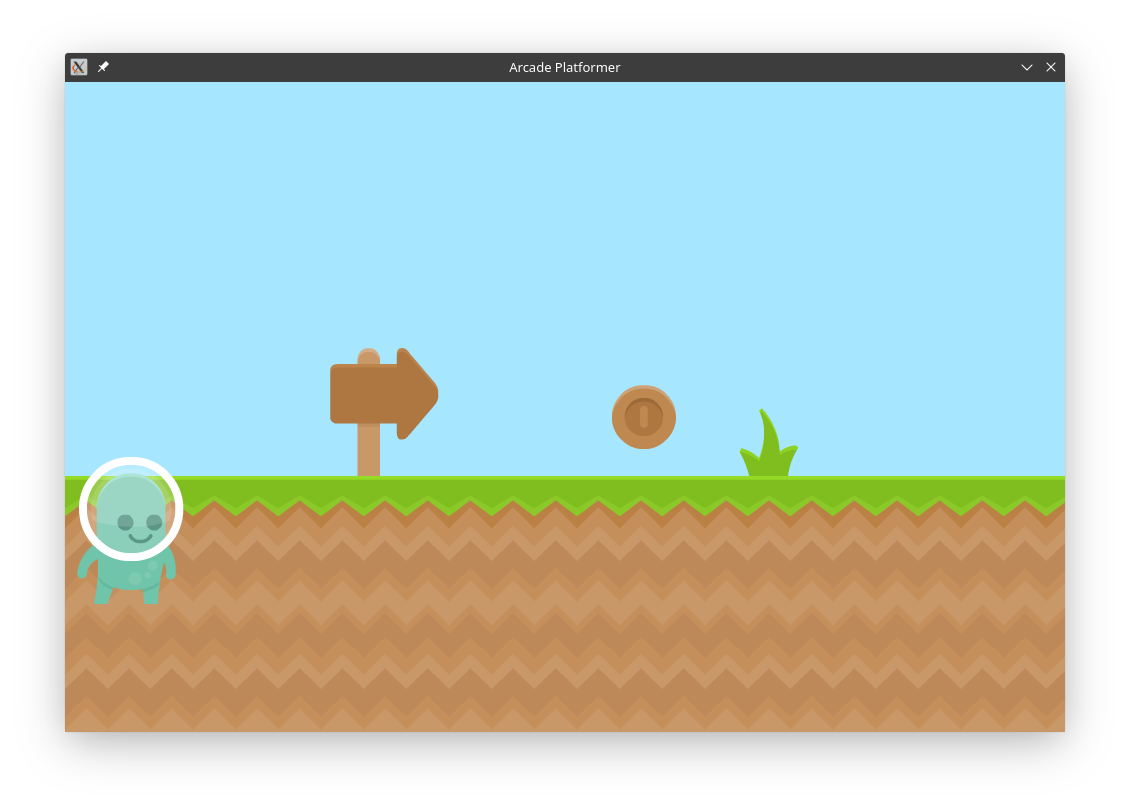
Below is a closer look at a first level designed with these guidelines in mind. In the downloadable materials, this complete level design is found under assets/platform_level_01.tmx:
The player starts on the left and proceeds to the right, indicated by the arrow pointing to the right. As the player moves right, they find a bronze coin, which will increase their score. A second bronze coin is found later hanging higher in the air, which demonstrates to the player that coins may be anywhere. Then the player finds a gold coin, which has a different point value.
The player then climbs a ramp, which demonstrates that there is more of the world above them. At the top of the hill is the final gold coin, which they have to jump to get. On the other side of the hill is the exit, which is also marked.
This simple level helps show the user how to move and jump. It shows that there are collectible items in the world worth points. It also shows items that are informative or decorative and with which the player does not interact, such as the arrow sign, exit sign, and grass tufts. Finally, it shows them what the goal looks like.
With the hard work of designing your first level complete, you can now build it in Tiled.
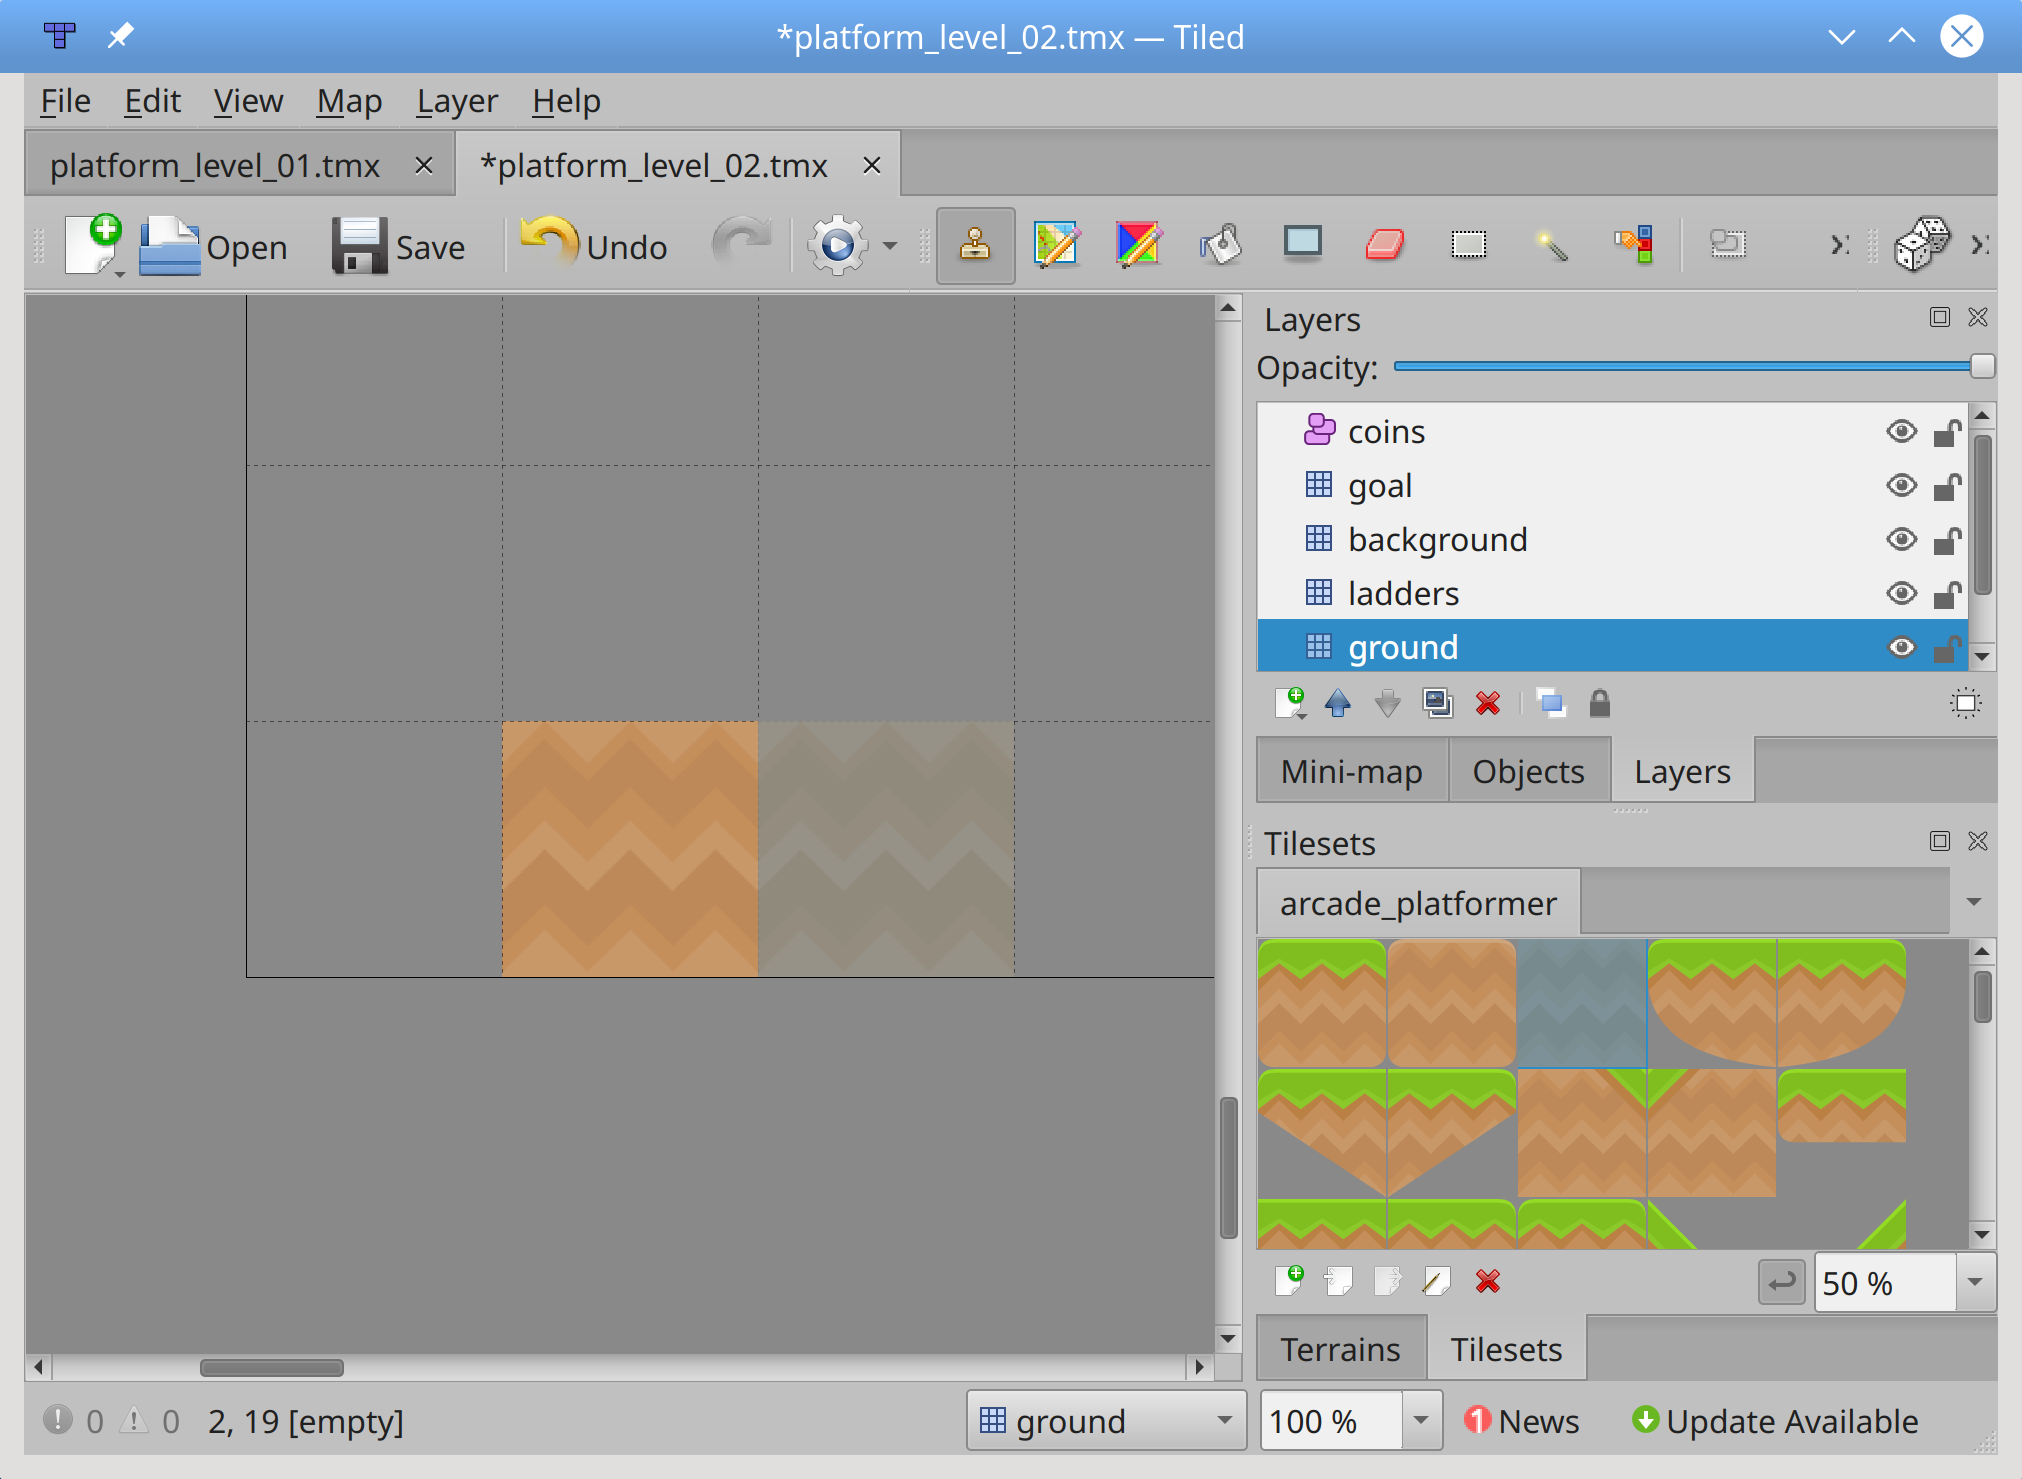
Building a Level
Before you can place coins and the goal, you need to know how to get there. So the first thing to define is where the ground is located. With your tile map selected in Tiled, select the ground layer to build.
Note: Make sure you have the correct layer selected when placing tiles on your tile map. If not, arcade won’t be able to properly handle your items.
From your tileset, select the grassCenter tile. Then, click in any grid on the bottom row of your tile map to set that tile in place:
With the first tileset, you can drag across the bottom row to set everything to grassCenter. Then, select the grassMid tile to draw the grassy top of the level across the second row:
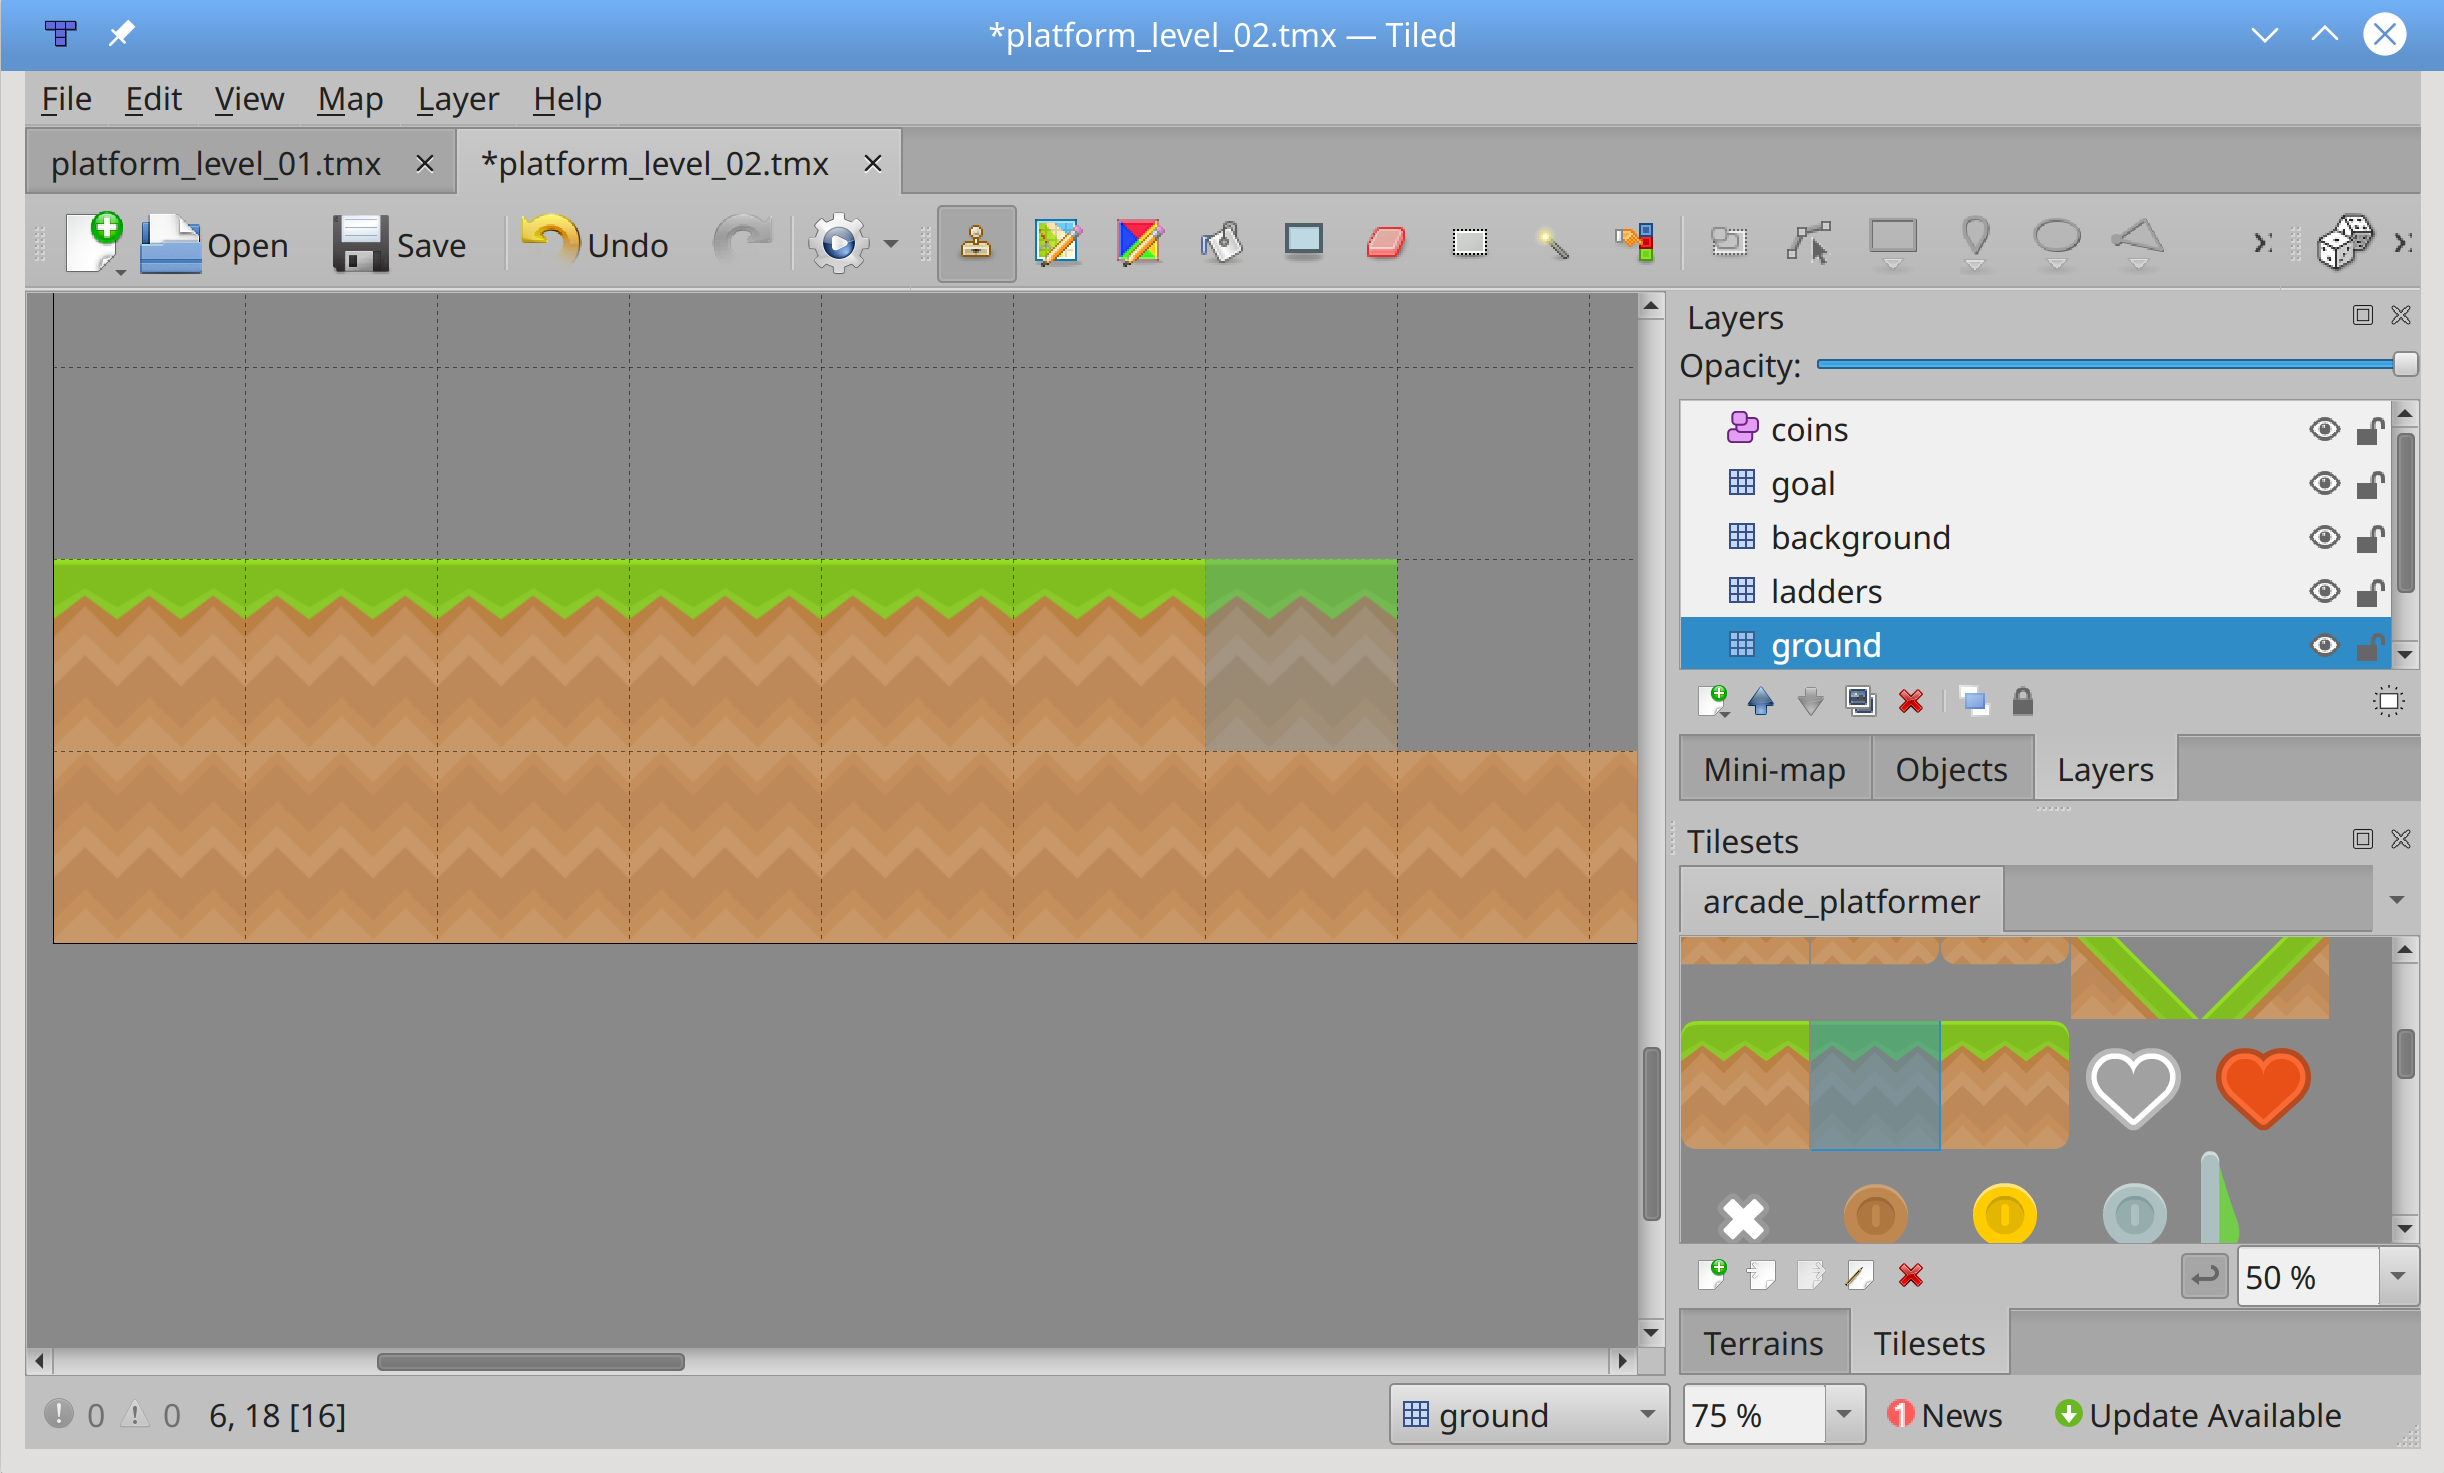
Continue building the level using the grass tiles to build a two-tile-high hill starting about halfway through the world. Leave a space of four tiles at the right edge to provide room for the player to walk down the hill and for the exit sign and exit portal.
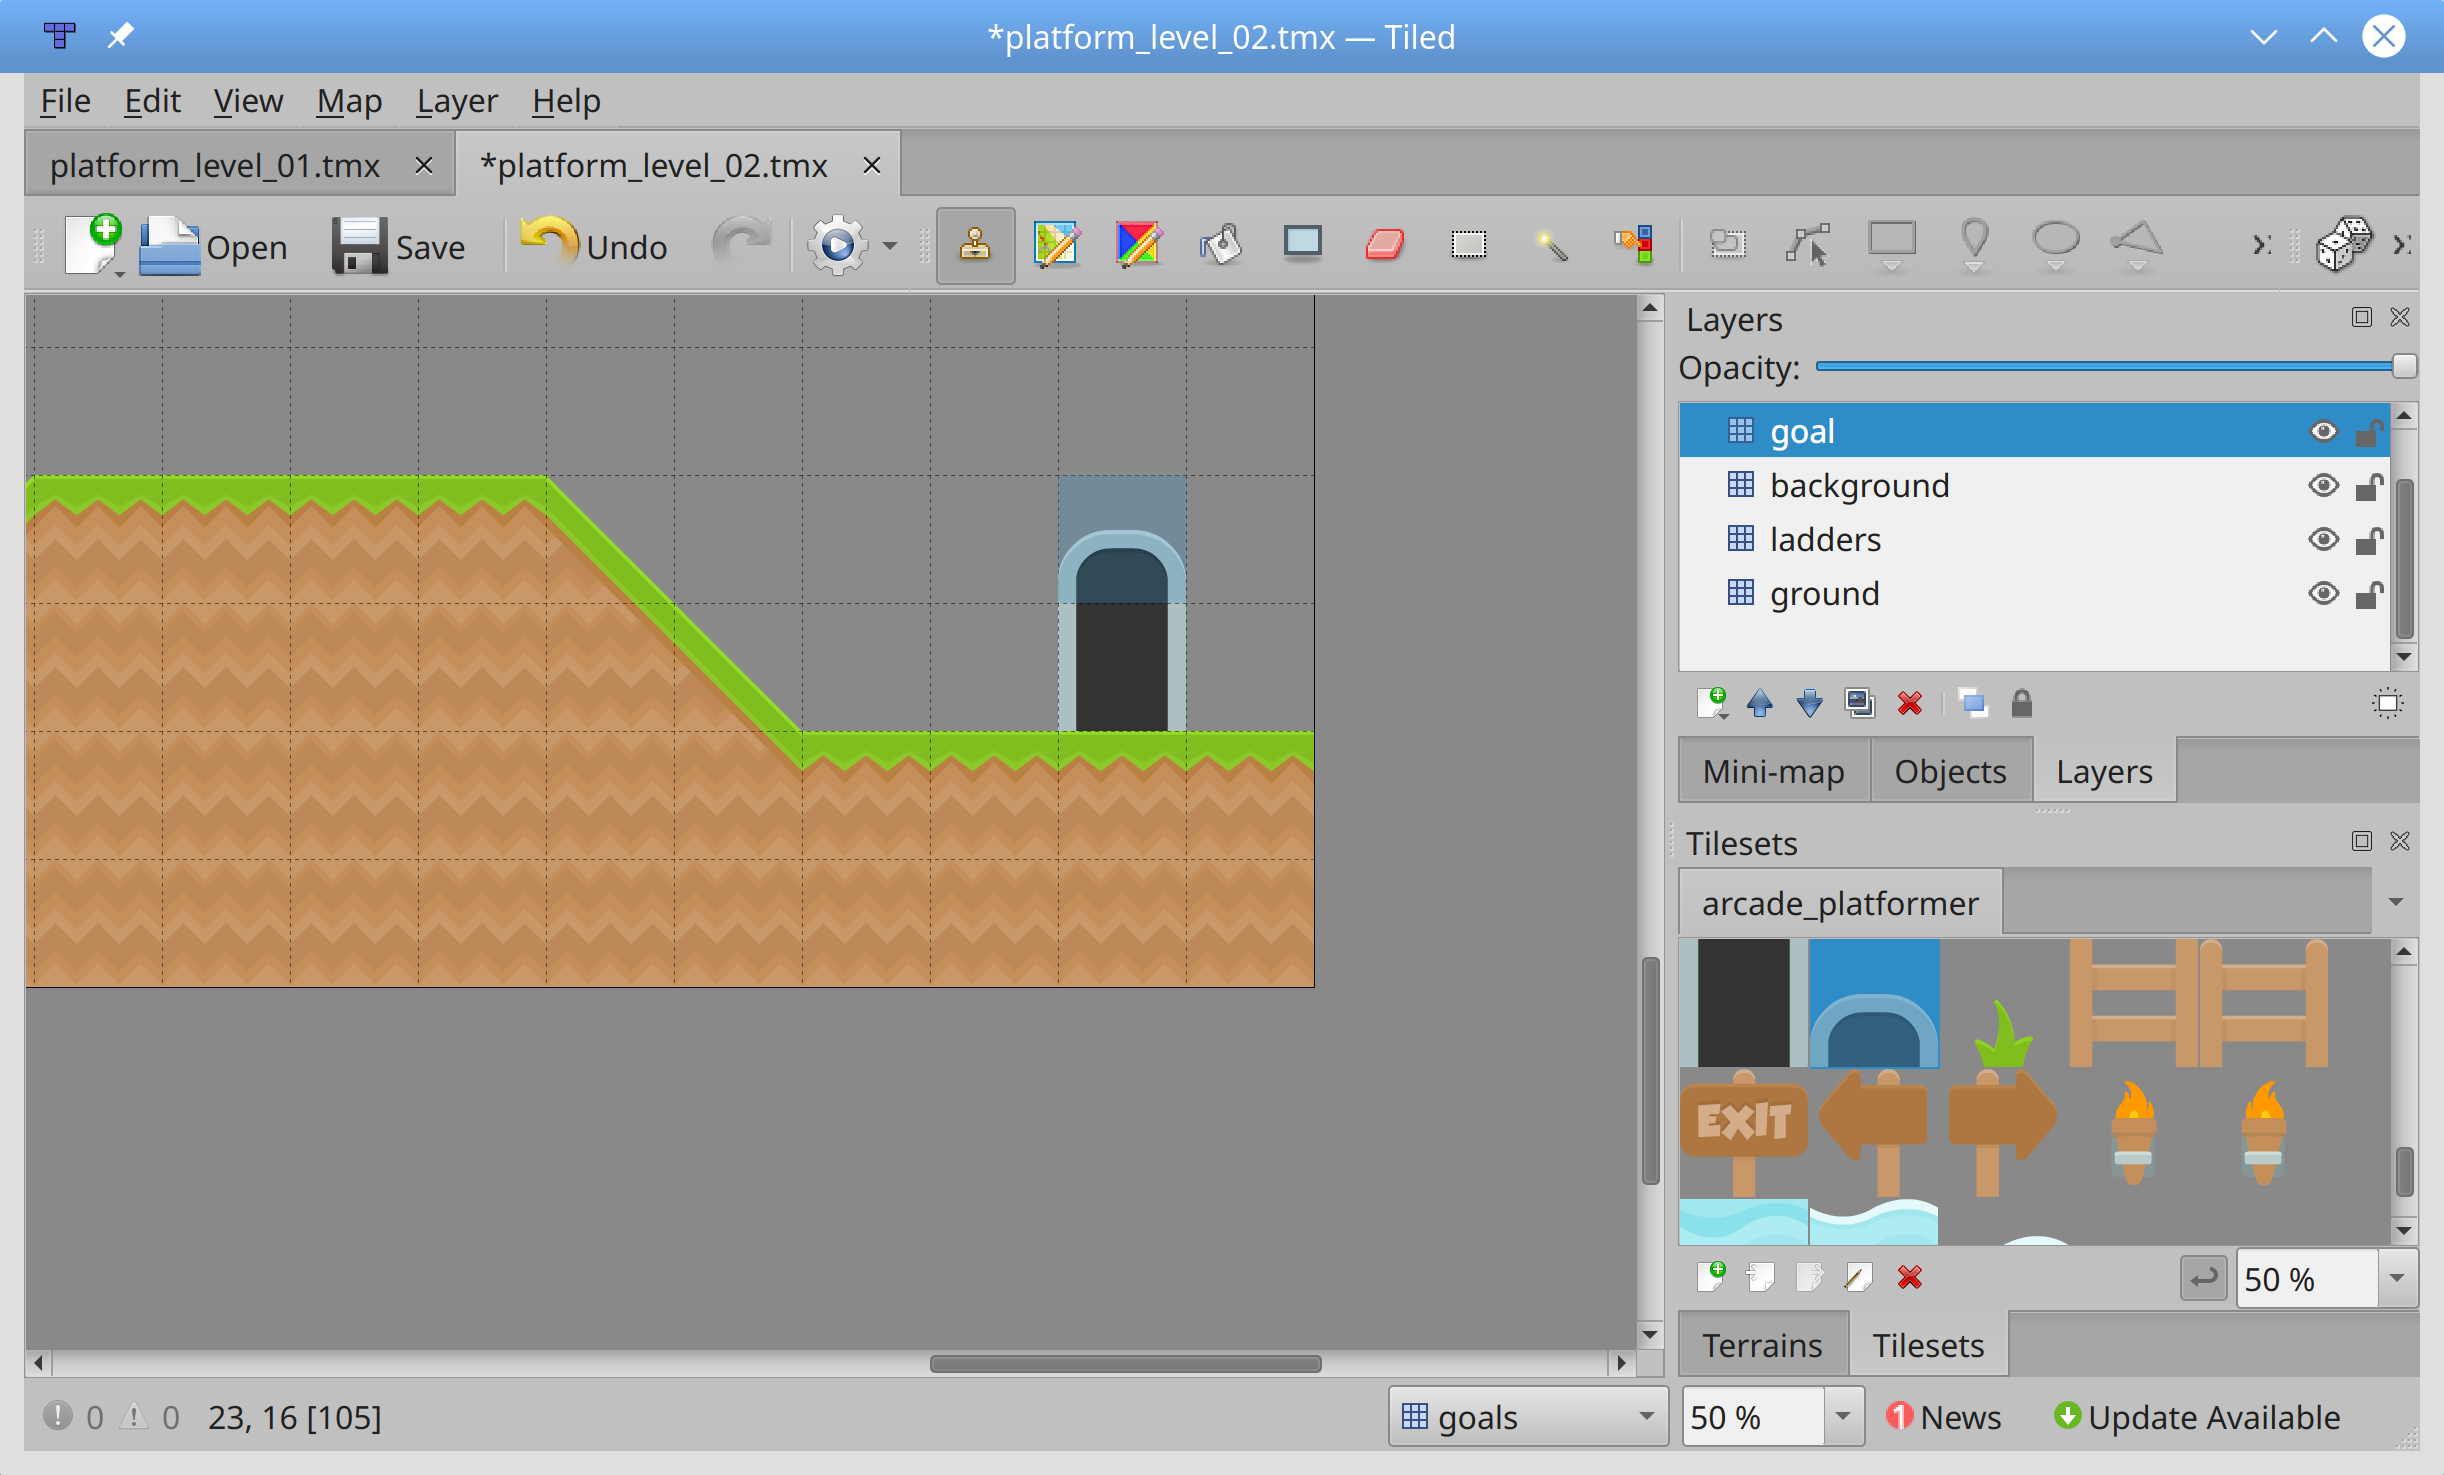
Next, switch to the goal layer and place the exit portal tiles one tile in from the far-right edge:
With the basic platform and goal in place, you can place some background items. Switch to the background layer, place an arrow on the left side to direct the player where to go and an Exit sign next to the portal. You can also place grass tufts anywhere you’d like on the map:
Now you can define where to place the coins. Switch to your coins layer to do so. Remember, this is an object layer, so you’re not limited to placing coins on the grid. Select the bronze coin and place it close to the starting arrow. Place a second bronze coin a little further to the right and a little higher:
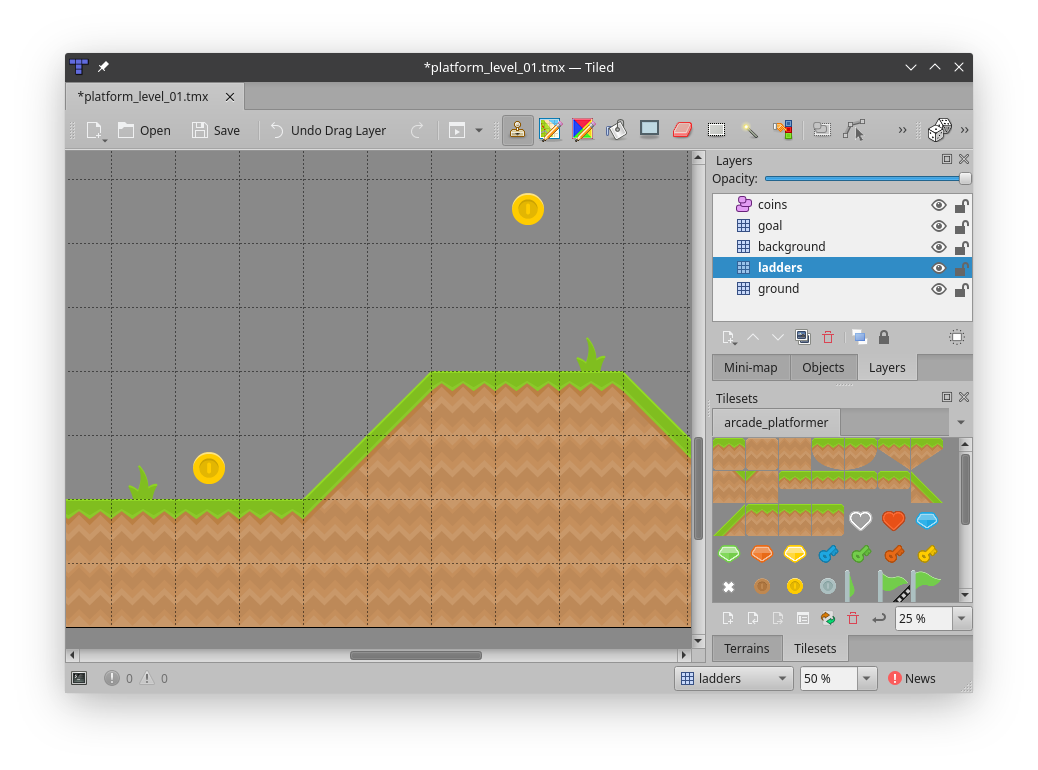
Repeat this process with two gold coins, placing one just before the hill and one on top, at least three tiles above the top of the hill:
The different coins should score different point values when the player collects them. There are a couple of ways you can do this, but for this tutorial you’ll set a custom property to track each coin’s point value.
Defining Custom Properties
One of the benefits of using an object layer is the ability to set custom properties on objects on that layer. Custom properties are defined by you and represent any value you wish. In this case, you’ll use them to specify the point value for each coin on the layer.
With the coins layer selected, press S to begin selecting objects. Then right-click the first bronze coin you placed, and select Object Properties from the context menu to view its properties:
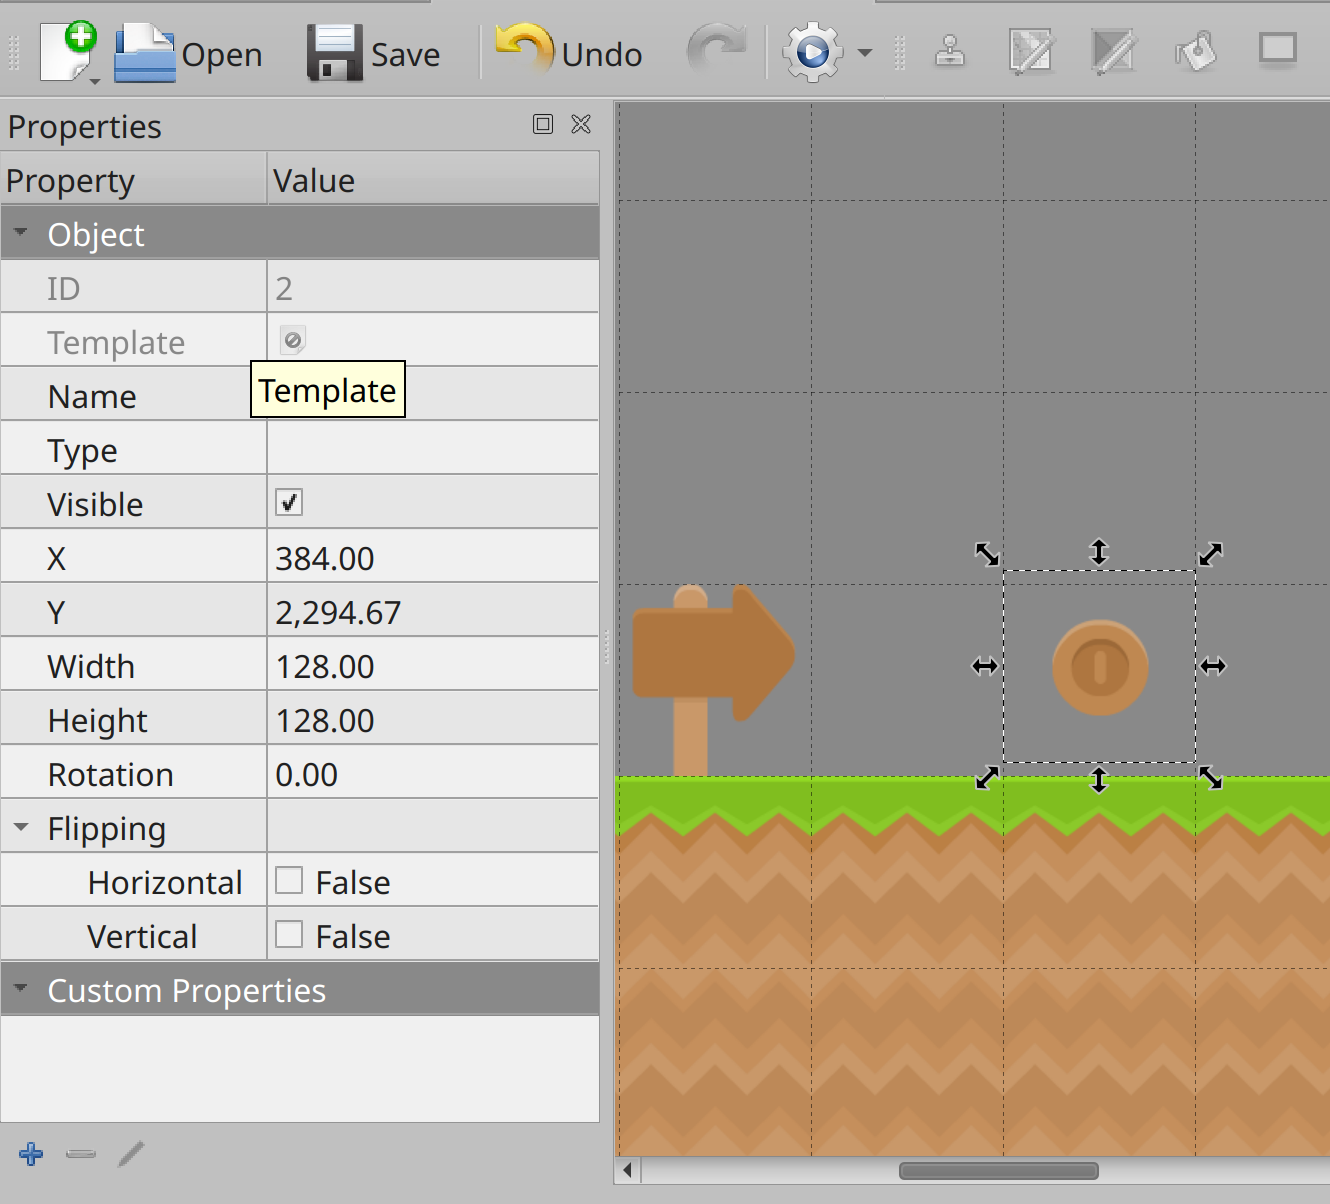
Predefined object properties are shown at the top of the Object Properties view, while custom properties are shown below. Currently there are no custom properties, so you need to add one. Click the blue plus sign at the bottom of the Object Properties view to add a new custom property:
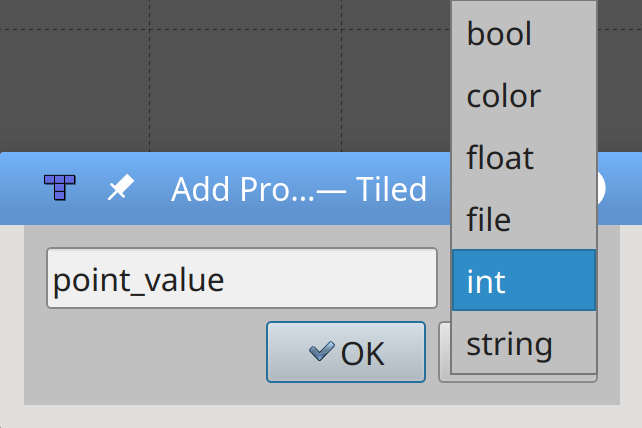
You define both the name and the type of the custom property. In this case, you set the property as an int and the name as point_value.
Note: While the custom property name points seems like a better choice, arcade uses that property name internally to define the shape of a sprite when determining collisions.
With the custom property defined, you can set its value in the Object Properties view:
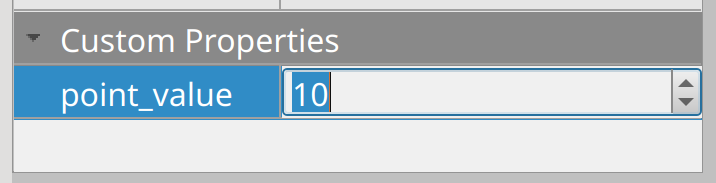
Perform these same steps for each of the coins in your level, setting the values to 10 for bronze coins and 20 for gold coins. Don’t forget to save the level, because next you’ll learn how to read it into arcade.
Reading Game Levels
Defining a game level in Tiled is great, but unless you can read it into arcade, it’s not very useful. Luckily, arcade natively supports reading Tiled tile maps and processing the layers. Once done, your game will look like this:
Reading your game level is handled completely in .setup(). This code can be found in the file arcade_platformer/03_read_level_one.py.
Note: If you’re entering code as the article progresses, the line numbers shown in code blocks may not match the line numbers in your code.
Where possible, additional context has been added to enable you to locate the correct lines to add new code.
First, you add a few more constants:
# Game constants
# Window dimensions
SCREEN_WIDTH = 1000
SCREEN_HEIGHT = 650
SCREEN_TITLE = "Arcade Platformer"

# Scaling constants
MAP_SCALING = 1.0

# Player constants
GRAVITY = 1.0
PLAYER_START_X = 65
PLAYER_START_Y = 256
These constants define the scaling factor for your maps as well as the starting position of your player and the strength of gravity in your world. These constants are used to define the level in .setup():
def setup(self) -> None:
    """Sets up the game for the current level"""

    # Get the current map based on the level
    map_name = f"platform_level_{self.level:02}.tmx"
    map_path = ASSETS_PATH / map_name

    # What are the names of the layers?
    wall_layer = "ground"
    coin_layer = "coins"
    goal_layer = "goal"
    background_layer = "background"
    ladders_layer = "ladders"

    # Load the current map
    game_map = arcade.tilemap.read_tmx(str(map_path))

    # Load the layers
    self.background = arcade.tilemap.process_layer(
        game_map, layer_name=background_layer, scaling=MAP_SCALING
    )
    self.goals = arcade.tilemap.process_layer(
        game_map, layer_name=goal_layer, scaling=MAP_SCALING
    )
    self.walls = arcade.tilemap.process_layer(
        game_map, layer_name=wall_layer, scaling=MAP_SCALING
    )
    self.ladders = arcade.tilemap.process_layer(
        game_map, layer_name=ladders_layer, scaling=MAP_SCALING
    )
    self.coins = arcade.tilemap.process_layer(
        game_map, layer_name=coin_layer, scaling=MAP_SCALING
    )

    # Set the background color
    background_color = arcade.color.FRESH_AIR
    if game_map.background_color:
        background_color = game_map.background_color
    arcade.set_background_color(background_color)

    # Create the player sprite if they're not already set up
    if not self.player:
        self.player = self.create_player_sprite()

    # Move the player sprite back to the beginning
    self.player.center_x = PLAYER_START_X
    self.player.center_y = PLAYER_START_Y
    self.player.change_x = 0
    self.player.change_y = 0

    # Load the physics engine for this map
    self.physics_engine = arcade.PhysicsEnginePlatformer(
        player_sprite=self.player,
        platforms=self.walls,
        gravity_constant=GRAVITY,
        ladders=self.ladders,
    )
First, you build the name of the current tile map using the current level. The format string {self.level:02} results in a two-digit level number and allows you to define up to ninety-nine different map levels.
Next, using pathlib syntax, define the full path to your maps. This allows arcade to properly locate all your game resources.
Next, define the names of your layers, which you will use shortly. Make sure these match the layer names you defined in Tiled.
Now you open the tile map so you can process the previously named layers. The function arcade.tilemap.process_layer() takes a number of arguments, but you will provide only three of them:
- The
game_map, which contains the layer to be processed - The name of the layer to read and process
- Any scaling to apply to the tiles
arcade.tilemap.process_layer() returns a SpriteList populated with Sprite objects representing the tiles in the layer. Any custom properties defined for a tile, such as point_value for the tiles in the coins layer, are stored with the Sprite in a dictionary called .properties. You’ll see how to access them later.
You also set the background color of the level. You can define your own background color in Tiled using Map → Map Properties and defining the Background Color property. If a background color isn’t set in Tiled, you use the predefined .FRESH_AIR color.
Next, check to see if a player is already created. This might be the case if you call .setup() to restart the level or move to the next level. If not, you call a method to create the player sprite (more on that a little later). If there is a player, then you place the player into position and ensure it’s not moving.
Finally, you can define the physics engine to use, passing in the following parameters:
- The player sprite
- A
SpriteListcontaining walls - A constant defining gravity
- A
SpriteListcontaining ladders
Walls determine where the player can move and when they can jump, and ladders enable climbing. The gravity constant controls how fast or slow the player falls.
Of course, running this code now won’t work, as you still need to define the player.
Defining the Player
The one thing missing from your game so far is a player:
In .setup(), you called a method called .create_player_sprite() to define the player if it didn’t already exist. You create the player sprite in a separate method for two main reasons:
- It isolates any changes in the player from other code in
.setup(). - It helps simplify the game setup code.
In any game, sprites can be static or animated. Static sprites don’t change their appearance as the game progresses, such as the sprites that represent your ground tiles, background items, and coins. Animated sprites, by contrast, change their appearance as the game progresses. To add some visual interest, you’ll make your player sprite animated.
In Python arcade, you create an animated sprite by defining a list of images, called textures, for each animation sequence, such as climbing or walking. As the game progresses, arcade picks the next texture to display from the list for the sequence being animated. When the end of the list is reached, arcade starts over again from the beginning. By picking textures carefully, you can create the illusion of movement in your animated sprites:
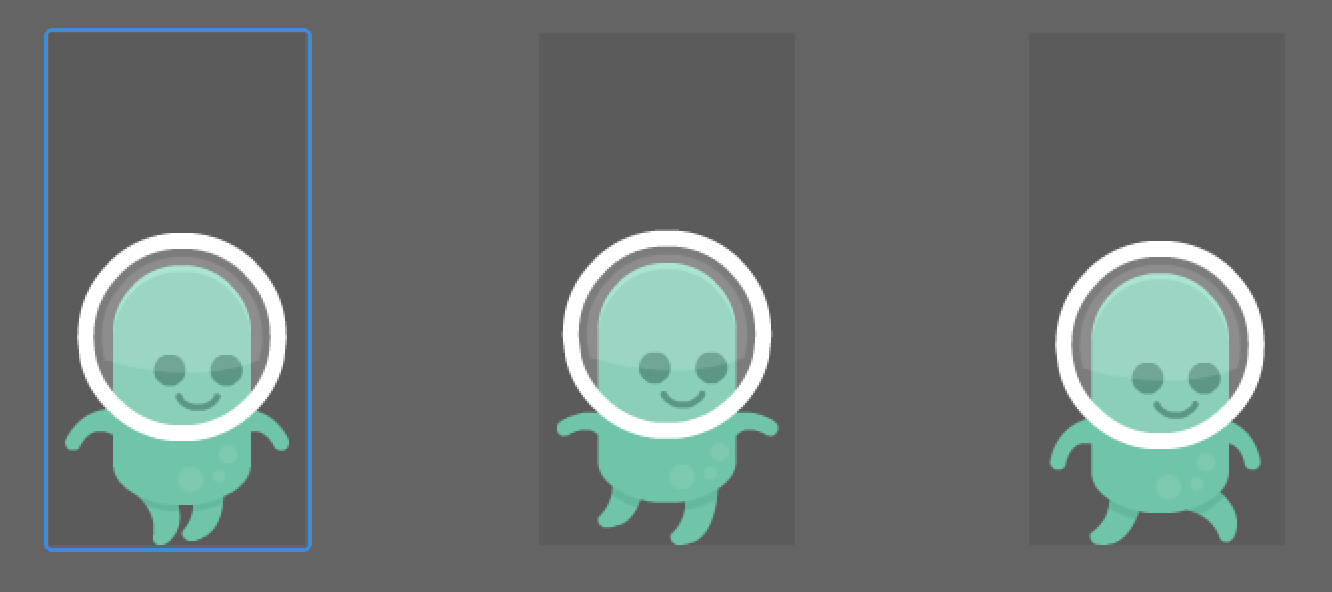
Because your player sprite performs a number of different activities, you provide texture lists for each of the following:
- Standing, facing both right and left
- Walking to the right and to the left
- Climbing up and down a ladder
You can provide any number of textures for each of these activities. If you don’t want an action animated, you can provide a single texture.
The file arcade_platformer/04_define_player.py contains the definition of .create_player_sprite(), which defines the animated player sprite. Place this method in your Platformer class below .setup():
def create_player_sprite(self) -> arcade.AnimatedWalkingSprite:
    """Creates the animated player sprite

    Returns:
        The properly set up player sprite
    """
    # Where are the player images stored?
    texture_path = ASSETS_PATH / "images" / "player"

    # Set up the appropriate textures
    walking_paths = [
        texture_path / f"alienGreen_walk{x}.png" for x in (1, 2)
    ]
    climbing_paths = [
        texture_path / f"alienGreen_climb{x}.png" for x in (1, 2)
    ]
    standing_path = texture_path / "alienGreen_stand.png"

    # Load them all now
    walking_right_textures = [
        arcade.load_texture(texture) for texture in walking_paths
    ]
    walking_left_textures = [
        arcade.load_texture(texture, mirrored=True)
        for texture in walking_paths
    ]

    walking_up_textures = [
        arcade.load_texture(texture) for texture in climbing_paths
    ]
    walking_down_textures = [
        arcade.load_texture(texture) for texture in climbing_paths
    ]

    standing_right_textures = [arcade.load_texture(standing_path)]

    standing_left_textures = [
        arcade.load_texture(standing_path, mirrored=True)
    ]

    # Create the sprite
    player = arcade.AnimatedWalkingSprite()

    # Add the proper textures
    player.stand_left_textures = standing_left_textures
    player.stand_right_textures = standing_right_textures
    player.walk_left_textures = walking_left_textures
    player.walk_right_textures = walking_right_textures
    player.walk_up_textures = walking_up_textures
    player.walk_down_textures = walking_down_textures

    # Set the player defaults
    player.center_x = PLAYER_START_X
    player.center_y = PLAYER_START_Y
    player.state = arcade.FACE_RIGHT

    # Set the initial texture
    player.texture = player.stand_right_textures[0]

    return player
For your game, you animate Roz when they walk and climb but not when they are simply standing still. Each animation has two separate images, and your first task is to locate those images. You can download all the assets and source code used in this tutorial by clicking the link below:
Get the Source Code: Click here to get the source code you’ll use to build a platform game with Python Arcade in this tutorial.
Alternatively, you can create a folder called assets/images/player to store the textures used to draw Roz. Then, in the Platformer Pack Redux (360 Assets) archive you downloaded earlier, locate the PNG/Players/128x256/Green folder, and copy all the images there to your new assets/images/player folder.
This new path containing the player textures is defined in texture_path. Using this path, you create full pathnames to each texture resource using list comprehensions and f-string formatting.
Having these paths allows you to create a list of textures with arcade.load_texture() using more list comprehensions. Since Roz can walk left and right, you define different lists for each direction. The images show Roz pointing to the right, so you use the mirrored parameter when defining the textures for Roz walking or standing facing left. Moving up or down a ladder looks the same, so those lists are defined identically.
Even though there is only one standing texture, you still need to place it in a list so arcade can deal with the AnimatedSprite properly.
All the really hard work is done now. You create the actual AnimatedWalkingSprite, specifying the texture lists to use. Next, you set Roz’s initial location and direction as well as the first texture to display. Finally, you return the completely constructed sprite at the end of the method.
Now you have an initial map and a player sprite. If you run this code, you should see the following:
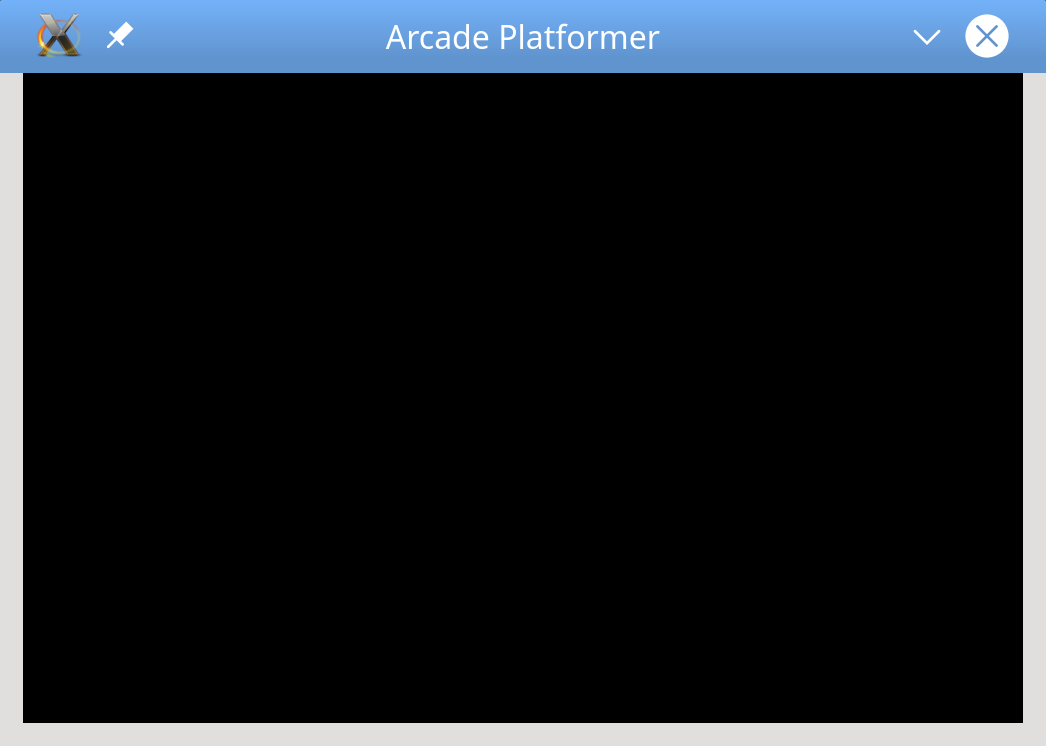
Well, that’s not very entertaining. That’s because while you’ve created everything, you aren’t currently updating or drawing anything. Time to fix that!
Updating and Drawing
Updating the state of your game occurs in .on_update(), which arcade calls roughly sixty times per second. This method handles the following actions and events:
- Moving player and enemy sprites
- Detecting collisions with enemies or collectibles
- Updating scores
- Animating sprites
In short, everything that makes your game playable occurs in .on_update(). After everything has been updated, arcade calls .on_draw() to render everything to the screen.
This separation of game logic from game display means you can add or modify features in your game freely without affecting code that displays the game. In fact, because most of the game logic occurs in .on_update(), your .on_draw() method is often very short.
You can find all the code below in arcade_platformer/05_update_and_draw.py in the downloadable materials. Add .on_draw() to your Platformer class:
def on_draw(self) -> None:
    arcade.start_render()

    # Draw all the sprites
    self.background.draw()
    self.walls.draw()
    self.coins.draw()
    self.goals.draw()
    self.ladders.draw()
    self.player.draw()
After the obligatory call to arcade.start_render(), you call .draw() on all your sprite lists, followed by the player sprite. Note the order in which items are drawn. You should start with sprites that appear farthest back and proceed forward. Now when you run the code, it should look like this:
The only thing missing is proper placement of the player sprite. Why? Because animated sprites need to be updated to select the proper texture to display and proper placement on the screen, and you haven’t updated anything yet. Here’s what that looks like:
def on_update(self, delta_time: float) -> None:
    """Updates the position of all game objects

    Arguments:
        delta_time {float} -- How much time since the last call
    """

    # Update the player animation
    self.player.update_animation(delta_time)

    # Update player movement based on the physics engine
    self.physics_engine.update()

    # Restrict user movement so they can't walk off screen
    if self.player.left < 0:
        self.player.left = 0

    # Check if we've picked up a coin
    coins_hit = arcade.check_for_collision_with_list(
        sprite=self.player, sprite_list=self.coins
    )

    for coin in coins_hit:
        # Add the coin score to our score
        self.score += int(coin.properties["point_value"])

        # Play the coin sound
        arcade.play_sound(self.coin_sound)

        # Remove the coin
        coin.remove_from_sprite_lists()

    # Now check if we're at the ending goal
    goals_hit = arcade.check_for_collision_with_list(
        sprite=self.player, sprite_list=self.goals
    )

    if goals_hit:
        # Play the victory sound
        self.victory_sound.play()

        # Set up the next level
        self.level += 1
        self.setup()
To make sure your game operates at a constant speed no matter the actual frame rate, .on_update() takes a single float parameter called delta_time, which indicates the time since the last update.
The first thing to do is to animate the player sprite. Based on the player’s movement, .update_animation() automatically selects the correct texture to use.
Next, you update the movement of everything that can move. Since you defined a physics engine in .setup(), it makes sense to let it handle movement. However, the physics engine will let the player run off the left side of the game map, so you also need to take steps to prevent that.
Important: Make sure you call AnimatedSprite.update_animation() before PhysicsEnginePlatformer.update(). By updating the sprite first, you ensure the physics engine will act on the current sprite settings rather than sprite settings from the previous frame.
Now that the player has moved, you check if they have collided with a coin. If so, that counts as collecting the coin, so you increment the player’s score using the point_value custom property you defined in Tiled. Then you play a sound and remove the coin from the play field.
You also check if the player has reached the final goal. If so, you play the victory sound, increment the level, and call .setup() again to load the next map and reset the player in it.
But how does the user reach that final goal? The physics engine will make sure Roz doesn’t fall through the floor and can jump, but it doesn’t actually know where to move Roz or when to jump. That’s something the user should decide, and you need to provide a way for them to do that.
Moving the Player Sprite
In the early days of computer gaming, the only input device available was the keyboard. Even today, many games—including this one—still provide keyboard control.
Moving the player using the keyboard can be done in a variety of ways. There are many different popular keyboard arrangements, including:
- Arrow keys
- IJKM keys
- IJKL keys
- WASD keys for left-handed control
Of course, there are many other keyboard arrangements to choose from.
Since you need to allow Roz to move in all four directions as well as jump, for this game you’ll use the arrow and IJKL keys for movement and the space bar for jumping:
All keyboard input in arcade is handled by .on_key_press() and .on_key_release(). You can find the code for making Roz move via the keyboard in arcade_platformer/06_keyboard_movement.py.
First, you need two new constants:
23# Player constants
24GRAVITY = 1.0
25PLAYER_START_X = 65
26PLAYER_START_Y = 256
27PLAYER_MOVE_SPEED = 10
28PLAYER_JUMP_SPEED = 20
These constants control how fast Roz moves. PLAYER_MOVE_SPEED controls their movement left, right, and up and down ladders. PLAYER_JUMP_SPEED indicates how high Roz can jump. By setting these values as constants, you can tweak them to dial in the proper gameplay during testing.
You use those constants in .on_key_press():
def on_key_press(self, key: int, modifiers: int) -> None:
    """Arguments:
    key -- Which key was pressed
    modifiers -- Which modifiers were down at the time
    """

    # Check for player left or right movement
    if key in [arcade.key.LEFT, arcade.key.J]:
        self.player.change_x = -PLAYER_MOVE_SPEED
    elif key in [arcade.key.RIGHT, arcade.key.L]:
        self.player.change_x = PLAYER_MOVE_SPEED

    # Check if player can climb up or down
    elif key in [arcade.key.UP, arcade.key.I]:
        if self.physics_engine.is_on_ladder():
            self.player.change_y = PLAYER_MOVE_SPEED
    elif key in [arcade.key.DOWN, arcade.key.K]:
        if self.physics_engine.is_on_ladder():
            self.player.change_y = -PLAYER_MOVE_SPEED

    # Check if player can jump
    elif key == arcade.key.SPACE:
        if self.physics_engine.can_jump():
            self.player.change_y = PLAYER_JUMP_SPEED
            # Play the jump sound
            arcade.play_sound(self.jump_sound)
There are three major components to this code:
-
You handle horizontal movement by checking for the Left and Right arrows and the J and L keys from your IJKL arrangement. You then set the
.change_xproperty appropriately. -
You handle vertical movement by checking for the Up and Down arrows as well as the I and K keys. However, since Roz can only move up and down on ladders, you verify that using
.is_on_ladder()before moving up or down. -
You handle jumping via the Space key. To prevent Roz from jumping in midair, you check if Roz can jump using
.can_jump(), which returnsTrueonly if Roz is standing on a wall. If so, you move the player up and play the jump sound.
When you release a key, Roz should stop moving. You set that up in .on_key_release():
def on_key_release(self, key: int, modifiers: int) -> None:
    """Arguments:
    key -- The key which was released
    modifiers -- Which modifiers were down at the time
    """

    # Check for player left or right movement
    if key in [
        arcade.key.LEFT,
        arcade.key.J,
        arcade.key.RIGHT,
        arcade.key.L,
    ]:
        self.player.change_x = 0

    # Check if player can climb up or down
    elif key in [
        arcade.key.UP,
        arcade.key.I,
        arcade.key.DOWN,
        arcade.key.K,
    ]:
        if self.physics_engine.is_on_ladder():
            self.player.change_y = 0
This code follows a similar pattern to .on_key_press():
- You check if any of the horizontal movement keys were released. If so, then Roz’s
change_xis set to 0. - You check if the vertical movement keys were released. Again, since Roz needs to be on a ladder to move up and down, you need to check
.is_on_ladder()here as well. If not, a player could jump and then press and release Up, leaving Roz hanging in midair!
Note that you don’t need to check if the jump key was released.
OK, now you can move Roz around, but why does Roz just walk out of the window to the right? You need a way to keep Roz visible in the game world as they move around, and that’s where viewports come in.
Scrolling the Viewport
Early video games restricted gameplay to a single window, which was the entire world for the player. However, modern video game worlds can be too large to fit in a tiny game window. Most games implement a scrolling view, which shows a portion of game world to the player. In Python arcade, this scrolling view is called a viewport. It is essentially a rectangle that defines which part of the game world you show in the gameplay window:
You can find this code in the downloadable materials under arcade_platformer/07_scrolling_view.py.
To implement the scrolling view, you define the viewport based on Roz’s current location. When Roz travels close to any edge of the gameplay window, you move the viewport in the direction of travel so Roz remains comfortably on screen. You also ensure the viewport doesn’t scroll outside the visible world. To do this, you need to know a few things:
- How close can Roz travel to the gameplay window edge before the viewport scrolls? This is known as the margin, and it can be different for each window edge.
- Where is the current viewport now?
- How wide is your game map?
- Where is Roz now?
First, you define the margins as constants at the top of the code:
# Player constants
GRAVITY = 1.0
PLAYER_START_X = 65
PLAYER_START_Y = 256
PLAYER_MOVE_SPEED = 10
PLAYER_JUMP_SPEED = 20

# Viewport margins
# How close do we have to be to scroll the viewport?
LEFT_VIEWPORT_MARGIN = 50
RIGHT_VIEWPORT_MARGIN = 300
TOP_VIEWPORT_MARGIN = 150
BOTTOM_VIEWPORT_MARGIN = 150
Note the difference between LEFT_VIEWPORT_MARGIN and RIGHT_VIEWPORT_MARGIN. This allows Roz to get closer to the left edge than the right. This way, as Roz moves right, the user has more time to see and react to obstacles.
The viewport is a rectangle with the same width and height as the gameplay window, which are the constants SCREEN_WIDTH and SCREEN_HEIGHT. Therefore, to fully describe the viewport, you only need to know the location of the bottom-left corner. By changing this corner, the viewport will react to Roz’s movement. You track this corner in your game object and define it in .setup(), right after you move Roz to the start of the level:
# Move the player sprite back to the beginning
self.player.center_x = PLAYER_START_X
self.player.center_y = PLAYER_START_Y
self.player.change_x = 0
self.player.change_y = 0

# Reset the viewport
self.view_left = 0
self.view_bottom = 0
For this tutorial, since every level starts in the same place, the bottom-left corner of the viewport always starts in the same place as well.
You can calculate the width of the game map by multiplying the number of tiles contained in the game map by the width of each tile. You calculate this after you read each map and set the background color in .setup():
# Set the background color
background_color = arcade.color.FRESH_AIR
if game_map.background_color:
    background_color = game_map.background_color
arcade.set_background_color(background_color)

# Find the edge of the map to control viewport scrolling
self.map_width = (
    game_map.map_size.width - 1
) * game_map.tile_size.width
Subtracting 1 from game_map.map_size.width corrects for the tile indexing used by Tiled.
Lastly, you know where Roz is located at any time by inspecting any of the position properties in self.player.
Here’s how you use all this information to scroll the viewport in .update():
- After updating Roz’s position, you calculate whether they are within a margin’s distance of any of the four edges.
- If so, you move the viewport in that direction by the amount Roz is inside the margin.
You can put this code in a separate method of the Platformer class to make updates easier:
def scroll_viewport(self) -> None:
    """Scrolls the viewport when the player gets close to the edges"""
    # Scroll left
    # Find the current left boundary
    left_boundary = self.view_left + LEFT_VIEWPORT_MARGIN

    # Are we to the left of this boundary? Then we should scroll left.
    if self.player.left < left_boundary:
        self.view_left -= left_boundary - self.player.left
        # But don't scroll past the left edge of the map
        if self.view_left < 0:
            self.view_left = 0

    # Scroll right
    # Find the current right boundary
    right_boundary = self.view_left + SCREEN_WIDTH - RIGHT_VIEWPORT_MARGIN

    # Are we to the right of this boundary? Then we should scroll right.
    if self.player.right > right_boundary:
        self.view_left += self.player.right - right_boundary
        # Don't scroll past the right edge of the map
        if self.view_left > self.map_width - SCREEN_WIDTH:
            self.view_left = self.map_width - SCREEN_WIDTH

    # Scroll up
    top_boundary = self.view_bottom + SCREEN_HEIGHT - TOP_VIEWPORT_MARGIN
    if self.player.top > top_boundary:
        self.view_bottom += self.player.top - top_boundary

    # Scroll down
    bottom_boundary = self.view_bottom + BOTTOM_VIEWPORT_MARGIN
    if self.player.bottom < bottom_boundary:
        self.view_bottom -= bottom_boundary - self.player.bottom

    # Only scroll to integers. Otherwise we end up with pixels that
    # don't line up on the screen.
    self.view_bottom = int(self.view_bottom)
    self.view_left = int(self.view_left)

    # Do the scrolling
    arcade.set_viewport(
        left=self.view_left,
        right=SCREEN_WIDTH + self.view_left,
        bottom=self.view_bottom,
        top=SCREEN_HEIGHT + self.view_bottom,
    )
This code can look a little confusing, so it may be useful to look at a concrete example, such as what happens when Roz moves right and you need to scroll the viewport. Here’s the code you’ll walk through:
# Scroll right
# Find the current right boundary
right_boundary = self.view_left + SCREEN_WIDTH - RIGHT_VIEWPORT_MARGIN

# Are we right of this boundary? Then we should scroll right.
if self.player.right > right_boundary:
    self.view_left += self.player.right - right_boundary
    # Don't scroll past the right edge of the map
    if self.view_left > self.map_width - SCREEN_WIDTH:
        self.view_left = self.map_width - SCREEN_WIDTH
Here are some sample values for your key variables:
- Roz has moved right, setting their
self.player.rightproperty to710. - The viewport hasn’t changed yet, so
self.view_leftis currently0. - The constant
SCREEN_WIDTHis1000. - The constant
RIGHT_VIEWPORT_MARGINis300.
First, calculate the value of right_boundary, which determines if Roz is within the margin of the right edge of the viewport:
- The right edge of the visible viewport is
self.view_left + SCREEN_WIDTH, which is1000. - Subtracting the
RIGHT_VIEWPORT_MARGINfrom this gives you aright_boundaryof700.
Next, check if Roz has moved beyond the right_boundary. Since self.player.right > right_boundary is True, you need to move the viewport, so you calculate how far to move it:
- Calculate
self.player.right - right_boundaryas10, which is how far Roz has moved into the right margin. - Since the viewport rectangle is measured from the left, add this to
self.view_leftto make it10.
However, you don’t want to move the viewport off the edge of the world. If the viewport were scrolled all the way to the right, its left edge would be a full screen width smaller than the width of the map:
- Check if
self.view_left > self.map_width - SCREEN_WIDTH. - If so, simply set
self.view_leftto that value to restrict the viewport movement.
You do the same sequence of steps for the left boundary. The top and bottom edges are also checked to update self.view_bottom. With both view variables updated, the last thing to do is to set the viewport using arcade.set_viewport().
Since you put this code in a separate method, call it at the end of .on_update():
if goals_hit:
    # Play the victory sound
    self.victory_sound.play()

    # Set up the next level
    self.level += 1
    self.setup()

# Set the viewport, scrolling if necessary
self.scroll_viewport()
With this in place, your game view should follow Roz as they move left, right, up, or down, never letting them get off screen!
That’s it—you have a platformer! Now it’s time to add some extras!
Adding Extra Features
Aside from adding levels with progressively more intricate platforms to reach, there are a number of additional features you can add to make your game stand out. This tutorial will cover some of them, including:
- Maintaining an on-screen score
- Controlling Roz using a joystick or game controller
- Adding title, end game, help, and pause screens
- Automatically moving enemies and platforms
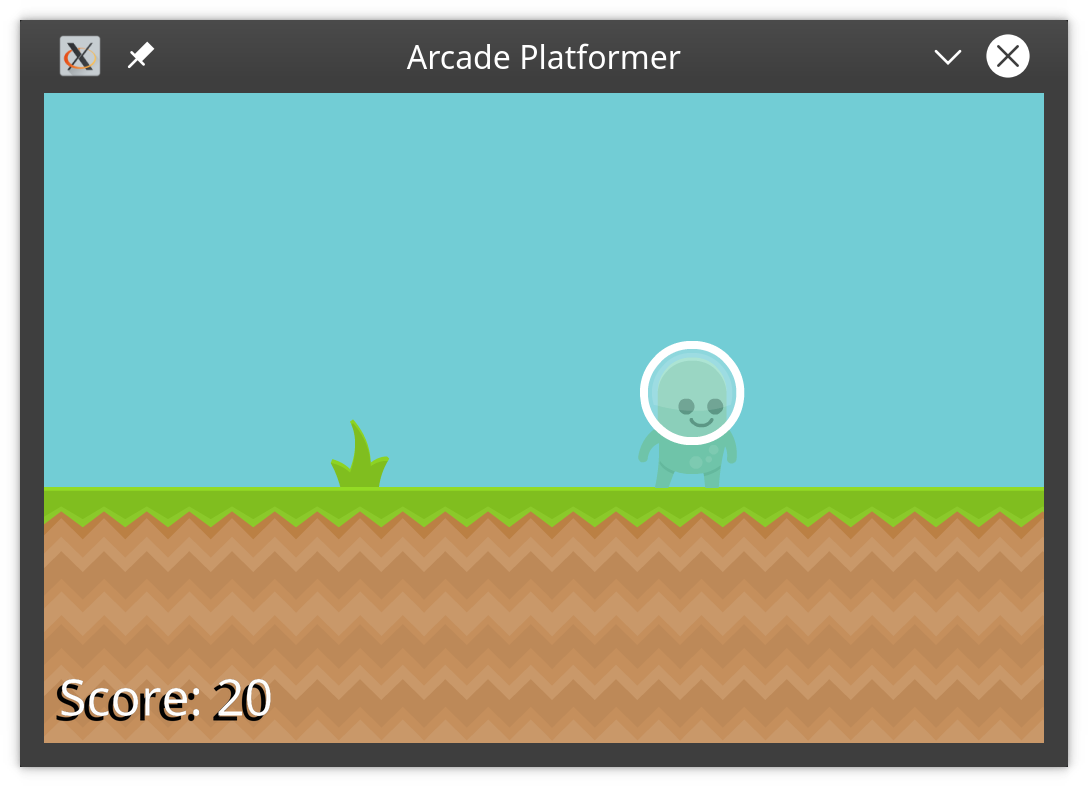
Since you already saw it in action in the scrolling view, let’s start by adding the running score on screen.
On-Screen Score
You’re already keeping track of the player’s score in self.score, which means all you need to do is draw it on the screen. You can handle that in .on_draw() by using arcade.draw_text():
You can find this code in arcade_platformer/08_on_screen_score.py.
The code to draw the score appears at the bottom of .on_draw(), right after the self.player.draw() call. You draw the score last so it’s always visible over everything else:
def on_draw(self) -> None:
    arcade.start_render()

    # Draw all the sprites
    self.background.draw()
    self.walls.draw()
    self.coins.draw()
    self.goals.draw()
    self.ladders.draw()
    self.player.draw()

    # Draw the score in the lower left
    score_text = f"Score: {self.score}"

    # First a black background for a shadow effect
    arcade.draw_text(
        score_text,
        start_x=10 + self.view_left,
        start_y=10 + self.view_bottom,
        color=arcade.csscolor.BLACK,
        font_size=40,
    )
    # Now in white, slightly shifted
    arcade.draw_text(
        score_text,
        start_x=15 + self.view_left,
        start_y=15 + self.view_bottom,
        color=arcade.csscolor.WHITE,
        font_size=40,
    )
First, you construct the string showing the current score. This is what will be displayed by the subsequent calls to arcade.draw_text(). Then you draw the actual text on the screen, passing in the following parameters:
- The text to draw
- The
start_xandstart_ycoordinates indicating where to begin drawing the text - The
colorto draw the text - The
font_sizein points to use
By basing the start_x and start_y parameters on the viewport properties self.view_left and self.view_bottom, you ensure the score is always displayed in the same place in the window, even when the viewport moves.
You draw the same text a second time, but shifted slightly and in a lighter color to provide some contrast.
There are more options available for use with arcade.draw_text(), including specifying bold or italic text and using game-specific fonts. Check out the documentation to customize the text to your liking.
Joystick and Game Controllers
Platform games work extremely well with joysticks and game controllers. The control pads, sticks, and myriad buttons give you many opportunities to allow ultimate control over the characters on screen. Adding joystick control helps your game stand out from the crowd.
Unlike keyboard control, there are no specific joystick methods to override. Instead, arcade provides a function to set up the joystick and exposes variables and methods from pyglet to read the state of the actual stick and buttons. You use the following subset of these in your game:
arcade.get_joysticks()returns a list of the joysticks attached to the system. If this list is empty, then no joysticks are present.joystick.xandjoystick.yreturn the state of the joystick deflection in the horizontal and vertical directions, respectively. Thesefloatvalues range from -1.0 to 1.0 and will need to be converted to useful values for your game.joystick.buttonsreturns a list of Boolean values specifying states of all the buttons on the controller. If a button has been pushed, then its value will beTrue.
For a complete list of the available joystick variables and methods, check out the pyglet documentation.
The code for this can be found in arcade_platformer/09_joystick_control.py.
Before your players can use a joystick, you need to verify one is attached in your game’s .__init__() method. This code appears after you load your game sounds:
# Check if a joystick is connected
joysticks = arcade.get_joysticks()

if joysticks:
    # If so, get the first one
    self.joystick = joysticks[0]
    self.joystick.open()
else:
    # If not, flag it so we won't use it
    print("There are no Joysticks")
    self.joystick = None
First, you enumerate all attached joysticks using arcade.get_joysticks(). If any are found, the first one is saved as self.joystick. Otherwise, you set self.joystick = None.
With the joystick detected and defined, you can read it to provide control for Roz. You do this at the top of .on_update(), before any other checks:
def on_update(self, delta_time: float) -> None:
    """Updates the position of all game objects

    Arguments:
        delta_time {float} -- How much time since the last call
    """

    # First, check for joystick movement
    if self.joystick:
        # Check if we're in the dead zone
        if abs(self.joystick.x) > DEAD_ZONE:
            self.player.change_x = self.joystick.x * PLAYER_MOVE_SPEED
        else:
            self.player.change_x = 0

        if abs(self.joystick.y) > DEAD_ZONE:
            if self.physics_engine.is_on_ladder():
                self.player.change_y = self.joystick.y * PLAYER_MOVE_SPEED
            else:
                self.player.change_y = 0

        # Did the user press the jump button?
        if self.joystick.buttons[0]:
            if self.physics_engine.can_jump():
                self.player.change_y = PLAYER_JUMP_SPEED
                # Play the jump sound
                arcade.play_sound(self.jump_sound)

    # Update the player animation
    self.player.update_animation(delta_time)
Before you can read the joystick, you first make sure a joystick is attached.
All joysticks at rest fluctuate around the center, or zero, value. Because joystick.x and joystick.y return float values, these fluctuations may cause return values slightly above or below zero, which will translate to Roz moving very slightly without any joystick input.
To combat this, game designers define a joystick dead zone that encompasses those small fluctuations. Any changes to joystick.x or joystick.y within this dead zone are ignored. You can implement a dead zone by first defining a constant DEAD_ZONE at the top of your code:
# Viewport margins
# How close do we have to be to scroll the viewport?
LEFT_VIEWPORT_MARGIN = 50
RIGHT_VIEWPORT_MARGIN = 300
TOP_VIEWPORT_MARGIN = 150
BOTTOM_VIEWPORT_MARGIN = 150

# Joystick control
DEAD_ZONE = 0.1
Now you can check if the joystick is moved more than DEAD_ZONE. If not, you ignore the joystick input. Otherwise, you multiply the joystick value by PLAYER_MOVE_SPEED to move Roz. This allows the player to move Roz slower or faster based on how far the joystick is pushed. Remember, you still have to check if Roz is on a ladder before you allow them to move up or down.
Next, you handle jumping. If the first button on the joystick was pressed, which is the A button on my gamepad, you interpret that as a jump command and make Roz jump in the same manner as Space does.
That’s it! Now you can control Roz using any joystick that’s attached and supported by your operating system!
Title and Other Screens
A game that just starts with no introduction can leave your users feeling abandoned. Unless they already know what to do, starting the game directly on level 1 with no title screen or basic instructions can be disconcerting. You can fix that in arcade using views.
A view in arcade represents anything you want to show to the user, whether that’s static text, cutscenes between levels, or the actual game itself. Views are based on the class arcade.View and can be used to show information to the user as well as allow them to play your game:
For this game, you’ll define three separate views:
- Title view allows users to start the game or see a help screen.
- Instructions view shows users the backstory and the basic controls.
- Pause view is displayed when the user pauses the game.
To make everything seamless, you first need to convert your game to a view, so you’ll take care of that now!
The PlatformerView
Modifying your existing game to use views seamlessly requires three separate code changes. You can find these changes in the downloadable materials in arcade_platformer/10_view_conversion.py. You can download all the materials and code used in this tutorial by clicking the link below:
Get the Source Code: Click here to get the source code you’ll use to build a platform game with Python Arcade in this tutorial.
The first is a single line change to your Platformer class:
class PlatformerView(arcade.View):
    def __init__(self) -> None:
        super().__init__()
To keep the naming consistent, you change the name of the class as well as the base class. Functionally, the PlatformerView class contains the same methods the original Platformer class had.
The second change is in .__init__(), where you are no longer passing in the constants SCREEN_WIDTH, SCREEN_HEIGHT, or SCREEN_TITLE. This is because your PlatformerView class is now based on arcade.View, which does not use these constants. Your super() call also changes to reflect that.
Why don’t you need those constants anymore? Views aren’t windows, so there’s no need to pass in those arcade.Window parameters. So where do you define the size and appearance of the game window?
That happens in the final change, at the bottom of your file, in the __main__ section:
if __name__ == "__main__":
    window = arcade.Window(
        width=SCREEN_WIDTH, height=SCREEN_HEIGHT, title=SCREEN_TITLE
    )
    platform_view = PlatformerView()
    platform_view.setup()
    window.show_view(platform_view)
    arcade.run()
You explicitly create an arcade.Window in which to display your views. You then create the PlatformerView object, call .setup(), and use window.show_view(platformer_view) to display it. Once it’s visible, you run your game as before.
These changes should result in no functional change to gameplay, so after testing this, you’re ready to add a title view.
The Title View
The title view for any game should show the game off a bit and allow players to start the game at their leisure. While animated title pages are possible, for this tutorial you’ll create a static title view with a simple menu to allow users to start the game or view a help screen:
The code for this can be found at arcade_platformer/11_title_view.py.
Creating the title view begins by defining a new class for it:
class TitleView(arcade.View):
    """Displays a title screen and prompts the user to begin the game.
    Provides a way to show instructions and start the game.
    """

    def __init__(self) -> None:
        super().__init__()

        # Find the title image in the images folder
        title_image_path = ASSETS_PATH / "images" / "title_image.png"

        # Load our title image
        self.title_image = arcade.load_texture(title_image_path)

        # Set our display timer
        self.display_timer = 3.0

        # Are we showing the instructions?
        self.show_instructions = False
The title view displays a simple static image.
Note: The title image used here is provided in the downloadable materials only. You may use it as provided or substitute your own as you wish.
You use the self.display_timer and self.show_instructions properties to make a set of instructions flash on screen. This is handled in .on_update(), which you create in the TitleView class:
def on_update(self, delta_time: float) -> None:
    """Manages the timer to toggle the instructions

    Arguments:
        delta_time -- time passed since last update
    """

    # First, count down the time
    self.display_timer -= delta_time

    # If the timer has run out, we toggle the instructions
    if self.display_timer < 0:

        # Toggle whether to show the instructions
        self.show_instructions = not self.show_instructions

        # And reset the timer so the instructions flash slowly
        self.display_timer = 1.0
Recall that the delta_time parameter tells you how much time has passed since the last call to .on_update(). Each time .on_update() is called, you subtract delta_time from self.display_timer. When that passes zero, you toggle self.show_instructions and reset the timer.
So how does this control when the instructions are displayed? That all happens in .on_draw():
def on_draw(self) -> None:
    # Start the rendering loop
    arcade.start_render()

    # Draw a rectangle filled with our title image
    arcade.draw_texture_rectangle(
        center_x=SCREEN_WIDTH / 2,
        center_y=SCREEN_HEIGHT / 2,
        width=SCREEN_WIDTH,
        height=SCREEN_HEIGHT,
        texture=self.title_image,
    )

    # Should we show our instructions?
    if self.show_instructions:
        arcade.draw_text(
            "Enter to Start | I for Instructions",
            start_x=100,
            start_y=220,
            color=arcade.color.INDIGO,
            font_size=40,
        )
After drawing the background image, you check if self.show_instructions is set. If so, you draw the instruction text using arcade.draw_text(). Otherwise, you draw nothing. Since .on_update() toggles the value of self.show_instructions once every second, this makes the text flash on screen.
The instructions ask the player to hit Enter or I, so you need to provide an .on_key_press() method:
def on_key_press(self, key: int, modifiers: int) -> None:
    """Resume the game when the user presses ESC again

    Arguments:
        key -- Which key was pressed
        modifiers -- What modifiers were active
    """
    if key == arcade.key.RETURN:
        game_view = PlatformerView()
        game_view.setup()
        self.window.show_view(game_view)
    elif key == arcade.key.I:
        instructions_view = InstructionsView()
        self.window.show_view(instructions_view)
If the user presses Enter, you create a PlatformerView object called game_view, call game_view.setup(), and show that view to start the game. If the user presses I, you create an InstructionsView object (more on that below) and show it instead.
Finally, you want the title screen to be the first thing the user sees, so you update your __main__ section as well:
if __name__ == "__main__":
    window = arcade.Window(
        width=SCREEN_WIDTH, height=SCREEN_HEIGHT, title=SCREEN_TITLE
    )
    title_view = TitleView()
    window.show_view(title_view)
    arcade.run()
Now, what was that about an instructions view?
Instructions View
Showing the user game instructions can be as involved as the full game or as lightweight as the title screen:
In this case, your instructions view is very similar to the title screen:
- Show a pre-generated image with the game instructions.
- Allow the player to start the game if they press Enter.
- Return to the title screen if the player presses Esc.
Since there is no timer, you only need to implement three methods:
.__init__()to load the instructions image.on_draw()to draw the image.on_key_press()to handle user input
You can find this code under arcade_platformer/12_instructions_view.py:
class InstructionsView(arcade.View):
    """Show instructions to the player"""

    def __init__(self) -> None:
        """Create instructions screen"""
        super().__init__()

        # Find the instructions image in the image folder
        instructions_image_path = (
            ASSETS_PATH / "images" / "instructions_image.png"
        )

        # Load our title image
        self.instructions_image = arcade.load_texture(instructions_image_path)

    def on_draw(self) -> None:
        # Start the rendering loop
        arcade.start_render()

        # Draw a rectangle filled with the instructions image
        arcade.draw_texture_rectangle(
            center_x=SCREEN_WIDTH / 2,
            center_y=SCREEN_HEIGHT / 2,
            width=SCREEN_WIDTH,
            height=SCREEN_HEIGHT,
            texture=self.instructions_image,
        )

    def on_key_press(self, key: int, modifiers: int) -> None:
        """Start the game when the user presses Enter

        Arguments:
            key -- Which key was pressed
            modifiers -- What modifiers were active
        """
        if key == arcade.key.RETURN:
            game_view = PlatformerView()
            game_view.setup()
            self.window.show_view(game_view)

        elif key == arcade.key.ESCAPE:
            title_view = TitleView()
            self.window.show_view(title_view)
With that, you can now show your player a title screen and instructions and allow them to move between the screens.
But what if someone is playing your game and the phone rings? Let’s see how you can use views to implement a pause feature.
Pause View
Implementing pause functionality requires you to code two new features:
- A keypress that will pause and unpause the game
- A way to indicate the game is paused
When the user pauses, they will see something that looks like this:
You can find this code in arcade_platformer/13_pause_view.py.
You add the keypress in PlatformerView.on_keypress(), just after checking for the jump key:
# Check if we can jump
elif key == arcade.key.SPACE:
    if self.physics_engine.can_jump():
        self.player.change_y = PLAYER_JUMP_SPEED
        # Play the jump sound
        arcade.play_sound(self.jump_sound)

# Did the user want to pause?
elif key == arcade.key.ESCAPE:
    # Pass the current view to preserve this view's state
    pause = PauseView(self)
    self.window.show_view(pause)
When the player hits Esc, the game creates a new PauseView object and shows it. Since the PlatformerView won’t actively be shown anymore, it can’t process any method calls such as .on_update() or .on_draw(). This effectively stops the game from running.
One thing to note is the line creating your new PauseView object. Here you pass in self, which is a reference to the current PlatformerView object. Remember this, as it will be important later.
Now you can create the new PauseView class. This class is very similar to the TitleView and InstructionView classes you’ve already implemented. The biggest difference is what the view shows. Instead of a graphic that completely covers the game screen, the PauseView shows the active game screen covered with a translucent layer. Text drawn on this layer indicates that the game is paused, while the background shows the user where it is paused.
Defining the pause view starts with defining the class and its .__init__() method:
class PauseView(arcade.View):
    """Shown when the game is paused"""

    def __init__(self, game_view: arcade.View) -> None:
        """Create the pause screen"""
        # Initialize the parent
        super().__init__()

        # Store a reference to the underlying view
        self.game_view = game_view

        # Store a semitransparent color to use as an overlay
        self.fill_color = arcade.make_transparent_color(
            arcade.color.WHITE, transparency=150
        )
Here, .__init__() accepts a single parameter called game_view. This is the reference to the PlatformerView game you passed when you created the PauseView object. You need to store this reference in self.game_view since you’ll be using it later.
To create the translucent layer effect, you also create a semitransparent color that you’ll use to fill the screen in PauseView.on_draw():
def on_draw(self) -> None:
    """Draw the underlying screen, blurred, then the Paused text"""

    # First, draw the underlying view
    # This also calls start_render(), so no need to do it again
    self.game_view.on_draw()

    # Now create a filled rect that covers the current viewport
    # We get the viewport size from the game view
    arcade.draw_lrtb_rectangle_filled(
        left=self.game_view.view_left,
        right=self.game_view.view_left + SCREEN_WIDTH,
        top=self.game_view.view_bottom + SCREEN_HEIGHT,
        bottom=self.game_view.view_bottom,
        color=self.fill_color,
    )

    # Now show the Pause text
    arcade.draw_text(
        "PAUSED - ESC TO CONTINUE",
        start_x=self.game_view.view_left + 180,
        start_y=self.game_view.view_bottom + 300,
        color=arcade.color.INDIGO,
        font_size=40,
    )
Notice that you use the saved reference to the current PlatformerView object here. The current state of gameplay is shown first by calling self.game_view.on_draw(). Since self.game_view is still in memory and active, this is perfectly acceptable. As long as self.game_view.on_update() is never called, you’ll always draw a static view of the game at the moment the pause key was pressed.
Next, you draw a rectangle that covers the entire window, filled with the semitransparent color defined in .__init__(). Since this happens after the game has drawn its objects, it appears as if a fog has descended on the game.
To make clear that the game is paused, you finally inform the user of that fact by displaying a message on the screen.
Unpausing the game uses the same Esc keypress as pausing, so you have to handle it:
def on_key_press(self, key: int, modifiers: int) -> None:
    """Resume the game when the user presses ESC again

    Arguments:
        key -- Which key was pressed
        modifiers -- What modifiers were active
    """
    if key == arcade.key.ESCAPE:
        self.window.show_view(self.game_view)
Here is the final reason to save the self.game_view reference. When the player presses Esc again, you need to reactivate the game where it left off. Instead of creating a new PlatformerView, you just show the already active view you saved earlier.
Using these techniques, you can implement as many views as you like. Some ideas for expansion include:
- A Game Over view at the end of the game
- An end-of-level view to transition between levels and allow for cutscenes
- A special restart screen to be displayed if the player chooses to restart the level
- The ever-popular boss key, with a spreadsheet overlay for players who are playing at work
The choices are all yours!
Moving Enemies and Platforms
Making things move on screen automatically isn’t as difficult as it sounds. Instead of moving an object in response to player input, you move objects based on the internal and game states. You’ll implement two different kinds of movement:
- Enemies who move freely in confined areas
- Platforms that move on set paths
You’ll explore making enemies move first.
Enemy Movement
You can find the code for this section in the downloadable materials, in arcade_platformer/14_enemies.py and assets/platform_level_02.tmx. It will show you how to make your game resemble this:
Before you can make enemies move, you have to have an enemy. For this tutorial, you’ll define your enemies in code, which requires an enemy class:
class Enemy(arcade.AnimatedWalkingSprite):
    """An enemy sprite with basic walking movement"""

    def __init__(self, pos_x: int, pos_y: int) -> None:
        super().__init__(center_x=pos_x, center_y=pos_y)

        # Where are the player images stored?
        texture_path = ASSETS_PATH / "images" / "enemies"

        # Set up the appropriate textures
        walking_texture_path = [
            texture_path / "slimePurple.png",
            texture_path / "slimePurple_move.png",
        ]
        standing_texture_path = texture_path / "slimePurple.png"

        # Load them all now
        self.walk_left_textures = [
            arcade.load_texture(texture) for texture in walking_texture_path
        ]

        self.walk_right_textures = [
            arcade.load_texture(texture, mirrored=True)
            for texture in walking_texture_path
        ]

        self.stand_left_textures = [
            arcade.load_texture(standing_texture_path, mirrored=True)
        ]
        self.stand_right_textures = [
            arcade.load_texture(standing_texture_path)
        ]

        # Set the enemy defaults
        self.state = arcade.FACE_LEFT
        self.change_x = -PLAYER_MOVE_SPEED // 2

        # Set the initial texture
        self.texture = self.stand_left_textures[0]
Defining the enemy as a class follows a similar pattern to that used for Roz. Based on arcade.AnimatedWalkingSprite, enemies inherit some basic functionality. Like Roz, you need to take the following steps:
- Define the textures to use when animating.
- Define which way the sprite should initially face.
- Define how fast it should move.
By making the enemy move at half the speed of Roz, you ensure Roz can outrun the enemy.
Now you need to create the enemy and place it on the screen. Since each level may have different enemies in different places, create a PlatformerView method to handle this:
def create_enemy_sprites(self) -> arcade.SpriteList:
    """Creates enemy sprites appropriate for the current level

    Returns:
        A Sprite List of enemies"""
    enemies = arcade.SpriteList()

    # Only enemies on level 2
    if self.level == 2:
        enemies.append(Enemy(1464, 320))

    return enemies
Creating a SpriteList to hold your enemies ensures you can manage and update your enemies in a similar fashion to other on-screen objects. While this example shows a single enemy placed at a hard-coded position for a single level, you can write code to handle multiple enemies for different levels or read enemy placement information from a data file as well.
You call this method in .setup(), right after creating the player sprite and before setting up the viewport:
# Move the player sprite back to the beginning
self.player.center_x = PLAYER_START_X
self.player.center_y = PLAYER_START_Y
self.player.change_x = 0
self.player.change_y = 0

# Set up our enemies
self.enemies = self.create_enemy_sprites()

# Reset the viewport
self.view_left = 0
self.view_bottom = 0
Now that your enemies are created, you can update them right after updating the player in .on_update():
# Update the player animation
self.player.update_animation(delta_time)

# Are there enemies? Update them as well
self.enemies.update_animation(delta_time)
for enemy in self.enemies:
    enemy.center_x += enemy.change_x
    walls_hit = arcade.check_for_collision_with_list(
        sprite=enemy, sprite_list=self.walls
    )
    if walls_hit:
        enemy.change_x *= -1
The arcade physics engine doesn’t manage enemy movement automatically, so you have to handle it manually. You also need to check for wall hits, reversing the enemy movement if it collides with a wall.
You also need to check if Roz has collided with any of your enemies. Do this after checking to see if Roz picked up a coin:
for coin in coins_hit:
    # Add the coin score to our score
    self.score += int(coin.properties["point_value"])

    # Play the coin sound
    arcade.play_sound(self.coin_sound)

    # Remove the coin
    coin.remove_from_sprite_lists()

# Has Roz collided with an enemy?
enemies_hit = arcade.check_for_collision_with_list(
    sprite=self.player, sprite_list=self.enemies
)

if enemies_hit:
    self.setup()
    title_view = TitleView()
    window.show_view(title_view)
This code starts identically to the coin collision check, except you look for collisions between Roz and self.enemies. However, if you’ve collided with any enemy, the game is over, so the only check required is whether at least one enemy was hit. If so, you call .setup() to reset the current level and show a TitleView. If you’ve created a Game Over view, this would be the place to create and show it.
The last thing to do is draw your enemies using the same techniques as other sprite lists. Add the following to .on_draw():
def on_draw(self) -> None:
    arcade.start_render()

    # Draw all the sprites
    self.background.draw()
    self.walls.draw()
    self.coins.draw()
    self.goals.draw()
    self.ladders.draw()
    self.enemies.draw()
    self.player.draw()
You can expand this technique to create as many enemies of as many different types as you’d like.
Now you’re ready to put some platforms in motion!
Moving Platforms
Moving platforms give your game visual and strategic interest. They allow you to build worlds and obstacles that require thought and skill to overcome:
You can find the code for this section at arcade_platformer/15_moving_platforms.py and assets/platform_level_02.tmx. If you want to build the moving platforms yourself, you can find a starting level without existing platforms at assets/platform_level_02_start.tmx.
Since platforms are treated as walls in arcade, it’s usually quicker to define them declaratively in Tiled. In Tiled, open your map and create a new object layer called moving_platforms:
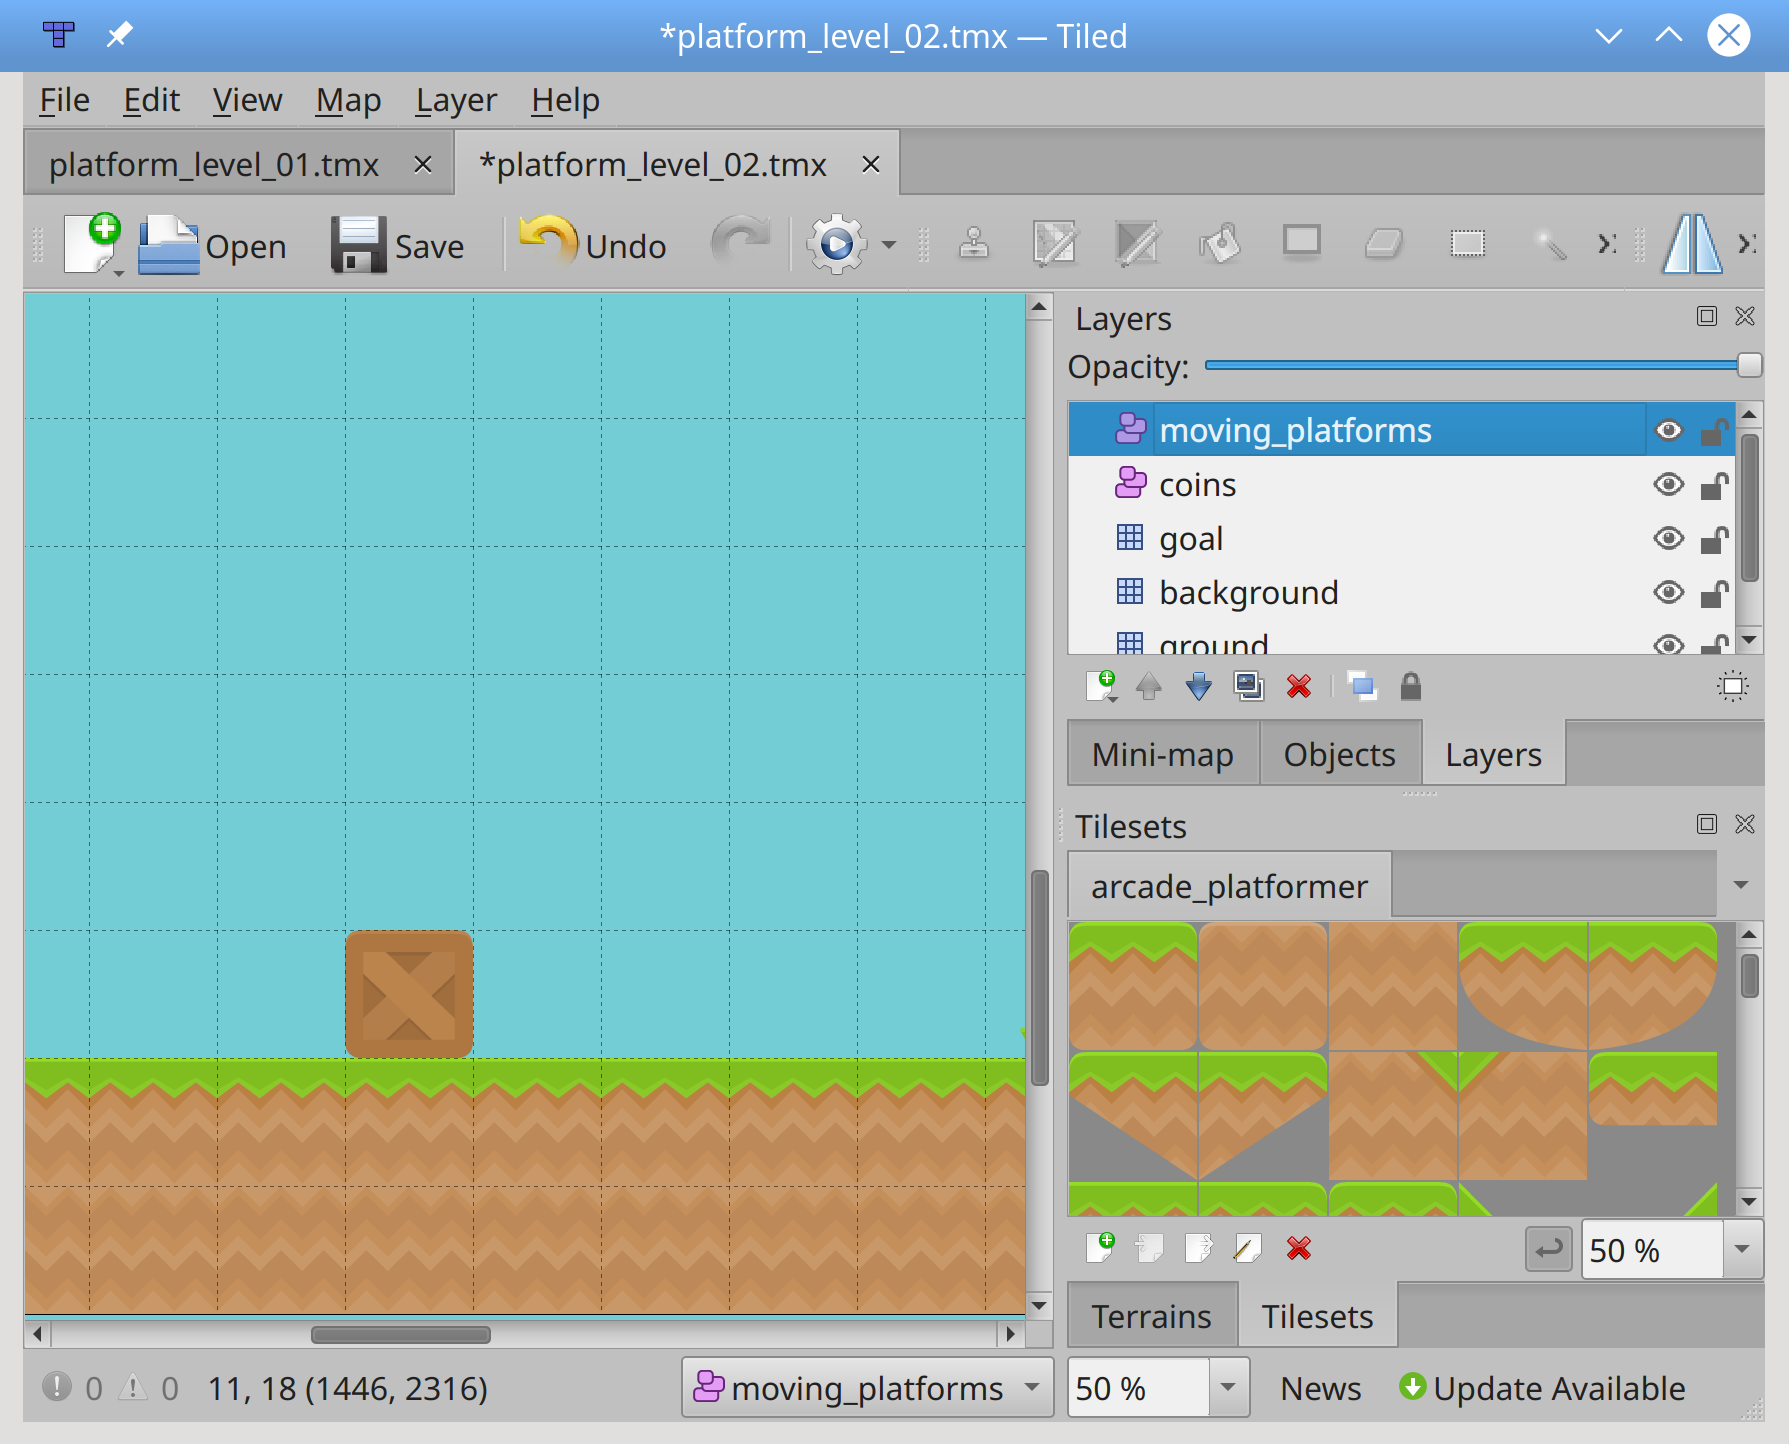
Creating moving platforms on an object layer allows you to define properties arcade will use later to move the platforms. For this tutorial, you’ll create a single moving platform.
With this layer selected, hit T to add a new tile and select the tile that will be the new platform. Place the tile near the location you want it to start or end. A tile that appears complete on its own is usually the best selection:
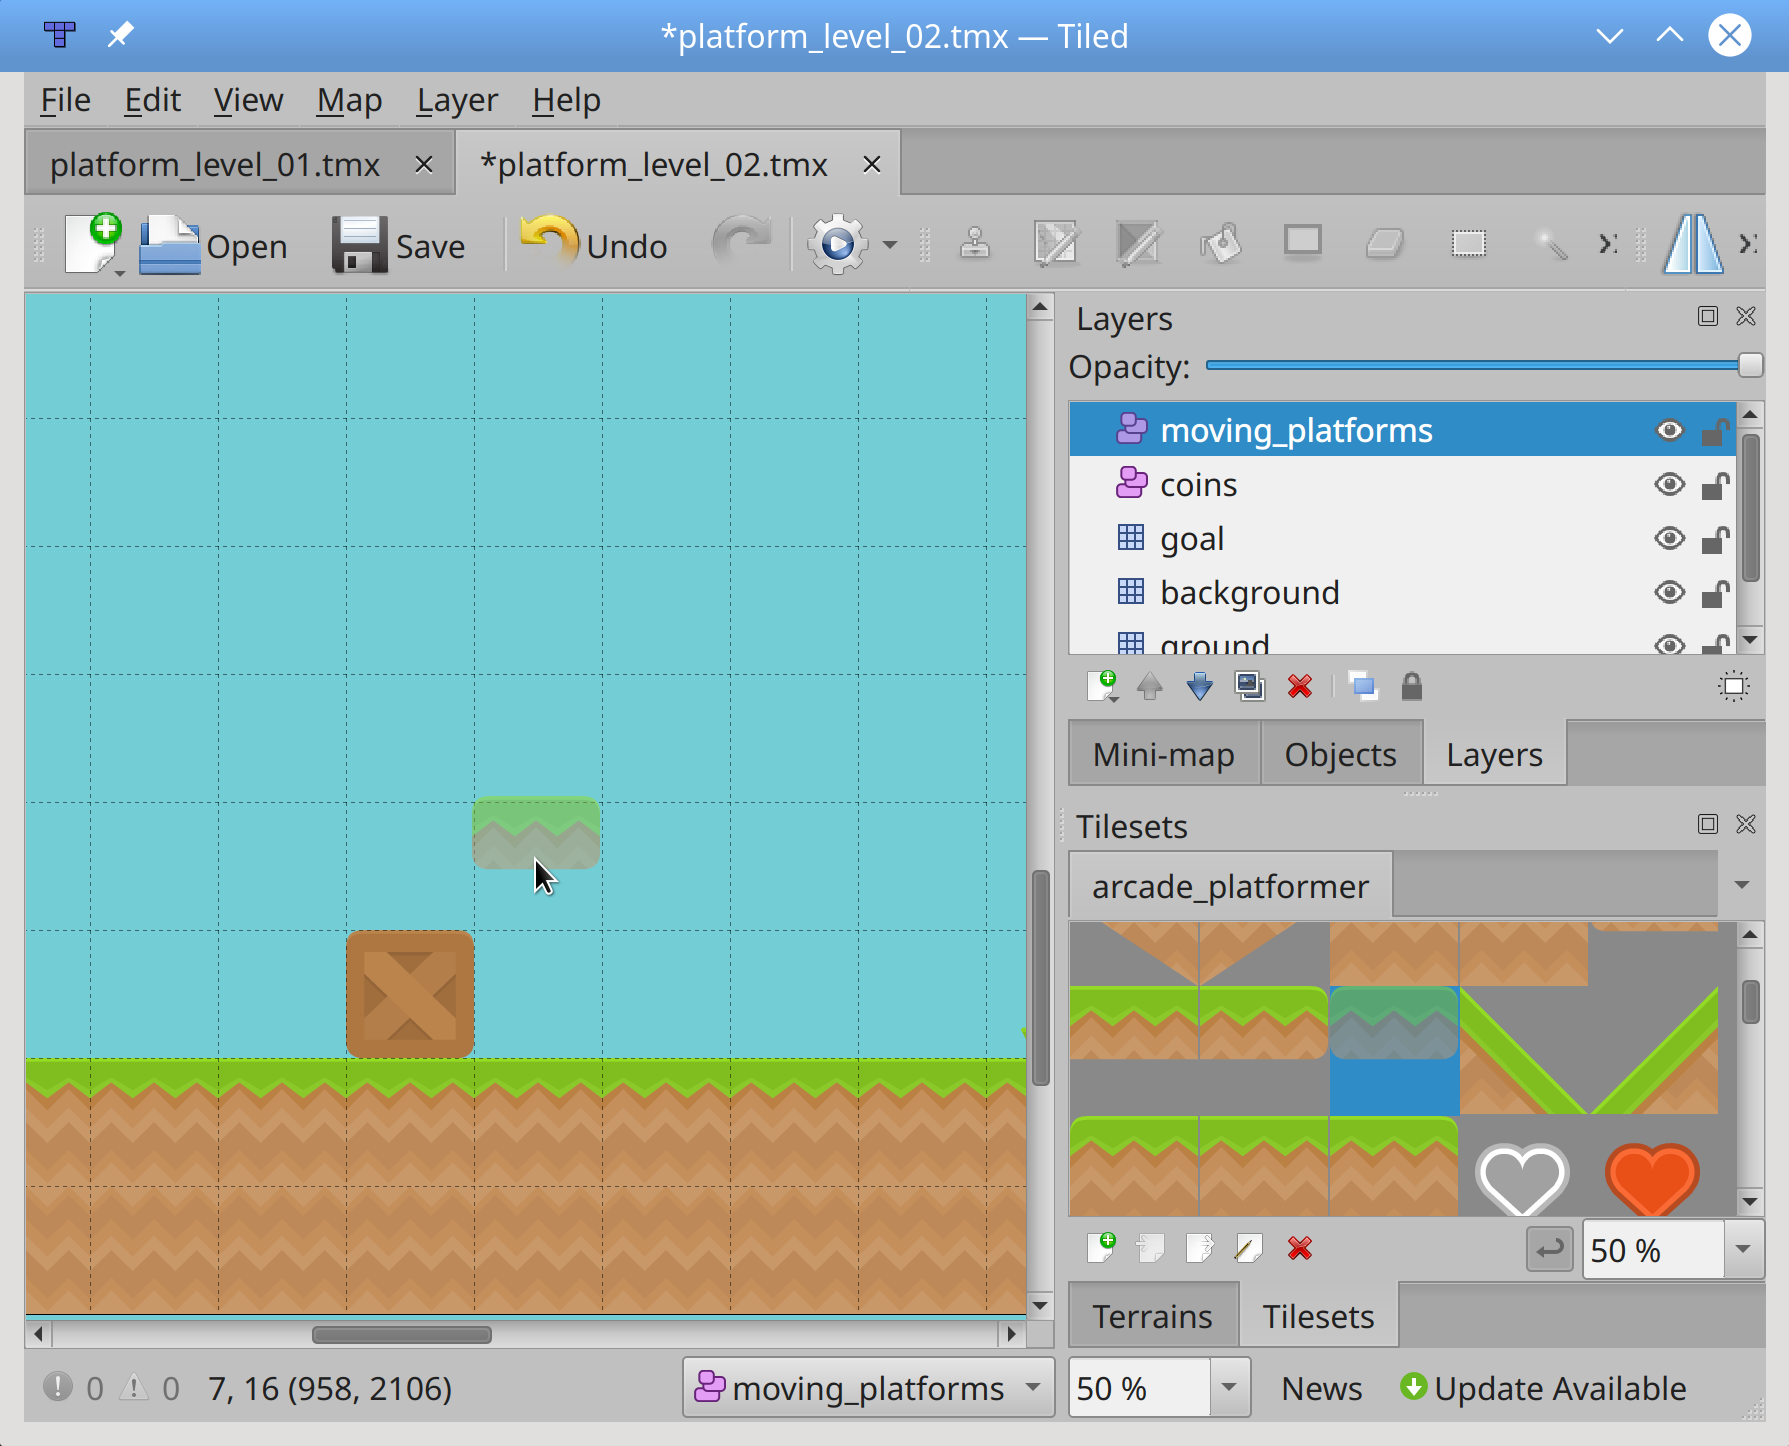
Once the moving tile is placed, hit Esc to stop placing tiles.
Next, you define custom properties to set the speed and limits of the moving platform’s motion. Support for moving platforms both horizontally and vertically is built into arcade using the following defined properties:
boundary_leftandboundary_rightlimit the platform’s horizontal motion.boundary_topandboundary_bottomlimit the platform’s vertical motion.change_xsets the horizontal speed.change_ysets the vertical speed.
Since this platform carries Roz horizontally over an enemy below, only the boundary_left, boundary_right, and change_x properties are defined as float values:
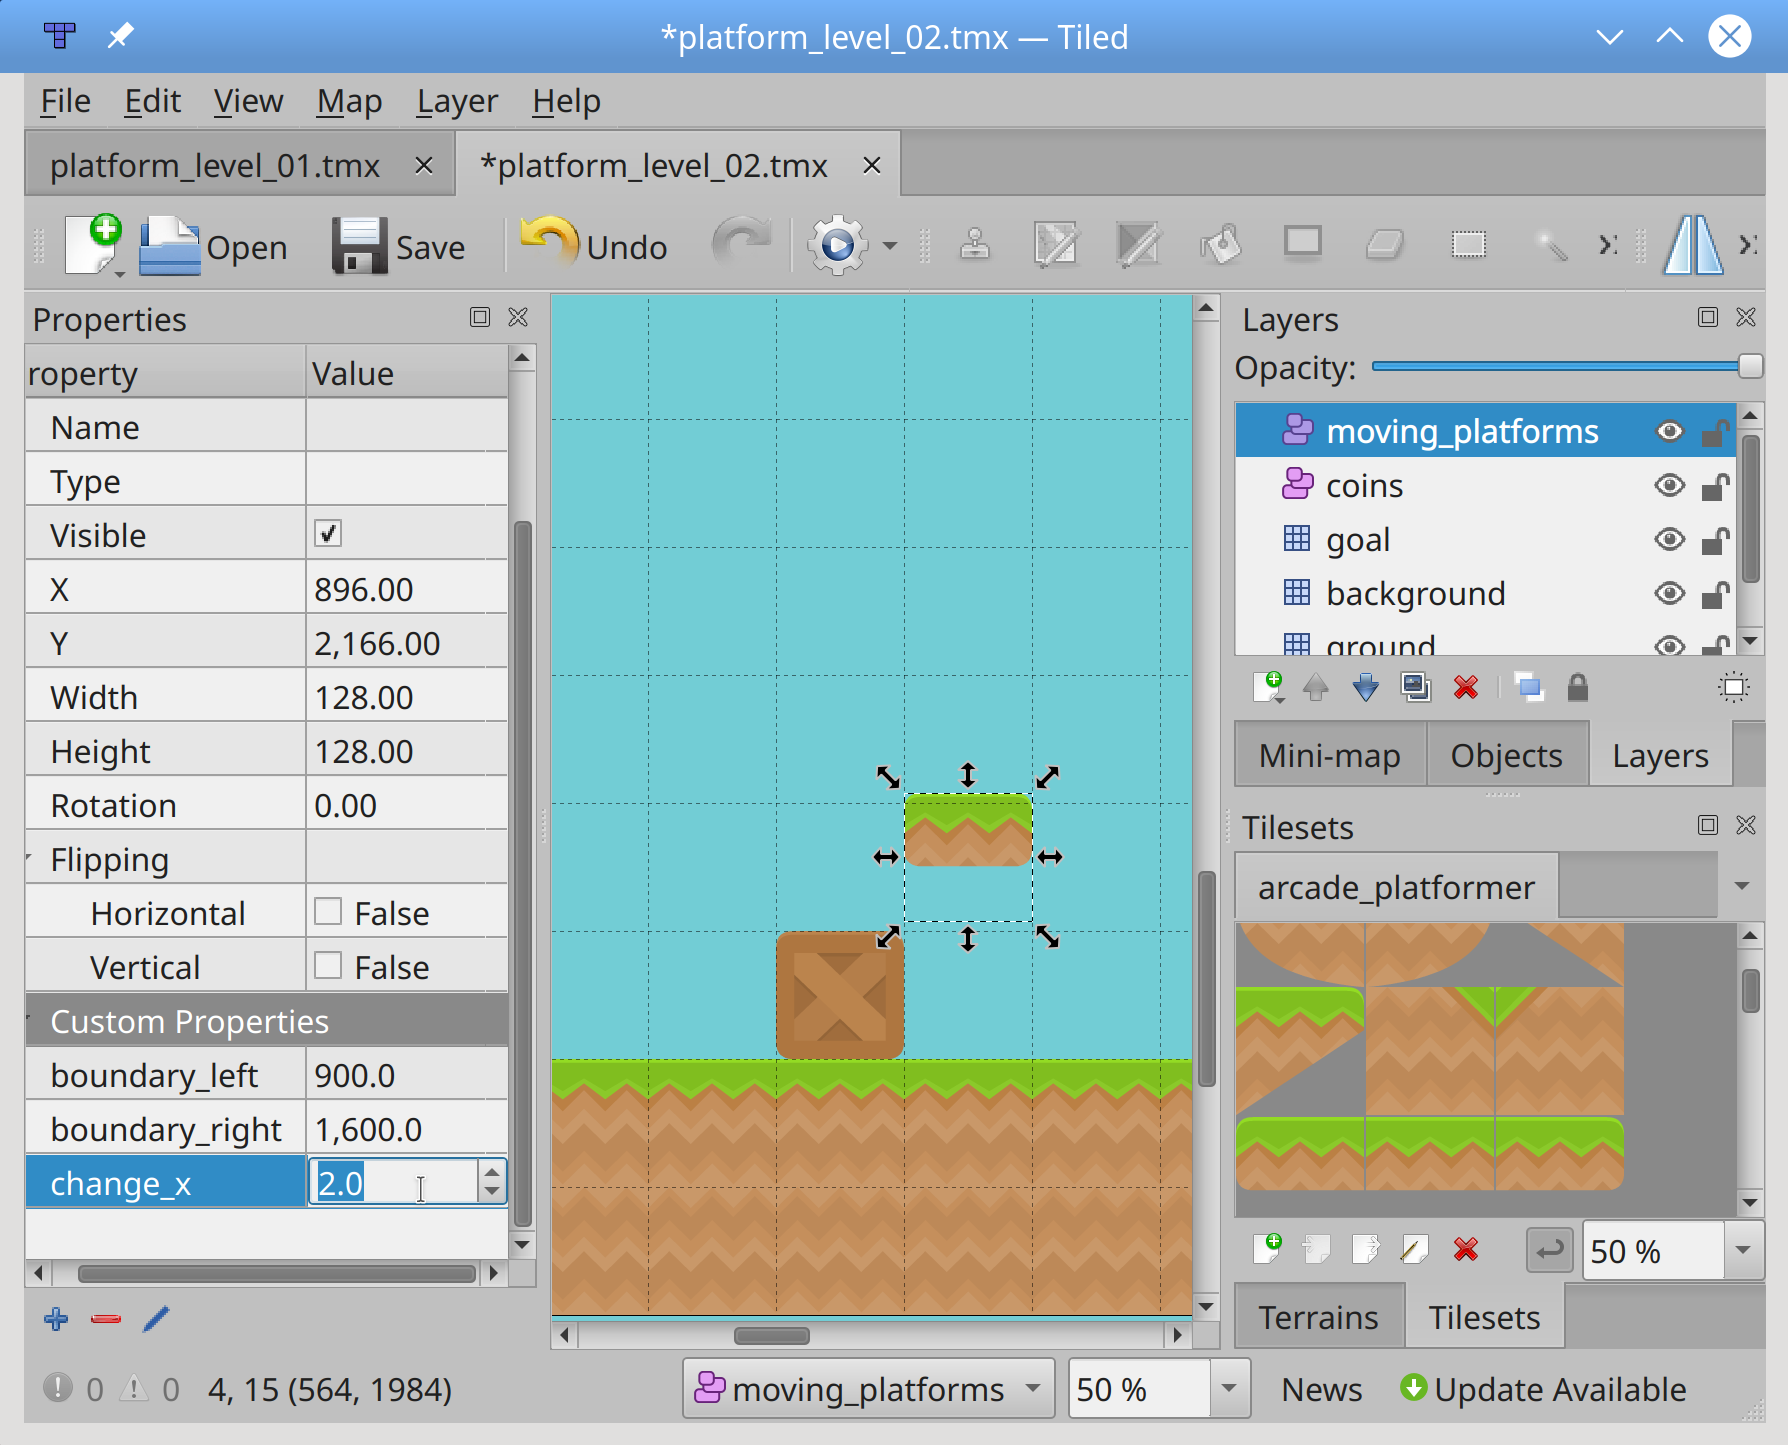
You can modify these properties to suit your level design. If you define all six custom properties, your platform will move in a diagonal pattern!
With your platform and its properties set, it’s time to process the new layer. In PlatformerView.setup(), add the following code after processing your map layers and before setting the background color:
self.coins = arcade.tilemap.process_layer(
    game_map, layer_name=coin_layer, scaling=MAP_SCALING
)

# Process moving platforms
moving_platforms_layer_name = "moving_platforms"
moving_platforms = arcade.tilemap.process_layer(
    game_map,
    layer_name=moving_platforms_layer_name,
    scaling=MAP_SCALING,
)
for sprite in moving_platforms:
    self.walls.append(sprite)
Since your moving platforms live in an object layer, they must be processed separately from your other walls. However, since your player needs to be able to stand on them, you add them to self.walls so the physics engine can handle them properly.
Finally, you need to make your platforms move. Or do you?
Remember what you’ve already done:
- When you defined the moving platform in Tiled, you set custom properties to define its movement.
- When you processed the
moving_platformslayer, you added everything in it toself.walls. - When you created the
self.physics_engine, you passed theself.wallslist as a parameter.
What this all means is that, when you call self.physics_engine.update() in .on_update(), all your platforms will move automatically! Any wall tiles that don’t have the custom properties set won’t move at all. The physics engine is even smart enough to move Roz when they are standing on a moving platform:
You can add as many moving platforms as you wish, to create as complex a world as you wish.
Conclusion
The Python arcade library is a modern Python framework, ideal for crafting games with compelling graphics and sound. Object oriented and built for Python 3.6 and up, arcade provides the programmer with a modern set of tools for crafting great game experiences, including platform games. arcade is open source and contributions are always welcome.
After reading this tutorial, you’re now able to:
- Install the Python
arcadelibrary - Create a basic 2D game structure
- Find usable game artwork and other assets
- Build platform maps using the Tiled map editor
- Define player actions, game rewards, and obstacles
- Control your player with keyboard and joystick input
- Play sound effects for game actions
- Scroll the game screen with viewports to keep your player in view
- Add title, instruction, and pause screens
- Move nonplayer game elements on the screen
There’s still plenty to do with this game. Here are some feature ideas you can implement:
- Add a Game Over screen.
- Animate coins on screen.
- Add animations when Roz collides with an enemy.
- Detect when Roz falls off the map.
- Give Roz multiple lives.
- Add a high score table.
- Use the
arcade.PymunkPhysicsEngineto provide more realistic physics interactions.
There’s lots more to explore in the arcade library as well. With these techniques, you’re now fully equipped to get out there and make some cool games!
You can download all the code, images, and sounds used in this tutorial by clicking the link below:
Get the Source Code: Click here to get the source code you’ll use to build a platform game with Python Arcade in this tutorial.


