
Creating applications with a user-friendly command-line interface (CLI) is a useful skill for a Python developer. With this skill, you can create tools to automate and speed up tasks in your working environment. In this tutorial, you’ll build a Python directory tree generator tool for your command line.
The application will take a directory path as an argument at the command line and display a directory tree diagram on your screen. It’ll also provide other options to tweak the output.
In this tutorial, you’ll learn how to:
- Create a CLI application with Python’s
argparse - Recursively traverse a directory structure using
pathlib - Generate, format, and display a directory tree diagram
- Save the directory tree diagram to an output file
You can download the code and other resources required to build this directory tree generator project by clicking the link below:
Get Sample Code: Click here to get the sample code you’ll use to build a directory tree generator with Python in this tutorial.
Demo: A Directory Tree Generator Tool in Python
In this tutorial, you’ll build a command-line tool to list the contents of a directory or folder in a treelike diagram. There are already several mature solutions out there that perform this task. You’ll find tools like the tree command, which is available on most operating systems, plus other tools, like treelib, dirtriex, and so on. However, figuring out your own solution to this problem would be a good learning exercise.
This tutorial refers to the kind of tool described above as a directory tree generator. The tool you’ll build here will allow you to generate and display a treelike diagram listing the internal structure of a given directory in your file system. You’ll also find this diagram referred to as a directory tree diagram throughout the tutorial.
Your directory tree generator will have a user-friendly CLI. It’ll also provide some interesting features, such as displaying a tree diagram with the contents of a directory on your terminal window and saving the diagram to an external file.
Here’s how the application will look and work once you get to the end of this tutorial:
Your directory tree generator will provide a fully functional but minimal CLI with a couple of options that allow you to generate and display a tree diagram listing all the files and directories in a given root directory.
Project Overview
The project you’ll build in this tutorial consists of a command-line application that takes a directory path as an argument, walks through its internal structure, and generates a treelike diagram listing the contents of the directory at hand. In this section, you’ll take a first look at the problem and a possible solution. You’ll also decide how to lay out the project.
Laying Out the Project
To build your directory tree generator, you’ll create a few modules and a package. Then you’ll give the project a coherent Python application layout. At the end of this tutorial, your project’s root directory will have the following directory structure:
./rptree_project/
│
├── rptree/
│   ├── rptree.py
│   ├── __init__.py
│   └── cli.py
│
├── README.md
└── tree.py
The rptree_project/ directory is the project’s root directory. There, you’ll place the following files:
-
README.mdprovides the project description and instructions on installing and running the application. Adding a descriptive and detailed README file to your projects is considered a best practice in programming, especially if you’re planning to release the project as an open source solution. -
tree.pyprovides an entry-point script for you to run the application.
Then you have the rptree/ directory that holds a Python package with three modules:
rptree.pyprovides the application’s main functionalities.__init__.pyenablesrptree/as a Python package.cli.pyprovides the command-line interface for the application.
Your directory tree generator tool will run on the command line. It’ll take arguments, process them, and display a directory tree diagram on the terminal window. It can also save the output diagram to a file in markdown format.
Outlining the Solution
Traversing a directory in your file system and generating a user-friendly tree diagram that reflects its contents might not look like a difficult task at first glance. However, when you start thinking about it, you realize that it hides a lot of complexity.
First off, it’s a problem that involves recursion. Say you have your file manager open at your home directory and you’re looking for a specific file. Then you double-click the Documents/ subdirectory and get its contents displayed on your screen. If the file is there, then you open it. Otherwise, you open another subdirectory and continue looking. You can describe this process with the following steps:
- Open a directory.
- Inspect the directory contents.
- If the file is found, open it. Otherwise, go back to step one.
The conclusion is that working with directories and their contents is a problem that you’ll commonly approach using recursion. That’s the path you’ll follow in this tutorial. In general, you’ll run the following steps:
- Get the path to a directory on your file system.
- Open the directory.
- Get a list of all its entries (directories and files).
- If the directory contains subdirectories, then repeat the process from step two.
To run the first step, you need to provide a way for your application to take a directory path at the command line. To do this, you’ll use Python’s argparse module from the standard library.
To complete the second and third steps, you’ll use pathlib. This module provides several tools to manage and represent file system paths. Finally, you’ll use a regular Python list to store the list of entries in the directory structure.
A second point to consider is how to shape a good-looking tree diagram that reflects the directory structure in an accurate and user-friendly way. In this tutorial, you’ll shape your tree diagrams using a strategy that mimics what the tree command does, so your diagrams will look like the one you saw in the above section.
Organizing the Code
In terms of design, if you think of the problem at hand and apply the single-responsibility principle, then you can organize the code of your directory tree generator app according to three main responsibilities:
- Provide the CLI
- Walk the root directory and build the tree diagram
- Display the tree diagram
The CLI-related code will live in cli.py. In rptree.py, you’ll place the code related to the second and third responsibilities.
In this example, you’ll write a high-level DirectoryTree class to generate and display the tree diagram. You’ll use this class in your client code, or main function. The class will provide a method called .generate() to generate and display the directory tree diagram.
Next, you’ll code a low-level _TreeGenerator class to walk the directory structure and create the list containing the entries that shape the tree diagram. This class will provide a method called .build_tree() to perform this operation.
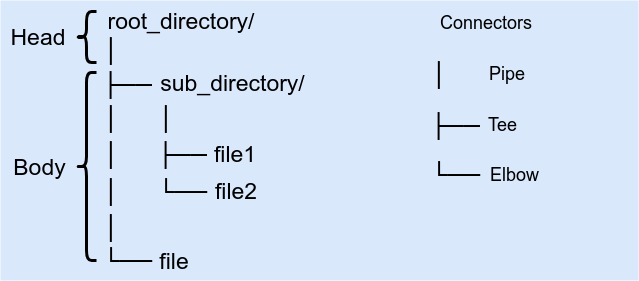
The tree diagram will have two main components:
- Head will provide the root directory representation.
- Body will provide the directory content representation.
The tree head representation will consist of the name of the root directory and an additional pipe (│) character to connect the tree head and body.
The tree body representation will consist of strings that include the following components:
- A prefix string that provides the required spacing to reflect the position of an entry in the directory structure
- A character that connects the current subdirectory or file with its parent directory
- The name of the current subdirectory or file
Here’s how you’ll combine these elements to build a directory tree diagram:
Your tree generator’s .build_tree() method will return a list with all the entries that shape the directory tree diagram. To display the diagram, you need to call .generate() on your directory tree object.
Prerequisites
To complete this tutorial and get the most out of it, you should be comfortable with the following concepts:
- Creating command-line interfaces (CLIs) with Python’s
argparsemodule - Traversing the file system with
pathlib - Using recursion and creating recursive functions in Python
- Working with files using
open()and thewithstatement - Using
print()to print text to the screen and also to write to physical files in your file system - Using object-oriented programming in Python
If you don’t have all of the required knowledge before starting this tutorial, then that’s okay! You can always stop and review the following resources:
- How to Build Command Line Interfaces in Python With argparse
- Python 3’s pathlib Module: Taming the File System
- Thinking Recursively in Python
- Working With Files in Python
- Your Guide to the Python print() Function
- Object-Oriented Programming (OOP) in Python 3
In terms of software dependencies, your directory tree generator project doesn’t need any external libraries. All its dependencies are available as Python built-in functions or as modules in the standard library.
That said, it’s time to get your hands dirty with real code and build your own directory tree generator tool!
Step 1: Setting Up the Project Structure
First, you need to create a coherent application layout for your directory tree generator project. Go ahead and create a new directory on your file system with the name rptree_project/. Inside this directory, you need two empty files:
README.mdtree.py
Next, you need to create a subdirectory called rptree/ with the following empty files in it: rptree.py, __init__.py, and - cli.py. With this addition, your project’s root directory should look like this:
./rptree_project/
│
├── rptree/
│   ├── rptree.py
│   ├── __init__.py
│   └── cli.py
│
├── README.md
└── tree.py
To download these files and the code you’ll add to them in this section, click the link below:
Get Sample Code: Click here to get the sample code you’ll use to build a directory tree generator with Python in this tutorial.
At this point, you need an additional setup step. Fire up your favorite code editor or IDE in your project’s directory, open __init__.py, and add the following content:
# __init__.py

"""Top-level package for RP Tree."""

__version__ = "0.1.0"
Python uses __init__.py files to turn a normal directory into a package. Packages contain modules, such as rptree.py and cli.py in this project. Packages and modules are the mechanisms that allow you to organize and structure your Python code.
In this case, __init__.py contains the module’s documentation string, commonly known as a docstring. It also defines a global constant called __version__, which holds the application’s version number.
Finally, you need a sample directory to test the application and make sure it works correctly. Leave your project’s root directory and create the following directory structure in your file system, side by side with your project’s folder:
../hello/
│
├── hello/
│   ├── __init__.py
│   └── hello.py
│
├── tests/
│   └── test_hello.py
│
├── requirements.txt
├── setup.py
├── README.md
└── LICENSE
This directory structure mimics the general layout of a Python project. You’ll use this sample directory structure to test the directory tree generator tool throughout the steps in this tutorial. This way, you can compare your result with the expected result at any given step on the tutorial.
Step 2: Generating a Directory Tree Diagram in Python
Now that you know the project’s requirements and you’ve set up the project layout and the sample directory, you can start working on the real code. So get your editor ready to jump into coding.
In this section, you’ll code the project’s main functionality. In other words, you’ll write the code to generate a full directory tree diagram from an input directory path. To download that code, click the link below:
Get Sample Code: Click here to get the sample code you’ll use to build a directory tree generator with Python in this tutorial.
Now get back to your code editor and open rptree.py. Then add the following code to the file:
# rptree.py

"""This module provides RP Tree main module."""

import os
import pathlib

PIPE = "│"
ELBOW = "└──"
TEE = "├──"
PIPE_PREFIX = "│   "
SPACE_PREFIX = "    "
In this piece of code, you first import os and pathlib from the Python standard library. Next, you define several module-level constants to hold the connector characters and the prefix strings you’ll use to draw the tree diagram on the terminal window. The symbols you’ll use to draw the tree diagram are the same symbols you’ve seen in previous diagrams in this tutorial. The command-line tool tree uses these same symbols to draw tree diagrams.
Coding the High-Level DirectoryTree Class
Next, you’ll define a high-level class to create the directory tree diagram and display it on your screen. Name the class DirectoryTree and add the following code to it:
# rptree.py
# Snip...

class DirectoryTree:
    def __init__(self, root_dir):
        self._generator = _TreeGenerator(root_dir)

    def generate(self):
        tree = self._generator.build_tree()
        for entry in tree:
            print(entry)
In the class initializer, you take a root directory as an argument and create an instance attribute called ._generator. To create this attribute, you use an OOP technique called composition that defines a “has a” relationship. This means that every DirectoryTree object has a _TreeGenerator object attached.
Note: The leading underscore character (_) in the name _TreeGenerator is a commonly used Python convention. It implies that the class is nonpublic, which means that you don’t expect this class to be used from outside its containing module, rptree.py.
This same convention applies to nonpublic methods and attributes, which you don’t want to be used from outside the containing class. Typically, you start defining attributes as nonpublic and make them public when needed. See PEP 8 for further details on this convention.
You’ll see how to create this _TreeGenerator class in a minute. For now, take a look at .generate(). This method creates a local variable called tree that holds the result of calling .build_tree() on the tree generator object. Then you use a for loop to print each entry in the tree to your screen.
Coding the Low-Level _TreeGenerator Class
Now that you’ve finished coding DirectoryTree, it’s time to code the class that traverses the file system and generates the directory tree diagram:
 1# rptree.py
 2# Snip...
 3
 4class _TreeGenerator:
 5    def __init__(self, root_dir):
 6        self._root_dir = pathlib.Path(root_dir)
 7        self._tree = []
 8
 9    def build_tree(self):
10        self._tree_head()
11        self._tree_body(self._root_dir)
12        return self._tree
13
14    def _tree_head(self):
15        self._tree.append(f"{self._root_dir}{os.sep}")
16        self._tree.append(PIPE)
Here’s how this code works:
-
Line 4 defines a new class,
_TreeGenerator. -
Line 5 defines the class initializer. In this case,
.__init__()takesroot_diras an argument. It holds the tree’s root directory path. Note that you turnroot_dirinto apathlib.Pathobject and assign it to the nonpublic instance attribute._root_dir. -
Line 7 defines an empty list to store the entries that shape the directory tree diagram.
-
Lines 9 to 12 define
.build_tree(). This public method generates and returns the directory tree diagram. Inside.build_tree(), you first call._tree_head()to build the tree head. Then you call._tree_body()with._root_diras an argument to generate the rest of the diagram. -
Lines 14 to 16 define
._tree_head(). This method adds the name of the root directory to._tree. Then you add aPIPEto connect the root directory to the rest of the tree.
Up to this point, you’ve coded just the first part of the class. The next step is to write ._tree_body(), which will take several lines of code.
Note: The line numbers in the above code and in the rest of the code samples in this tutorial are intended to facilitate the explanation. They don’t match the order of lines in the final module or script.
The code in ._tree_body() provides the low-level functionality of the class. It takes a directory path as an argument, traverses the file system under that directory, and generates the corresponding directory tree diagram. Here’s its implementation:
 1# rptree.py
 2# Snip...
 3
 4class _TreeGenerator:
 5    # Snip...
 6
 7    def _tree_body(self, directory, prefix=""):
 8        entries = directory.iterdir()
 9        entries = sorted(entries, key=lambda entry: entry.is_file())
10        entries_count = len(entries)
11        for index, entry in enumerate(entries):
12            connector = ELBOW if index == entries_count - 1 else TEE
13            if entry.is_dir():
14                self._add_directory(
15                    entry, index, entries_count, prefix, connector
16                )
17            else:
18                self._add_file(entry, prefix, connector)
A lot is happening in this code. Here’s what it does, line by line:
-
Line 7 defines
._tree_body(). This method takes two arguments:-
directoryholds the path to the directory you want to walk through. Note thatdirectoryshould be apathlib.Pathobject. -
prefixholds a prefix string that you use to draw the tree diagram on the terminal window. This string helps to show up the position of the directory or file in the file system.
-
-
Line 8 calls
.iterdir()ondirectoryand assign the result toentries. This call to.iterdir()returns an iterator over the files and subdirectories contained indirectory. -
Line 9 sorts the entries in
directoryusingsorted(). To do this, you create alambdafunction that checks ifentryis a file and returnsTrueorFalseaccordingly. In Python,TrueandFalseare internally represented as integer numbers,1and0, respectively. The net effect is thatsorted()places the directories first becauseentry.is_file() == False == 0and the files after them becauseentry.is_file() == True == 1. -
Line 10 calls
len()to get the number of entries in thedirectoryat hand. -
Lines 11 starts a
forloop that iterates over the entries indirectory. The loop usesenumerate()to associate an index to each entry. -
Line 12 defines the connector symbol you’ll use to draw the tree diagram on the terminal window. For example, if the current entry is the last in the directory (
index == entries_count - 1), then you use an elbow (└──) as aconnector. Otherwise, you use a tee (├──). -
Lines 13 to 18 define a conditional statement that checks if the current entry is a directory. If so, then the
ifcode block calls._add_directory()to add a new directory entry. Otherwise, theelseclause calls._add_file()to add a new file entry.
To finish coding _TreeGenerator, you need to write ._add_directory() and ._add_file(). Here’s the code for those nonpublic methods:
 1# rptree.py
 2# Snip...
 3
 4class _TreeGenerator:
 5    # Snip...
 6
 7    def _add_directory(
 8        self, directory, index, entries_count, prefix, connector
 9    ):
10        self._tree.append(f"{prefix}{connector} {directory.name}{os.sep}")
11        if index != entries_count - 1:
12            prefix += PIPE_PREFIX
13        else:
14            prefix += SPACE_PREFIX
15        self._tree_body(
16            directory=directory,
17            prefix=prefix,
18        )
19        self._tree.append(prefix.rstrip())
20
21    def _add_file(self, file, prefix, connector):
22        self._tree.append(f"{prefix}{connector} {file.name}")
Here’s what this code does, line by line:
-
Line 7 defines
._add_directory(). It’s a helper method that takes five arguments, without countingself. You already know what each of these arguments represents, so there’s no need to cover them again. -
Line 10 appends a new directory to
._tree. Each directory in._treeis represented by a string containing aprefix, aconnector, the name of the directory (entry.name), and a final separator (os.sep). Note that the separator is platform dependent, which means that your tree generator uses the separator that corresponds to your current operating system. -
Lines 11 to 14 run a conditional statement that updates
prefixaccording to theindexof the current entry. -
Lines 15 to 18 call
._tree_body()with a new set of arguments. -
Line 19 appends a new
prefixto separate the content of the current directory from the content of the next one.
There is an important detail discuss in the call to ._tree_body() on line 15. This is an indirect recursive call. In other words, ._tree_body() is calling itself by means of ._add_directory() until it traverses the whole directory structure.
Finally, on lines 21 and 22, you define ._add_file(). This method appends a file entry to the directory tree list.
Running the Directory Tree Generator Code
Wow! That was a lot of work! Your directory tree generator now provides its main functionality. It’s time to give it a try. Open a Python interactive session on the project’s root directory and type the following code:
>>> from rptree.rptree import DirectoryTree
>>> tree = DirectoryTree("../hello")
>>> tree.generate()
../hello/
│
├── hello/
│   ├── __init__.py
│   └── hello.py
│
├── tests/
│   └── test_hello.py
│
├── requirements.txt
├── setup.py
├── README.md
└── LICENSE
Here, you first import DirectoryTree from rptree.py. Next, you create a directory tree object, passing the path to the previously created hello/ sample directory. When you call .generate() on the directory tree object, you get the full directory tree diagram printed on your screen.
Cool! You already coded your directory tree generator’s main functionality. In the next section, you’ll give your project a nice and user-friendly command-line interface and an executable script.
Step 3: Building the Directory Tree Generator’s CLI
There are several tools out there to create CLI applications. Some of the more popular ones are Click, docopt, Typer, and also argparse, which is available in the standard library. In your directory tree generator project, you’ll use argparse to provide the command-line interface. This way, you’ll avoid having an external dependency.
Python’s argparse allows you to define the arguments your application will take at the command line and to validate the user’s input. The module also generates help and usage messages for your scripts.
To download the files and the code that you’ll add or modify in this section, click the link below:
Get Sample Code: Click here to get the sample code you’ll use to build a directory tree generator with Python in this tutorial.
To implement the directory tree generator’s CLI, get back to the project’s directory and open the cli.py file from the rptree package. Then type in the following code:
"""This module provides the RP Tree CLI."""
# cli.py

import argparse
import pathlib
import sys

from . import __version__
from .rptree import DirectoryTree

def main():
    args = parse_cmd_line_arguments()
    root_dir = pathlib.Path(args.root_dir)
    if not root_dir.is_dir():
        print("The specified root directory doesn't exist")
        sys.exit()
    tree = DirectoryTree(root_dir)
    tree.generate()
In this piece of code, you first import the required modules from the standard library. Then you import __version__ and also DirectoryTree from the containing package, rptree.
In main(), you first call parse_cmd_line_arguments() and pack the command line arguments in args. You’ll see what this function does in a minute. Next, you turn the root directory into a pathlib.Path object. The conditional statement does a quick validation to ensure that the user provides a valid directory path and otherwise exits the application.
Finally, you create a DirectoryTree object using root_dir as an argument and call .generate() on it to generate and display the corresponding directory tree diagram on your terminal window.
Now you can dive into the code of parse_cmd_line_arguments(). This function provides all the CLI-related features:
 1# cli.py
 2# Snip...
 3
 4def parse_cmd_line_arguments():
 5    parser = argparse.ArgumentParser(
 6        prog="tree",
 7        description="RP Tree, a directory tree generator",
 8        epilog="Thanks for using RP Tree!",
 9    )
10    parser.version = f"RP Tree v{__version__}"
11    parser.add_argument("-v", "--version", action="version")
12    parser.add_argument(
13        "root_dir",
14        metavar="ROOT_DIR",
15        nargs="?",
16        default=".",
17        help="Generate a full directory tree starting at ROOT_DIR",
18    )
19    return parser.parse_args()
Here’s what this function does:
-
Line 5 instantiates
argparse.ArgumentParser, providing the application’s command name (prog), a shortdescriptionof the program, and anepilogphrase to display after the user runs the application’s help option. This class provides a parser for all the arguments the user types at the command line. -
Line 10 sets the parser’s
versionattribute to a string that holds the application’s name along with its current version,__version__. -
Line 11 adds the first optional argument to your application’s CLI. The
-vor--versionflag is required to provide this argument, which has the default action of displaying the application’s version string on your terminal window. -
Lines 12 to 18 add a second argument to the CLI. Here,
root_diris a positional argument that holds the directory path you’ll use as a starting point to generate the directory tree diagram. In this case, there are four arguments to.add_argument():-
metavarholds the name of the argument in usage messages. -
nargsdefines the number of values your program can take under the argument at hand. For example, your directory tree generator can take only one directory path at the command line, so the appropriate value fornargsis"?". -
defaultprovides a default value for the argument at hand. In this case, you use a dot (".") to set the current directory as the default root directory. -
helpprovides a brief help message describing what the argument does.
-
-
Line 19 parses the supplied arguments using
.parse_args(). This method returns aNamespaceobject with all the supplied arguments. You can access these arguments using the dot notation on the namespace object. Note that you stored this namespace inargsback when you wrotemain().
The final action to complete this step of your journey is to provide an entry-point script. Get back to your code editor and open tree.py, then add the following code to it:
#!/usr/bin/env python3
# tree.py

"""This module provides RP Tree entry point script."""

from rptree.cli import main

if __name__ == "__main__":
    main()
This file is short and straightforward. You first import main() from cli.py and then wrap its call in the traditional if __name__ == "__main__": conditional so that Python calls main() only if you run the file as a program rather than import it as a module.
With this script in place, you can start using your brand-new command-line directory tree generator. Open a command line window, move to the project’s directory, and run the following commands:
$ python tree.py ../hello
../hello/
│
├── hello/
│   ├── __init__.py
│   └── hello.py
│
├── tests/
│   └── test_hello.py
│
├── requirements.txt
├── setup.py
├── README.md
└── LICENSE

$ python tree.py -v
RP Tree v0.1.0

$ python tree.py --help
usage: tree [-h] [-v] [ROOT_DIR]

RP Tree, a directory tree generator

positional arguments:
  ROOT_DIR       Generate a full directory tree starting at ROOT_DIR

optional arguments:
  -h, --help     show this help message and exit
  -v, --version  show program's version number and exit

Thanks for using RP Tree!
That’s it! Your directory tree generator tool works. It generates and displays a user-friendly tree diagram on the screen. It also provides version and usage information. That’s pretty cool for about a hundred lines of code! In the next sections, you’ll add a couple more features to the application.
Step 4: Implementing a Directory-Only Option
An interesting feature to add to your directory tree generator is the ability to generate and display directory-only tree diagrams. In other words, a diagram that only displays directories. In this project, you’ll add -d and --dir-only flags to get this done, but before that, you need to update _TreeGenerator so it can support this new feature.
You can download the files and the code that you’ll add or modify in this section by clicking the link below:
Get Sample Code: Click here to get the sample code you’ll use to build a directory tree generator with Python in this tutorial.
Now open the rptree.py module and update its code like this:
# rptree.py
# Snip...

class _TreeGenerator:
    def __init__(self, root_dir, dir_only=False):
        self._root_dir = pathlib.Path(root_dir)
        self._dir_only = dir_only
        self._tree = []

    # Snip...

    def _tree_body(self, directory, prefix=""):
        entries = self._prepare_entries(directory)
        entries_count = len(entries)
        for index, entry in enumerate(entries):
            connector = ELBOW if index == entries_count - 1 else TEE
            if entry.is_dir():
                self._add_directory(
                    entry, index, entries_count, prefix, connector
                )
            else:
                self._add_file(entry, prefix, connector)

    def _prepare_entries(self, directory):
        entries = directory.iterdir()
        if self._dir_only:
            entries = [entry for entry in entries if entry.is_dir()]
            return entries
        entries = sorted(entries, key=lambda entry: entry.is_file())
        return entries

    # Snip...
First, you add dir_only as an argument to the class initializer. This is a Boolean argument that allows you to generate a full tree or a directory-only tree depending on the user’s input at the command line. This argument defaults to False because generating a full tree is the most common use case.
In the second highlighted line, you create an instance attribute called ._dir_only to hold the newly added argument.
In the third highlighted line, you replace two lines of the original code with a call to ._prepare_entries(). As its name suggests, this function prepares the directory entries to generate either a full tree or a directory-only tree.
In ._prepare_entries(), you first get the entries generator. The if statement checks if ._dir_only is True. If so, then you filter out the files with a list comprehension and return a list of directories. If ._dir_only is False, then you sort the entries, reusing the same code you saw before. Finally, you return the complete list of entries in directory.
Now you need to make sure that you pass this new argument to the instance of _TreeGenerator back in DirectoryTree:
# rptree.py
# Snip...

class DirectoryTree:
    def __init__(self, root_dir, dir_only=False):
        self._generator = _TreeGenerator(root_dir, dir_only)

    # Snip...
In the first highlighted line, you add a new argument called dir_only to the class initializer. In the second highlighted line, you make sure to pass the new argument to the constructor of _TreeGenerator.
With these changes in place, you can update the cli.py file so that the application can take and process the -d and --dir-only flags at the command line. First, you need to update main():
# cli.py
# Snip...

def main():
    # Snip...
    tree = DirectoryTree(root_dir, dir_only=args.dir_only)
    tree.generate()
In the highlighted line, you pass args.dir_only to the dir_only argument of DirectoryTree. This attribute of the args namespace holds a Boolean value that depends on the user’s input. If the user provides the -d or --dir-only option at the command line, then args.dir_only is True. Otherwise, it’s False.
Next, go and add those -d and --dir-only flags to the command-line interface. To do that, you need to update parse_cmd_line_arguments() like this:
# cli.py
# Snip...

def parse_cmd_line_arguments():
    # Snip...
    parser.add_argument(
        "-d",
        "--dir-only",
        action="store_true",
        help="Generate a directory-only tree",
    )
    return parser.parse_args()
The action argument in the call to .add_argument() holds the value "store_true", which means that this argument automatically stores True or False according to the user’s input. In this case, if the user provides the -d or --dir-only flag at the command line, then the argument stores True. Otherwise, it stores False.
With this update in place, it’s time to run and test the application. Get back to your terminal window and execute the following command:
$ python tree.py ../hello -d
../hello/
│
├── hello/
│
└── tests/
From this point on, if you provide the -d or -dir-only flag at the command line, then the tree diagram only displays the subdirectories in your sample hello/ directory.
Step 5: Saving the Directory Tree Diagram to a File
In this section, you’ll add a final feature to your directory tree generator tool. You’ll provide the app with the capability to save the generated directory tree diagram to an external file. To do that, you’ll add a new argument to the CLI with the flags -o and --output-file.
As usual, to download the code that you’ll add or modify in this section, click the link below:
Get Sample Code: Click here to get the sample code you’ll use to build a directory tree generator with Python in this tutorial.
Now go back to rptree.py and update DirectoryTree like this:
# rptree.py
# Snip...
import sys

# Snip...

class DirectoryTree:
    def __init__(self, root_dir, dir_only=False, output_file=sys.stdout):
        self._output_file = output_file
        self._generator = _TreeGenerator(root_dir, dir_only)

    def generate(self):
        tree = self._generator.build_tree()
        if self._output_file != sys.stdout:
            # Wrap the tree in a markdown code block
            tree.insert(0, "```")
            tree.append("```")
            self._output_file = open(
                self._output_file, mode="w", encoding="UTF-8"
            )
        with self._output_file as stream:
            for entry in tree:
                print(entry, file=stream)
This update is almost a full reimplementation of DirectoryTree. First, you add a new argument to the class initializer called output_file. This argument defaults to sys.stdout, which is the standard output (your screen). Then you store the newly added argument in an instance attribute called ._output_file.
In .generate(), you first build the directory tree diagram and store it in tree. The conditional statement checks if the user has provided an output file different from sys.stdout. If so, then the if code block wraps the tree diagram in a markdown code block using backticks ("```").
Next, you open the provided output file using open() so you can process it using the with statement.
Note: Calling .insert(0, x) on a list object might be an expensive operation in terms of execution time. That’s because Python needs to move all the items one position to the right and then insert the new item at the first position.
An efficient alternative to .insert() would be to use collections.deque and append the item at the first position of the data structure using .appendleft(). This data structure is optimized for this kind of operation.
In the with block, you start a for loop to print the directory tree diagram to the provided output file. Note that print() can also write to regular files on your file system. To do this, you just need to provide a custom file argument. To dive deeper into the features of print(), check out Your Guide to the Python print() Function.
Once you’ve finished with DirectoryTree, you can update the command-line interface to enable the output file option. Get back to cli.py and modify it like this:
# cli.py
# Snip...

def main():
    # Snip...
    tree = DirectoryTree(
        root_dir, dir_only=args.dir_only, output_file=args.output_file
    )
    tree.generate()

def parse_cmd_line_arguments():
    # Snip...
    parser.add_argument(
        "-o",
        "--output-file",
        metavar="OUTPUT_FILE",
        nargs="?",
        default=sys.stdout,
        help="Generate a full directory tree and save it to a file",
    )
    return parser.parse_args()
The first step is to take the output file as an argument in the DirectoryTree constructor. The output file, if any, will be stored in args.output_file.
Next, you add a new argument to parser. This argument has two flags: -o and --output-file. To provide an alternative output file, the user has to use one of these flags and provide the path to the files at the command line. Note that the output file defaults to sys.stdout. This way, if the user doesn’t provide an output file, then the application automatically uses the standard output, the screen.
You can test the newly added option by running the following command on your terminal:
$ python tree.py ../hello -o output_file.md
This command generates a full directory tree diagram and saves it into the output_file.md file in your current directory. If you open the file, then you’ll see the directory tree diagram saved there in markdown format.
That’s it! Your directory tree generator project is complete. Besides the default option that generates and displays a full directory tree diagram, the application provides the following options:
-v,--versionshow the current version information and exit the application.-h,--helpshow help and usage messages.-d,--dir-onlygenerate a directory-only tree and print it into the screen.-o,--output-to-markdowngenerate a tree and save it to a file in markdown format.
You now have a fully functional command-line tool that generates user-friendly directory tree diagrams. Great job!
Conclusion
You can automate and speed up several processes and tasks in your working environment by creating CLI tools and applications. In Python, you can quickly create this kind of tool using argparse or other third-party libraries. In this tutorial, you wrote a full project to build a Python directory tree generator tool for your command line.
The application takes a directory path at the command line, generates a directory tree diagram, and displays it on your terminal window or saves it to an external file on your file system. It also provides a few more options to tweak the resulting tree diagram.
In this tutorial, you learned how to:
- Create a CLI application with Python’s
argparse - Recursively traverse a directory structure using
pathlib - Generate, format, and print a directory tree diagram
- Save the directory tree diagram to an output file
The final source code for the directory tree generator project is available for you to download. To get it, click the link below:
Get Sample Code: Click here to get the sample code you’ll use to build a directory tree generator with Python in this tutorial.
Next Steps
Up to this point, you’ve built a fully functional directory tree generator tool. Even though the application provides a minimal set of features, it’s a good starting point for you to continue adding features and learning in the process. This will help you take your skills with Python and CLI applications to the next level.
Here are a few ideas you can implement to continue improving your directory tree generator tool:
-
Add support for sorting files and directories: The ability to sort files and directories is a great feature to have. For example, you can add
-sand--sort-treeBoolean flags to allow the user to tweak the order of files and directories in the final tree diagram. -
Add icons and colors to the tree diagram: Adding icons, font colors, or both is also a nice feature to implement. For example, you can use custom folder icons for the directories and file type–based icons for the files.
-
Set up the application to publish it as an open source project: Preparing the application to publish to PyPI as an open source project might be an interesting challenge for you to take. Doing so will allow you to share your work with your friends and colleagues. To get started with publishing packages to PyPI, check out How to Publish an Open-Source Python Package to PyPI.
These are just a few ideas of how you can continue adding features to your directory tree generator. Take the challenge and build something amazing on top of this!


