Watch Now This tutorial has a related video course created by the Real Python team. Watch it together with the written tutorial to deepen your understanding: Using Pygame to Build an Asteroids Game in Python
Do you want to create your own computer games but like Python too much to abandon it for a career as a game developer? There’s a solution for that! With the Pygame module, you can use your amazing Python skills to create games, from the basic to the very complex. Below, you’ll learn how to use Pygame by making a clone of the Asteroids game!
In this tutorial, you’ll learn how to build a complete game, including:
- Loading images and displaying them on the screen
- Handling user input in order to control the game
- Moving objects according to the game logic
- Detecting collisions between objects
- Displaying text on the screen
- Playing sounds
Click the link below to download the code for this project and follow along as you build your game:
Get the Source Code: Click here to get the source code you’ll use to build an Asteroids game in Python with Pygame in this tutorial.
Let’s get started!
Demo: Asteroids Game in Python
The game you’ll be making is a clone of the classic arcade game Asteroids. In it, you control a spaceship and shoot asteroids. If your spaceship collides with an asteroid, you lose. If you shoot down all asteroids, you win!
Project Overview
Your Asteroids game in Python will feature a single spaceship. The spaceship can rotate left and right as well as accelerate forward. When it’s not accelerating, it will continue moving with the velocity it had. The spaceship can also shoot bullets.
The game will use the following key mappings:
| Key | Action |
|---|---|
| Right | Rotate the spaceship right |
| Left | Rotate the spaceship left |
| Up | Accelerate the spaceship forward |
| Space | Shoot |
| Esc | Exit the game |
There will also be six big asteroids in the game. When a bullet hits a big asteroid, it will split into two medium ones. When a bullet hits a medium asteroid, it will split into two small ones. A small asteroid won’t split but will be destroyed by a bullet.
When an asteroid collides with the spaceship, the spaceship will be destroyed, and the game will end in a defeat. When all asteroids are gone, the game will end in a victory!
The project will be broken into ten steps:
- Setting up Pygame for a Python project
- Handing input in the game
- Loading images and showing them on the screen
- Creating game objects with an image, a position, and some logic
- Moving the spaceship
- Moving the asteroids and detecting collisions with the spaceship
- Shooting bullets and destroying asteroids
- Splitting asteroids into smaller ones
- Playing sounds
- Handling the end of the game
Each step will provide links to all necessary resources.
Prerequisites
To build your Asteroids game, you’ll need some more advanced elements of Python. You should already be comfortable with the language itself as well as with concepts like classes, inheritance, and callbacks. If you need to refresh your knowledge on these topics, then check our Object-Oriented Programming (OOP) in Python 3.
The game will also use vectors to represent positions and directions, as well as some vector operations to move the elements on the screen. Pygame will take care of most of the math, and all the necessary concepts will be explained in this tutorial. However, if you want to know more, then you can check out Vector Addition.
The Pygame documentation can be useful if you want to understand some concepts in depth, but you’ll find everything you need to know in this tutorial.
Step 1: Pygame Setup
At the end of this step, you’ll have a small Python project that uses Pygame. It will display a window with a caption, filled with a blue color. This will be first step toward your Asteroids game. You won’t need any specific game development tools. Your favorite text editor and the command line will be enough.
Python Project
To organize your project, start by creating a folder for it:
$ mkdir awesome_pygame_project
$ cd awesome_pygame_project
As with any Python project, you should also create a virtual environment for your Asteroids game. You can read more about virtual environments in Python Virtual Environments: A Primer.
When you’re done, create a requirements.txt file and add a Pygame dependency. For this project, it’s recommended that you use the latest version, which will make your Asteroids game work seamlessly on Linux and macOS. Your file should look like this:
pygame==2.0.0
Next, install the dependencies:
(venv) $ python -m pip install -r requirements.txt
You can check if Pygame was installed correctly by running this command:
(venv) $ python -m pygame.examples.aliens
If everything went well, then you should see a window with the Pygame Aliens game.
Pygame Code
Now it’s time to start working on your own code! In general, the structure of a Pygame program looks like this:
 1initialize_pygame()
 2
 3while True:
 4    handle_input()
 5    process_game_logic()
 6    draw_game_elements()
Line 3 starts a loop, called the game loop. Each iteration of this loop generates a single frame of the game and usually performs the following operations:
-
Input handling: Input like pressed buttons, mouse motion, and VR controllers position is gathered and then handled. Depending on the game, it can cause objects to change their position, create new objects, request the end of the game, and so on.
-
Game logic: This is where most of the game mechanics are implemented. Here, the rules of physics are applied, collisions are detected and handled, artificial intelligence does its job, and so on. This part is also responsible for checking if the player has won or lost the game.
-
Drawing: If the game hasn’t ended yet, then this is where the frame will be drawn on screen. It will include all the items that are currently in the game and are visible to the player.
The general structure of a Pygame program isn’t complicated, and you could probably get away with putting it in a basic loop. However, considering that you might expand your Asteroids game in the future, it’s a good idea to encapsulate all these operations in a Python class.
Creating a class means that you need to pick a name for your game, but “Asteroids” is already taken. How about “Space Rocks”?
Create a space_rocks directory, and inside it create a file called game.py. This is where you’ll put the main class of your Asteroids game: SpaceRocks. The file should look like this:
 1import pygame
 2
 3class SpaceRocks:
 4    def __init__(self):
 5        self._init_pygame()
 6        self.screen = pygame.display.set_mode((800, 600))
 7
 8    def main_loop(self):
 9        while True:
10            self._handle_input()
11            self._process_game_logic()
12            self._draw()
13
14    def _init_pygame(self):
15        pygame.init()
16        pygame.display.set_caption("Space Rocks")
17
18    def _handle_input(self):
19        pass
20
21    def _process_game_logic(self):
22        pass
23
24    def _draw(self):
25        self.screen.fill((0, 0, 255))
26        pygame.display.flip()
Here’s what’s happening in the code, step by step:
-
Line 1 imports the Pygame module to get access to all its amazing features.
-
Line 3 creates the
SpaceRocksclass. -
Line 4 is the constructor of the
SpaceRocksclass, and it’s a perfect place to put any methods required to initialize Pygame. The actual Pygame initialization happens in_init_pygame(). You’ll learn more about this method in a moment. -
Line 6 creates a display surface. Images in Pygame are represented by surfaces. Here are a few things to know about them:
-
Surfaces can be drawn on one another, allowing you to create complex scenes from simple pictures.
-
There’s one special surface in each Pygame project. That surface represents the screen and is the one that will eventually be displayed to players. All other surfaces have to be drawn on this one at some point. Otherwise, they won’t be shown.
-
To create the display surface, your program uses
pygame.display.set_mode(). The only argument you pass to this method is the size of the screen, represented by a tuple of two values: width and height. In this case, Pygame will create a screen with a width of800pixels and a height of600pixels.
-
-
Line 8 is the game loop discussed above. It contains the same three steps for each frame:
-
Line 10 contains input handling.
-
Line 11 contains game logic.
-
Line 12 contains drawing.
-
-
Line 14 defines a method called
_init_pygame(). This is where a one-time initialization of Pygame happens. The method does two things:-
Line 15 calls
pygame.init(). This single line of code is responsible for setting up the amazing features of Pygame. Every time you work with Pygame, you should callpygame.init()at the beginning of your program to make sure that the framework will work correctly. -
Line 16 sets the caption of your Pygame program using
pygame.display.set_caption(). In this case, the caption will be the name of your game:Space Rocks.
-
-
Lines 18 and 21 define
_handle_input()and_process_game_logic(). They’re empty for now, but in the following sections you’ll add some code to make your game more interesting. -
Line 24 defines
_draw(). It wouldn’t make much sense to create a template for your game without displaying anything on the screen, so this method already has some code. It’s called every frame to draw the content of the screen, and it does that in two steps:-
Line 25 fills the screen with a color using
screen.fill(). The method takes a tuple with three values, representing three base colors: red, green, and blue. Each color value ranges between0and255, representing its intensity. In this example, a tuple of (0, 0, 255) means that the color will consist only of blue, with no traces of red or green. -
Line 26 updates the content of the screen using
pygame.display.flip(). Because your game will eventually display moving objects, you’ll call this method every frame to update the display. Because of this, you need to fill your screen with color every frame, as the method will clear the contents generated during the previous frame.
-
This might seem like a lot of extra steps, but now your code is nicely structured and has methods with descriptive names. Next time you need to change something related to drawing, you’ll know to use _draw(). To add input handling, you’ll modify _handle_input(), and so on.
Note: Normally, you would extract variables like screen size and color to a constant at the beginning of your class. However, in a few steps, you’ll replace the color with an image, and you won’t use the size of the screen outside of this method. Because of that, you can leave the values as they are.
Next, create a __main__.py file in your space_rocks folder. This file will take care of creating a new instance of your game and starting it by running main_loop(). It should look like this:
from game import SpaceRocks

if __name__ == "__main__":
    space_rocks = SpaceRocks()
    space_rocks.main_loop()
The structure of your project should now look like this:
awesome_pygame_project/
|
├── space_rocks/
|   ├── __main__.py
|   └── game.py
|
└── requirements.txt
Go ahead and run the game:
(venv) $ python space_rocks
You’ll see a window with a blue background:
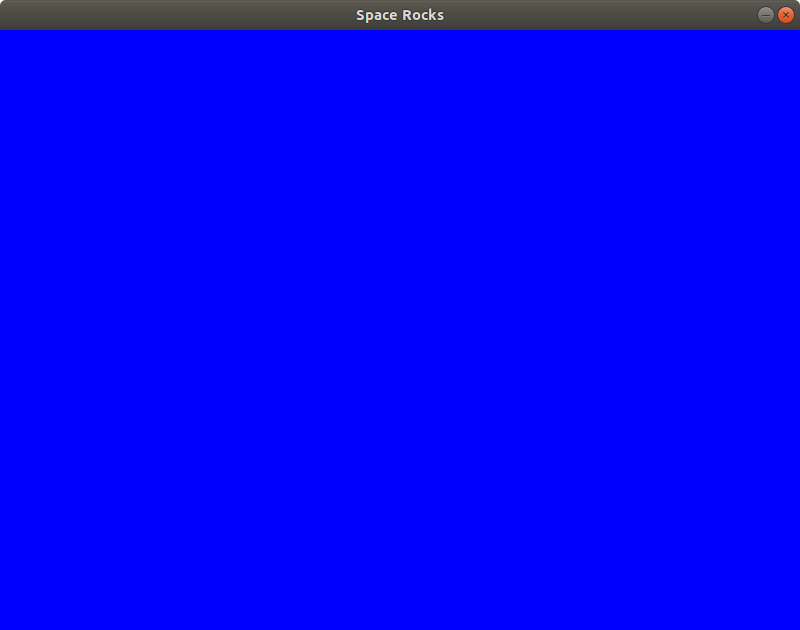
Congratulations, you just created a Pygame project! However, there’s no exit condition at this point, so you still have to use Ctrl+C in the command line to quit it. That’s why you’ll learn about input handling next.
Step 2: Input Handling
At this point, you have the main loop of the game, ready to be filled with logic. At the end of this step, you’ll also have a scaffolding in place to start plugging in user controls.
Most input processing in Pygame happens within an event loop. In each frame, your program can get a collection of events that happened since the previous frame. That includes mouse movement, keypresses, and so on. Then, one by one, these events can be handled. In Pygame, the method for obtaining that collection is pygame.event.get().
The event you need right now is pygame.QUIT. It happens when someone requests the program to end, either by clicking Close or by pressing Alt+F4 on Windows and Linux or Cmd+W on macOS. Modify space_rocks/game.py by rewriting SpaceRocks._handle_input() like so:
def _handle_input(self):
    for event in pygame.event.get():
        if event.type == pygame.QUIT:
            quit()
Go ahead and test it. Run the game and click the little X in the corner or use a proper shortcut. The window will be closed, just like you would expect.
But you can go a step further. In the end, your game will be controlled with only the keyboard, not the mouse. How about closing the window by pressing a custom key?
There are other types of events in Pygame, and one of them is a keypress event. It’s represented by a pygame.KEYDOWN constant. Each such event has information about the key that was pressed stored in the event.key attribute. You can check constants for different keys in the Pygame documentation. In this example, to close the game by pressing Esc, you’ll use pygame.K_ESCAPE.
Modify the _handle_input() method again:
def _handle_input(self):
    for event in pygame.event.get():
        if event.type == pygame.QUIT or (
            event.type == pygame.KEYDOWN and event.key == pygame.K_ESCAPE
        ):
            quit()
Now your game also closes when you press Esc.
You’ve managed to display a window and close it properly. But the window is still filled with a single color. Next, you’ll learn how to load an image and show it on the screen.
Step 3: Images
At this point, you have a game window that you can close by pressing a key. At the end of this step, you’ll display an image in that window.
Although you could make a computer game with only colored rectangles and other simple shapes, using images will make it much more attractive. In computer game development, images are usually called sprites. Of course, games use many more types of resources, like sounds, fonts, animations, and so on. Together, these resources are called assets.
As your game grows, it’s important for it to keep a proper structure. So, start by creating a folder called assets and, inside it, another called sprites. That’s where you’ll put all the sprites used by your game.
Next, download the image of the space background and put it in the assets/sprites folder. You can download the source code by clicking the link below:
Get the Source Code: Click here to get the source code you’ll use to build an Asteroids game in Python with Pygame in this tutorial.
Also, because images will be loaded many times in your program, it’s a good idea to extract this functionality to a separate method in a separate file. Create a file called space_rocks/utils.py that will keep all the reusable methods. Then implement image loading:
 1from pygame.image import load
 2
 3def load_sprite(name, with_alpha=True):
 4    path = f"assets/sprites/{name}.png"
 5    loaded_sprite = load(path)
 6
 7    if with_alpha:
 8        return loaded_sprite.convert_alpha()
 9    else:
10        return loaded_sprite.convert()
Here’s what happens:
-
Line 1 imports a method called
load()that will be necessary for reading images later. -
Line 4 creates a path to an image, assuming that it’s stored in the
assets/spritesdirectory and that it’s a PNG file. That way, you’ll only need to provide the name of the sprite later. -
Line 5 loads the image using
load(). This method returns a surface, which is an object used by Pygame to represent images. You can later draw it on the screen (or on another surface, if you want). -
Lines 8 and 10 convert the image to a format that better fits the screen to speed up the drawing process. This is done with either
convert_alpha()orconvert(), depending on whether you want to use transparency.
Note: In general, you could just use convert_alpha() for all types of images since it can also handle an image without transparent pixels. However, drawing transparent images is a bit slower than drawing nontransparent ones.
Since computer games are all about performance, you’ll practice optimizing your games by choosing the correct type of image and increasing the speed of your game, even if by just a bit.
The structure of your project now looks like this:
awesome_pygame_project/
|
├── assets/
|   |
│   └── sprites/
│       └── space.png
|
├── space_rocks/
│   ├── __main__.py
│   ├── game.py
│   └── utils.py
|
└── requirements.txt
Now that your program can load images, it’s time to change the blue background into something more interesting. Edit the space_rocks/game.py file:
import pygame

from utils import load_sprite

class SpaceRocks:
    def __init__(self):
        self._init_pygame()
        self.screen = pygame.display.set_mode((800, 600))
        self.background = load_sprite("space", False)

    def main_loop(self):
        while True:
            self._handle_input()
            self._process_game_logic()
            self._draw()

    def _init_pygame(self):
        pygame.init()
        pygame.display.set_caption("Space Rocks")

    def _handle_input(self):
        for event in pygame.event.get():
            if event.type == pygame.QUIT or (
                event.type == pygame.KEYDOWN and event.key == pygame.K_ESCAPE
            ):
                quit()

    def _process_game_logic(self):
        pass

    def _draw(self):
        self.screen.blit(self.background, (0, 0))
        pygame.display.flip()
To display one surface on another in Pygame, you need to call blit() on the surface you want to draw on. This method takes two arguments:
- The surface that you want to draw
- The point where you want to draw it
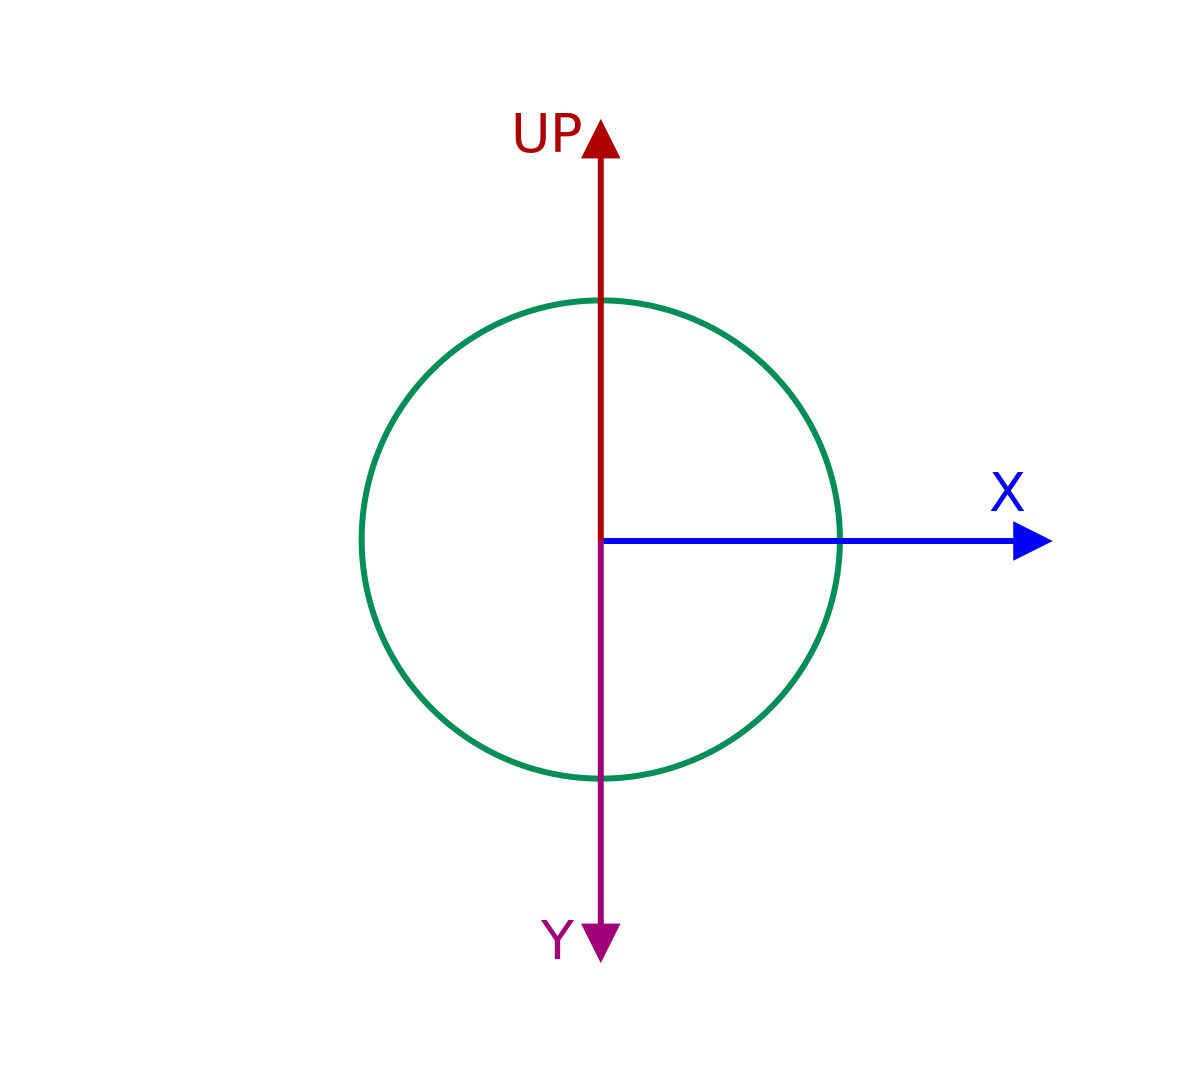
It’s good to keep in mind that in Pygame, the coordinate system starts in the top-left corner. The x-axis goes from left to right, and the y-axis goes from top to bottom:
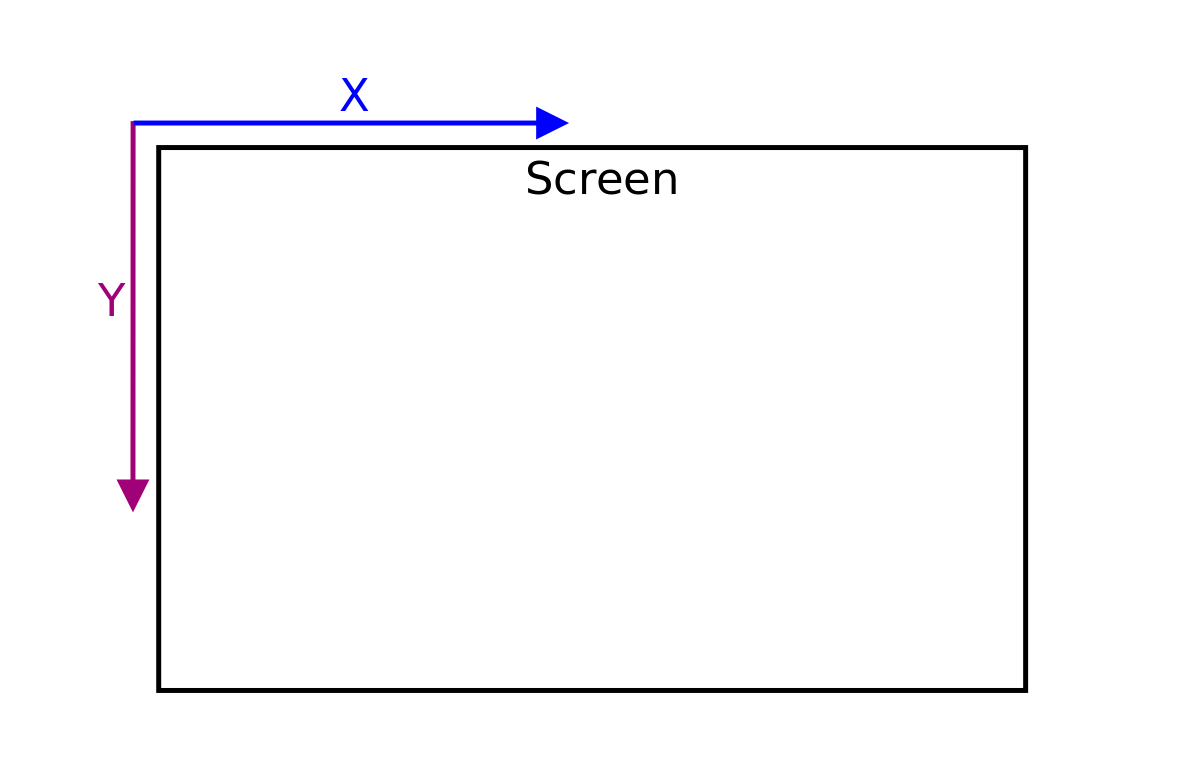
As you can see, the UP vector, pointing upwards, will have a negative y-coordinate.
The coordinates passed to blit() are given as two values: X and Y. They represent the point where the top-left corner of the surface will be located after the operation:
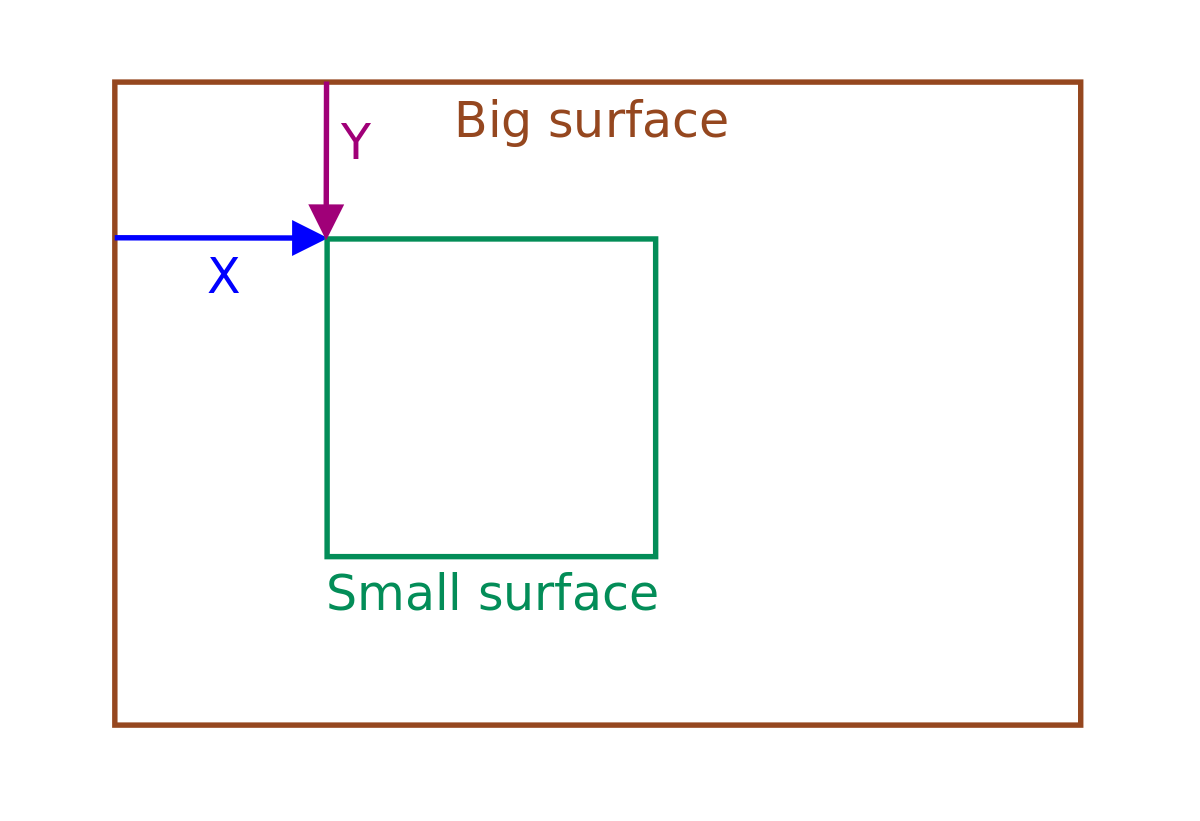
As you can see, the top-left corner is moved by the blit coordinates to calculate the correct position.
In your case, the new background has the same size as the screen (800 × 600 pixels), so the coordinates will be (0, 0), representing the top-left corner of the screen. That way, the background image will cover the entire screen.
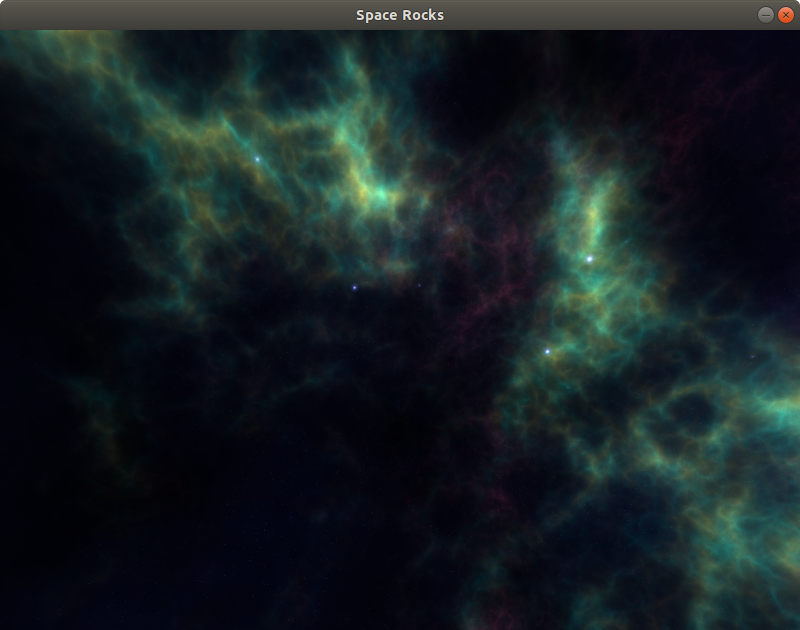
Run your program now, and you’ll see a screen with a background image:
Your game now has a very nice background image, but nothing is happening there yet. Let’s change this by adding some objects.
Step 4: Controlling Game Objects
At this point, your program displays a background image of a small piece of cosmos where your Asteroids game will take place. It’s a bit empty right now, so in this section you’ll fill it up. You’ll create a class that represents other drawable game objects and use it to show a spaceship and an asteroid.
Advanced Behavior
You’ve already used surfaces, but Pygame also offers another class, Sprite, that’s intended as a base class for visible objects. It contains some useful methods, but you might also encounter a couple of limitations.
One limitation is that a game object is more than just a sprite. It contains additional data, like its direction and velocity. It also needs more advanced behaviors, like shooting bullets or playing sounds. Most of this additional information and behavior isn’t provided by the Sprite class, so you would need to add it on your own.
Another issue is that Pygame draws sprites starting from the top-left corner. In your game, it might be easier to store the central position of an object for the purpose of moving and rotating it. In that case, you’ll have to implement a way to transform that position into a top-left corner as required by Pygame.
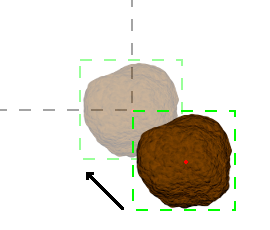
Finally, although Pygame already has methods for detecting overlaps between images, they might not be good for detecting collisions between objects. A rotatable spaceship or an asteroid probably won’t fill the entire image, but rather the round area within it. In that case, the collision should take into account only that round area, not the entire surface of the sprite. Otherwise, you might get incorrect results:
In this example, the sprites collide, but game objects don’t.
This is actually where the Sprite class could help, since you can use it with pygame.sprite.collide_circle(). This method detects collisions between two sprites using circles centered on their surfaces. However, detecting a collision of circles isn’t a very complicated process, and you can implement it on your own.
Given these issues, it quickly becomes apparent that the built-it Pygame Sprite class is meant to be augmented, not simply used on its own. In the case of your game, Pygame sprites provide few useful features. It might be a good idea to implement a custom class for game objects instead. That should give you more control and help you understand some concepts since you’ll be implementing them on your own.
GameObject Class
In this section, you’ll introduce the GameObject class. It will encapsulate some generic behavior and data for all other game objects. Classes that represent specific objects (like the spaceship) will inherit from it and extend it with their own behavior and data. If you want to refresh your knowledge of classes and inheritance, then check out Object-Oriented Programming (OOP) in Python 3.
The GameObject class will store the following data:
position: A point in the center of the object on the 2D screensprite: An image used to display the objectradius: A value representing the collision zone around the object’s positionvelocity: A value used for movement
Here’s a graphical representation of the game object:
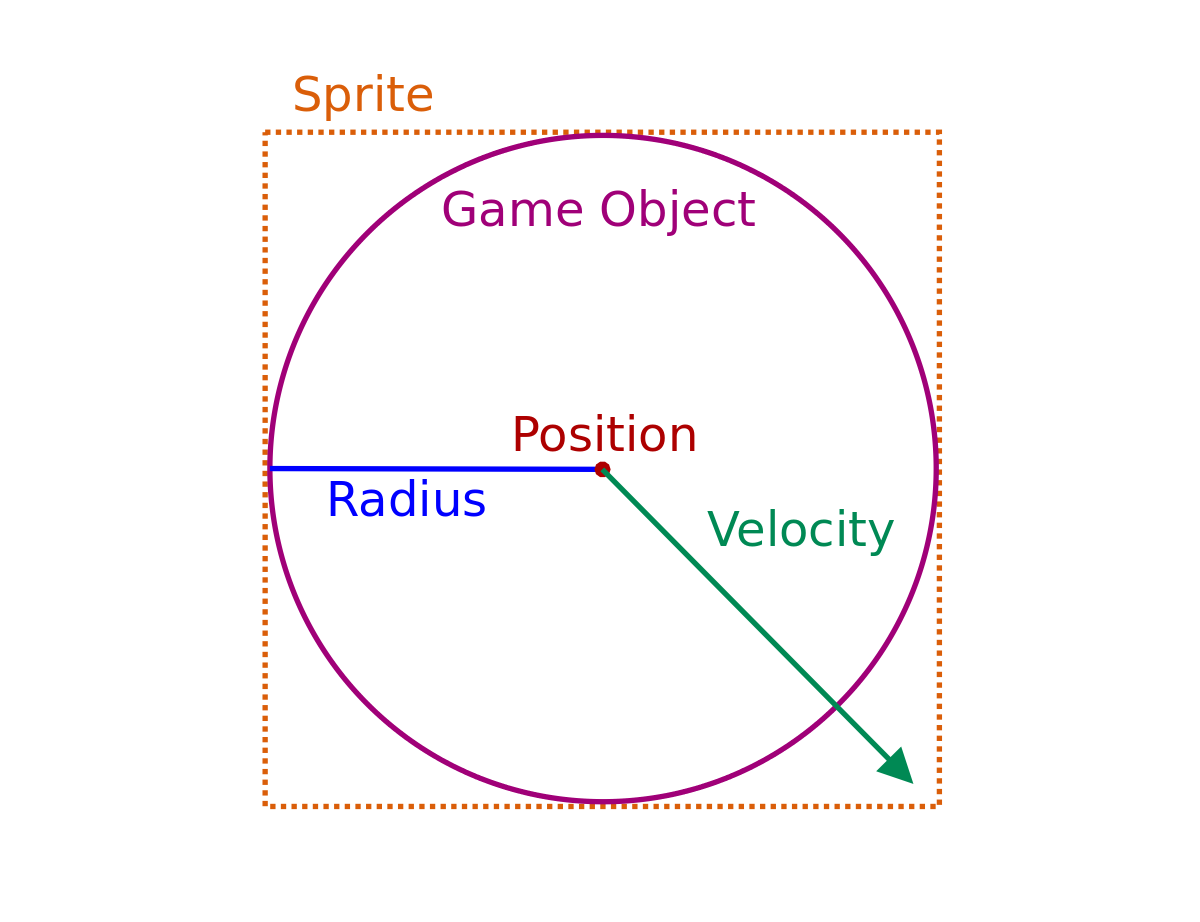
The sprite will be a surface loaded with load_sprite() from the previous examples. The radius is an integer indicating the number of pixels from the center of the object to the edge of the collision zone. However, the position itself and the velocity will need a new type: a vector.
Vectors are similar to tuples. In a 2D world (like the one in your game), vectors are represented by two values indicating x- and y-coordinates. These coordinates can point to a position, but they can also represent motion or acceleration in a given direction. Vectors can be added, subtracted, or even multiplied to quickly update the position of a sprite. You can read more about vectors in Vectors in 2-dimensional Space.
Because of how useful vectors are in games, Pygame already has a class for them: Vector2 in the pygame.math module. It offers some additional functionality, like calculating the distance between vectors and adding or subtracting vectors. Those features will make your game logic much easier to implement.
In the space_rocks directory, create a new file called models.py. For now, it will store the GameObject class, but later you’ll add classes for asteroids, bullets, and the spaceship. The file should look like this:
 1from pygame.math import Vector2
 2
 3class GameObject:
 4    def __init__(self, position, sprite, velocity):
 5        self.position = Vector2(position)
 6        self.sprite = sprite
 7        self.radius = sprite.get_width() / 2
 8        self.velocity = Vector2(velocity)
 9
10    def draw(self, surface):
11        blit_position = self.position - Vector2(self.radius)
12        surface.blit(self.sprite, blit_position)
13
14    def move(self):
15        self.position = self.position + self.velocity
16
17    def collides_with(self, other_obj):
18        distance = self.position.distance_to(other_obj.position)
19        return distance < self.radius + other_obj.radius
Here’s a breakdown:
-
Line 1 imports the
Vector2class mentioned earlier. -
Line 3 creates the
GameObjectclass, which you’ll use to represent all game objects in Space Rocks. -
Line 4 is the constructor of the
GameObjectclass. It needs three arguments:-
position: The center of the object -
sprite: The image used to draw this object -
velocity: Updates thepositionof the object each frame
-
-
Lines 5 and 8 ensure that the
positionand thevelocitywill always be represented as vectors for future calculations, even if tuples are passed to the constructor. You do that by calling theVector2()constructor. If it’s given a tuple, then it will create a new vector out of it. If it’s given a vector, then it will create a copy of that vector. -
Line 7 calculates the
radiusas half the width of thespriteimage. In this program, game object sprites will always be squares with transparent backgrounds. You could also use the height of the image—it would make no difference. -
Line 10 defines
draw(), which will draw the object’sspriteon the surface passed as an argument. -
Line 11 calculates the correct position for blitting the image. The process is described in more detail below. Notice that the
Vector2()constructor receives a single number instead of a tuple. In that case, it will use that number for both values. SoVector2(self.radius)is the equivalent ofVector2((self.radius, self.radius)). -
Line 12 uses the newly calculated blit position to put your object’s sprite in a correct place on the given surface.
-
Line 14 defines
move(). It will update the position of the game object. -
Line 15 adds the velocity to the position and gets an updated position vector as a result. Pygame makes manipulating vectors straightforward, allowing you to add them like numbers.
-
Line 17 defines the
collides_with()method, that will be used to detect collisions. -
Line 18 calculates the distance between two objects by using
Vector2.distance_to(). -
Line 19 checks if that distance is smaller than the sum of the objects’ radiuses. If so, the objects collide.
Please note that your game objects have a central position, but blit() requires a top-left corner. So, the blit position has to be calculated by moving the actual position of the object by a vector:
That process happens in draw().
You can test this by adding a spaceship and a single asteroid. First, copy the spaceship and asteroid images to assets/sprites. You can download the source code by clicking the link below:
Get the Source Code: Click here to get the source code you’ll use to build an Asteroids game in Python with Pygame in this tutorial.
The structure of your project should look like this:
awesome_pygame_project/
|
├── assets/
|   |
│   └── sprites/
│       ├── asteroid.png
│       ├── space.png
│       └── spaceship.png
|
├── space_rocks/
│   ├── __main__.py
│   ├── game.py
│   ├── models.py
│   └── utils.py
|
└── requirements.txt
Now modify the space_rocks/game.py file:
import pygame

from models import GameObject
from utils import load_sprite

class SpaceRocks:
    def __init__(self):
        self._init_pygame()
        self.screen = pygame.display.set_mode((800, 600))
        self.background = load_sprite("space", False)
        self.spaceship = GameObject(
            (400, 300), load_sprite("spaceship"), (0, 0)
        )
        self.asteroid = GameObject(
            (400, 300), load_sprite("asteroid"), (1, 0)
        )

    def main_loop(self):
        while True:
            self._handle_input()
            self._process_game_logic()
            self._draw()

    def _init_pygame(self):
        pygame.init()
        pygame.display.set_caption("Space Rocks")

    def _handle_input(self):
        for event in pygame.event.get():
            if event.type == pygame.QUIT or (
                event.type == pygame.KEYDOWN and event.key == pygame.K_ESCAPE
            ):
                quit()

    def _process_game_logic(self):
        self.spaceship.move()
        self.asteroid.move()

    def _draw(self):
        self.screen.blit(self.background, (0, 0))
        self.spaceship.draw(self.screen)
        self.asteroid.draw(self.screen)
        pygame.display.flip()
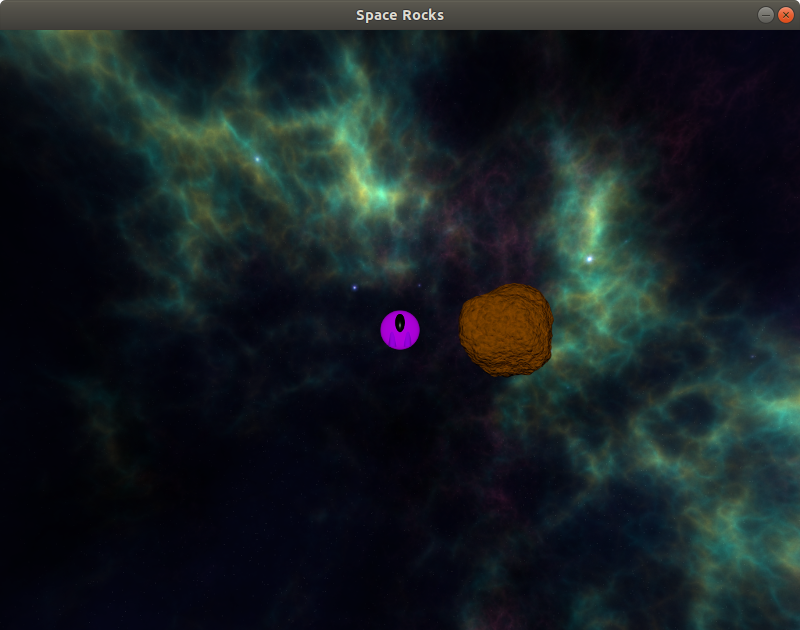
Both objects are placed in the middle of the screen, using the coordinates (400, 300). Both objects’ position will be updated each frame using _process_game_logic(), and they’ll be drawn using _draw().
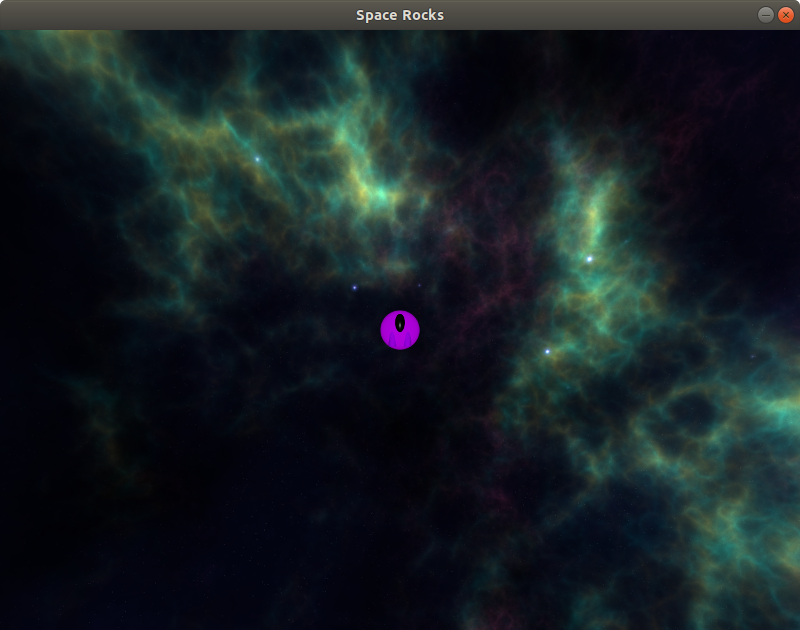
Run this program, and you’ll see an asteroid moving to the right and a spaceship standing still in the middle of the screen:
You can also test collides_with() by temporarily adding one line at the end of _draw():
print("Collides:", self.spaceship.collides_with(self.asteroid))
In the command line, you’ll notice how the method initially prints True since the asteroid covers the spaceship. Later, as the asteroid moves further to the right, it starts printing False.
Controlling the Speed
Now that you have moving objects on the screen, it’s time to think about how your game will perform on different machines with different processors. Sometimes it’ll run faster, and sometimes it’ll run slower.
Because of that, the asteroids (and soon bullets) will move with different speed, making the game sometimes easier and sometimes harder. That’s not something that you want. What you want is for your game to run with a fixed number of frames per second (FPS).
Luckily, Pygame can take care of that. It offers a pygame.time.Clock class with a tick() method. This method will wait long enough to match the desired FPS value, passed as an argument.
Go ahead and update space_rocks/game.py:
import pygame

from models import GameObject
from utils import load_sprite

class SpaceRocks:
    def __init__(self):
        self._init_pygame()
        self.screen = pygame.display.set_mode((800, 600))
        self.background = load_sprite("space", False)
        self.clock = pygame.time.Clock()
        self.spaceship = GameObject(
            (400, 300), load_sprite("spaceship"), (0, 0)
        )
        self.asteroid = GameObject(
            (400, 300), load_sprite("asteroid"), (1, 0)
        )

    def main_loop(self):
        while True:
            self._handle_input()
            self._process_game_logic()
            self._draw()

    def _init_pygame(self):
        pygame.init()
        pygame.display.set_caption("Space Rocks")

    def _handle_input(self):
        for event in pygame.event.get():
            if event.type == pygame.QUIT or (
                event.type == pygame.KEYDOWN and event.key == pygame.K_ESCAPE
            ):
                quit()

    def _process_game_logic(self):
        self.spaceship.move()
        self.asteroid.move()

    def _draw(self):
        self.screen.blit(self.background, (0, 0))
        self.spaceship.draw(self.screen)
        self.asteroid.draw(self.screen)
        pygame.display.flip()
        self.clock.tick(60)
If you run your game now, then the asteroid might move at a different speed than it initially had. However, you can now be sure that this speed will remain the same, even on computers with super-fast processors. That’s because your game will always run at 60 FPS. You can also experiment with different values passed to tick() to see the difference.
You just learned how to show and move objects on the screen. Now you can add some more advanced logic to your game.
Step 5: Spaceship
At this point, you should have a class for general drawable and movable game objects. At the end of this step, you’ll use it to create a controllable spaceship.
The class you created in the previous step, GameObject, holds some general logic that can be reused by different game objects. However, each game object will also implement its own logic. The spaceship, for example, is expected to rotate and accelerate. It will also shoot bullets, but that comes later.
Creating a Class
The image of the spaceship is already in the space_rocks/assets directory that you added in Step 4. However, earlier it was used in the main game file, and now you need to load it in one of the models. To be able to do this, update the imports section in the space_rocks/models.py file:
from pygame.math import Vector2

from utils import load_sprite
Now you can create, in the same file, the Spaceship class that inherits from GameObject:
class Spaceship(GameObject):
    def __init__(self, position):
        super().__init__(position, load_sprite("spaceship"), Vector2(0))
It doesn’t do a lot at this point—it just calls the GameObject constructor with a specific image and a zero velocity. However, you’ll soon add more functionality.
To use this new class, you first need to import it. Update the imports in the space_rocks/game.py file like this:
import pygame

from models import Spaceship
from utils import load_sprite
You probably noticed that the original import of the GameObject class is gone. That’s because GameObject is used as a base class to be inherited by other classes. You shouldn’t use it directly, but rather import the classes that represent actual game objects.
This means that the asteroid from the previous step will stop working, but that’s not a big issue. You’ll soon add a proper class that represents asteroids. Until then, you should focus on the spaceship.
Go ahead and edit the SpaceRocks class to look like this:
 1class SpaceRocks:
 2    def __init__(self):
 3        self._init_pygame()
 4        self.screen = pygame.display.set_mode((800, 600))
 5        self.background = load_sprite("space", False)
 6        self.clock = pygame.time.Clock()
 7        self.spaceship = Spaceship((400, 300))
 8
 9    def main_loop(self):
10        while True:
11            self._handle_input()
12            self._process_game_logic()
13            self._draw()
14
15    def _init_pygame(self):
16        pygame.init()
17        pygame.display.set_caption("Space Rocks")
18
19    def _handle_input(self):
20        for event in pygame.event.get():
21            if event.type == pygame.QUIT or (
22                event.type == pygame.KEYDOWN and event.key == pygame.K_ESCAPE
23            ):
24                quit()
25
26    def _process_game_logic(self):
27        self.spaceship.move()
28
29    def _draw(self):
30        self.screen.blit(self.background, (0, 0))
31        self.spaceship.draw(self.screen)
32        pygame.display.flip()
33        self.clock.tick(60)
Two things happened:
-
In line 7, you replaced the base
GameObjectclass with a dedicatedSpaceshipclass. -
You removed all
self.asteroidreferences from__init__(),_process_game_logic()and_draw().
If you run your game now, then you’ll see a spaceship in the middle of the screen:
The changes didn’t add any new behavior yet, but now you have a class that you can extend.
Rotating the Spaceship
By default, the spaceship is facing up, toward the top of the screen. Your players should be able to rotate it left and right. Luckily, Pygame has built-in methods for rotating sprites, but there’s a small problem.
In general, image rotation is a complex process that requires recalculating pixels in the new image. During that recalculation, information about the original pixels is lost and the image is deformed a bit. With each rotation, the deformation becomes more and more visible.
Because of that, it might be a better idea to store the original sprite in the Spaceship class and have another sprite, which will be updated every time the spaceship rotates.
For that approach to work, you’ll need to know the angle by which the spaceship is rotated. This can be done in two ways:
- Keep the angle as a floating point value and update it during rotation.
- Keep the vector representing the direction the spaceship is facing and calculate the angle using that vector.
Both ways are good, but you need to pick one before you proceed. Since the position and the velocity of the spaceship are already vectors, it makes sense to use another vector to represent the direction. That will make it more straightforward to add vectors and update the position later. Luckily, the Vector2 class can be rotated very easily, and the result won’t be deformed.
First, create a constant vector called UP in the space_rocks/models.py file. You’ll use it as a reference later:
UP = Vector2(0, -1)
Remember that Pygame’s y-axis goes from top to bottom, so a negative value actually points upwards:
Next, modify the Spaceship class:
class Spaceship(GameObject):
    MANEUVERABILITY = 3
The MANEUVERABILITY value determines how fast your spaceship can rotate. You learned earlier that vectors in Pygame can be rotated, and this value represents an angle in degrees by which your spaceship’s direction can rotate each frame. Using a larger number will rotate the spaceship faster, while a smaller number will allow more granular control over the rotation.
Next, add a direction to the Spaceship class by modifying the constructor:
def __init__(self, position):
    # Make a copy of the original UP vector
    self.direction = Vector2(UP)

    super().__init__(position, load_sprite("spaceship"), Vector2(0))
The direction vector will initially be the same as the UP vector. However, it will be modified later, so you need to create a copy of it.
Next, you need to create a new method in the Spaceship class called rotate():
def rotate(self, clockwise=True):
    sign = 1 if clockwise else -1
    angle = self.MANEUVERABILITY * sign
    self.direction.rotate_ip(angle)
This method will change the direction by rotating it either clockwise or counterclockwise. The rotate_ip() method of the Vector2 class rotates it in place by a given angle in degrees. The length of the vector doesn’t change during this operation. You can learn a bit more about the advanced math behind 2D vector rotation from Rotating Points Using Rotation Matrices.
All that’s left is to update the drawing of the Spaceship. To do this, you first need to import rotozoom, which is responsible for scaling and rotating images:
from pygame.math import Vector2
from pygame.transform import rotozoom

from utils import load_sprite, wrap_position
Then, you can override the draw() method in the Spaceship class:
 1def draw(self, surface):
 2    angle = self.direction.angle_to(UP)
 3    rotated_surface = rotozoom(self.sprite, angle, 1.0)
 4    rotated_surface_size = Vector2(rotated_surface.get_size())
 5    blit_position = self.position - rotated_surface_size * 0.5
 6    surface.blit(rotated_surface, blit_position)
Here’s a step-by-step breakdown:
-
Line 2 uses the
angle_to()method of theVector2class to calculate the angle by which one vector needs to be rotated in order to point in the same direction as the other vector. This makes it painless to translate the spaceship’s direction into the rotation angle in degrees. -
Line 3 rotates the sprite using
rotozoom(). It takes the original image, the angle by which it should be rotated, and the scale that should be applied to the sprite. In this case, you don’t want to change the size, so you keep the scale as1.0. -
Lines 4 and 5 recalculate the blit position, using the size of
rotated_surface. The process is described below. -
Line 5 contains the
rotated_surface_size * 0.5operation. That’s another thing you can do with vectors in Pygame. When you multiply a vector by a number, all its coordinates are multiplied by that number. As a result, multiplying by0.5will return a vector with half the length of the original. -
Line 6 uses the newly calculated blit position to put the image on the screen.
Note that rotozoom() returns a new surface with a rotated image. However, in order to keep all the contents of the original sprite, the new image might have a different size. In that case, Pygame will add some additional, transparent background:
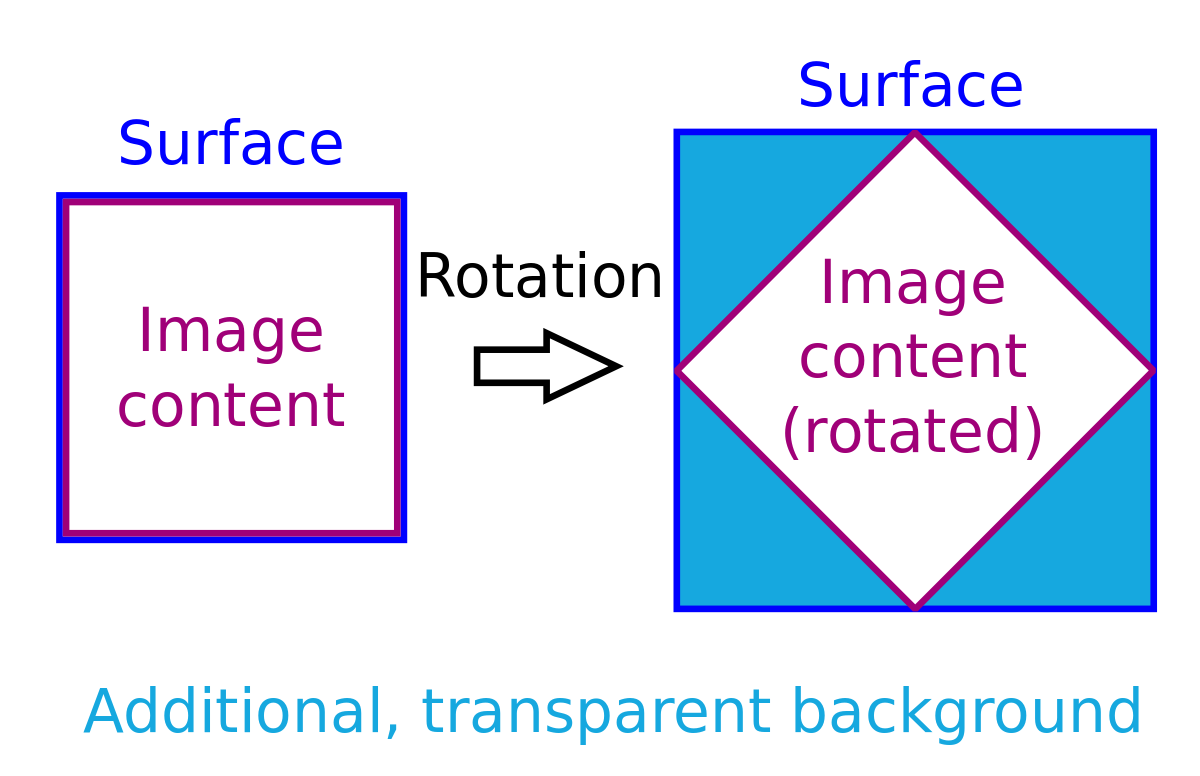
The size of the new image can be significantly different than that of the original image. That’s why draw() recalculates the blit position of rotated_surface. Remember that blit() starts in the upper-left corner, so to center the rotated image, you also need to move the blit position by half the size of the image.
Now you need to add input handling. However, the event loop won’t exactly work here. Events are recorded when they happen, but you need to constantly check if a key is pressed. After all, the spaceship should accelerate for as long as you press Up, and it should rotate constantly when you press Left or Right.
You could create a flag for each key, set it when the key is pressed, and reset when it’s released. However, there’s a better way.
The current state of the keyboard is stored in Pygame and can be obtained using pygame.key.get_pressed(). It returns a dictionary where key constants (like pygame.K_ESCAPE that you used previously) are keys, and the value is True if the key is pressed or False otherwise.
Knowing this, you can edit the space_rocks/game.py file and update the _handle_input() method of SpaceRocks class. The constants you need to use for arrow keys are pygame.K_RIGHT and pygame.K_LEFT:
def _handle_input(self):
    for event in pygame.event.get():
        if event.type == pygame.QUIT or (
            event.type == pygame.KEYDOWN and event.key == pygame.K_ESCAPE
        ):
            quit()

    is_key_pressed = pygame.key.get_pressed()

    if is_key_pressed[pygame.K_RIGHT]:
        self.spaceship.rotate(clockwise=True)
    elif is_key_pressed[pygame.K_LEFT]:
        self.spaceship.rotate(clockwise=False)
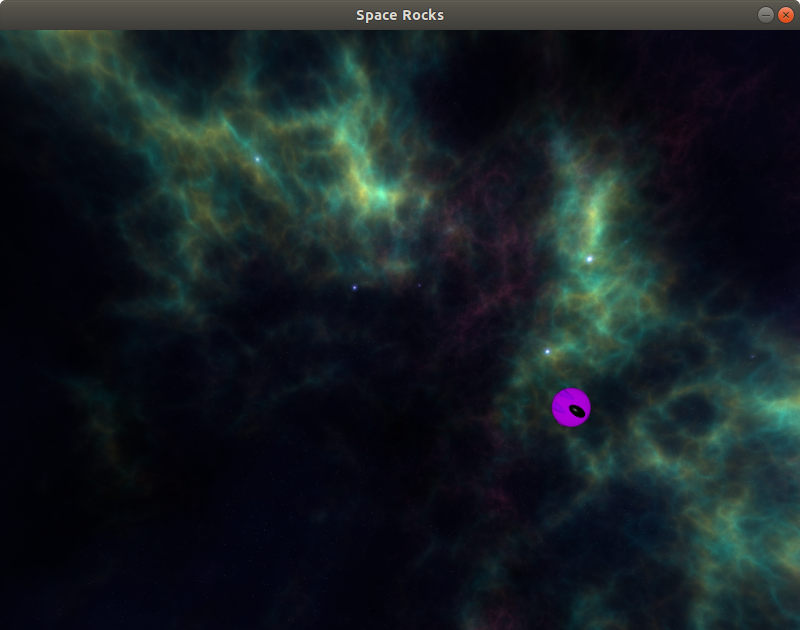
Now your spaceship will rotate left and right when you press arrow keys:

As you can see, the spaceship rotates correctly. However, it still doesn’t move. You’ll fix that next.
Accelerating the Spaceship
In this section, you’ll add acceleration to your spaceship. Remember that, according to the game mechanics of Asteroids, the spaceship can only move forward.
In your game, when you press Up, the spaceship’s speed will increase. When you release the key, the spaceship will maintain its current speed but should no longer accelerate. So in order to slow it down, you’ll have to turn the spaceship around and press Up again.
The process might already seem a bit complicated, so before you proceed, here is a short recap:
directionis a vector describing where the spaceship is pointing.velocityis a vector describing where the spaceship moves each frame.ACCELERATIONis a constant number describing how fast the spaceship can speed up each frame.
You can calculate the change in velocity by multiplying the direction vector by the ACCELERATION value and adding the result to the current velocity. This happens only when the engine is on—that is, when the player presses Up. The new position of the spaceship is calculated by adding the current velocity to the current position of the spaceship. This happens each frame, regardless of the engine status.
Knowing this, you can add the ACCELERATION value to the Spaceship class:
class Spaceship(GameObject):
    MANEUVERABILITY = 3
    ACCELERATION = 0.25
Then, create accelerate() in the Spaceship class:
def accelerate(self):
    self.velocity += self.direction * self.ACCELERATION
Now you can add input handling to _handle_input() in SpaceRocks. Similarly to the rotation, this will check the current state of the keyboard, not the keypress events. The constant for Up is pygame.K_UP:
def _handle_input(self):
    for event in pygame.event.get():
        if event.type == pygame.QUIT or (
            event.type == pygame.KEYDOWN and event.key == pygame.K_ESCAPE
        ):
            quit()

    is_key_pressed = pygame.key.get_pressed()

    if is_key_pressed[pygame.K_RIGHT]:
        self.spaceship.rotate(clockwise=True)
    elif is_key_pressed[pygame.K_LEFT]:
        self.spaceship.rotate(clockwise=False)
    if is_key_pressed[pygame.K_UP]:
        self.spaceship.accelerate()
Go ahead and test this. Run your game, rotate the spaceship, and turn on the engine:
Your spaceship can now move and rotate! However, when it reaches the edge of the screen, it just keeps moving. That’s something you should fix!
Wrapping Objects Around the Screen
An important element of this game is making sure that game objects don’t leave the screen. You can either have them bounce back off the edge or make them reappear on the opposite edge of the screen. In this project, you’ll implement the latter.
Start by importing the Vector2 class in space_rocks/utils.py file:
from pygame.image import load
from pygame.math import Vector2
Next, create wrap_position() in the same file:
 1def wrap_position(position, surface):
 2    x, y = position
 3    w, h = surface.get_size()
 4    return Vector2(x % w, y % h)
By using the modulo operator on line 4, you make sure that the position never leaves the area of the given surface. In your game, that surface will be the screen.
Import this new method in space_rocks/models.py:
from pygame.math import Vector2
from pygame.transform import rotozoom

from utils import load_sprite, wrap_position
Now you can update move() in the GameObject class:
def move(self, surface):
    self.position = wrap_position(self.position + self.velocity, surface)
Notice that using the wrap_position() isn’t the only change here. You also add a new surface argument to this method. That’s because you need to know the area around which the position should be wrapped. Remember to update the method call in the SpaceRocks class as well:
def _process_game_logic(self):
    self.spaceship.move(self.screen)
Now your spaceship reappears on the other side of the screen.
The logic of moving and rotating the spaceship is ready. But the ship is still alone in the empty space. Time to add some asteroids!
Step 6: Asteroids
At this point, you have a single spaceship that you can move on the screen. At the end of this step, your game will also show some asteroids. Moreover, you’re going to implement collisions between the spaceship and the asteroids.
Creating a Class
Similar to Spaceship, you’ll start by creating a class called Asteroid that inherits from GameObject. Edit the space_rocks/models.py file like so:
class Asteroid(GameObject):
    def __init__(self, position):
        super().__init__(position, load_sprite("asteroid"), (0, 0))
Just like before, you start by calling the GameObject constructor with a specific image. You added the image in one of the previous steps.
Next, import the new class in space_rocks/game.py:
import pygame

from models import Asteroid, Spaceship
from utils import load_sprite
Finally, edit the constructor of the SpaceRocks class in the same file to create six asteroids:
def __init__(self):
    self._init_pygame()
    self.screen = pygame.display.set_mode((800, 600))
    self.background = load_sprite("space", False)
    self.clock = pygame.time.Clock()

    self.asteroids = [Asteroid((0, 0)) for _ in range(6)]
    self.spaceship = Spaceship((400, 300))
Now that you have more game objects, it would be a good idea to create a helper method in the SpaceRocks class that returns all of them. This method will then be used by the drawing and moving logic. That way, you can later introduce new types of game objects and modify only this single method, or you can exclude some objects from this group if necessary.
Call this method _get_game_objects():
def _get_game_objects(self):
    return [*self.asteroids, self.spaceship]
Now use it to move all game objects in a single loop by editing _process_game_logic():
def _process_game_logic(self):
    for game_object in self._get_game_objects():
        game_object.move(self.screen)
The same goes for _draw():
def _draw(self):
    self.screen.blit(self.background, (0, 0))

    for game_object in self._get_game_objects():
        game_object.draw(self.screen)

    pygame.display.flip()
    self.clock.tick(60)
Run your game now and you should see a screen with the asteroids:

Unfortunately, all the asteroids are piled up in one corner of the screen.
Well, that was kind of expected, since all the asteroids are created with a position of (0, 0), which represents the top-left corner. You can change this by setting a random position on the screen.
Randomizing the Position
To generate a random position, you’ll have to add some imports to space_rocks/utils.py file:
import random

from pygame.image import load
from pygame.math import Vector2
Then, create a method called get_random_position() in the same file:
def get_random_position(surface):
    return Vector2(
        random.randrange(surface.get_width()),
        random.randrange(surface.get_height()),
    )
This will generate a random set of coordinates on a given surface and return the result as a Vector2 instance.
Next, import this method in the space_rocks/game.py file:
import pygame

from models import Asteroid, Spaceship
from utils import get_random_position, load_sprite
Now use get_random_position() to place all six asteroids in random locations. Modify the constructor of the SpaceRocks class:
def __init__(self):
    self._init_pygame()
    self.screen = pygame.display.set_mode((800, 600))
    self.background = load_sprite("space", False)
    self.clock = pygame.time.Clock()

    self.asteroids = [
        Asteroid(get_random_position(self.screen)) for _ in range(6)
    ]
    self.spaceship = Spaceship((400, 300))
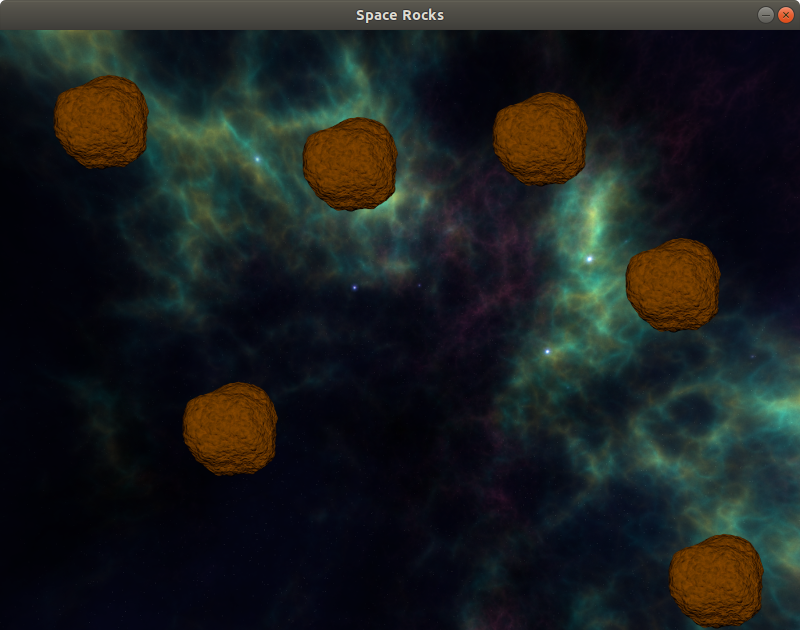
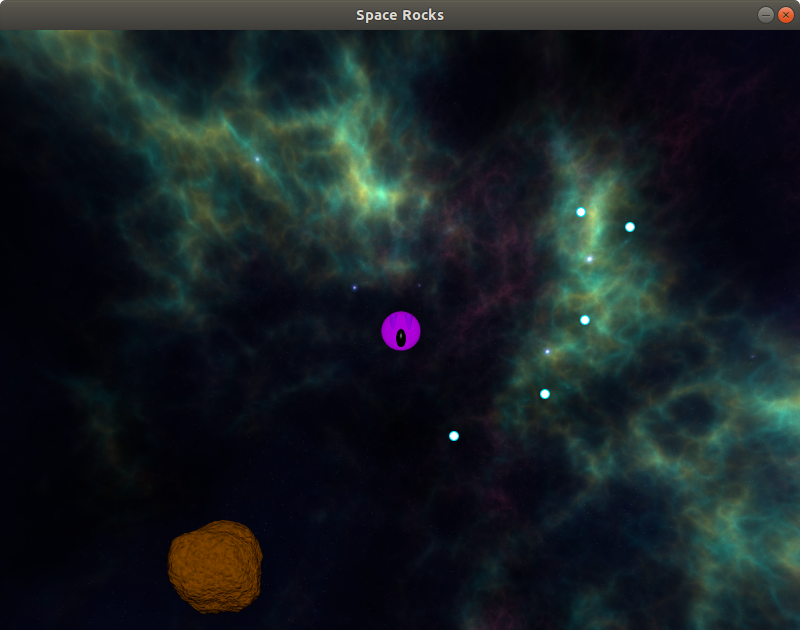
Now when you run the game, you’ll see a nice, random distribution of asteroids on the screen:
This looks much better, but there’s a small problem: the asteroids were generated in the same area as the spaceship. After you add collisions, this would cause the player to lose immediately after starting the game. That would be very unfair!
One solution to this problem is to check if the position is too close to the spaceship, and if so, generate a new one until a valid position is found.
Start by creating a constant representing an area that has to remain empty. A value of 250 pixels should be enough:
class SpaceRocks:
    MIN_ASTEROID_DISTANCE = 250
Now you can modify the constructor of the SpaceRocks class to make sure that your players always have a chance to win:
def __init__(self):
    self._init_pygame()
    self.screen = pygame.display.set_mode((800, 600))
    self.background = load_sprite("space", False)
    self.clock = pygame.time.Clock()

    self.asteroids = []
    self.spaceship = Spaceship((400, 300))

    for _ in range(6):
        while True:
            position = get_random_position(self.screen)
            if (
                position.distance_to(self.spaceship.position)
                > self.MIN_ASTEROID_DISTANCE
            ):
                break

        self.asteroids.append(Asteroid(position))
In a loop, your code checks if the position of an asteroid is larger than the minimal asteroid distance. If not, then the loop runs again until such a position is found.
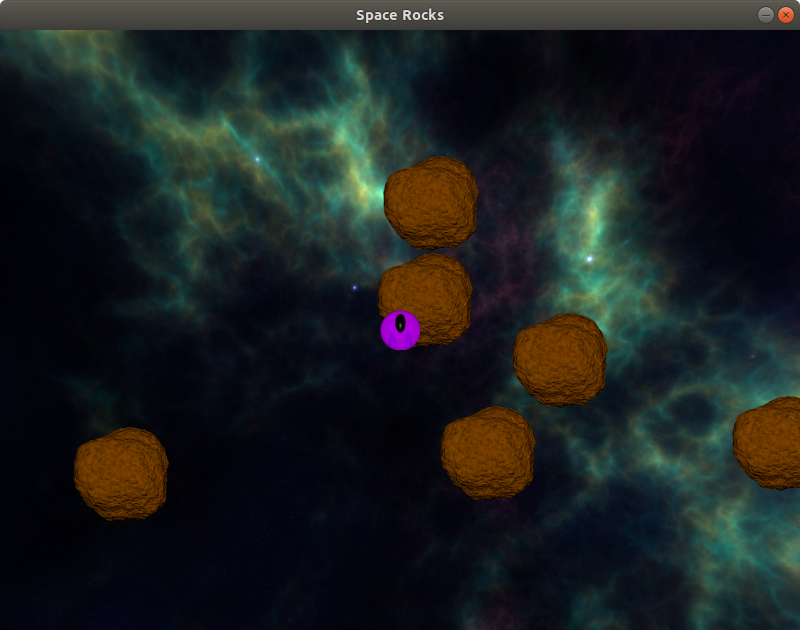
Run the program again, and none of the asteroids will overlap with the spaceship:
You can run the game several times to make sure that each time there’s some free space around the spaceship.
Moving the Asteroids
At the moment, your program shows six asteroids at random positions, and you’re ready to spice things up a bit by moving them! Similar to the position, the velocity of an asteroid should also be random, not only in terms of the direction, but also value.
Start by creating a method called get_random_velocity() in the space_rocks/utils.py file:
def get_random_velocity(min_speed, max_speed):
    speed = random.randint(min_speed, max_speed)
    angle = random.randrange(0, 360)
    return Vector2(speed, 0).rotate(angle)
The method will generate a random value between min_speed and max_speed and a random angle between 0 and 360 degrees. Then it will create a vector with that value, rotated by that angle.
Because the asteroid’s velocity should be random no matter where it is placed, let’s use this method directly in the Asteroid class. Start with updating the imports in the space_rocks/models.py file:
from pygame.math import Vector2
from pygame.transform import rotozoom
from utils import get_random_velocity, load_sprite, wrap_position
Note that you’re setting a your random position in one place and your random velocity somewhere else. That’s because the position should be random only for the six asteroids you start with, so it’s being set in in the space_rocks/game.py file, where the game is initialized. However, the velocity is random for every asteroid, so you set it in the constructor of the Asteroid class.
Then use the new method in the constructor of the Asteroid class:
def __init__(self, position):
    super().__init__(
        position, load_sprite("asteroid"), get_random_velocity(1, 3)
    )
Notice that the method uses the minimum value of 1. That’s because the asteroid should always move, at least a bit.
Run your game again to see moving asteroids:
You can also move the spaceship around the screen. Unfortunately, when it encounters an asteroid, nothing happens. It’s time to add some collisions.
Colliding With the Spaceship
A very important part of this game is the possibility of your spaceship being destroyed by an asteroid collision. You can check the collisions using GameObject.collides_with() introduced in Step 4. All you need to do it call this method for each asteroid.
Edit the _process_game_logic() method in the SpaceRocks class like this:
def _process_game_logic(self):
    for game_object in self._get_game_objects():
        game_object.move(self.screen)

    if self.spaceship:
        for asteroid in self.asteroids:
            if asteroid.collides_with(self.spaceship):
                self.spaceship = None
                break
If any of the asteroids collides with the spaceship, then the spaceship is destroyed. In this game, you’ll represent this by setting self.spaceship to None.
Notice that there’s also a check for self.spaceship at the beginning of the loop. That’s because, when the spaceship is destroyed, there’s no reason to check any collisions with it. Also, detecting a collision with a None object would result in an error.
Now that it’s possible for the spaceship to have a value of None, it’s important to update _get_game_objects() in the SpaceRocks class to avoid trying to render or move a destroyed spaceship:
def _get_game_objects(self):
    game_objects = [*self.asteroids]

    if self.spaceship:
        game_objects.append(self.spaceship)

    return game_objects
The same goes for input handling:
def _handle_input(self):
    for event in pygame.event.get():
        if event.type == pygame.QUIT or (
            event.type == pygame.KEYDOWN and event.key == pygame.K_ESCAPE
        ):
            quit()

    is_key_pressed = pygame.key.get_pressed()

    if self.spaceship:
        if is_key_pressed[pygame.K_RIGHT]:
            self.spaceship.rotate(clockwise=True)
        elif is_key_pressed[pygame.K_LEFT]:
            self.spaceship.rotate(clockwise=False)
        if is_key_pressed[pygame.K_UP]:
            self.spaceship.accelerate()
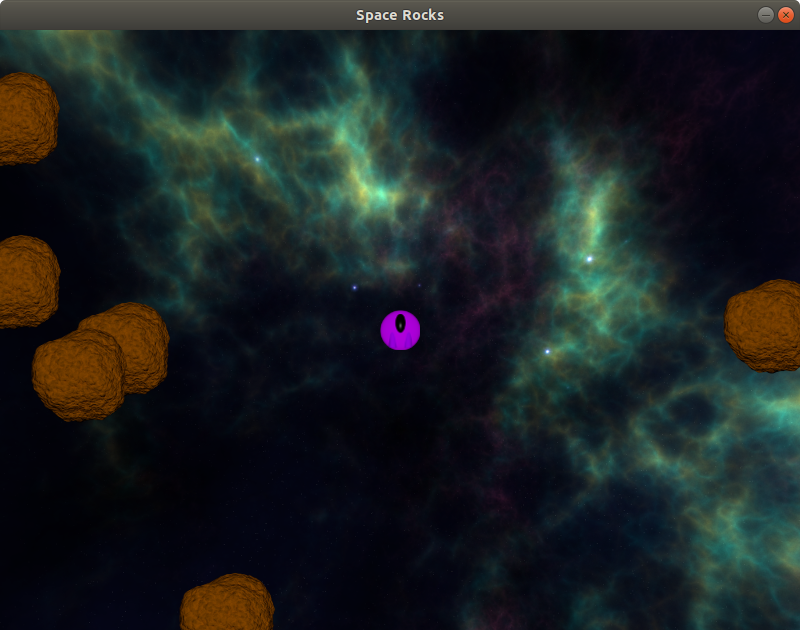
You can run your game now and see that the spaceship disappears after colliding with an asteroid:
Your spaceship can now fly around and be destroyed when it collides with asteroids. You’re ready to make it possible for the asteroids to be destroyed too.
Step 7: Bullets
At this point, you have some randomly placed and moving asteroids and a spaceship that can move around and avoid them. At the end of this step, your spaceship will also be able to defend itself by shooting bullets.
Creating a Class
Start with adding an image of a bullet to assets/sprites. You can download the source code by clicking the link below:
Get the Source Code: Click here to get the source code you’ll use to build an Asteroids game in Python with Pygame in this tutorial.
The structure of your project should look like this:
awesome_pygame_project/
|
├── assets/
|   |
│   └── sprites/
│       ├── asteroid.png
│       ├── bullet.png
│       ├── space.png
│       └── spaceship.png
|
├── space_rocks/
│   ├── __main__.py
│   ├── game.py
│   ├── models.py
│   └── utils.py
|
└── requirements.txt
Then edit the space_rocks/models.py file by creating a class called Bullet that inherits from GameObject:
class Bullet(GameObject):
    def __init__(self, position, velocity):
        super().__init__(position, load_sprite("bullet"), velocity)
Just like before, this will only call the GameObject constructor with a specific sprite. However, this time the velocity will be a required argument because a bullet has to move.
Next, you should add a way to keep track of the bullets, similar to what you did for the asteroids. Edit the constructor of the SpaceRocks class in the space_rocks/game.py file:
def __init__(self):
    self._init_pygame()
    self.screen = pygame.display.set_mode((800, 600))
    self.background = load_sprite("space", False)
    self.clock = pygame.time.Clock()

    self.asteroids = []
    self.bullets = []
    self.spaceship = Spaceship((400, 300))

    for _ in range(6):
        while True:
            position = get_random_position(self.screen)
            if (
                position.distance_to(self.spaceship.position)
                > self.MIN_ASTEROID_DISTANCE
            ):
                break

        self.asteroids.append(Asteroid(position))
Bullets should be treated the same way as other game objects, so edit the _get_game_object() method in SpaceRocks:
def _get_game_objects(self):
    game_objects = [*self.asteroids, *self.bullets]

    if self.spaceship:
        game_objects.append(self.spaceship)

    return game_objects
The list of bullets is there, but it’s empty for now. You can fix that.
Shooting a Bullet
There’s a small issue with shooting. Bullets are stored in the main game object, represented by the SpaceRocks class. However, the shooting logic should be determined by the spaceship. It’s the spaceship that knows how to create a new bullet, but it’s the game that stores and later animates the bullets. The Spaceship class needs a way to inform the SpaceRocks class that a bullet has been created and should be tracked.
To fix this, you can add a callback function to the Spaceship class. That function will be provided by the SpaceRocks class when the spaceship is initialized. Every time the spaceship creates a bullet, it will initialize a Bullet object and then call the callback. The callback will add the bullet to the list of all bullets stored by the game.
Start by adding a callback to the constructor of the Spaceship class in the space_rocks/models.py file:
def __init__(self, position, create_bullet_callback):
    self.create_bullet_callback = create_bullet_callback
    # Make a copy of the original UP vector
    self.direction = Vector2(UP)

    super().__init__(position, load_sprite("spaceship"), Vector2(0))
You’ll also need the value of the bullet’s speed:
class Spaceship(GameObject):
    MANEUVERABILITY = 3
    ACCELERATION = 0.25
    BULLET_SPEED = 3
Next, create a method called shoot() in the Spaceship class:
def shoot(self):
    bullet_velocity = self.direction * self.BULLET_SPEED + self.velocity
    bullet = Bullet(self.position, bullet_velocity)
    self.create_bullet_callback(bullet)
You start by calculating the velocity of the bullet. The bullet is always shot forward, so you use the direction of the spaceship multiplied by the speed of the bullet. Because the spaceship doesn’t necessarily stand still, you add its velocity to the velocity of the bullet. That way, you can create high-speed bullets if the spaceship is moving very fast.
Then you create an instance of the Bullet class at the same location as the spaceship, using the velocity that was just calculated. Finally, the bullet is added to all the bullets in the game by using the callback method.
Now add the callback to the spaceship when it’s created. Bullets are stored as a list, and the only thing the callback has to do is add new items to that list. Therefore, the append() method should do the job. Edit the constructor of the SpaceRocks class in the space_rocks/game.py file:
def __init__(self):
    self._init_pygame()
    self.screen = pygame.display.set_mode((800, 600))
    self.background = load_sprite("space", False)
    self.clock = pygame.time.Clock()

    self.asteroids = []
    self.bullets = []
    self.spaceship = Spaceship((400, 300), self.bullets.append)

    for _ in range(6):
        while True:
            position = get_random_position(self.screen)
            if (
                position.distance_to(self.spaceship.position)
                > self.MIN_ASTEROID_DISTANCE
            ):
                break

        self.asteroids.append(Asteroid(position))
The last thing you need to add is input handling. The bullet should be generated only when Space pressed, so you can use the event loop. The constant for Space is pygame.K_SPACE.
Modify the _handle_input() method in the SpaceRocks class:
def _handle_input(self):
    for event in pygame.event.get():
        if event.type == pygame.QUIT or (
            event.type == pygame.KEYDOWN and event.key == pygame.K_ESCAPE
        ):
            quit()
        elif (
            self.spaceship
            and event.type == pygame.KEYDOWN
            and event.key == pygame.K_SPACE
        ):
            self.spaceship.shoot()

    is_key_pressed = pygame.key.get_pressed()

    if self.spaceship:
        if is_key_pressed[pygame.K_RIGHT]:
            self.spaceship.rotate(clockwise=True)
        elif is_key_pressed[pygame.K_LEFT]:
            self.spaceship.rotate(clockwise=False)
        if is_key_pressed[pygame.K_UP]:
            self.spaceship.accelerate()
Notice that the new input handling also checks if the spaceship exists. Otherwise, you could encounter errors when trying to call shoot() on a None object.
Run your game now and shoot some bullets:
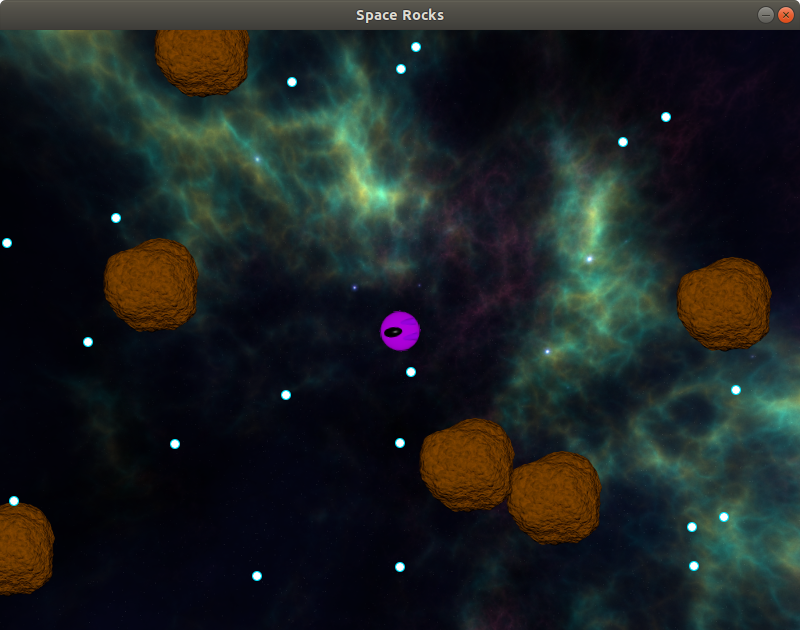
Your spaceship can finally shoot! However, the bullets don’t leave the screen, which might be an issue.
Wrapping the Bullets
At the moment, all game objects are wrapped around the screen. That includes bullets. However, because of this wrapping, the screen quickly gets filled with bullets flying in all directions. That might make the game a bit too easy!
You can solve this issue by disabling the wrapping only for bullets. Override move() in the Bullet class in the space_rocks/models.py file like this:
def move(self, surface):
    self.position = self.position + self.velocity
That way the bullets won’t wrap around the screen. However, they also won’t be destroyed. Instead, they’ll continue flying into the infinite abyss of the cosmos. Soon, your list of bullets will contain thousands of elements, and all of them will be processed in each frame, resulting in a decline of the performance of your game.
To avoid that situation, your game should remove the bullets as soon as they leave the screen. Update the _process_game_logic() method of the SpaceRocks class in the space_rocks/game.py file:
 1def _process_game_logic(self):
 2    for game_object in self._get_game_objects():
 3        game_object.move(self.screen)
 4
 5    if self.spaceship:
 6        for asteroid in self.asteroids:
 7            if asteroid.collides_with(self.spaceship):
 8                self.spaceship = None
 9                break
10
11    for bullet in self.bullets[:]:
12        if not self.screen.get_rect().collidepoint(bullet.position):
13            self.bullets.remove(bullet)
Notice that instead of using the original list, self.bullets, you create a copy of it using self.bullets[:] in line 11. That’s because removing elements from a list while iterating over it can cause errors.
Surfaces in Pygame have a get_rect() method that returns a rectangle representing their area. That rectangle, in turn, has a collidepoint() method that returns True if a point is included in the rectangle and False otherwise. Using these two methods, you can check if the bullet has left the screen, and if so, remove it from the list.
Colliding With Asteroids
A crucial element of your bullets is still missing: the ability to destroy asteroids! You’ll fix that in this section.
Update the _process_game_logic() method of the SpaceRocks class like this:
 1def _process_game_logic(self):
 2    for game_object in self._get_game_objects():
 3        game_object.move(self.screen)
 4
 5    if self.spaceship:
 6        for asteroid in self.asteroids:
 7            if asteroid.collides_with(self.spaceship):
 8                self.spaceship = None
 9                break
10
11    for bullet in self.bullets[:]:
12        for asteroid in self.asteroids[:]:
13            if asteroid.collides_with(bullet):
14                self.asteroids.remove(asteroid)
15                self.bullets.remove(bullet)
16                break
17
18    for bullet in self.bullets[:]:
19        if not self.screen.get_rect().collidepoint(bullet.position):
20            self.bullets.remove(bullet)
Now, whenever a collision is detected between a bullet and an asteroid, both will be removed from the game. Notice that, just like before in the bullet loop, you don’t use the original lists here. Instead, you create copies using [:] in lines 11 and 12.
If you run your game now and take a good aim when shooting, then you should be able to destroy some asteroids:
Your spaceship can finally protect itself! However, there are only six big targets in the game. Next, you’ll make it a bit more challenging.
Step 8: Splitting the Asteroids
At this point, you have a game with a spaceship, asteroids, and bullets. At the end of this step, your asteroids will split when hit by a bullet. A big asteroid will turn into two medium ones, a medium one will turn into two small ones, and a small one will disappear.
The size of an asteroid will be represented by a number:
| Asteroid size | Asteroid type |
|---|---|
3 |
Big asteroid |
2 |
Medium asteroid |
1 |
Small asteroid |
Each time an asteroid is hit, it will produce two asteroids with a smaller size. The exception is an asteroid with a size 1, as it should not produce any new asteroids.
The size of an asteroid will also determine the size of its sprite, and consequently its radius. In other words, the asteroids will be scaled like this:
| Asteroid size | Asteroid scale | Description |
|---|---|---|
| 3 | 1 | The default sprite and radius |
| 2 | 0.5 | Half the default sprite and radius |
| 1 | 0.25 | One-quarter of the default sprite and radius |
This might seem a bit complicated, but you can do it with just a few lines of code. Rewrite the constructor of the Asteroid class in the space_rocks/models.py file:
def __init__(self, position, size=3):
    self.size = size

    size_to_scale = {
        3: 1,
        2: 0.5,
        1: 0.25,
    }
    scale = size_to_scale[size]
    sprite = rotozoom(load_sprite("asteroid"), 0, scale)

    super().__init__(
        position, sprite, get_random_velocity(1, 3)
    )
This method will assign a size to an asteroid, using the default value 3, which represents a big asteroid. It will also scale the original sprite by using rotozoom(). You’ve used it before for rotating the spaceship. This method can also be used for scaling if the angle is 0 and the scale is anything other than 0. In this example, the size_to_scale lookup table contains scales for different sizes:
| Size | Scale |
|---|---|
| 3 | 1 |
| 2 | 0.5 |
| 1 | 0.25 |
Finally, you pass the scaled sprite to the constructor of the GameObject class, which will take care of calculating the radius based on the new image size.
Your new logic requires an asteroid to be able to create new asteroids. The situation is similar to the spaceship and bullets, so you can use a similar solution: a callback method.
Update the constructor of the Asteroid class again:
def __init__(self, position, create_asteroid_callback, size=3):
    self.create_asteroid_callback = create_asteroid_callback
    self.size = size

    size_to_scale = {
        3: 1,
        2: 0.5,
        1: 0.25,
    }
    scale = size_to_scale[size]
    sprite = rotozoom(load_sprite("asteroid"), 0, scale)

    super().__init__(
        position, sprite, get_random_velocity(1, 3)
    )
Now you can create a method called split() in the same class:
def split(self):
    if self.size > 1:
        for _ in range(2):
            asteroid = Asteroid(
                self.position, self.create_asteroid_callback, self.size - 1
            )
            self.create_asteroid_callback(asteroid)
This will create two new asteroids at the same position as the current one. Each of them will have a slightly smaller size. This logic will happen only if the current asteroid is a medium or large one.
Now you can add the callback to each newly created asteroid in the constructor of the SpaceRocks class. Just like in the case of the spaceship, you’ll use the append() method of the proper list:
def __init__(self):
    self._init_pygame()
    self.screen = pygame.display.set_mode((800, 600))
    self.background = load_sprite("space", False)
    self.clock = pygame.time.Clock()

    self.asteroids = []
    self.bullets = []
    self.spaceship = Spaceship((400, 300), self.bullets.append)

    for _ in range(6):
        while True:
            position = get_random_position(self.screen)
            if (
                position.distance_to(self.spaceship.position)
                > self.MIN_ASTEROID_DISTANCE
            ):
                break

        self.asteroids.append(Asteroid(position, self.asteroids.append))
Remember to call split() when an asteroid gets hit by a bullet. Update the _process_game_logic() method of the SpaceRocks class:
def _process_game_logic(self):
    for game_object in self._get_game_objects():
        game_object.move(self.screen)

    if self.spaceship:
        for asteroid in self.asteroids:
            if asteroid.collides_with(self.spaceship):
                self.spaceship = None
                break

    for bullet in self.bullets[:]:
        for asteroid in self.asteroids[:]:
            if asteroid.collides_with(bullet):
                self.asteroids.remove(asteroid)
                self.bullets.remove(bullet)
                asteroid.split()
                break

    for bullet in self.bullets[:]:
        if not self.screen.get_rect().collidepoint(bullet.position):
            self.bullets.remove(bullet)
If you run your game now and shoot down some asteroids, then you’ll notice that, instead of disappearing right away, they split into smaller ones:

You just implemented the entire logic of the game! The spaceship can move, it gets destroyed after colliding with an asteroid, it shoots bullets, and asteroids split into smaller ones. But the game is silent at the moment. You’ll take care of that next.
Step 9: Playing Sounds
At this point, your program displays all the game objects and handles interactions between them. At the end of this step, your game will also play sounds.
In Step 7, the spaceship was equipped with a weapon. That weapon is, however, completely silent. This is very accurate in terms of physics, since sounds don’t travel in a vacuum (“In space no one can hear you scream”). Nevertheless, using sounds in your game would make it much more attractive.
First, create an assets/sounds directory and add the laser sound there. You can download the source code by clicking the link below:
Get the Source Code: Click here to get the source code you’ll use to build an Asteroids game in Python with Pygame in this tutorial.
Your project’s structure should look like this:
awesome_pygame_project/
|
├── assets/
|   |
│   ├── sounds/
│   │   └── laser.wav
|   |
│   └── sprites/
│       ├── asteroid.png
│       ├── bullet.png
│       ├── space.png
│       └── spaceship.png
|
├── space_rocks/
│   ├── __main__.py
│   ├── game.py
│   ├── models.py
│   └── utils.py
|
└── requirements.txt
Now you need to load the file. In Pygame, a sound is represented by the Sound class from the pygame.mixer module. Although you will only use a single sound in this game, you might want to add more later. That’s why you’ll create a helper method for loading sounds, similar to the one you created for sprites.
First, import the Sound class in the space_rocks/utils.py file:
import random

from pygame.image import load
from pygame.math import Vector2
from pygame.mixer import Sound
Next, create a method called load_sound() in the same file:
def load_sound(name):
    path = f"assets/sounds/{name}.wav"
    return Sound(path)
The method has a similar logic to load_sprite(). It will assume that the sound is always located in the assets/sounds directory and that it’s a WAV file.
You can now import this new method in the space_rocks/models.py file:
from pygame.math import Vector2
from pygame.transform import rotozoom

from utils import get_random_velocity, load_sound, load_sprite, wrap_position
Then load the sound in the constructor of the Spaceship class:
def __init__(self, position, create_bullet_callback):
    self.create_bullet_callback = create_bullet_callback
    self.laser_sound = load_sound("laser")
    # Make a copy of the original UP vector
    self.direction = Vector2(UP)

    super().__init__(position, load_sprite("spaceship"), Vector2(0))
Finally, you should play the sound whenever the spaceship shoots. Update shoot():
def shoot(self):
    bullet_velocity = self.direction * self.BULLET_SPEED + self.velocity
    bullet = Bullet(self.position, bullet_velocity)
    self.create_bullet_callback(bullet)
    self.laser_sound.play()
Run the game now and you’ll hear a sound every time you shoot.
You’ve just learned how to work with audio files in Pygame! All that’s left is displaying a message at the end of the game.
Step 10: Ending the Game
At this point, your game is almost complete, with input handling, interactions, images, and even sounds. At the end of this step, you’ll also display the status of the game on the screen.
Many games show some additional information, both during the game and after it’s over. This can be a number of remaining hit points, a shield level, an ammo count, a total score for the mission, and so on. In this game, you’ll display the status of the game.
If the spaceship is destroyed by an asteroid, then the message You lost! should appear on the screen. But if all the asteroids are gone and the spaceship is still there, then you should display You won!
Pygame doesn’t have any advanced tools for drawing text, which means more work for the programmer. Rendered text is represented by a surface with a transparent background. You can manipulate that surface the same way you do with sprites, for example by using blit(). The surface itself is created using a font.
The full process of working with text in Pygame looks like this:
-
Create a font: The font is represented by the
pygame.font.Fontclass. You can use a custom font file, or you can use the default font. For this game, you’ll do the latter. -
Create a surface with the text: This is done using
Font.render(). You’ll learn more about that method later in this tutorial. For now, it’s enough to know that it creates a surface with the rendered text and a transparent background. -
Blit the surface onto the screen: As with any other surface in Pygame, the text will only be visible if you blit it onto the screen or another surface that will eventually be shown on the screen.
Your font will be rendered with a color. In Step 1, you created a color using three values: red, green, and blue. In this section, you’ll use a Color class instead. Start by importing it into the space_rocks/utils.py file:
import random

from pygame import Color
from pygame.image import load
from pygame.math import Vector2
from pygame.mixer import Sound
Then, create a print_text() method in the same file:
 1def print_text(surface, text, font, color=Color("tomato")):
 2    text_surface = font.render(text, True, color)
 3
 4    rect = text_surface.get_rect()
 5    rect.center = Vector2(surface.get_size()) / 2
 6
 7    surface.blit(text_surface, rect)
Here’s what’s happening:
-
Line 1 is the declaration of your method. It takes a surface to render the text on, the text itself, a font, and a color. The
Colorclass offers a lot of predefined colors, which you can find in the Pygame repository. Your method will use a default color called"tomato". -
Line 2 creates the surface with the text using
render(). Its first argument is the text that needs to be rendered. The second is an antialiasing flag. Setting it toTruewill smooth out the edges of the rendered text. The last argument is the color of the text. -
Line 4 obtains a rectangle that represents the area of the surface with your text. That rectangle is an instance of the
Rectclass and can be easily moved and aligned. You can read more about aligning in the documentation. -
Line 5 sets the
centerattribute of the rectangle to a point in the middle of the screen. That point is calculated by dividing the screen’s size by2. This operation ensures that your text will be displayed in the center of the screen. -
Line 7 draws the text on the screen. Notice that this time, you pass a rectangle, not a point, to
blit(). In this case, the method will take the top-left corner of the given rectangle and will start the blitting process there.
Now you can import this method in the space_rocks/game.py file:
import pygame

from models import Asteroid, Spaceship
from utils import get_random_position, load_sprite, print_text
Now you need to create a font. You should also store the message that will be displayed. Edit the constructor of the SpaceRocks class:
def __init__(self):
    self._init_pygame()
    self.screen = pygame.display.set_mode((800, 600))
    self.background = load_sprite("space", False)
    self.clock = pygame.time.Clock()
    self.font = pygame.font.Font(None, 64)
    self.message = ""

    self.asteroids = []
    self.bullets = []
    self.spaceship = Spaceship((400, 300), self.bullets.append)

    for _ in range(6):
        while True:
            position = get_random_position(self.screen)
            if (
                position.distance_to(self.spaceship.position)
                > self.MIN_ASTEROID_DISTANCE
            ):
                break

        self.asteroids.append(Asteroid(position, self.asteroids.append))
The constructor of the Font class takes two arguments:
- The name of the font file, where
Nonemeans that a default font will be used - The size of the font in pixels
The content of the message needs to be set properly. When the spaceship is destroyed, set it to "You lost!". When all the asteroids are destroyed, set it to "You won!". Edit the _process_game_logic() method of the SpaceRocks class:
def _process_game_logic(self):
    for game_object in self._get_game_objects():
        game_object.move(self.screen)

    if self.spaceship:
        for asteroid in self.asteroids:
            if asteroid.collides_with(self.spaceship):
                self.spaceship = None
                self.message = "You lost!"
                break

    for bullet in self.bullets[:]:
        for asteroid in self.asteroids[:]:
            if asteroid.collides_with(bullet):
                self.asteroids.remove(asteroid)
                self.bullets.remove(bullet)
                asteroid.split()
                break

    for bullet in self.bullets[:]:
        if not self.screen.get_rect().collidepoint(bullet.position):
            self.bullets.remove(bullet)

    if not self.asteroids and self.spaceship:
        self.message = "You won!"
The last thing you need to do is actually display the message on the screen. Update the _draw() method of the SpaceRocks class:
def _draw(self):
    self.screen.blit(self.background, (0, 0))

    for game_object in self._get_game_objects():
        game_object.draw(self.screen)

    if self.message:
        print_text(self.screen, self.message, self.font)

    pygame.display.flip()
    self.clock.tick(60)
Go ahead and test it. Start the game and crash the spaceship into an asteroid:
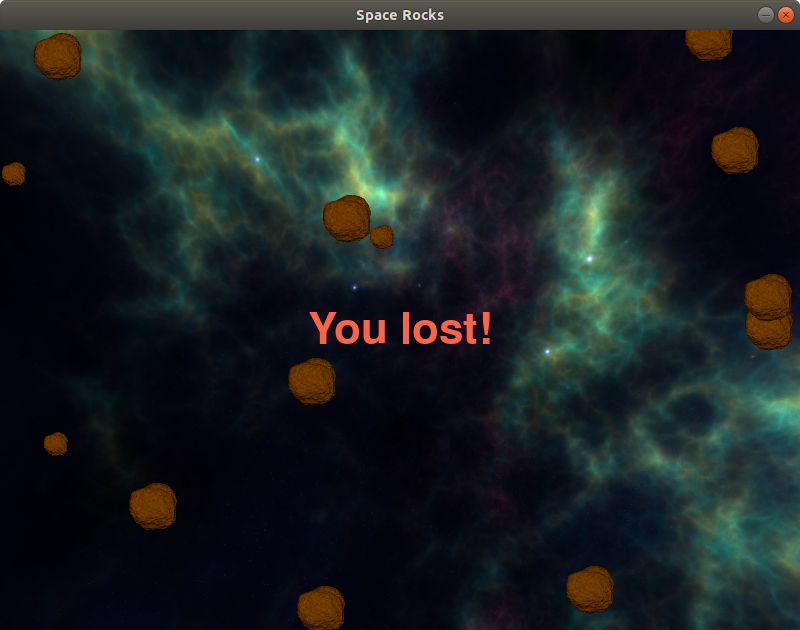
The game correctly shows a the message You lost!.
Now put some more effort and try to destroy all the asteroids. If you manage to do this, then you should see a victory screen:
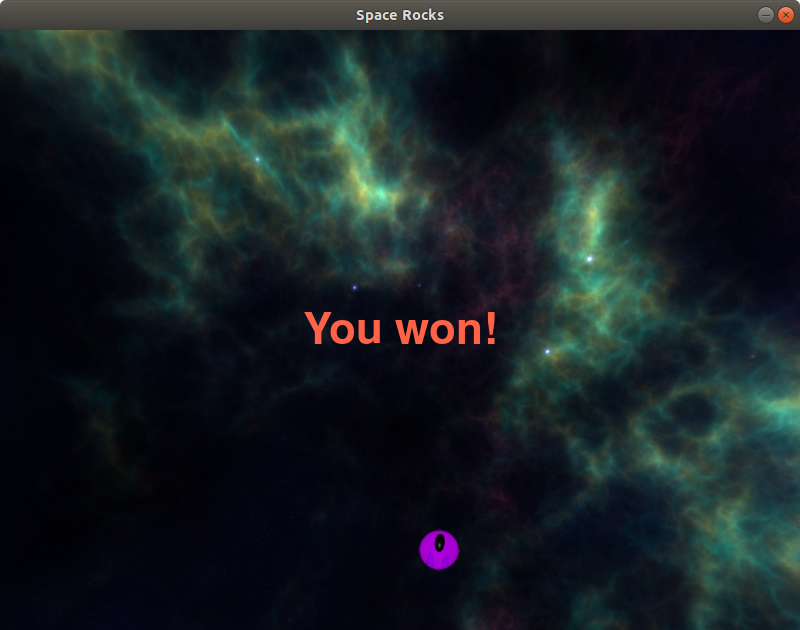
In this step, you’ve learned how to display a text message on the screen. That was the last step of this tutorial. Your game is now complete!
Conclusion
Congratulations, you just built a clone of the Asteroids game using Python! With Pygame, your Python knowledge can be directly translated into game development projects.
In this tutorial, you’ve learned how to:
- Load images and display them on the screen
- Add input handling to your game
- Implement game logic and collision detection in Python
- Play sounds
- Display text on the screen
You went through the entire process of designing a game, structuring files, importing and using assets, and coding the logic. You can use all that knowledge for all your amazing future projects!
Click the link below to download the code for this project and follow along as you build your game:
Get the Source Code: Click here to get the source code you’ll use to build an Asteroids game in Python with Pygame in this tutorial.
Next Steps
Your Asteroids game in Python is complete, but there are so many features that you can add. Here are a few ideas to get you started:
- Restrict the maximum speed of the spaceship.
- Play a sound when an asteroid is destroyed.
- Add a shield to the spaceship, allowing it to survive a single collision.
- Keep a record of the top scores.
- Make the bullets destroy the spaceship too and wrap them around the screen, making the game much more difficult!
What other ideas can you come up with to extend this project? Be creative and have fun! In this case, as they say, space is the limit 😃
If you’re interested in learning more about game development in Python, then here are some additional resources:
- PyGame: A Primer on Game Programming in Python: This article explains Pygame in a bit more detail.
- Arcade: A Primer on the Python Game Framework: This article introduces Arcade, another game framework for Python developers.
- Pygame projects list: This website shows a lot of Pygame projects that that you can use as an inspiration.
- Pygame documentation: Here you can find more tutorials and a detailed explanation of Pygame’s inner workings.
Watch Now This tutorial has a related video course created by the Real Python team. Watch it together with the written tutorial to deepen your understanding: Using Pygame to Build an Asteroids Game in Python


