
If you’re a web developer who prefers writing Python over JavaScript, then Brython, a Python implementation that runs in the browser, may be an appealing option.
JavaScript is the de facto language of front-end web development. Sophisticated JavaScript engines are an inherent part of all modern Internet browsers and naturally drive developers to code front-end web applications in JavaScript. Brython offers the best of both worlds by making Python a first-class citizen language in the browser and by having access to all the existing JavaScript libraries and APIs available in the browser.
In this tutorial, you’ll learn how to:
- Install Brython in your local environment
- Use Python in a browser
- Write Python code that interacts with JavaScript
- Deploy Python with your web application
- Create browser extensions with Python
- Compare Brython with other Python implementations for web applications
As an intermediate Python developer familiar with web development, you’ll get the most out of this tutorial if you also have some knowledge of HTML and JavaScript. For a JavaScript refresher, check out Python vs JavaScript for Pythonistas.
You can download the source material for the examples in this tutorial by clicking the link below:
Get the Source Code: Click here to get the source code you’ll use to learn about using Brython to run Python in the browser in this tutorial.
Running Python in the Browser: The Benefits
Although JavaScript is the ubiquitous language of front-end web development, the following points may apply to you:
- You may not like writing code in JavaScript.
- You may want to leverage your Python skills.
- You may not want to spend the time to learn JavaScript to explore browser technologies.
- You may not like being forced to learn and use JavaScript to implement a web application.
Whatever the reason, many developers would prefer a Python-based alternative to JavaScript for leveraging the power of the browser.
There are several benefits of running Python in the browser. It allows you to:
- Execute the same Python code in the server and the browser
- Work with various browser APIs using Python
- Manipulate the Document Object Model (DOM) with Python
- Use Python to interact with existing JavaScript libraries like Vue.js and jQuery
- Teach the Python language to Python students with the Brython editor
- Keep the sense of fun while programming in Python
One side effect of using Python in the browser is a loss of performance compared to the same code in JavaScript. However, this drawback doesn’t outweigh any of the benefits outlined above.
Implementing Isomorphic Web Development
Isomorphic JavaScript, or Universal JavaScript, emphasizes that JavaScript applications should run on both the client and the server. This is assuming that the back end is JavaScript based, namely a Node server. Python developers using Flask or Django can also apply the principles of isomorphism to Python, provided that they can run Python in the browser.
Brython allows you to build the front end in Python and share modules between the client and the server. For example, you can share validation functions, like the following code that normalizes and validates US phone numbers:
 1import re
 2
 3def normalize_us_phone(phone: str) -> str:
 4    """Extract numbers and digits from a given phone number"""
 5    return re.sub(r"[^\da-zA-z]", "", phone)
 6
 7def is_valid_us_phone(phone: str) -> bool:
 8    """Validate 10-digit phone number"""
 9    normalized_number = normalize_us_phone(phone)
10    return re.match(r"^\d{10}$", normalized_number) is not None
normalize_us_phone() eliminates any nonalphanumeric characters, whereas is_valid_us_phone() returns True if the input string contains exactly ten digits and no alphabetic characters. The same code can be shared between processes running on a Python server and a client built with Brython.
Accessing Web APIs
Internet browsers expose standardized web APIs to JavaScript. These standards are part of the HTML Living Standard. Some web API examples include:
Brython allows you to both use the web APIs and interact with JavaScript. You’ll work with some of the web APIs in a later section.
Prototyping and JavaScript Libraries
Python is often used to prototype snippets of code, language constructs, or bigger ideas. With Brython, this common coding practice becomes available in your browser. For example, you can use the Brython console or the interactive editor to experiment with a snippet of code.
Open the online editor and type the following code:
 1from browser import ajax
 2
 3def on_complete(req):
 4    print(req.text)
 5
 6language = "fr"
 7
 8ajax.get(f"https://fourtonfish.com/hellosalut/?lang={language}",
 9         blocking=True,
10         oncomplete=on_complete)
Here’s how this code works:
- Line 1 imports the
ajaxmodule. - Line 3 defines
on_complete(), the callback function that’s invoked after getting the response fromajax.get(). - Line 6 calls
ajax.get()to retrieve the translation of “hello” in French using the HelloSalut API. Note thatblockingcan beTrueorFalsewhen you execute this code in the Brython editor. It needs to beTrueif you execute the same code in the Brython console.
Click Run above the output pane to see the following result:
{"code":"fr","hello":"Salut"}
<completed in   5.00 ms>
Try modifying the language from fr to es and observe the result. The language codes supported by this API are listed in the HelloSalut documentation.
Note: HelloSalut is one of the public APIs available on the Internet and listed in the Public APIs GitHub project.
You can modify the code snippet in the online editor to consume a different public API. For example, try to fetch a random public API from the Public APIs project:
 1from browser import ajax
 2
 3def on_complete(req):
 4    print(req.text)
 5
 6ajax.get("https://api.publicapis.org/random",
 7         blocking=True,
 8         oncomplete=on_complete)
Copy the code above into the online Brython editor and click Run to display the result. Here’s an example in JSON format:
{
  "count": 1,
  "entries": [
    {
      "API": "Open Government, USA",
      "Description": "United States Government Open Data",
      "Auth": "",
      "HTTPS": true,
      "Cors": "unknown",
      "Link": "https://www.data.gov/",
      "Category": "Government"
    }
  ]
}
Because the endpoint fetches a random project, you’ll probably get a different result. For more information about the JSON format, check out Working With JSON Data in Python.
You can use prototyping to try out regular Python code as you would in the Python interpreter. Because you’re in the context of a browser, Brython also provides ways to:
- Learn how to use the web APIs
- Interact with the Document Object Model (DOM)
- Use existing JavaScript libraries like jQuery, D3, and Bokeh as well as JavaScript UI frameworks like Vue.js
As a shortcut, you can take advantage of most of the features described above by opening the console or editor available on the Brython website. This doesn’t require you to install or run anything on your local computer. Instead, it gives you an online playground to interact with both Python and web technologies.
Teaching Python to Students
Brython is both a Python compiler and an interpreter written in JavaScript. As a result, you can compile and run Python code in the browser. A good example of this feature is demonstrated by the online editor available on the Brython website.
With the online editor, Python is running in the browser. There’s no need to install Python on a machine, and there’s no need to send code to the server to be executed. The feedback is immediate for the user, and this approach doesn’t expose the back end to malicious scripts. Students can experiment with Python on any device with a working browser, such as phones or Chromebooks, even with a spotty internet connection.
Taking Performance Into Account
The Brython site notes that the implementation’s execution speed is comparable to CPython. But Brython is executed in the browser, and the reference in this environment is JavaScript baked into the browser engine. As a result, expect Brython to be slower than hand-written, well-tuned JavaScript.
Brython compiles Python code into JavaScript and then executes the generated code. These steps have an impact on overall performance, and Brython may not always meet your performance requirements. In some cases, you may need to delegate some code execution to JavaScript or even WebAssembly. You’ll see how to build WebAssembly and how to use the resulting code in Python in the section on WebAssembly.
However, don’t let perceived performance detract you from using Brython. For example, importing Python modules may result in downloading the corresponding module from the server. To illustrate this situation, open the Brython console and execute the following code:
>>> import uuid
The delay until the prompt is displayed (390 ms on a test machine) is noticeable. This is due to Brython having to download uuid and its dependencies and then compile the downloaded resources. However, from that point on, there’s no delay while executing functions available in uuid. For example, you can generate a random universally unique identifier, UUID version 4, with the following code:
>>> uuid.uuid4()
UUID('291930f9-0c79-4c24-85fd-f76f2ada0b2a')
Calling uuid.uuid4() generates a UUID object, whose string representation is printed in the console. Calling uuid.uuid4() returns immediately and is much quicker than the initial import of the uuid module.
Having Fun
If you’re reading this tutorial, then you’re probably interested in writing Python code in the browser. Seeing Python code executed in the browser is exciting for most Pythonistas and awakes a sense of fun and endless possibility.
The author of Brython, Pierre Quentel, and the contributors to the project also kept the fun of Python in mind while undertaking the huge task of making this language compatible with the web browser.
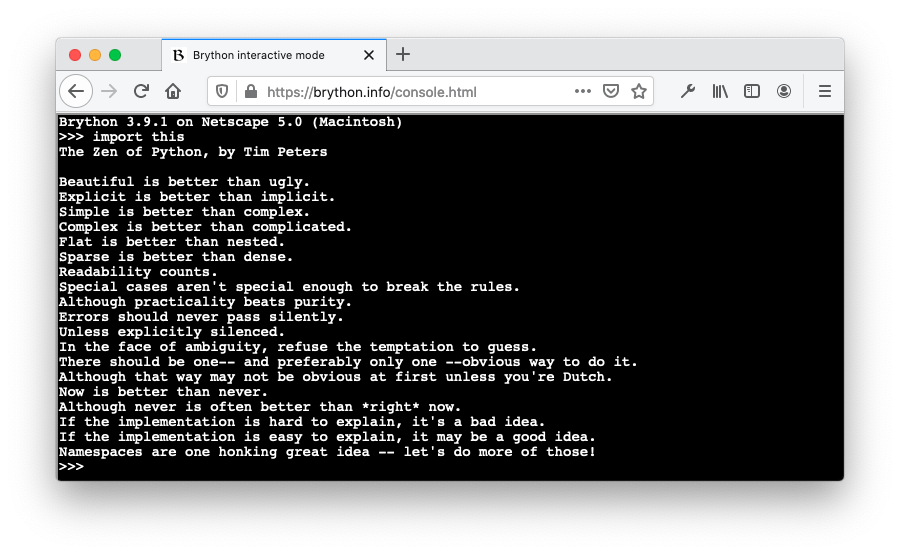
To prove it, point your browser to the Brython interactive console, and at the Python prompt, type the following:
import this
Similar to the experience of Python on your local machine, Brython compiles and executes the instructions on the fly and prints The Zen of Python. It takes place in the browser and the Python code execution does not require any interaction with a back-end server:
You can also try another classic Python Easter egg in the same browser environment with the following code:
import antigravity
Brython embraces the same bits of humor that you’ll find in the Python reference implementation.
Now that you’re familiar with the basics of working with Brython, you’ll explore more advanced features in the following sections.
Installing Brython
Experimenting with Brython’s online console is a good start, but it won’t allow you to deploy your Python code. There are several different options for installing Brython in a local environment:
Instructions for each of these methods are outlined below, but feel free to skip directly to your preferred approach if you’ve already made a decision.
CDN Installation
A content delivery network (CDN) is a network of servers that allows for improved performance and download speeds for online content. You can install Brython libraries from a few different CDNs:
You may choose this installation if you want to deploy a static website and add some dynamic behaviors to your pages with minimum overhead. You can think of this option as a substitute for jQuery, except using Python rather than JavaScript.
To illustrate the use of Brython with a CDN, you’ll use CDNJS. Create a file with the following HTML code:
 1<!doctype html>
 2<html>
 3    <head>
 4        <script
 5          src="https://cdnjs.cloudflare.com/ajax/libs/brython/3.9.0/brython.js">
 6        </script>
 7    </head>
 8    <body onload="brython()">
 9        <script type="text/python">
10            import browser
11            browser.alert("Hello Real Python!")
12        </script>
13    </body>
14</html>
Here are the key elements of this HTML page:
-
Line 5 loads
brython.jsfrom CDNJS. -
Line 8 executes
brython()when the document has finished loading.brython()reads the Python code in the current scope and compiles it to JavaScript. See the section Understanding How Brython Works for more details. -
Line 9 sets the type of the script to
text/python. This indicates to Brython which code needs to be compiled and executed. -
Line 10 imports
browser, a Brython module that exposes objects and functions allowing interaction with the browser. -
Line 11 calls
alert(), which displays a message box with the text"Hello Real Python!"
Save the file as index.html, then double-click the file to open it with your default Internet browser. The browser displays a message box with "Hello Real Python!" Click OK to close the message box:

To reduce the size of the downloaded file, especially in production, consider using the minimized version of brython.js:
 1<script
 2  src="https://cdnjs.cloudflare.com/ajax/libs/brython/3.9.0/brython.min.js">
 3</script>
The minimized version will reduce the download time and perceived latency from the user’s standpoint. In Understanding How Brython Works, you’ll learn how Brython is loaded by the browser and how the above Python code is executed.
GitHub Installation
The GitHub installation is very similar to the CDN installation, but it allows you to implement Brython applications with the latest development version. You can copy the previous example and modify the URL in the head element to get the following index.html:
<!doctype html>
<html>
  <head>
    <script
      src="https://raw.githack.com/brython-dev/brython/master/www/src/brython.js">
    </script>
  </head>
  <body onload="brython()">
    <script type="text/python">
      import browser
      browser.alert("Hello Real Python!")
    </script>
  </body>
</html>
After saving this file in a local directory, double-click index.html to render in the browser the same page you obtained with the CDN install.
PyPI Installation
So far, you haven’t needed to install anything in your local environment. Instead, you’ve indicated in the HTML file where the browser can find the Brython package. When the browser opens the page, it downloads the Brython JavaScript file from the appropriate environment, from either a CDN or GitHub.
Brython is also available for local installation on PyPI. The PyPI installation is for you if:
- You need more control and customization of the Brython environment beyond what’s available when pointing to a CDN file.
- Your background is in Python and you’re familiar with
pip. - You want a local installation to minimize network latency during development.
- You want to manage your project and deliverables in a more granular fashion.
Installing Brython from PyPI installs brython_cli, a command-line tool that you can use to automate functions like generating a project template or packaging and bundling modules to simplify deployment of a Brython project.
For more details, you can consult the local installation documentation to see the capabilities of brython-cli that are available in your environment after installation. brython-cli is available only with this type of installation. It isn’t available if you install from a CDN or with npm. You’ll see brython-cli in action later in the tutorial.
Before installing Brython, you want to create a Python virtual environment for this project.
On Linux or macOS, execute the following commands:
$ python3 -m venv .venv --prompt brython
$ source .venv/bin/activate
(brython) $ python -m pip install --upgrade pip
Collecting pip
  Downloading pip-20.2.4-py2.py3-none-any.whl (1.5 MB)
     |████████████████████████████████| 1.5 MB 1.3 MB/s
Installing collected packages: pip
  Attempting uninstall: pip
    Found existing installation: pip 20.2.3
    Uninstalling pip-20.2.3:
      Successfully uninstalled pip-20.2.3
On Windows, you can proceed as follows:
> python3 -m venv .venv --prompt brython
> .venv\Scripts\activate
(brython) > python -m pip install --upgrade pip
Collecting pip
  Downloading pip-20.2.4-py2.py3-none-any.whl (1.5 MB)
     |████████████████████████████████| 1.5 MB 1.3 MB/s
Installing collected packages: pip
  Attempting uninstall: pip
    Found existing installation: pip 20.2.3
    Uninstalling pip-20.2.3:
      Successfully uninstalled pip-20.2.3
You’ve just created a dedicated Python environment for your project and updated pip with the latest version.
In the next steps, you’ll install Brython and create a default project. The commands are the same on Linux, macOS, and Windows:
(brython) $ python -m pip install brython
Collecting brython
  Downloading brython-3.9.0.tar.gz (1.2 MB)
     |████████████████████████████████| 1.2 MB 1.4 MB/s
Using legacy 'setup.py install' for brython, since package 'wheel'
is not installed.
Installing collected packages: brython
    Running setup.py install for brython ... done
(brython) $ mkdir web
(brython) $ cd web
(brython) $ brython-cli --install
Installing Brython 3.9.0
done
You’ve installed Brython from PyPI, created an empty folder named web, and generated the default project skeleton by executing the brython-cli copied in your virtual environment during the installation.
In the web folder, brython-cli --install created a project template and generated the following files:
| File | Description |
|---|---|
README.txt |
Documentation on how to run a Python HTTP server and open demo.html |
brython.js |
Core Brython engine (compiler, runtime, and browser interface) |
brython_stdlib.js |
Brython standard library |
demo.html |
Source code of the Brython demo HTML page |
index.html |
Basic example that you can use as a starting page for a project |
unicode.txt |
Unicode Character Database (UCD) used by unicodedata |
To test this newly created web project, you can start a local Python web server with the following commands:
(brython) $ python -m http.server
Serving HTTP on :: port 8000 (http://[::]:8000/) ...
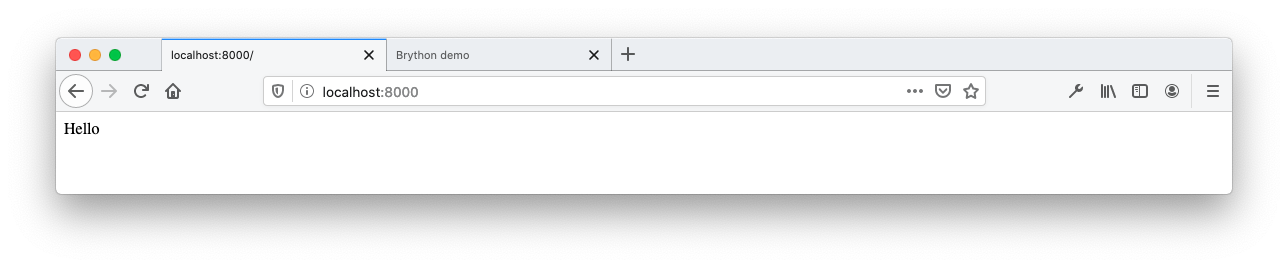
When you execute python -m http.server, Python starts a web server on port 8000. The expected default page is index.html. Point your internet browser to http://localhost:8000 to display a page with the text Hello:
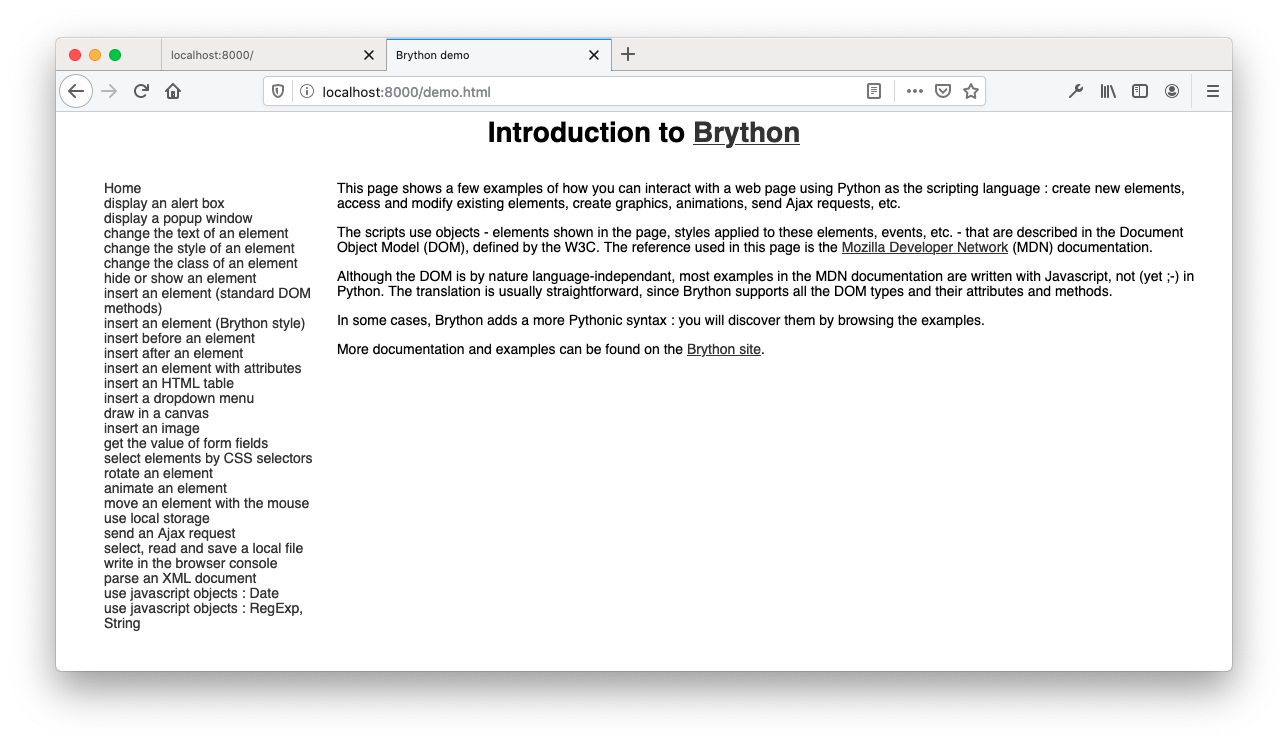
For a more complete example, you can change the URL in the browser’s address bar to http://localhost:8000/demo.html. You should see a page similar to the Brython demo page:
With this approach, the Brython JavaScript files are loaded directly from your local environment. Notice the src attribute in the head element of index.html:
 1<!doctype html>
 2<html>
 3  <head>
 4   <meta charset="utf-8">
 5   <script type="text/javascript" src="brython.js"></script>
 6   <script type="text/javascript" src="brython_stdlib.js"></script>
 7  </head>
 8  <body onload="brython(1)">
 9    <script type="text/python">
10      from browser import document
11      document <= "Hello"
12    </script>
13  </body>
14</html>
The HTML above is indented to enhance readability in this tutorial. The command brython_cli --install does not indent the initial HTML template that it generates.
The HTML file introduces a few new Brython features:
-
Line 6 loads
brython_stdlib.js, the Python standard library compiled to JavaScript. -
Line 8 invokes
brython()with the argument1to print error messages to the browser console. -
Line 10 imports the
documentmodule frombrowser. Functions to access the DOM are available indocument. -
Line 11 shows a new symbol (
<=) added to Python as syntactic sugar. In this example,document <= "Hello"is a substitute fordocument.body.appendChild(document.createTextNode("Hello")). For details about these DOM functions, check outDocument.createTextNode.
The operator <= is used to add a child node to an element of the DOM. You’ll see in more details on using Brython-specific operators in The DOM API in Brython.
npm Installation
If you’re well versed in the JavaScript ecosystem, then the npm installation might appeal to you. Node.js and npm are required before performing this install.
Installing with npm will make the JavaScript Brython modules available in your project like any other JavaScript modules. You’ll then be able to take advantage of your favorite JavaScript tooling to test, package, and deploy the Brython interpreter and libraries. This installation is ideal if you already have existing JavaScript libraries installed with npm.
Note: If you don’t have Node.js and npm installed on your system, then consider reading the rest of this section for information only, as you can safely skip the installation itself. The remainder of the tutorial doesn’t depend on the npm installation method for any of the examples.
Assuming that you have npm installed on your system, create a default package.json file by invoking npm init --yes in an empty directory:
$ npm init --yes
Wrote to /Users/john/projects/brython/npm_install/package.json:

{
  "name": "npm_install",
  "version": "1.0.0",
  "description": "",
  "main": "index.js",
  "scripts": {
    "test": "echo \"Error: no test specified\" && exit 1"
  },
  "keywords": [],
  "author": "",
  "license": "ISC"
}
To integrate Brython into your project, execute the following command:
$ npm install brython
npm notice created a lockfile as package-lock.json. You should commit this file.
npm WARN npm_install@1.0.0 No description
npm WARN npm_install@1.0.0 No repository field.

+ brython@3.9.0
added 1 package from 1 contributor and audited 1 package in 1.778s
found 0 vulnerabilities
You can ignore the warnings and note that Brython was added to your project. To confirm, open package.json and make sure you have a dependencies property pointing to an object containing a brython entry:
 1{
 2  "name": "npm_install",
 3  "version": "1.0.0",
 4  "description": "",
 5  "main": "index.js",
 6  "scripts": {
 7    "test": "echo \"Error: no test specified\" && exit 1"
 8  },
 9  "author": "",
10  "license": "ISC",
11  "dependencies": {
12    "brython": "^3.9.0"
13  }
14}
As for the previous examples, you can create the following index.html and open it with your browser. A web server isn’t needed for this example because the browser is able to load the JavaScript file node_modules/brython/brython.js locally:
 1<!doctype html>
 2<html>
 3<head>
 4  <meta charset="utf-8">
 5  <script
 6    type="text/javascript"
 7    src="node_modules/brython/brython.js" defer>
 8  </script>
 9</head>
10<body onload="brython()">
11<script type="text/python">
12from browser import document
13document <= "Hello"
14</script>
15</body>
16</html>
The browser renders index.html and loads brython.js from the script URL in index.html. In this example, you’ve seen a different way to install Brython that takes advantage of the JavaScript ecosystem. For the remainder of the tutorial, you’ll write code that relies on the CDN installation or the PyPI installation.
Recap of Brython Installation Options
Brython has one foot in the Python world and another in JavaScript. The different installation options illustrate this cross-technology situation. Pick the installation that feels the most compelling to you based on your background.
The following table provides you with some guidance:
| Type of Installation | Context |
|---|---|
| CDN | You want to deploy a static website and add some dynamic behaviors to your pages with minimum overhead. You can think about this option as a substitute for jQuery, except using Python rather than JavaScript. |
| GitHub | This is similar to the CDN installation, but you want to experiment with the bleeding-edge version of Brython. |
| PyPI | Your background is in Python. You’re familiar with pip and how to create Python virtual environments. Your project may require some customizations that you want to maintain in a local environment or in your source code repository. You want to have more control over the package that you’ll distribute. You want to deploy in a closed environment without access to the Internet. |
| npm | Your background is in JavaScript. You’re familiar with the JavaScript tools, in particular Node.js and npm. Your project may require some customizations that you want to maintain in a local environment or in your source code repository. You want to have more control over the packages you’ll distribute. You want to deploy in a closed environment without access to the Internet. |
This table summarizes the different installation options available to you. In the next section, you’ll learn more about how Brython works.
Understanding How Brython Works
Your tour of the different ways to install Brython has given you some high-level clues about how the implementation works. Here’s a summary of some of the characteristics that you’ve discovered so far in this tutorial:
- It’s a Python implementation in JavaScript.
- It’s a Python to JavaScript translator and a runtime executing in the browser.
- It exposes two main libraries available as JavaScript files:
brython.jsis the core of the Brython language, as detailed in Brython Core Components.brython_stdlib.jsis the Brython standard library.
- It invokes
brython(), which compiles Python code contained in thescripttags with thetext/pythontype.
In the following sections, you’ll take a more detailed look at how Brython works.
Brython Core Components
The core of Brython is contained in brython.js or in brython.min.js, the minimized version of the Brython engine. Both include the following key components:
-
brython()is the main JavaScript function exposed in the JavaScript global namespace. You can’t execute any Python code without calling this function. This is the only JavaScript function that you should have to call explicitly. -
__BRYTHON__is a JavaScript global object that holds all internal objects needed to run Python scripts. This object isn’t used directly when you write Brython applications. If you look at the Brython code, both JavaScript and Python, then you’ll see regular occurrences of__BRYTHON__. You don’t need to use this object, but you should be aware of it when you see an error or when you want to debug your code in the browser console. -
Built-in types are implementations of the Python built-in types in JavaScript. For example, py_int.js, py_string.js and py_dicts.js are respective implementations of
int,stranddict. -
browseris the browser module that exposes the JavaScript objects commonly used in a front-end web application, like the DOM interfaces usingdocumentand the browser window using thewindowobject.
You’ll see each of these components in action as you work through the examples in this tutorial.
Brython Standard Library
Now that you have an overall idea of the core Brython file, brython.js, you’re going to learn about its companion file, brython_stdlib.js.
brython_stdlib.js exposes the Python standard library. As this file is generated, Brython compiles the Python standard library into JavaScript and concatenates the result into the bundle brython_stdlib.js.
Brython is intended to be as close as possible to CPython, the Python reference implementation. For more information about CPython, check out Your Guide to the CPython Source Code and CPython Internals.
As Brython is running within the context of a web browser, it has some limitations. For example, the browser doesn’t allow direct access to the file system, so opening a file with os.open() isn’t possible. Functions that aren’t relevant to a web browser may not be implemented. For example, the code below is running in a Brython environment:
>>> import os
>>> os.unlink()
Traceback (most recent call last):
  File <string>, line 1, in <module>
NotImplementedError: posix.unlink is not implemented
os.unlink() raises an exception since it’s not secure to delete a local file from the browser environment and the File and Directory Entries API is only a draft proposal.
Brython only supports native Python modules. It doesn’t support Python modules built in C unless they’ve been reimplemented in JavaScript. For example, hashlib is written in C in CPython and implemented in JavaScript in Brython. You can consult the list of modules in the Brython distribution to compare with the CPython implementation.
You need to include brython_stdlib.js or brython_stdlib.min.js to import modules from the Python standard library.
Brython in Action
At this point, you may be wondering how Brython behaves within a browser that’s only aware of its JavaScript engine. Reusing the previous examples and the tools available in the browser, you’ll learn about the process involved in executing Python code in the browser.
In the section on the CDN server installation, you saw the following example:
 1<!doctype html>
 2<html>
 3    <head>
 4        <script
 5            src="https://cdnjs.cloudflare.com/ajax/libs/brython/3.9.0/brython.js">
 6        </script>
 7    </head>
 8    <body onload="brython()">
 9        <script type="text/python">
10            import browser
11            browser.alert("Hello Real Python!")
12        </script>
13    </body>
14</html>
Upon loading and parsing the HTML page, brython() takes the following steps:
- Reads the Python code contained in the element
<script type="text/python"> - Compiles the Python code to equivalent JavaScript
- Evaluates the resulting JavaScript code with
eval()
In the example above, the Python code is embedded in the HTML file:
<script type="text/python">
    import browser
    browser.alert("Hello Real Python!")
</script>
Another option is to download the Python code from a separate file:
<head>
    <script src="https://www.example.com/main.py"
            type="text/python"></script>
</head>
In this case, the Python file would look like this:
import browser
browser.alert("Hello Real Python!")
Separating the Python code from the HTML code is a cleaner approach and allows you to take advantage of the benefits and functionalities of code editors. Most editors have support for embedded JavaScript in HTML, but they don’t support inline Python in HTML.
Brython’s Internals
This section provides a deeper dive into the process of transforming Python code to JavaScript. If you’re not interested in these details, then feel free to skip this section, as it’s not required for understanding the rest of the tutorial. To illustrate this process and have a peek into the internals of Brython, take the following steps:
- Open the Brython home page.
- Open the web console with Cmd+Alt+I on Mac or Ctrl+Shift+I on Windows and Linux.
In the browser JavaScript REPL, type and execute the following code:
> eval(__BRYTHON__.python_to_js("import browser; browser.console.log('Hello Brython!')"));
python_to_js() parses and compiles the provided Python code to JavaScript and then executes the JavaScript in the web browser. You should get the following result:
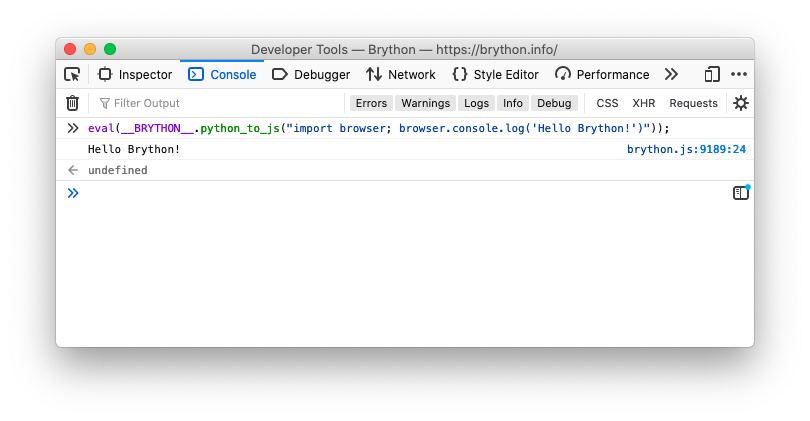
Applying eval() to Brython code prints "Hello Brython!" in the browser console. The JavaScript function returns undefined, which is the default return value for a function in JavaScript.
When you build a Brython application, you shouldn’t need to explicitly call a function in the __BRYTHON__ JavaScript module. This example is provided only to demonstrate how Brython operates behind the scenes. Being aware of __BRYTHON__ can help you read Brython code and even contribute to the project as you gain more experience. It will also help you better understand exceptions that may be displayed in the browser console.
The JavaScript __BRYTHON__ object is available in the JavaScript global scope, and you can access it with the browser JavaScript console.
Using Brython in the Browser
At this point, you have enough of an understanding of Brython to work with more detailed examples. In this section, you’re going to implement a Base64 calculator to experiment in the browser with the DOM API and other functionalities that are usually only available from JavaScript.
You can download the source code for the examples in this tutorial by clicking the link below:
Get the Source Code: Click here to get the source code you’ll use to learn about using Brython to run Python in the browser in this tutorial.
You’ll start by learning how to manipulate the DOM using Python and HTML.
The DOM API in Brython
To experiment with the DOM manipulations available in Brython, you’ll build a form to encode a string to Base64. The finished form will look like this:
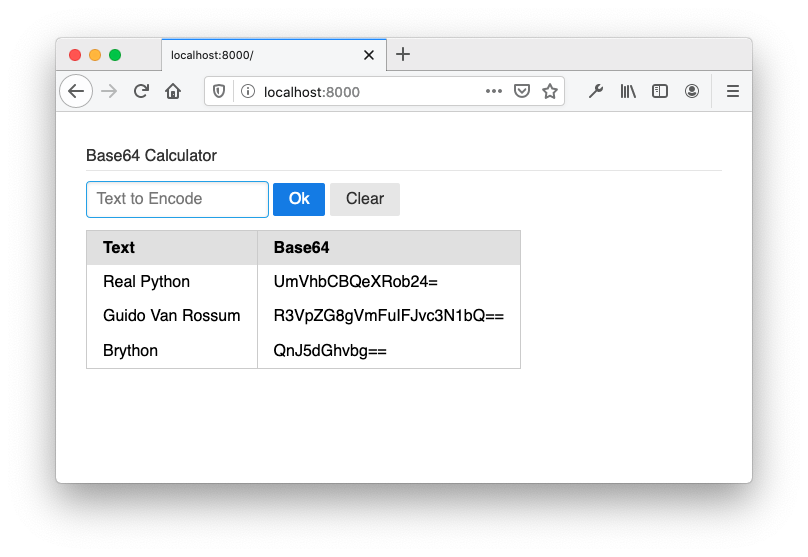
Create the following HTML file and name it index.html:
 1<!-- index.html -->
 2<!DOCTYPE html >
 3<html>
 4  <head>
 5    <meta charset="utf-8"/>
 6    <link rel="stylesheet"
 7          href="https://cdnjs.cloudflare.com/ajax/libs/pure/2.0.3/pure-min.css" />
 8    <script
 9        src="https://cdnjs.cloudflare.com/ajax/libs/brython/3.9.0/brython.min.js">
10    </script>
11    <script
12        src="https://cdnjs.cloudflare.com/ajax/libs/brython/3.9.0/brython_stdlib.min.js">
13    </script>
14    <script src="main.py" type="text/python" defer></script>
15    <style>body { padding: 30px; }</style>
16  </head>
17  <body onload="brython()">
18    <form class="pure-form" onsubmit="return false;">
19      <fieldset>
20        <legend>Base64 Calculator</legend>
21        <input type="text" id="text-src" placeholder="Text to Encode" />
22        <button
23          type="submit" id="submit"
24          class="pure-button pure-button-primary"
25          autocomplete="off">Ok</button>
26        <button id="clear-btn" class="pure-button">Clear</button>
27      </fieldset>
28    </form>
29    <div id="b64-display"></div>
30  </body>
31</html>
The HTML above loads the static resources, defines the UI layout, and initiates the Python compilation:
-
Line 7 loads the PureCSS style sheet to improve on the default HTML style. This isn’t necessary for Brython to work.
-
Line 9 loads the minimized version of the Brython engine.
-
Line 12 loads the minimized version of the Brython standard library.
-
Line 14 loads
main.py, which handles the dynamic logic of this static HTML page. Note the use ofdefer. It helps synchronize the loading and evaluation of resources and is sometimes needed to make sure that Brython and any Python scripts are fully loaded before executingbrython(). -
Line 21 describes an
inputfield. This field takes the string to encode as an argument. -
Lines 22 to 25 define the default
buttonthat triggers the main logic of the page. You can see this logic implemented inmain.pybelow. -
Line 26 defines a
buttonto clear up data and elements on the page. This is implemented inmain.pybelow. -
Line 29 declares a
divintended to be a placeholder for a table.
The associated Python code, main.py, is as follows:
 1from browser import document, prompt, html, alert
 2import base64
 3
 4b64_map = {}
 5
 6def base64_compute(_):
 7    value = document["text-src"].value
 8    if not value:
 9        alert("You need to enter a value")
10        return
11    if value in b64_map:
12        alert(f"'The base64 value of '{value}' already exists: '{b64_map[value]}'")
13        return
14    b64data = base64.b64encode(value.encode()).decode()
15    b64_map[value] = b64data
16    display_map()
17
18def clear_map(_) -> None:
19    b64_map.clear()
20    document["b64-display"].clear()
21
22def display_map() -> None:
23    table = html.TABLE(Class="pure-table")
24    table <= html.THEAD(html.TR(html.TH("Text") + html.TH("Base64")))
25    table <= (html.TR(html.TD(key) + html.TD(b64_map[key])) for key in b64_map)
26    base64_display = document["b64-display"]
27    base64_display.clear()
28    base64_display <= table
29    document["text-src"].value = ""
30
31document["submit"].bind("click", base64_compute)
32document["clear-btn"].bind("click", clear_map)
The Python code shows the definition of callback functions and the mechanism to manipulate the DOM:
-
Line 1 imports the modules that you use to interact with the DOM and the Browser API code in
brython.min.js. -
Line 2 imports
base64, which is available in the Brython standard library,brython_stdlib.min.js. -
Line 4 declares a dictionary that you’ll use to store data during the life of the HTML page.
-
Line 6 defines the event handler
base64_compute(), which encodes the Base64 value of the text entered in the input field with IDtext-src. This is a callback function that takes an event as an argument. This argument isn’t used in the function but is required in Brython and is optional in JavaScript. As a convention, you can use_as a dummy placeholder. An example of this usage is described in the Google Python Style Guide. -
Line 7 retrieves the value of the DOM element identified with
text-src. -
Line 18 defines the event handler
clear_map(), which clears the data and presentation of the data on this page. -
Line 22 defines
display_map(), which takes the data contained in theb64_mapand displays it under the form on the page. -
Line 26 retrieves the DOM element with the ID
text-src. -
Line 29 clears the value of the DOM element with the ID
text-src. -
Line 31 binds the
onclickevent of thesubmitbutton tobase64_compute(). -
Line 32 binds the
onclickevent of theclear-btnbutton toclear_map().
To manipulate the DOM, Brython uses two operators:
-
<=is a new operator, specific to Brython, that adds a child to a node. You can see a few examples of this usage indisplay_map(), defined on line 22. -
+is a substitute forElement.insertAdjacentHTML('afterend')and adds sibling nodes.
You can see both operators in the following statement taken from display_map():
table <= html.THEAD(html.TR(html.TH("Text") + html.TH("Base64")))
You can read the above code as “add to the table element a table head element containing a table row element composed of two adjacent table data cell elements. It’s rendered in the browser as the following HTML code:
<table>
<thead><tr><th>Text</th><th>Base64</th></tr></thead>
</table>
The HTML code shows a nested structure for the header row of a table element. Here’s a more readable format of the same code:
<table>
  <thead>
    <tr>
      <th>Text</th>
      <th>Base64</th>
    </tr>
  </thead>
</table>
To observe the result in the Brython console, you can enter the following code block:
>>> from browser import html
>>> table = html.TABLE()
>>> table <= html.THEAD(html.TR(html.TH("Text") + html.TH("Base64")))
>>> table.outerHTML
'<table><thead><tr><th>Text</th><th>Base64</th></tr></thead></table>'
To execute the full code, you need to start a web server. As before, you start the built-in Python web server in the same directory as the two files index.html and main.py:
$ python3 -m http.server
Serving HTTP on :: port 8000 (http://[::]:8000/) ...
After starting the web server, point your browser to http://localhost:8000. The page looks like this:
You’ll extend this example in the section Browser Web API by allowing the data to be stored between page reloads.
Import in Brython
You can use import to access Python modules or Brython modules compiled to JavaScript.
Python modules are files with a .py extension in the root folder of your project or, for a Python package, in a subfolder containing an __init__.py file. To import Python modules in your Brython code, you need to start a web server. For more on the Python modules, check out Python Modules and Packages – An Introduction.
To explore how to import Python modules into your Brython code, follow the instructions described in the section on installing with PyPI, create and activate a Python virtual environment, install Brython, and modify index.html as follows:
<!doctype html>
<html>

<head>
<meta charset="utf-8">
<script type="text/javascript" src="brython.js"></script>
<script type="text/javascript" src="brython_stdlib.js"></script>
</head>

<body onload="brython()">

<script type="text/python">
from browser import document, html, window
import sys
import functional

selection = functional.take(10, range(10000))
numbers = ', '.join([str(x) for x in selection])

document <= html.P(f"{sys.version=}")
document <= html.P(f"{numbers=}")
</script>

</body>

</html>
The HTML file above exposes modules imported from the core engine (browser), from the standard library (sys), and from a local Python module (functional). Here’s the content of functional.py:
import itertools

def take(n, iterable):
    "Return first n items of the iterable as a list"
    return list(itertools.islice(iterable, n))
This module implements take(), one of the itertools recipes. take() returns the first n elements of a given iterable. It relies on itertools.slice().
If you try to open index.html from the file system with your browser, then you’ll get the following error in the browser console:
Traceback (most recent call last):
  File file:///Users/andre/brython/code/import/index.html/__main__
  line 3, in <module>
    import functional
ModuleNotFoundError: functional
Importing a Python module requires starting a local web server. Start a local web server and point your browser to http://localhost:8000. You should see the following HTML page:
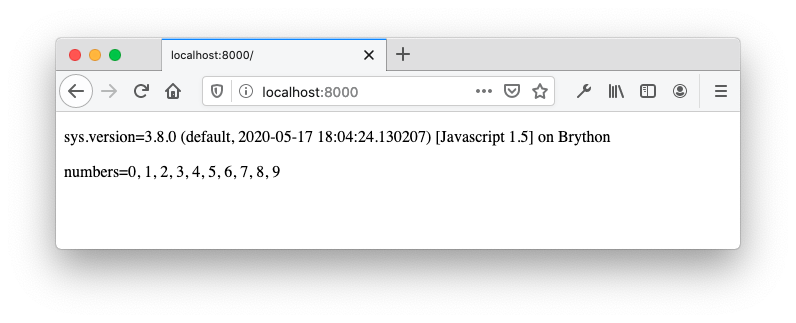
With a running web server, the browser was able to fetch the module functional.py when import functional was executed. The results of both values, sys.version and numbers, are inserted in the HTML file by the last two lines of the embedded Python script and rendered by the browser.
Reduce Import Size
In the project directory of the previous example, to reduce the size of the imported JavaScript modules and to precompile Python modules to JavaScript, you can use brython-cli with the option --modules:
$ brython-cli --modules
Create brython_modules.js with all the modules used by the application
searching brython_stdlib.js...
finding packages...
script in html index.html
This will generate brython_modules.js, and you can modify the head element of index.html as follows:
 1<head>
 2<meta charset="utf-8">
 3<script type="text/javascript" src="brython.js"></script>
 4<script type="text/javascript" src="brython_modules.js"></script>
 5</head>
Line 4 changes the original script source from brython_stdlib.js to brython_modules.js.
Opening index.html with your browser or pointing the browser to the local server renders the same HTML page. Notice the following points:
- You can render the HTML page in your browser, without running a web server.
- You don’t need to distribute
functional.pysince the code has been converted to JavaScript and bundled inbrython_modules.js. - You don’t need to load
brython_stdlib.js.
The command-line tool brython-cli --modules provides a solution to remove unnecessary code from the standard libraries and compiles your python module to JavaScript code. This helps to package your application and results in a smaller resources download.
Note: Similarly to importing a Python module, loading a Python module with the HTML script element requires you to start a web server. Consider the following HTML script element:
<script src="main.py" type="text/python"></script>
When the Brython function is executed and loads a script content pointing to a Python file, it attempts to execute an Ajax call that can only be done when a web server is running. If you try to open the file from the file system, then an error similar to the following is displayed in the browser JavaScript console:
IOError: can't load external script at file:///project/main.py
(Ajax calls not supported with protocol file:///)
Security protection prevents you from loading main.py from the local file system. You can resolve this issue by running a local file server. For more information about this behavior, see the Brython documentation.
Interacting With JavaScript
Brython allows Python code to interact with JavaScript code. The most common pattern is to access JavaScript from Brython. The reverse, although possible, isn’t common. You’ll see an example of JavaScript invoking a Python function in the section JavaScript Unit Tests.
JavaScript
Up to this point, you’ve experienced a few scenarios where Python code interacted with JavaScript code. In particular, you’ve been able to display a message box by invoking browser.alert().
You can see alert in action in the following three examples running in the Brython console, not in the standard CPython interpreter shell:
>>> import browser
>>> browser.alert("Real Python")
Or you can use window:
>>> from browser import window
>>> window.alert("Real Python")
Or you can use this:
>>> from javascript import this
>>> this().alert("Real Python")
Due to the new layer exposed by Brython and the global nature of both alert() and window, you can invoke alert on browser.window or even on javascript.this.
Here are the main Brython modules allowing access to JavaScript functions:
| Modules | Context | Examples |
|---|---|---|
browser |
Contains the built-in names and modules | browser.alert() |
browser.document |
Accesses the DOM | document.getElementById("element-id") document["element-id"] |
browser.html |
Creates HTML elements | html.H1("This is the title") |
browser.window |
Accesses Window functions and objects |
window.navigator window.frames |
javascript |
Accesses objects defined in JavaScript | javascript.this() javascript.JSON.parse() |
In addition to JavaScript functions and APIs available in the browser, you can also access to JavaScript functions that you wrote. The following example demonstrates how to access a custom JavaScript function from Brython:
 1<!doctype html>
 2<html>
 3  <head>
 4    <meta charset="utf-8">
 5    <script
 6        src="https://cdnjs.cloudflare.com/ajax/libs/brython/3.9.0/brython.js">
 7    </script>
 8    <script type="text/javascript">
 9      function myMessageBox(name) {
10        window.alert(`Hello ${name}!`);
11      }
12    </script>
13  </head>
14  <body onload="brython()">
15    <script type="text/python">
16      from browser import window
17      window.myMessageBox("Jon")
18    </script>
19  </body>
20</html>
Here’s how it works:
- Line 9 defines the custom function
myMessageBox()in a JavaScript block. - Line 17 invokes
myMessageBox().
You can use the same feature to access JavaScript libraries. You’ll see how in the section Web UI Framework, where you’ll interact with Vue.js, a popular web UI framework.
Browser Web API
Browsers expose web APIs that you can access from JavaScript, and Brython has access to the same APIs. In this section, you’ll extend the Base64 calculator to store the data between browser page reloads.
The web API allowing this feature is the Web Storage API. It includes two mechanisms:
You’ll use localStorage in the upcoming example.
As you learned earlier, the Base64 calculator creates a dictionary containing the input string mapped to the Base64-encoded value of this string. The data persists in memory after the page is loaded but is purged when you reload the page. Saving the data to localStorage will preserve the dictionary between page reloads. The localStorage is a key-value store.
To access localStorage, you need to import storage. To stay close to the initial implementation, you’ll load and save the dictionary data to localStorage in the JSON format. The key to save and fetch the data will be b64data. The modified code includes new imports and a load_data() function:
from browser.local_storage import storage
import json, base64

def load_data():
    data = storage.get("b64data")
    if data:
        return json.loads(data)
    else:
        storage["b64data"] = json.dumps({})
        return {}
load_data() is executed when the Python code is loaded. It fetches the JSON data from localStorage and populates a Python dictionary that will be used to hold the data in memory during the life of the page. If it doesn’t find b64data in localStorage, then it creates an empty dictionary for key b64data in localStorage and returns an empty dictionary.
You can view the full Python code incorporating load_data() by expanding the box below. It shows how to use the localStorage web API as persistent storage rather than relying on ephemeral in-memory storage, like in the previous implementation of this example.
The following code shows how to manage data using the browser localStorage:
 1from browser import document, prompt, html, alert
 2from browser.local_storage import storage
 3import json, base64
 4
 5def load_data():
 6    data = storage.get("b64data")
 7    if data:
 8        return json.loads(data)
 9    else:
10        storage["b64data"] = json.dumps({})
11        return {}
12
13def base64_compute(evt):
14    value = document["text-src"].value
15    if not value:
16        alert("You need to enter a value")
17        return
18    if value in b64_map:
19        alert(f"'{value}' already exists: '{b64_map[value]}'")
20        return
21    b64data = base64.b64encode(value.encode()).decode()
22    b64_map[value] = b64data
23    storage["b64data"] = json.dumps(b64_map)
24    display_map()
25
26def clear_map(evt):
27    b64_map.clear()
28    storage["b64data"] = json.dumps({})
29    document["b64-display"].clear()
30
31def display_map():
32    if not b64_map:
33        return
34    table = html.TABLE(Class="pure-table")
35    table <= html.THEAD(html.TR(html.TH("Text") + html.TH("Base64")))
36    table <= (html.TR(html.TD(key) + html.TD(b64_map[key])) for key in b64_map)
37    base64_display = document["b64-display"]
38    base64_display.clear()
39    base64_display <= table
40    document["text-src"].value = ""
41
42b64_map = load_data()
43display_map()
44document["submit"].bind("click", base64_compute)
45document["clear-btn"].bind("click", clear_map)
The new lines are highlighted. The global dictionary b64_map is populated by load_data() when the file is loaded and processed at the invocation of brython(). When the page is reloaded, the data is fetched from the localStorage.
Each time a new Base64 value is calculated, the content of b64_map is converted to JSON and stored in the local storage. The key to the storage is b64data.
You can access all the web API functions from browser and other submodules. High-level documentation on accessing the web API is available in the Brython documentation. For more details, you can consult the web API documentation and use the Brython console to experiment with the web APIs.
In some situations, you may have to choose between familiar Python functions and functions from the web APIs. For example, in the code above, you use the Python Base64 encoding, base64.b64encode(), but you could have used JavaScript’s btoa():
>>> from browser import window
>>> window.btoa("Real Python")
'UmVhbCBQeXRob24='
You can test both variations in the online console. Using window.btoa() would work only in the Brython context, whereas base64.b64encode() can be executed with a regular Python implementation like CPython. Note that in the CPython version, base64.b64encode() takes a bytearray as the argument type, whereas the JavaScript window.btoa() takes a string.
If performance is a concern, then consider using the JavaScript version.
Web UI Framework
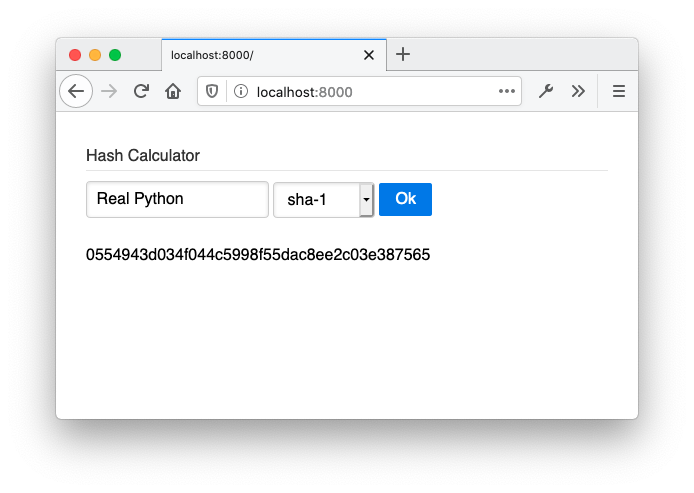
Popular JavaScript UI frameworks like Angular, React, Vue.js or Svelte have become an important part of the front-end developer’s tool kit, and Brython integrates seamlessly with some of these frameworks. In this section, you’ll build an application using Vue.js version 3 and Brython.
The application you’ll build is a form that calculates the hash of a string. Here’s a screenshot of the running HTML page:
The body of the HTML page defines the bindings and templates declaratively:
<!DOCTYPE html >
<html>
  <head>
    <meta charset="utf-8"/>
    <link
      rel="stylesheet"
      href="https://cdnjs.cloudflare.com/ajax/libs/pure/2.0.3/pure-min.min.css"/>
    <script src="https://cdnjs.cloudflare.com/ajax/libs/vue/3.0.2/vue.global.prod.js"></script>
    <script src="https://cdnjs.cloudflare.com/ajax/libs/brython/3.9.0/brython.min.js"></script>
    <script src="https://cdnjs.cloudflare.com/ajax/libs/brython/3.9.0/brython_stdlib.min.js"></script>
    <script src="main.py" type="text/python"></script>
    <style>
      body { padding: 30px; }
      [v-cloak] { visibility: hidden; }
    </style>
  </head>

<body onload="brython(1)">
  <div id="app">
    <form class="pure-form" onsubmit="return false;">
      <fieldset>
        <legend>Hash Calculator</legend>
        <input type="text" v-model.trim="input_text"
               placeholder="Text to Encode" autocomplete="off"/>
        <select v-model="algo" v-cloak>
          <option v-for="name in algos" v-bind:value="name">

          </option>
        </select>
        <button @click="compute_hash" type="submit"
                class="pure-button pure-button-primary">Ok</button>
      </fieldset>
    </form>
    <p v-cloak></p>
  </div>
</body>
If you’re not familiar with Vue, then you’ll cover a few things quickly below, but feel free to consult the official documentation for more information:
- Vue.js directives are special attribute values, prefixed with
v-, that provide dynamic behavior and data mapping between values of the DOM and Vue.js components:v-model.trim="input_text"binds the input value to the Vue modelinput_textand trims the value.v-model="algo"binds the value of the dropdown toalgo.v-for="name in algos"binds the option value toname.
- Vue templates are denoted with variables surrounded by double curly braces. Vue.js substitutes the corresponding placeholders with the corresponding value in the Vue component:
hash_valuename
- Event handlers are identified with an at symbol (
@) like in@click="compute_hash".
The corresponding Python code describes the Vue and attached business logic:
 1from browser import alert, window
 2from javascript import this
 3import hashlib
 4
 5hashes = {
 6    "sha-1": hashlib.sha1,
 7    "sha-256": hashlib.sha256,
 8    "sha-512": hashlib.sha512,
 9}
10
11Vue = window.Vue
12
13def compute_hash(evt):
14    value = this().input_text
15    if not value:
16        alert("You need to enter a value")
17        return
18    hash_object = hashes[this().algo]()
19    hash_object.update(value.encode())
20    hex_value = hash_object.hexdigest()
21    this().hash_value = hex_value
22
23def created():
24    for name in hashes:
25        this().algos.append(name)
26    this().algo = next(iter(hashes))
27
28app = Vue.createApp(
29    {
30        "el": "#app",
31        "created": created,
32        "data": lambda _: {"hash_value": "", "algos": [], "algo": "", "input_text": ""},
33        "methods": {"compute_hash": compute_hash},
34    }
35)
36
37app.mount("#app")
The declarative nature of Vue.js is displayed in the HTML file with the Vue directives and templates. It’s also demonstrated in the Python code with the declaration of the Vue component on line 11 and lines 28 to 35. This declarative technique wires the node values of the DOM with the Vue data, allowing the reactive behavior of the framework.
This eliminates some boilerplate code that you had to write in the previous example. For instance, notice that you didn’t have to select elements from the DOM with an expression like document["some_id"]. Creating the Vue app and invoking app.mount() handles the mapping of the Vue component to the corresponding DOM elements and the binding of the JavaScript functions.
In Python, accessing the Vue object fields requires you to refer to the Vue object with javascript.this():
- Line 14 fetches the value of the component field
this().input_text. - Line 21 updates the data component
this().hash_value. - Line 25 adds an algorithm to the list
this().algos. - Line 26 instantiates
this().algowith the first key ofhashes{}.
If this introduction of Vue combined with Brython has spurred your interest, then you may want to check out the vuepy project, which provides full Python bindings for Vue.js and uses Brython to run Python in the browser.
WebAssembly
In some situations, you can use WebAssembly to improve the performance of Brython or even JavaScript. WebAssembly, or Wasm, is binary code that is supported by all major browsers. It can provide a performance improvement over JavaScript in the browser and is a compilation target for languages like C, C++, and Rust. If you’re not using Rust or Wasm, then you can skip this section.
In the following example that demonstrates a way to use WebAssembly, you’ll implement a function in Rust and will invoke it from Python.
This isn’t intended to be a thorough Rust tutorial. It only scratches the surface. For more details about Rust, check out the Rust documentation.
Start by installing Rust using rustup. To compile Wasm files, you also need to add the wasm32 target:
$ rustup target add wasm32-unknown-unknown
Create a project using cargo, which is installed during the Rust installation:
$ cargo new --lib op
The command above creates a skeleton project in a folder named op. In this folder, you’ll find Cargo.toml, the Rust build configuration file, which you need to modify to indicate that you want to create a dynamic library. You can do this by adding the highlighted section:
[package]
name = "op"
version = "0.1.0"
authors = ["John <john@example.com>"]
edition = "2018"

[lib]
crate-type=["cdylib"]

[dependencies]
Modify src/lib.rs by replacing its content with the following:
#[no_mangle]
pub extern fn double_first_and_add(x: u32, y: u32) -> u32 {
    (2 * x) + y
}
In the root of the project, where Cargo.toml is, compile your project:
$ cargo build --target wasm32-unknown-unknown
Next, create a web directory with the following index.html:
 1<!-- index.html -->
 2<!DOCTYPE html>
 3<html>
 4<head>
 5  <script src="https://cdnjs.cloudflare.com/ajax/libs/brython/3.9.0/brython.min.js"></script>
 6  <script src="main.py" type="text/python"></script>
 7</head>
 8<body onload="brython()">
 9
10<form class="pure-form" onsubmit="return false;">
11  <h2>Custom Operation using Wasm + Brython</h2>
12  <fieldset>
13    <legend>Multiply first number by 2 and add result to second number</legend>
14    <input type="number" value="0" id="number-1" placeholder="1st number"
15           autocomplete="off" required/>
16    <input type="number" value="0" id="number-2" placeholder="2nd number"
17           autocomplete="off" required/>
18    <button type="submit" id="submit" class="pure-button pure-button-primary">
19        Execute
20    </button>
21  </fieldset>
22</form>
23
24<br/>
25<div id="result"></div>
26</body>
27</html>
Line 6 above loads the following main.py from the same directory:
 1from browser import document, window
 2
 3double_first_and_add = None
 4
 5def add_rust_fn(module):
 6  global double_first_and_add
 7  double_first_and_add = module.instance.exports.double_first_and_add
 8
 9def add_numbers(evt):
10    nb1 = document["number-1"].value or 0
11    nb2 = document["number-2"].value or 0
12    res = double_first_and_add(nb1, nb2)
13    document["result"].innerHTML = f"Result: ({nb1} * 2) + {nb2} = {res}"
14
15document["submit"].bind("click", add_numbers)
16window.WebAssembly.instantiateStreaming(window.fetch("op.wasm")).then(add_rust_fn)
The highlighted lines are the glue allowing Brython to access the Rust function double_first_and_add():
- Line 16 reads
op.wasmusingWebAssemblyand then invokesadd_rust_fn()when the Wasm file is downloaded. - Line 5 implements
add_rust_fn(), which takes the Wasm module as an argument. - Line 7 assigns
double_first_and_add()to the localdouble_first_and_addname to make it available to Python.
In the same web directory, copy op.wasm from target/wasm32-unknown-unknown/debug/op.wasm:
$ cp target/wasm32-unknown-unknown/debug/op.wasm web
The project folder layout look like this:
├── Cargo.lock
├── Cargo.toml
├── src
│   └── lib.rs
├── target
│   ...
└── web
    ├── index.html
    ├── main.py
    └── op.wasm
This shows the folder structure of the Rust project created with cargo new. For clarity, target is partially omitted.
Now start a server in web:
$ python3 -m http.server
Serving HTTP on :: port 8000 (http://[::]:8000/) ...
Finally, point your Internet browser to http://localhost:8000. Your browser should render a page like the following:
This project shows how to create a WebAssembly that you can use from JavaScript or Brython. Due to the significant overhead resulting from building a Wasm file, this shouldn’t be your first approach for tackling a particular problem.
Note: For a deep dive into WebAssembly, check out The Real Python Podcast - Episode 154 with Brett Cannon.
If JavaScript doesn’t meet your performance requirements, then Rust might be an option. This is mostly useful if you already have Wasm code to interact with, either code that you built or existing Wasm libraries.
Another possible benefit of using Rust to generate a WebAssembly is its access to libraries that don’t exist in Python or JavaScript. It can also be useful if you want to use a Python library that is written in C and that can’t be used with Brython. If such a library exists in Rust, then you might consider building a Wasm file to use it with Brython.
Applying Asynchronous Development in Brython
Synchronous programming is the computation behavior that you may be the most familiar with. For example, when executing three statements, A, B, and C, a program first executes A, then B, and finally C. Each statement blocks the flow of the program before passing it on to the next one.
Imagine a technique such that A would be executed first, B would be invoked but not executed immediately, and then C would be executed. You can think of B as a promise of being executed in the future. Since B is nonblocking, it’s considered asynchronous. For additional background on asynchronus programming, you can check out Getting Started With Async Features in Python.
JavaScript is single threaded and relies on asynchronous processing in particular when network communications are involved. For example, fetching the result of an API doesn’t require blocking the execution of other JavaScript functions.
With Brython, you have access to asynchronous features through a number of components:
As JavaScript has evolved, callbacks have been progressively replaced with promises or async functions. In this tutorial, you’ll learn how to use promises from Brython and how to use the browser.ajax and browser.aio modules, which leverage the asynchronous nature of JavaScript.
The asyncio module from the CPython library can’t be used in the browser context and is replaced in Brython by browser.aio.
JavaScript Promises in Brython
In JavaScript, a promise is an object that may produce a result sometime in the future. The value produced upon completion will be either a value or the reason for an error.
Here’s an example that illustrates how to use the JavaScript Promise object from Brython. You can work with this example in the online console:
 1>>> from browser import timer, window
 2>>> def message_in_future(success, error):
 3...   timer.set_timeout(lambda: success("Message in the future"), 3000)
 4...
 5>>> def show_message(msg):
 6...   window.alert(msg)
 7...
 8>>> window.Promise.new(message_in_future).then(show_message)
 9<Promise object>
In the web console, you can get immediate feedback about the execution of the Python code:
- Line 1 imports
timerto set a timeout andwindowto access thePromiseobject. - Line 2 defines an executor,
message_in_future(), that returns a message when the promise is successful, at the end of the timeout. - Line 5 defines a function,
show_message(), that displays an alert. - Line 8 creates a promise with the executor, chained with a
thenblock, allowing access to the result of the promise.
In the example above, the timeout artificially simulates a long-running function. Real uses of a promise could involve a network call. After 3 seconds, the promise completes successfully with the value "Message in the future".
If the executor function, message_in_future(), detects an error, then it could invoke error() with the reason for the error as an argument. You can implement this with a new chained method, .catch(), on the Promise object, as follows:
>>> window.Promise.new(message_in_future).then(show_message).catch(show_message)
You can see the behavior of the successful completion of the promise in the following image:
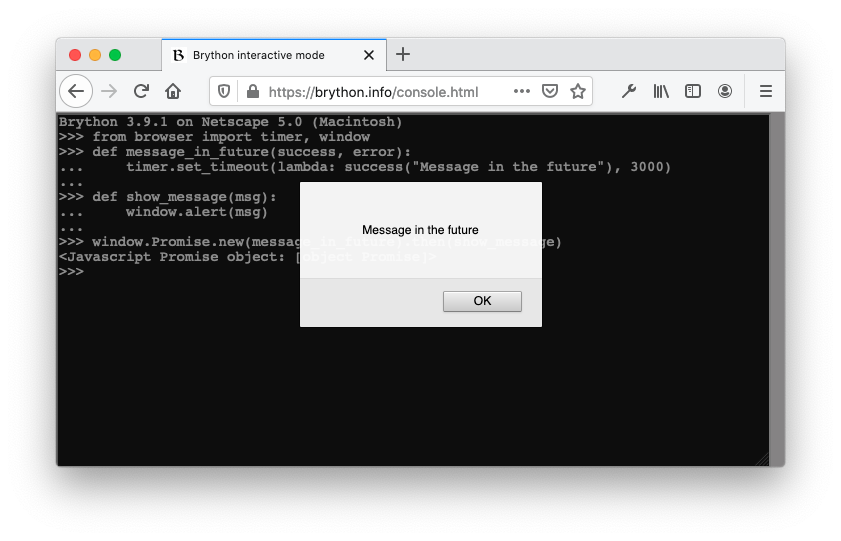
When you run the code in the console, you can see that the Promise object is created first, and then, after the timeout, the message box is displayed.
Ajax in Brython
Asynchronous functions are particularly useful when functions are qualified as I/O bound. This is in contrast to CPU-bound functions. An I/O-bound function is a function that mostly spends time waiting for input or output to finish, whereas a CPU-bound function is computing. Invoking an API over the network or querying a database is an I/O-bound execution, whereas calculating a sequence of prime numbers is CPU bound.
Brython’s browser.ajax exposes HTTP functions like get() and post() that are, by default, asynchronous. These functions take a blocking parameter that can be set to True to render the same function synchronous.
To invoke HTTP GET asynchronously, invoke ajax.get() as follows:
ajax.get(url, oncomplete=on_complete)
To fetch an API in a blocking mode, set the blocking parameter to True:
ajax.get(url, blocking=True, oncomplete=on_complete)
The following code shows the difference between making a blocking Ajax call and a nonblocking Ajax call:
 1from browser import ajax, document
 2import javascript
 3
 4def show_text(req):
 5    if req.status == 200:
 6        log(f"Text received: '{req.text}'")
 7    else:
 8        log(f"Error: {req.status} - {req.text}")
 9
10def log(message):
11    document["log"].value += f"{message} \n"
12
13def ajax_get(evt):
14    log("Before async get")
15    ajax.get("/api.txt", oncomplete=show_text)
16    log("After async get")
17
18def ajax_get_blocking(evt):
19    log("Before blocking get")
20    try:
21        ajax.get("/api.txt", blocking=True, oncomplete=show_text)
22    except Exception as exc:
23        log(f"Error: {exc.__name__} - Did you start a local web server?")
24    else:
25        log("After blocking get")
26
27document["get-btn"].bind("click", ajax_get)
28document["get-blocking-btn"].bind("click", ajax_get_blocking)
The code above illustrates both behaviors, synchronous and asynchronous:
-
Line 13 defines
ajax_get(), which fetches text from a remote file usingajax.get(). The default behavior ofajax.get()is asynchronous.ajax_get()returns, andshow_text()assigned to the parameteroncompleteis called back after receiving the remote file/api.txt. -
Line 18 defines
ajax_get_blocking(), which demonstrates how to useajax.get()with the blocking behavior. In this scenario,show_text()is called beforeajax_get_blocking()returns.
When you run the full example and click Async Get and Blocking Get, you’ll see the following screen:
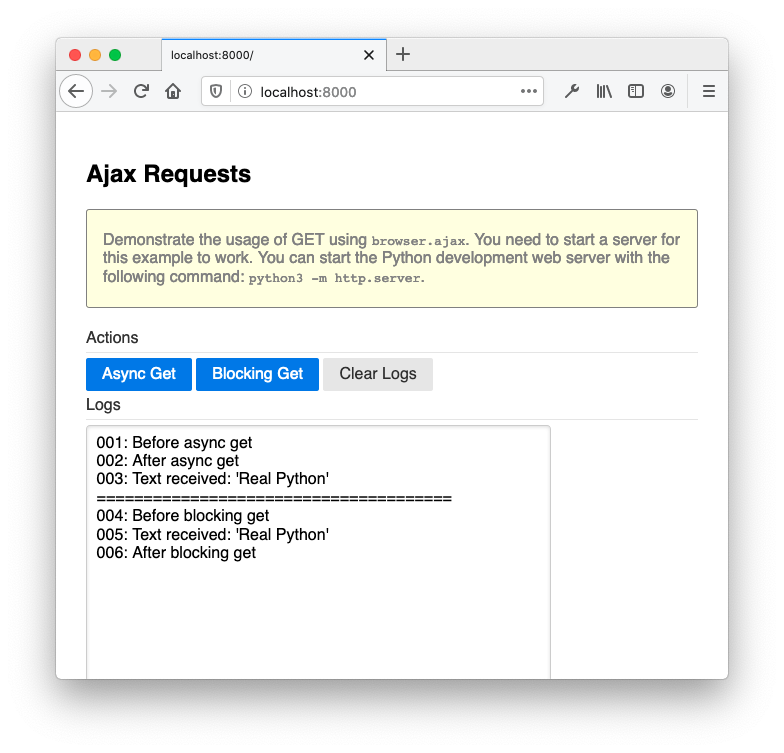
You can see that in the first scenario, ajax_get() is fully executed, and the result of the API call happens asynchronously. In the second situation, the result of the API call is displayed before returning from ajax_get_blocking().
Async IO in Brython
With asyncio, Python 3.4 started to expose new asynchronous capabilities. In Python 3.5, asynchronous support has been enriched with the async/await syntax. Due to incompatibility with the browser event loop, Brython implements browser.aio as a substitute for the standard asyncio.
The Brython module browser.aio and the Python module asyncio both support using the async and await keywords and share common functions, like run() and sleep(). Both modules implement other distinct functions that pertain to their respective contexts of execution, the CPython context environment for asyncio and the browser environment for browser.aio.
Coroutines
You can use run() and sleep() to create coroutines. To illustrate the behavior of coroutines implemented in Brython, you’ll implement a variant of a coroutine example available in the CPython documentation:
 1from browser import aio as asyncio
 2import time
 3
 4async def say_after(delay, what):
 5    await asyncio.sleep(delay)
 6    print(what)
 7
 8async def main():
 9    print(f"started at {time.strftime('%X')}")
10
11    await say_after(1, 'hello')
12    await say_after(2, 'world')
13
14    print(f"finished at {time.strftime('%X')}")
15
16asyncio.run(main())
Except for the first import line, the code is the same as you found in the CPython documentation. It demonstrates the use of the keywords async and await and shows run() and sleep() in action:
- Line 1 uses
asyncioas an alias forbrowser.aio. Although it shadowsaio, it keeps the code close to the Python documentation example to facilitate the comparison. - Line 4 declares the coroutine
say_after(). Note the use ofasync. - Line 5 invokes
asyncio.sleep()withawaitso that the current function will cede control to another function untilsleep()completes. - Line 8 declares another coroutine that will itself call the coroutine
say_after()twice. - Line 9 invokes
run(), a nonblocking function that takes a coroutine—main()in this example—as an argument.
Note that in the context of the browser, aio.run() leverages the internal JavaScript event loop. This differs from the related function asyncio.run() in CPython, which fully manages the event loop.
To execute this code, paste it into the online Brython editor and click Run. You should get an output similar to the following screenshot:
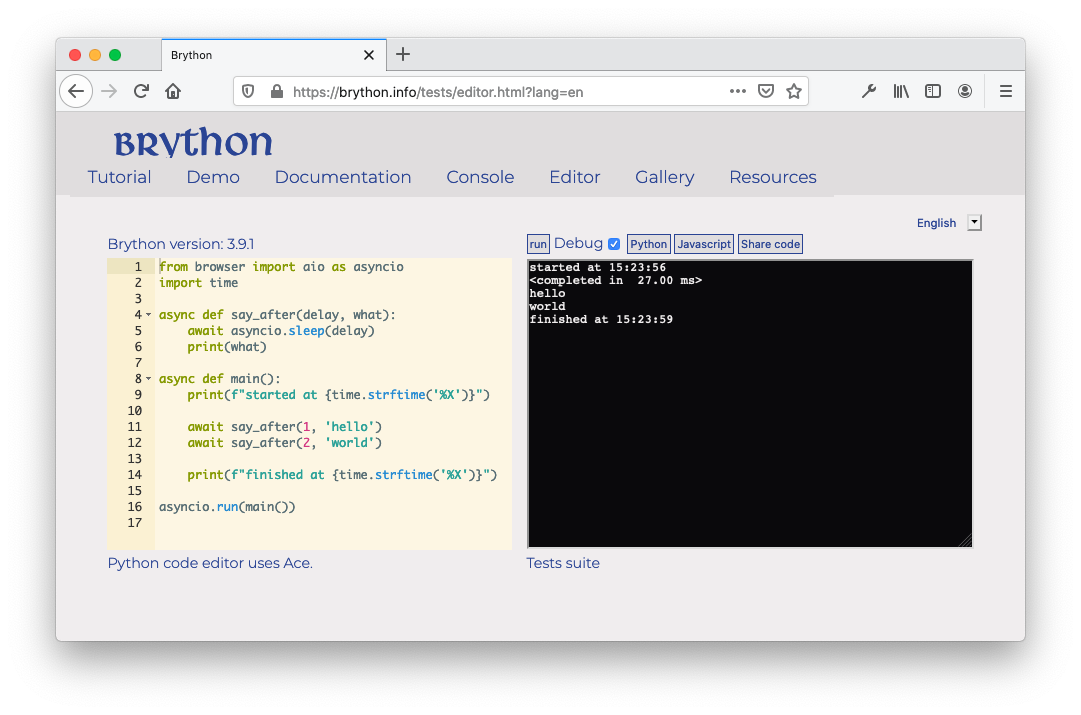
First the script is executed, then "hello" is displayed, and finally "world" is displayed.
For additional details about coroutines in Python, you can check out Async IO in Python: A Complete Walkthrough.
The generic concepts of asynchronous I/O apply to all platforms embracing this pattern. In JavaScript, the event loop is intrinsically part of the environment, whereas in CPython this is something that is managed using functions exposed by asyncio.
The example above was an intentional exercise to keep the code exactly as shown in the Python documentation example. While coding in the browser with Brython, it’s recommended to explicitly use browser.aio, as you’ll see in the following section.
Web Specific Functions
To issue an asynchronous call to an API, like in the previous section, you can write a function like the following:
async def process_get(url):
    req = await aio.get(url)
Note the use of the keywords async and await. The function needs to be defined as async to use a call with await. During the execution of this function, when reaching the call to await aio.get(url), the function gives control back to the main event loop while waiting for the network call, aio.get(), to complete. The rest of the program execution is not blocked.
Here’s an example of how to invoke process_get():
aio.run(process_get("/some_api"))
The function aio.run() executes the coroutine process_get(). It’s nonblocking.
A more complete code example shows how to use the keywords async and await and how aio.run() and aio.get() are complementary:
 1from browser import aio, document
 2import javascript
 3
 4def log(message):
 5    document["log"].value += f"{message} \n"
 6
 7async def process_get(url):
 8    log("Before await aio.get")
 9    req = await aio.get(url)
10    log(f"Retrieved data: '{req.data}'")
11
12def aio_get(evt):
13    log("Before aio.run")
14    aio.run(process_get("/api.txt"))
15    log("After aio.run")
16
17document["get-btn"].bind("click", aio_get)
As in the most recent versions of Python 3, you can use the async and await keywords:
- Line 7 defines
process_get()with the keywordasync. - Line 9 invokes
aio.get()with the keywordawait. Usingawaitrequires the enclosing function to be defined withasync. - Line 14 shows how to use
aio.run(), which takes as an argument theasyncfunction to be called.
To run the full example, you need to start a web server. You can start the Python development web server with python3 -m http.server. It starts a local web server on port 8000 and the default page index.html:
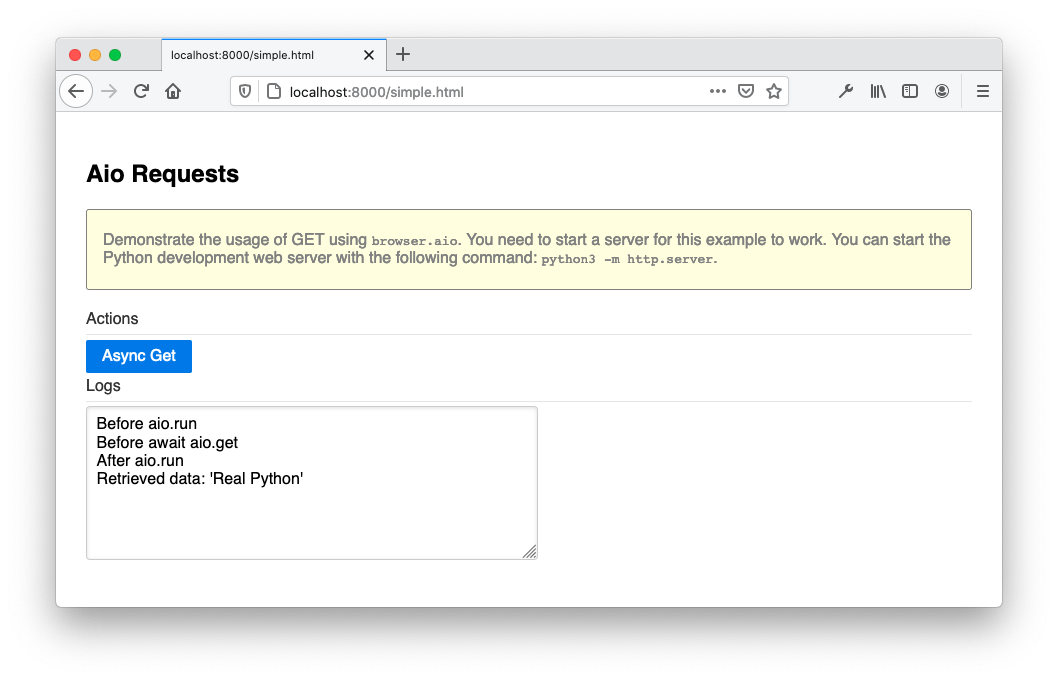
The screenshot shows the sequence of steps executed after clicking Async Get. The combination of using the aio module and the keywords async and await shows how you can embrace the asynchronous programming model that JavaScript promotes.
Distributing and Packaging a Brython Project
The method you use to install Brython may affect how and where you can deploy your Brython project. In particular, to deploy to PyPI, the best option is to first install Brython from PyPI and then create your project with brython-cli. But a typical web deployment to a private server or to a cloud provider can leverage any installation method you choose.
You have several deployment options:
- Manual and automatic deployments
- Deployment to PyPI
- Deployment to a CDN
You’ll explore each of these in the following sections.
Manual and Automatic Web Deployments
Your application contains all the static dependencies, CSS, JavaScript, Python, and image files that you need for your website. Brython is part of your JavaScript files. All the files can be deployed as-is on the provider of your choice. You can consult the Web Development Tutorials and Automating Django Deployments with Fabric and Ansible for details on deploying your Brython applications.
If you decide to use brython-cli --modules to precompile your Python code, then the files you deploy won’t have any Python source code, only brython.js and brython_modules.js. You also won’t include brython_stdlib.js since the required modules will be included in brython_modules.js already.
Deploying to PyPI
When you install Brython from PyPI, you can use brython-cli to create a package that can be deployed to PyPI. The goals of creating such a package are to extend the default Brython template as a base for your custom projects and to make Brython websites available from PyPI.
After following the instructions in the section on installing from PyPI, execute the following command in your new web project:
$ brython-cli --make_dist
You’ll be prompted to answer a few questions intended to create brython_setup.json, which you can modify later. After completion of the command, you’ll have a directory called __dist__ containing the files you need to create an installable package.
You can test the installation of this new package locally as follows:
$ pip install -e __dist__
Subsequently, you can also confirm that the new command deployed locally with the web package by executing the following command:
$ python -m web --help
usage: web.py [-h] [--install]

optional arguments:
  -h, --help  show this help message and exit
  --install   Install web in an empty directory
Notice that the web command behaves exactly as Brython does after an initial install. You’ve just created a custom installable Brython package that can be deployed to PyPI. For a thorough description of how to deploy your package to PyPI, check out How to Publish an Open-Source Python Package to PyPI.
Once deployed to PyPI, you can install your Brython package with pip in a Python virtual environment. You’ll be able to create your new customized application with the new command you created:
$ python -m <application_name> --install
To summarize, here are the steps for deploying to PyPI:
- Install Brython from PyPI.
- Create a project with
brython-cli --install. - Create an installable package from your project with
brython-cli --make-dist. - Deploy this package to PyPI.
The other installation methods—CDN, GitHub, and npm—don’t include brython-cli and therefore aren’t well suited to preparing a PyPI package.
Deploying to a CDN
Just as brython.js and brython_stdlibs.js are available on CDN servers, you can also deploy your static assets, images, styles, and JavaScript files, including your Python files or brython_modules.js, to a CDN. Examples of CDNs include:
If your application is open source, then you can get free CDN support. Examples include CDNJS and jsDelivr.
Creating Google Chrome Extensions
Chrome extensions are components built with web technologies and incorporated into Chrome to customize your browsing environment. Typically, the icons of these extensions are visible at the top of the Chrome window, to the right of the address bar.
Public extensions are available on the Chrome web store. To learn, you’ll install Google Chrome extensions from local files:
Before undertaking the implementation of a Google Chrome extension in Brython, you’ll first implement a JavaScript version and then translate it into Brython.
Hello World Extension in JS
As a starter, you’ll implement an extension that will perform the following actions:
- Open a popup window when you click on the extension icon
- Open a prompt message when you click on the popup window button
- Append the message you entered at the bottom of the initial popup window
The following screenshot illustrates this behavior:
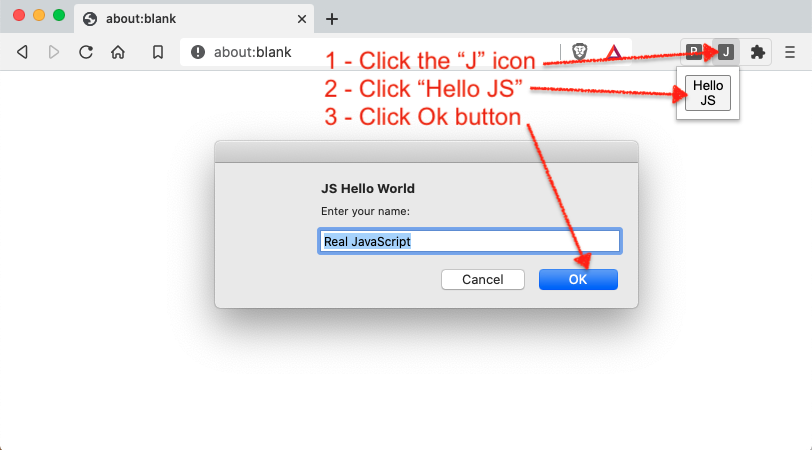
In an empty folder, create the file manifest.json to configure the extension:
 1// manifest.json
 2{
 3    "name": "JS Hello World",
 4    "version": "1.0",
 5    "description": "Hello World Chrome Extension in JavaScript",
 6    "manifest_version": 2,
 7    "browser_action": {
 8        "default_popup": "popup.html"
 9    },
10    "permissions": ["declarativeContent", "storage", "activeTab"]
11}
The important field for this example is the default popup file, popup.html, which you’ll also have to create. For information on the other fields and more, you can consult the Manifest file format documentation.
In the same folder, create the popup.html file used to define the user interface of the extension:
 1<!-- popup.html -->
 2<!DOCTYPE html>
 3<html>
 4  <head>
 5    <script src="popup.js" defer></script>
 6  </head>
 7  <body>
 8    <button id="hello-btn">Hello JS</button>
 9    <div id="hello"></div>
10  </body>
11</html>
The HTML file includes a link to the JavaScript business logic of the extension and describes its user interface:
- Line 5 refers to
popup.js, which contains the logic of the extension. - Line 8 defines a
buttonthat will be bound to a handler inpopup.js. - Line 9 declares a field to be used by the JavaScript code to display some text.
You also need to create popup.js:
 1// popup.js
 2'use strict';
 3
 4let helloButton = document.getElementById("hello-btn");
 5
 6helloButton.onclick = function (element) {
 7  const defaultName = "Real JavaScript";
 8  let name = prompt("Enter your name:", defaultName);
 9  if (!name) {
10    name = defaultName;
11  }
12  document.getElementById("hello").innerHTML = `Hello, ${name}!`;
13};
The main logic of the JavaScript code consists of declaring an onclick handler bound to the field hello-btn of the HTML container:
- Line 2 invokes the script mode that enables more stringent validation in JavaScript to reveal JavaScript mistakes.
- Line 4 selects the field identified by
hello-btninpopup.htmland assigns it to a variable. - Line 6 defines the handler that will process the event when a user clicks the button. This event handler prompts the user for their name, then changes the contents of the
<div>identified withhelloto the provided name.
Before installing this extension, take the following steps:
- Open the Google Chrome menu on the right-hand side of the screen.
- Open the submenu More Tools.
- Click Extensions.
A screen will display your currently installed extensions, if any. It may look like this:
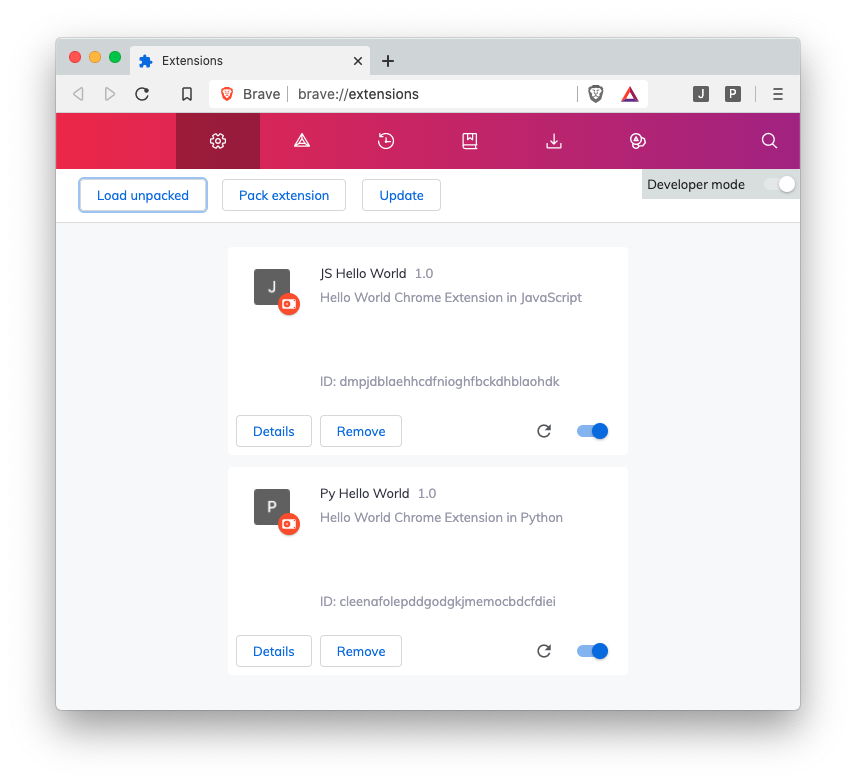
To install your new extension, you’ll need to take the following steps:
- Ensure that the Developer mode is enabled on the top right-hand side of the screen.
- Click Load unpacked.
- Select the folder containing all the files you just created.
If no error occurred during the installation, then you should now see a new icon with a J on the right-hand side of your browser’s address bar. To test your extension, click the J icon of the toolbar displayed below:

If any errors occur during installation or execution, then you should see a red error button to the right of the extension card’s Remove button:
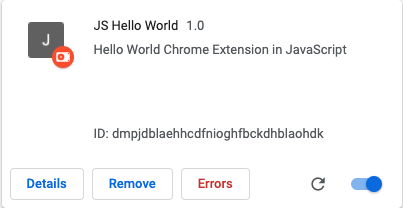
You can click Errors to display the error and identify the root cause. After correction, reload the extension by clicking the circular arrow at the bottom right of the extension card, then repeat the process until it works as you expect.
To test your newly installed extension, you can click the J icon displayed on the right-hand side of the browser toolbar. If the icon isn’t displayed, then click Extensions to list the installed extensions and select the pushpin button aligned with the JS Hello World extension you just installed.
Hello World Extension in Python
If you’ve reached this point, then you’ve already completed the most difficult steps, mostly to get familiar with the process of creating a Chrome extension and installing it. The steps will be similar with Brython, with a couple of differences that you’ll learn in this section.
The manifest file will be distinct, with a different extension name and, for good measure, a different description:
 1// manifest.json
 2{
 3    "name": "Py Hello World",
 4    "version": "1.0",
 5    "description": "Hello World Chrome Extension in Python",
 6    "manifest_version": 2,
 7    "browser_action": {
 8        "default_popup": "popup.html"
 9    },
10    "content_security_policy": "script-src 'self' 'unsafe-eval';object-src 'self'",
11    "permissions": ["declarativeContent", "storage", "activeTab"]
12}
Note that you also have to include a new property, content_security_policy. This is needed so that the policy against eval() can be relaxed in the chrome extension system. Remember that Brython uses eval().
This isn’t something that you introduced and that you can control in Brython. You’ll need to enable using eval() if you want to use Brython as the language of your browser extension. If you don’t add unsafe-eval to the content_security_policy, then you’ll see the following error:
Uncaught EvalError: Refused to evaluate a string as JavaScript because
'unsafe-eval' is not an allowed source of script in the following Content
Security Policy directive: "script-src 'self' blob: filesystem:".
The HTML file will also have a few updates, as follows:
 1<!-- popup.html -->
 2<!DOCTYPE html>
 3<html>
 4  <head>
 5    <script src="brython.min.js" defer></script>
 6    <script src="init_brython.js" defer></script>
 7    <script src="popup.py" type="text/python" defer></script>
 8  </head>
 9  <body>
10    <button id="hello-btn">Hello Py</button>
11    <div id="hello"></div>
12  </body>
13</html>
The HTML code is very similar to the one you used to create a Chrome extension in JavaScript. A few details are worth noting:
- Line 5 loads
brython.min.jsfrom a local package. For security reasons, only local scripts are loaded and you can’t load from an external source like a CDN. - Line 6 loads
init_brython.js, which invokesbrython(). - Line 7 loads
popup.py. - Line 9 declares
bodywithout the usualonload="brython()".
Another security constraint prevents you from calling brython() in the onload event of the body tag. The workaround is to add a listener to the document and to indicate to the browser to execute brython() after the content of the document is loaded:
// init_brython.js
document.addEventListener('DOMContentLoaded', function () {
    brython();
});
Finally, you can see the main logic of this application in the following Python code:
# popup.py
from browser import document, prompt

def hello(evt):
    default = "Real Python"
    name = prompt("Enter your name:", default)
    if not name:
        name = default
    document["hello"].innerHTML = f"Hello, {name}!"

document["hello-btn"].bind("click", hello)
With that, you’re ready to proceed with the installation and testing as you did for the JavaScript chrome extension.
Testing and Debugging Brython
There are currently no convenient libraries for unit testing Brython code. As Brython evolves, you’ll see more options to test and debug Python code in the browser. It’s possible to take advantage of the Python unit test framework for a standalone Python module that can be used outside the browser. In the browser, Selenium with browser drivers is a good option. Debugging is also limited but possible.
Python Unit Tests
The Python unit test frameworks, like the built-in unittest and pytest, don’t work in the browser. You can use these frameworks for Python modules that could also be executed in the context of CPython. Any Brython-specific modules like browser can’t be tested with such tools at the command line. For more information about Python unit testing, check out Getting Started With Testing in Python.
Selenium
Selenium is a framework for automating browsers. It’s agnostic to the language used in the browser, whether it’s JavaScript, Elm, Wasm, or Brython, because it uses the WebDriver concept to behave like a user interacting with the browser. You can check out Modern Web Automation With Python and Selenium for more information about this framework.
JavaScript Unit Tests
There are many JavaScript-focused testing frameworks, like Mocha, Jasmine, and QUnit, that perform well in the full JavaScript ecosystem. But they’re not necessarily well suited to unit test Python code running in the browser. One option requires globally exposing the Brython functions to JavaScript, which goes against best practices.
To illustrate the option of exposing a Brython function to JavaScript, you’ll use QUnit, a JavaScript unit test suite that can run self-contained in an HTML file:
 1<!-- index.html -->
 2<!DOCTYPE html >
 3<html>
 4
 5<head>
 6  <meta charset="utf-8">
 7  <meta name="viewport" content="width=device-width">
 8  <title>Test Suite</title>
 9  <link rel="stylesheet" href="https://code.jquery.com/qunit/qunit-2.13.0.css">
10  <script src="https://cdnjs.cloudflare.com/ajax/libs/brython/3.9.0/brython.min.js"></script>
11  <script src="https://code.jquery.com/qunit/qunit-2.13.0.js"></script>
12</head>
13
14<body onload="brython()">
15<div id="qunit"></div>
16<div id="qunit-fixture"></div>
17<script type="text/python">
18from browser import window
19
20def python_add(a, b):
21  return a + b
22
23window.py_add = python_add
24</script>
25
26<script>
27const js_add = (a, b) => a + b;
28QUnit.module('js_add_test', function() {
29  QUnit.test('should add two numbers', function(assert) {
30    assert.equal(js_add(1, 1), 2, '1 + 1 = 2 (javascript');
31  });
32});
33
34QUnit.module('py_add_test', function() {
35  QUnit.test('should add two numbers in Brython', function(assert) {
36    assert.equal(py_add(2, 3), 5, '2 + 3 = 5 (python)');
37  });
38});
39
40QUnit.module('py_add_failed_test', function() {
41  QUnit.test('should add two numbers in Brython (failure)', function(assert) {
42    assert.equal(py_add(2, 3), 6, '2 + 3 != 6 (python)');
43  });
44});
45</script>
46
47</body>
48</html>
In one HTML file, you’ve written Python code, JavaScript code, and JavaScript tests to validate functions from both languages executed in the browser:
- Line 11 imports the QUnit framework.
- Line 23 exposes
python_add()to JavaScript. - Line 28 defines
js_add_testto test the JavaScript functionjs_add(). - Line 34 defines
py_add_testto test the Python functionpython_add(). - Line 40 defines
py_add_failed_testto test the Python functionpython_add()with an error.
You don’t need to start a web server to execute the unit test. Open index.html in a browser, and you should see the following:
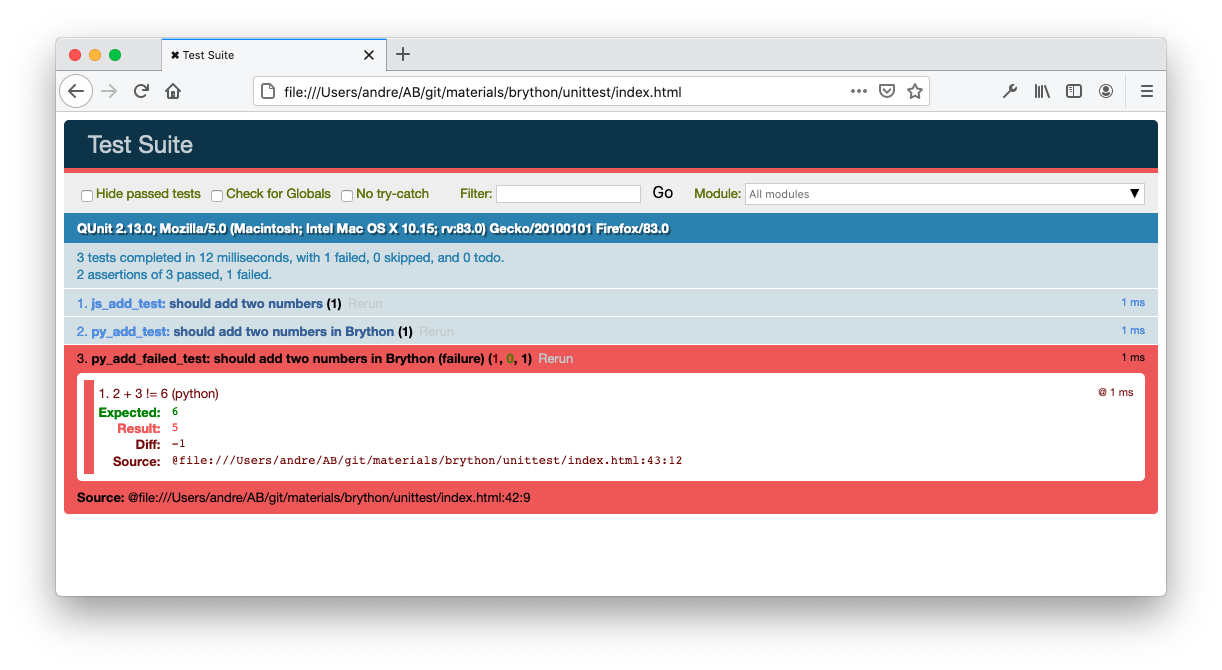
The page shows two successful tests, js_add_test() and py_add_test(), and one failed test, py_add_failed_test().
Exposing a Python function to JavaScript shows how you can use a JavaScript unit test framework to execute Python in the browser. Although possible for testing, it’s not recommended in general because it may conflict with existing JavaScript names.
Debugging in Brython
As of this writing, there were no user-friendly tools to debug your Brython application. You weren’t able to generate a source map file that would allow you to debug step by step in the browser development tools.
This shouldn’t discourage you from using Brython. Here are a few tips to help with debugging and troubleshooting your Brython code:
- Use
print()orbrowser.console.log()to print variable values in the browser’s developer tools console. - Use f-string debugging as described in Cool New Features in Python 3.8.
- Clear the browser’s IndexedDB once in a while by using the developer tools.
- Disable the browser cache during development by checking the Disable cache checkbox in the Network tab of the browser’s developer tools.
- Add options to
brython()to enable additional debug information to be displayed in the JavaScript console. - Copy
brython.jsandbrython_stdlib.min.jslocally to speed up reloading during development. - Start a local server when you
importPython code. - Open the inspector from the extension when troubleshooting a Chrome extension.
One of the niceties of Python is the REPL (read-eval-print loop). The online Brython console offers a platform to experiment with, test, and debug the behavior of some code snippets.
Exploring Alternatives to Brython
Brython isn’t the only option for writing Python code in the browser. A few alternatives are available:
Each implementation approaches the problem from a different angle. Brython attempts to be a replacement for JavaScript by providing access to the same web API and DOM manipulation as JavaScript, but with the appeal of the Python syntax and idioms. It’s packaged as a small download in comparison to some alternatives that may have different goals.
Note: At PyCon US 2022, a new alternative was unveiled: PyScript! For a guide to this new framework, you can check out A First Look at PyScript: Python in the Web Browser.
How do these frameworks compare?
Skulpt
Skulpt compiles Python code to JavaScript in the browser. The compilation takes place after the page is loaded, whereas in Brython the compilation takes place during page loading.
Although it doesn’t have built-in functions to manipulate the DOM, Skulpt is very close to Brython in its applications. This includes educational uses and full-blown Python applications, as demonstrated by Anvil.
Skulpt is a maintained project moving toward Python 3. Brython is mostly on par with CPython 3.9 for modules compatible with an execution in the browser.
Transcrypt
Transcrypt includes a command-line tool to compile Python code to JavaScript code. The compilation is said to be ahead of time (AOT). The resulting code can then be loaded into the browser. Transcrypt has a small footprint, about 100KB. It’s fast and supports DOM manipulation.
The difference between Skulpt and Brython is that Transcrypt is compiled to JavaScript with the Transcrypt compiler before being downloaded and used in the browser. This enables speed and small size. However, it prevents Transcrypt from being used as a platform for education like the other platforms.
Pyodide
Pyodide is a WebAssembly compilation of the CPython interpreter. It interprets Python code in the browser. There’s no JavaScript compilation phase. Although Pyodide, like PyPy.js, requires you to download a significant amount of data, it comes loaded with scientific libraries like NumPy, Pandas, Matplotlib, and more.
You can see Pyodide as a Jupyter Notebook environment running entirely in the browser rather than served by a back-end server. You can experiment with Pyodide using a live example.
PyPy.js
PyPy.js uses the PyPy Python interpreter compiled to JavaScript with emscripten, making it compatible for running in a browser.
In addition to the project’s current dormant status, PyPy.js is a large package, about 10 MB, that is prohibitive for typical web applications. You can still use PyPy.js as a platform for learning Python in a browser by opening the PyPy.js home page.
PyPy.js is compiled to JavaScript with emscripten. Pyodide takes it one step further, leveraging emscripten and Wasm in particular to compile Python C extensions like NumPy to WebAssembly.
As of this writing, PyPy.js did not appear to be maintained. For something in the same vein regarding the compilation process, consider Pyodide.
Conclusion
In this tutorial, you’ve taken a deep dive into several facets of writing Python code in the browser. This may have given you some interest in trying Python for front-end development.
In this tutorial, you’ve learned how to:
- Install and use Brython in a local environment
- Replace JavaScript with Python in your front-end web applications
- Manipulate the DOM
- Interact with JavaScript
- Create browser extensions
- Compare alternatives to Brython
In addition to accessing features usually reserved for JavaScript, one of the best uses of Brython is as a learning and teaching tool. You can access a Python editor and console that run in your browser to start exploring the many uses of Brython today.
To review the examples you saw in this tutorial, you can download the source code by clicking the link below:
Get the Source Code: Click here to get the source code you’ll use to learn about using Brython to run Python in the browser in this tutorial.


