
Building applications that use an SQL database is a fairly common programming task. SQL databases are everywhere and have great support in Python. In GUI programming, PyQt provides robust and cross-platform SQL database support that allows you to create, connect to, and manage your databases consistently.
PyQt’s SQL support fully integrates with its Model-View architecture to help you in the process of building database applications.
In this tutorial, you’ll learn how to:
- Use PyQt’s SQL support to reliably connect to a database
- Execute SQL queries on a database using PyQt
- Use PyQt’s Model-View architecture in database applications
- Display and edit data using different PyQt widgets
The examples in this tutorial require a basic knowledge of the SQL language, especially of the SQLite database management system. Some previous knowledge of GUI programming with Python and PyQt will also be helpful.
Free Bonus: 5 Thoughts On Python Mastery, a free course for Python developers that shows you the roadmap and the mindset you’ll need to take your Python skills to the next level.
Connecting PyQt to an SQL Database
Connecting an application to a relational database and getting the application to create, read, update, and delete the data stored in that database is a common task in programming. Relational databases are generally organized into a set of tables, or relations. A given row in a table is referred to as a record or tuple, and a column is referred to as an attribute.
Note: The term field is commonly used to identify a single piece of data stored in a cell of a given record in a table. On the other hand, the term field name is used to identify the name of a column.
Each column stores a specific kind of information, such as a names, dates, or numbers. Each row represents a set of closely related data, and every row has the same general structure. For example, in a database that stores data about the employees in a company, a specific row represents an individual employee.
Most relational database systems use SQL (structured query language) for querying, manipulating, and maintaining the data held in the database. SQL is a declarative and domain-specific programming language specially designed for communicating with databases.
Relational database systems and SQL are widely used nowadays. You’ll find several different database management systems, such as SQLite, PostgreSQL, MySQL, MariaDB, and many others. You can connect Python to any of these database systems using a dedicated Python SQL library.
Note: Even though PyQt’s built-in SQL support is the preferred option for managing SQL databases in PyQt, you can also use any other library to handle the database connection. Some of these libraries include SQLAlchemy, pandas, SQLite, and so on.
However, using a different library to manage your databases has some drawbacks. You won’t be able to take advantage of the integration between PyQt’s SQL classes and the Model-View architecture. In addition, you’ll be adding extra dependencies to your application.
When it comes to GUI programming with Python and PyQt, PyQt provides a robust set of classes for working with SQL databases. This set of classes will be your best ally when you need to connect your application to an SQL database.
Note: Unfortunately, PyQt5’s official documentation has some incomplete sections. To work around this, you can check out the PyQt4 documentation, the Qt For Python’s documentation, or the original Qt documentation. In this tutorial, some links take you to the original Qt documentation, which is a better source of information in most cases.
In this tutorial, you’ll learn the basics of how to use PyQt’s SQL support to create GUI applications that reliably interact with relational databases to read, write, delete, and display data.
Creating a Database Connection
Connecting your applications to a physical SQL database is an important step in the process of developing database applications with PyQt. To perform this step successfully, you need some general information about how your database is set up.
For example, you need to know what database management system your database is built on, and you might also need to have a username, a password, a hostname, and so on.
In this tutorial, you’ll use SQLite 3, which is a well-tested database system with support on all platforms and minimal configuration requirements. SQLite allows you to read and write directly to databases in your local disk without the need for a separate server process. That makes it a user-friendly option for learning database application development.
Another advantage of using SQLite is that the library comes shipped with Python and also with PyQt, so you don’t need to install anything else to start working with it.
In PyQt, you can create a database connection by using the QSqlDatabase class. This class represents a connection and provides an interface for accessing the database. To create a connection, just call .addDatabase() on QSqlDatabase. This static method takes an SQL driver and an optional connection name as arguments and returns a database connection:
QSqlDatabase.addDatabase(
    driver, connectionName=QSqlDatabase.defaultConnection
)
The first argument, driver, is a required argument that holds a string containing the name of a PyQt-supported SQL driver. The second argument, connectionName, is an optional argument that holds a string with the name of the connection. connectionName defaults to QSqlDatabase.defaultConnection, which normally holds the string "qt_sql_default_connection".
If you already have a connection called connectionName, then that connection is removed and replaced with a new connection, and .addDatabase() returns the newly added database connection back to the caller.
A call to .addDatabase() adds a database connection to a list of available connections. This list is a global registry that PyQt maintains behind the scenes to keep track of the available connections in an application. Registering your connections with a meaningful connectionName will allow you to manage several connections in a database application.
Once you’ve created a connection, you might need to set several attributes on it. The specific set of attributes will depend on the driver you’re using. In general, you’ll need to set attributes such as the database name, the username, and the password for accessing the database.
Here’s a summary of the setter methods that you can use to set the more commonly used attributes or properties of a database connection:
| Method | Description |
|---|---|
.setDatabaseName(name) |
Sets the database name to name, which is a string representing a valid database name |
.setHostName(host) |
Sets the hostname to host, which is a string representing a valid hostname |
.setUserName(username) |
Sets the username to username, which is a string representing a valid user name |
.setPassword(password) |
Sets the password to password, which is a string representing a valid password |
Note that the password you pass as an argument to .setPassword() is stored in plain text and can be retrieved later by calling .password(). This is a serious security risk that you should avoid introducing in your database applications. You’ll learn a safer approach in the section Opening a Database Connection later in this tutorial.
To create a connection to an SQLite database using QSqlDatabase, open a Python interactive session and type in the following code:
>>> from PyQt5.QtSql import QSqlDatabase

>>> con = QSqlDatabase.addDatabase("QSQLITE")
>>> con.setDatabaseName("contacts.sqlite")

>>> con
<PyQt5.QtSql.QSqlDatabase object at 0x7f0facec0c10>

>>> con.databaseName()
'contacts.sqlite'

>>> con.connectionName()
'qt_sql_default_connection'
This code will create a database connection object using "QSQLITE" as the connection’s driver and "contacts.sqlite" as the connection’s database name. Since you don’t pass a connection name to .addDatabase(), the newly created one becomes your default connection, whose name is "qt_sql_default_connection".
In the case of SQLite databases, the database name is normally a filename or a path that includes the database filename. You can also use the special name ":memory:" for an in-memory database.
Handling Multiple Connections
There may be situations in which you need to use multiple connections to a single database. For example, you might want to log users’ interactions with the database using a specific connection for each user.
In other situations, you might need to connect your application to several databases. For example, you might want to connect to several remote databases in order to collect data to populate or update a local database.
To handle these situations, you can provide specific names for your different connections and reference each connection by its name. If you want to give your database connection a name, then pass that name as the second argument to .addDatabase():
>>> from PyQt5.QtSql import QSqlDatabase

>>> # First connection
>>> con1 = QSqlDatabase.addDatabase("QSQLITE", "con1")
>>> con1.setDatabaseName("contacts.sqlite")

>>> # Second connection
>>> con2 = QSqlDatabase.addDatabase("QSQLITE", "con2")
>>> con2.setDatabaseName("contacts.sqlite")

>>> con1
<PyQt5.QtSql.QSqlDatabase object at 0x7f367f5fbf90>
>>> con2
<PyQt5.QtSql.QSqlDatabase object at 0x7f3686dd7510>

>>> con1.databaseName()
'contacts.sqlite'
>>> con2.databaseName()
'contacts.sqlite'

>>> con1.connectionName()
'con1'
>>> con2.connectionName()
'con2'
Here, you create two different connections to the same database, contacts.sqlite. Each connection has its own connection name. You can use the connection name to get a reference to a specific connection any time later in your code according to your needs. To do this, you can call .database() with a connection name:
>>> from PyQt5.QtSql import QSqlDatabase

>>> db = QSqlDatabase.database("con1", open=False)

>>> db.databaseName()
'contacts.sqlite'
>>> db.connectionName()
'con1'
In this example, you see that .database() takes two arguments:
connectionNameholds the connection name that you need to use. If you don’t pass a connection name, then the default connection will be used.openholds a Boolean value that tells.database()if you want to automatically open the connection or not. IfopenisTrue(the default) and the connection isn’t open, then the connection is opened automatically.
The return value of .database() is a reference to the connection object called connectionName. You can use different connection names to get references to specific connection objects and then use them to manage your database.
Using Different SQL Divers
So far, you’ve learned how to create a database connection using the SQLite driver. This isn’t the only driver available in PyQt. The library provides a rich set of SQL drivers that allow you to use different types of database management systems according to your specific needs:
| Driver Name | Database Management System |
|---|---|
| QDB2 | IBM Db2 (version 7.1 and above) |
| QIBASE | Borland InterBase |
| QMYSQL/MARIADB | MySQL or MariaDB (version 5.0 and above) |
| QOCI | Oracle Call Interface |
| QODBC | Open Database Connectivity (ODBC) |
| QPSQL | PostgreSQL (versions 7.3 and above) |
| QSQLITE2 | SQLite 2 (obsolete since Qt 5.14) |
| QSQLITE | SQLite 3 |
| QTDS | Sybase Adaptive Server (obsolete since Qt 4.7) |
The Driver Name column holds the identifier strings that you need to pass to .addDatabase() as its first argument to use the associated driver. Unlike with the SQLite driver, when you use a different driver, you might need to set several attributes, such as databaseName, hostName , userName, and password, for the connection to work properly.
Database drivers are derived from QSqlDriver. You can create your own database drivers by subclassing QSqlDriver, but that topic goes beyond the scope of this tutorial. If you’re interested in creating your own database drivers, then check out How to Write Your Own Database Driver for more details.
Opening a Database Connection
Once you have a database connection, you need to open that connection to be able to interact with your database. To do that, you call .open() on the connection object. .open() has the following two variations:
.open()opens a database connection using the current connection values..open(username, password)opens a database connection using the providedusernameandpassword.
Both variations return True if the connection is successful. Otherwise, they return False. If the connection can’t be established, then you can call .lastError() to get information about what happened. This function returns information about the last error reported by the database.
Note: As you learned before, .setPassword(password) stores passwords as plain text, which is a security risk. On the other hand, .open() doesn’t store passwords at all. It passes the password directly to the driver when opening the connection. After that, it discards the password. So, using .open() to manage your passwords is the way to go if you want to prevent security issues.
Here’s an example of how to open an SQLite database connection using the first variation of .open():
>>> from PyQt5.QtSql import QSqlDatabase

>>> # Create the connection
>>> con = QSqlDatabase.addDatabase("QSQLITE")
>>> con.setDatabaseName("contacts.sqlite")

>>> # Open the connection
>>> con.open()
True
>>> con.isOpen()
True
In the above example, you first create a connection to your SQLite database and open that connection using .open(). Since .open() returns True, the connection is successful. At this point, you can check the connection using .isOpen(), which returns True if the connection is open and False otherwise.
Note: If you call .open() on a connection that uses the SQLite driver and the database file doesn’t exist, then a new and empty database file will be created automatically.
In real-world applications, you need to make sure that you have a valid connection to your database before you try to do any operations on your data. Otherwise, your application can break down and fail. For example, what if you don’t have write permissions for the directory in which you’re trying to create that database file? You need to make sure that you’re handling any error that can occur while opening a connection.
A common way of calling .open() is to wrap it in a conditional statement. This allows you to handle errors that can occur when opening the connection:
>>> import sys
>>> from PyQt5.QtSql import QSqlDatabase

>>> # Create the connection
>>> con = QSqlDatabase.addDatabase("QSQLITE")
>>> con.setDatabaseName("contacts.sqlite")

>>> # Open the connection and handle errors
>>> if not con.open():
...     print("Unable to connect to the database")
...     sys.exit(1)
Wrapping the call to .open() in a conditional statement allows you to handle any error that happens when you open the connection. This way, you can inform your users about any problems before the application runs. Note that the application exits with an exit status of 1, which is customarily used to indicate a program failure.
In the above example, you use .open() in an interactive session, so you use print() to present error messages to the users. However, in GUI applications, instead of using print(), you normally use a QMessageBox object. With QMessageBox, you can create small dialogs to present information to your users.
Here’s a sample GUI application that illustrates a way of handling connection errors:
 1import sys
 2
 3from PyQt5.QtSql import QSqlDatabase
 4from PyQt5.QtWidgets import QApplication, QMessageBox, QLabel
 5
 6# Create the connection
 7con = QSqlDatabase.addDatabase("QSQLITE")
 8con.setDatabaseName("/home/contacts.sqlite")
 9
10# Create the application
11app = QApplication(sys.argv)
12
13# Try to open the connection and handle possible errors
14if not con.open():
15    QMessageBox.critical(
16        None,
17        "App Name - Error!",
18        "Database Error: %s" % con.lastError().databaseText(),
19    )
20    sys.exit(1)
21
22# Create the application's window
23win = QLabel("Connection Successfully Opened!")
24win.setWindowTitle("App Name")
25win.resize(200, 100)
26win.show()
27sys.exit(app.exec_())
The if statement in line 14 checks if the connection was unsuccessful. If the /home/ directory doesn’t exist or if you don’t have permission to write in it, then the call to .open() fails because the database file can’t be created. In this situation, the flow of execution enters the if statement code block and shows a message on the screen.
If you change the path to any other directory in which you can write, then the call to .open() will succeed and you’ll see a window displaying the message Connection Successfully Opened! You’ll also have a new database file called contacts.sqlite in the selected directory.
Note that you pass None as the message’s parent because, at the time of showing the message, you haven’t created a window yet, so you don’t have a viable parent for the message box.
Running SQL Queries With PyQt
With a fully functional database connection, you’re ready to start working with your database. To do that, you can use string-based SQL queries and QSqlQuery objects. QSqlQuery allows you to run any kind of SQL query in your database. With QSqlQuery, you can execute data manipulation language (DML) statements, such as SELECT, INSERT, UPDATE, and DELETE, as well as data definition language (DDL) statements, such as CREATE TABLE and so on.
The constructor of QSqlQuery has several variations, but in this tutorial, you’re going to learn about two of them:
-
QSqlQuery(query, connection)constructs a query object using a string-based SQLqueryand a databaseconnection. If you don’t specify a connection, or if the specified connection is invalid, then the default database connection is used. Ifqueryisn’t an empty string, then it will be executed right away. -
QSqlQuery(connection)constructs a query object usingconnection. Ifconnectionis invalid, then the default connection is used.
You can also create QSqlQuery objects without passing any arguments to the constructor. In that case, the query will use the default database connection, if any.
To execute a query, you need to call .exec() on the query object. You can use .exec() in two different ways:
-
.exec(query)executes the string-based SQL query contained inquery. It returnsTrueif the query was successful and otherwise returnsFalse. -
.exec()executes a previously prepared SQL query. It returnsTrueif the query was successful and otherwise returnsFalse.
Note: PyQt also implements variations of QSqlQuery.exec() with the name .exec_(). These provide backward compatibility with older versions of Python in which exec was a keyword of the language.
Now that you know the basics of using QSqlQuery to create and execute SQL queries, you’re ready to learn how to put your knowledge into practice.
Executing Static SQL Queries
To start creating and executing queries with PyQt, you’re going to fire up your favorite code editor or IDE and create a Python script called queries.py. Save the script and add the following code to it:
 1import sys
 2
 3from PyQt5.QtSql import QSqlDatabase, QSqlQuery
 4
 5# Create the connection
 6con = QSqlDatabase.addDatabase("QSQLITE")
 7con.setDatabaseName("contacts.sqlite")
 8
 9# Open the connection
10if not con.open():
11    print("Database Error: %s" % con.lastError().databaseText())
12    sys.exit(1)
13
14# Create a query and execute it right away using .exec()
15createTableQuery = QSqlQuery()
16createTableQuery.exec(
17    """
18    CREATE TABLE contacts (
19        id INTEGER PRIMARY KEY AUTOINCREMENT UNIQUE NOT NULL,
20        name VARCHAR(40) NOT NULL,
21        job VARCHAR(50),
22        email VARCHAR(40) NOT NULL
23    )
24    """
25)
26
27print(con.tables())
In this script, you start by importing the modules and classes that you’re going to work with. Then you create a database connection using .addDatabase() with the SQLite driver. You set the database name to "contacts.sqlite" and open the connection.
To create your first query, you instantiate QSqlQuery without any arguments. With the query object in place, you call .exec(), passing a string-based SQL query as an argument. This kind of query is known as a static query because it doesn’t get any parameters from outside the query.
The above SQL query creates a new table called contacts in your database. That table will have the following four columns:
| Column | Content |
|---|---|
id |
An integer with the table’s primary key |
name |
A string with the name of a contact |
job |
A string with the job title of a contact |
email |
A string with the email of a contact |
The last line in the above script prints the list of tables contained in your database. If you run the script, then you’ll note that a new database file called contacts.sqlite is created in your current directory. You’ll also get something like ['contacts', 'sqlite_sequence'] printed on your screen. This list contains the names of the tables in your database.
Note: A string-based SQL query must use an appropriate syntax according to the specific SQL database that you’re querying. If the syntax is wrong, then .exec() ignores the query and returns False.
In the case of SQLite, the query can contain only one statement at a time.
Calling .exec() on a QSqlQuery object is a common way of immediately executing string-based SQL queries on your databases, but what if you want to prepare your queries beforehand for later execution? That’s the topic of the next section.
Executing Dynamic Queries: String Formatting
So far, you’ve learned how to execute static queries on a database. Static queries are those that don’t accept parameters, so the query runs as it is. Even though these queries are fairly useful, sometimes you need to create queries that retrieve data in response to certain input parameters.
Queries that accept parameters at execution time are known as dynamic queries. Using parameters allows you to fine-tune the query and retrieve data in response to specific parameter values. Different values will produce different results. You can take input parameters in a query by using one of the following two approaches:
- Build the query dynamically, using string formatting to interpolate parameter values.
- Prepare the query using placeholder parameters and then bind specific values to parameters.
The first approach allows you to create dynamic queries quickly. However, to safely use this approach, you need to be sure that your parameter values come from a trusted source. Otherwise, you might face SQL injection attacks.
Here’s an example of how to use string formatting to create dynamic queries in PyQt:
>>> from PyQt5.QtSql import QSqlQuery, QSqlDatabase

>>> con = QSqlDatabase.addDatabase("QSQLITE")
>>> con.setDatabaseName("contacts.sqlite")
>>> con.open()
True

>>> name = "Linda"
>>> job = "Technical Lead"
>>> email = "linda@example.com"

>>> query = QSqlQuery()
>>> query.exec(
...     f"""INSERT INTO contacts (name, job, email)
...     VALUES ('{name}', '{job}', '{email}')"""
... )
True
In this example, you use an f-string to create a dynamic query by interpolating specific values into a string-based SQL query. The final query inserts data into your contacts table, which now contains data about Linda.
Note: Later on in this tutorial, you’ll see how to retrieve and navigate the data stored in a database.
Note that for this kind of dynamic query to work, you need to make sure that the values to be inserted have the right data type. So, you use single quotes around the placeholder in the f-string because those values need to be strings.
Executing Dynamic Queries: Placeholder Parameters
The second approach for executing dynamic queries requires you to prepare your queries beforehand using a template with placeholders for parameters. PyQt supports two parameter placeholder styles:
- Oracle style uses named placeholders such as
:nameor:email. - ODBC style uses a question mark (
?) as a positional placeholder.
Note that these styles can’t be mixed in the same query. You can check out Approaches to Binding Values for extra examples on how to use placeholders.
Note: ODBC stands for Open Database Connectivity.
To create this kind of dynamic query in PyQt, you first create a template with a placeholder for each query parameter and then pass that template as an argument to .prepare(), which parses, compiles, and prepares the query template for execution. If the template has any problems, such as an SQL syntax error, then .prepare() fails to compile the template and returns False.
If the preparation process succeeds, then prepare() returns True. After that, you can pass a specific value to each parameter using .bindValue() with named or positional parameters or using .addBindValue() with positional parameters. .bindValue() has the following two variations:
.bindValue(placeholder, val).bindValue(pos, val)
In the first variation, placeholder represents an Oracle-style placeholder. In the second variation, pos represents a zero-based integer number with the position of a parameter in the query. In both variations, val holds the value to be bound to a specific parameter.
.addBindValue() adds a value to the list of placeholders using positional binding. This means that the order of the calls to .addBindValue() determines which value will be bound to each placeholder parameter in the prepared query.
To start using prepared queries, you can prepare an INSERT INTO SQL statement to populate your database with some sample data. Go back to the script that you created in the section Executing Static SQL Queries and add the following code right after the call to print():
28# Creating a query for later execution using .prepare()
29insertDataQuery = QSqlQuery()
30insertDataQuery.prepare(
31    """
32    INSERT INTO contacts (
33        name,
34        job,
35        email
36    )
37    VALUES (?, ?, ?)
38    """
39)
40
41# Sample data
42data = [
43    ("Joe", "Senior Web Developer", "joe@example.com"),
44    ("Lara", "Project Manager", "lara@example.com"),
45    ("David", "Data Analyst", "david@example.com"),
46    ("Jane", "Senior Python Developer", "jane@example.com"),
47]
48
49# Use .addBindValue() to insert data
50for name, job, email in data:
51    insertDataQuery.addBindValue(name)
52    insertDataQuery.addBindValue(job)
53    insertDataQuery.addBindValue(email)
54    insertDataQuery.exec()
The first step is to create a QSqlQuery object. Then you call .prepare() on the query object. In this case, you use the ODBC style for the placeholders. Your query will take values for your contact’s name, job, and email, so you need three placeholders. Since the id column is an autoincremented integer number, you don’t need to supply values for it.
Then you create some sample data to populate the database. data holds a list of tuples, and each tuple contains three items: the name, job, and email of each contact.
The final step is to bind the values that you want to pass to each placeholder and then call .exec() to execute the query. To do that, you use a for loop. The loop header unpacks each tuple in data into three separate variables with convenient names. Then you call .addBindValue() on the query object to bind the values to the placeholders.
Note that you’re using positional placeholders, so the order in which you call .addBindValue() will define the order in which each value is passed to the corresponding placeholder.
This approach for creating dynamic queries is handy when you want to customize your queries using values that come from your user’s input. Anytime you take the user’s input to complete a query on a database, you face the security risk of SQL injection.
In PyQt, combining .prepare(), .bindValue(), and .addBindValue() fully protects you against SQL injection attacks, so this is the way to go when you’re taking untrusted input to complete your queries.
Navigating the Records in a Query
If you execute a SELECT statement, then your QSqlQuery object will retrieve zero or more records from one or more tables in your database. The query will hold records containing data that matches the query’s criteria. If no data matches the criteria, then your query will be empty.
QSqlQuery provides a set of navigation methods that you can use to move throughout the records in a query result:
| Method | Retrieves |
|---|---|
.next() |
The next record |
.previous() |
The previous record |
.first() |
The first record |
.last() |
The last record |
.seek(index, relative=False) |
The record at position index |
All these methods position the query object on the retrieved record if that record is available. Most of these methods have specific rules that apply when using them. With these methods, you can move forward, backward, or arbitrarily through the records in a query result. Since they all return either True or False, you can use them in a while loop to navigate all the records in one go.
These methods work with active queries. A query is active when you’ve successfully run .exec() on it, but the query isn’t finished yet. Once an active query is on a valid record, you can retrieve data from that record using .value(index). This method takes a zero-based integer number, index, and returns the value at that index (column) in the current record.
Note: If you execute a SELECT * type of query, then the columns in the result won’t follow a known order. This might cause problems when you use .value() to retrieve the value at a given column because there’s no way of knowing if you’re using the right column index.
You’ll look at a few examples of how to use some of the navigation methods to move throughout a query below. But first, you need to create a connection to your database:
>>> from PyQt5.QtSql import QSqlDatabase, QSqlQuery

>>> con = QSqlDatabase.addDatabase("QSQLITE")
>>> con.setDatabaseName("contacts.sqlite")
>>> con.open()
True
Here, you create and open a new connection to contacts.sqlite. If you’ve been following along with this tutorial so far, then this database already contains some sample data. Now you can create a QSqlQuery object and execute it on that data:
>>> # Create and execute a query
>>> query = QSqlQuery()
>>> query.exec("SELECT name, job, email FROM contacts")
True
This query retrieves data about the name, job, and email of all the contacts stored in the contacts table. Since .exec() returned True, the query was successful and is now an active query. You can navigate the records in this query using any of the navigation methods you saw before. You can also retrieve the data at any column in a record using .value():
>>> # First record
>>> query.first()
True

>>> # Named indices for readability
>>> name, job, email = range(3)

>>> # Retrieve data from the first record
>>> query.value(name)
'Linda'

>>> # Next record
>>> query.next()
True
>>> query.value(job)
'Senior Web Developer'

>>> # Last record
>>> query.last()
True
>>> query.value(email)
'jane@example.com'
With the navigation methods, you can move around the query result. With .value(), you can retrieve the data at any column in a given record.
You can also iterate through all the records in your query using a while loop along with .next():
>>> query.exec()
True

>>> while query.next():
...     print(query.value(name), query.value(job), query.value(email))
...
Linda Technical Lead linda@example.com
Joe Senior Web Developer joe@example.com
...
With .next(), you navigate all the records in a query result. .next() works similar to the iterator protocol in Python. Once you’ve iterated over the records in a query result, .next() starts returning False until you run .exec() again. A call to .exec() retrieves data from a database and places the query object’s internal pointer one position before the first record, so when you call .next(), you get the first record again.
You can also loop in reverse order using .previous():
>>> while query.previous():
...     print(query.value(name), query.value(job), query.value(email))
...
Jane Senior Python Developer jane@example.com
David Data Analyst david@example.com
...
.previous() works similar to .next(), but the iteration is done in reverse order. In other words, the loop goes from the query pointer’s position back to the first record.
Sometimes you might want to get the index that identifies a given column in a table by using the name of that column. To do that, you can call .indexOf() on the return value of .record():
>>> query.first()
True

>>> # Get the index of name
>>> name = query.record().indexOf("name")

>>> query.value(name)
'Linda'

>>> # Finish the query object if unneeded
>>> query.finish()
>>> query.isActive()
False
The call to .indexOf() on the result of .record() returns the index of the "name" column. If "name" doesn’t exist, then .indexOf() returns -1. This is handy when you use a SELECT * statement in which the order of columns is unknown. Finally, if you’re done with a query object, then you can turn it inactive by calling .finish(). This will free the system memory associated with the query object at hand.
Closing and Removing Database Connections
In practice, some of your PyQt applications will depend on a database, and others won’t. An application that depends on a database often creates and opens a database connection just before creating any window or graphical component and keeps the connection open until the application is closed.
On the other hand, applications that don’t depend on a database but use a database to provide some of their functionalities typically connect to that database only when needed, if at all. In these cases, you can close the connection after use and free the resources associated with that connection, such as system memory.
To close a connection in PyQt, you call .close() on the connection. This method closes the connection and frees any acquired resources. It also invalidates any associated QSqlQuery objects because they can’t work properly without an active connection.
Here’s an example of how to close an active database connection using .close():
>>> from PyQt5.QtSql import QSqlDatabase

>>> con = QSqlDatabase.addDatabase("QSQLITE")
>>> con.setDatabaseName("contacts.sqlite")

>>> con.open()
True
>>> con.isOpen()
True

>>> con.close()
>>> con.isOpen()
False
You can call .close() on a connection to close it and free all its associated resources. To make sure that a connection is closed, you call .isOpen().
Note that QSqlQuery objects remain in memory after closing their associated connection, so you must make your queries inactive by calling .finish() or .clear(), or by deleting the QSqlQuery object before closing the connection. Otherwise, residual memory is left out in your query object.
You can reopen and reuse any previously closed connection. That’s because .close() doesn’t remove connections from the list of available connections, so they remain usable.
You can also completely remove your database connections using .removeDatabase(). To do this safely, first finish your queries using .finish(), then close the database using .close(), and finally remove the connection. You can use .removeDatabase(connectionName) to remove the database connection called connectionName from the list of available connections. Removed connections are no longer available for use in the application at hand.
To remove the default database connection, you can call .connectionName() on the object returned by .database() and pass the result to .removeDatabase():
>>> # The connection is closed but still in the list of connections
>>> QSqlDatabase.connectionNames()
['qt_sql_default_connection']

>>> # Remove the default connection
>>> QSqlDatabase.removeDatabase(QSqlDatabase.database().connectionName())

>>> # The connection is no longer in the list of connections
>>> QSqlDatabase.connectionNames()
[]

>>> # Try to open a removed connection
>>> con.open()
False
Here, the call to .connectionNames() returns the list of available connections. In this case, you have only one connection, the default. Then you remove the connection using .removeDatabase().
Note: Before closing and removing a database connection, you need to make sure that everything that uses the connection is deleted or set to use a different data source. Otherwise, you can have a resource leak.
Since you need a connection name to use .removeDatabase(), you call .connectionName() on the result of .database() to get the name of the default connection. Finally, you call .connectionNames() again to make sure that the connection is no longer in the list of available connections. Trying to open a removed connection will return False because the connection no longer exists.
Displaying and Editing Data With PyQt
A common requirement in GUI applications that use databases is the ability to load, display, and edit data from the database using different widgets. Table, list, and tree widgets are commonly used in GUIs to manage data.
PyQt provides two different kind of widgets for managing data:
- Standard widgets include internal containers for storing data.
- View widgets don’t maintain internal data containers but use models to access data.
For small GUI applications that manage small databases, you can use the first approach. The second approach is handy when you’re building complex GUI applications that manage large databases.
The second approach takes advantage of PyQt’s Model-View programming. With this approach, you have widgets that represent views such as tables, lists, and trees on one hand and model classes that communicate with your data on the other hand.
Understanding PyQt’s Model-View Architecture
The Model-View-Controller (MVC) design pattern is a general software pattern intended to divide an application’s code into three general layers, each with a different role.
The model takes care of the business logic of the application, the view provides on-screen representations, and the controller connects the model and the view to make the application work.
Qt provides a custom variation of MVC. They call it the Model-View architecture, and it’s available for PyQt as well. The pattern also separates the logic into three components:
-
Models communicate with and access the data. They also define an interface that’s used by views and delegates to access the data. All models are based on
QAbstractItemModel. Some commonly used models includeQStandardItemModel,QFileSystemModel, and SQL-related models. -
Views are responsible for displaying the data to the user. They also have similar functionality to the controller in the MVC pattern. All views are based on
QAbstractItemView. Some commonly used views areQListView,QTableView, andQTreeView. -
Delegates paint view items and provide editor widgets for modifying items. They also communicate back with the model if an item has been modified. The base class is
QAbstractItemDelegate.
Separating classes into these three components implies that changes on models will be reflected on associated views or widgets automatically, and changes on views or widgets through delegates will update the underlying model automatically.
In addition, you can display the same data in different views without the need for multiple models.
Using Standard Widget Classes
PyQt provides a bunch of standard widgets for displaying and editing data in your GUI applications. These standard widgets provide views such as tables, trees, and lists. They also provide an internal container for storing data and convenient delegates for editing the data. All these features are grouped into a single class.
Here are three of these standard classes:
| Standard Class | Displays |
|---|---|
QListWidget |
A list of items |
QTreeWidget |
A hierarchical tree of items |
QTableWidget |
A table of items |
QTableWidget is arguably the most popular widget when it comes to displaying and editing data. It creates a 2D array of QTableWidgetItem objects. Each item holds an individual value as a string. All these values are displayed and organized in a table of rows and columns.
You can perform at least the following operations on a QTableWidget object:
- Editing the content of its items using delegate objects
- Adding new items using
.setItem() - Setting the number of rows and columns using
.setRowCount()and.setColumnCount() - Adding vertical and horizontal header labels using
setHorizontalHeaderLabels()and.setVerticalHeaderLabels
Here’s a sample application that shows how to use a QTableWidget object to display data in a GUI. The application uses the database you created and populated in previous sections, so if you want to run it, then you need to save the code into the same directory in which you have the contacts.sqlite database:
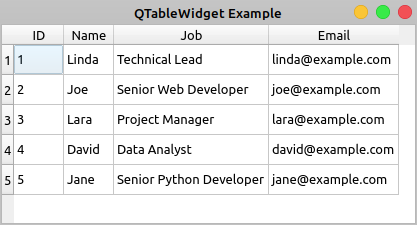
If you double-click any cell of the table, then you’ll be able to edit the content of the cell. However, your changes won’t be saved to your database.
Here’s the code for your application:
 1import sys
 2
 3from PyQt5.QtSql import QSqlDatabase, QSqlQuery
 4from PyQt5.QtWidgets import (
 5    QApplication,
 6    QMainWindow,
 7    QMessageBox,
 8    QTableWidget,
 9    QTableWidgetItem,
10)
11
12class Contacts(QMainWindow):
13    def __init__(self, parent=None):
14        super().__init__(parent)
15        self.setWindowTitle("QTableView Example")
16        self.resize(450, 250)
17        # Set up the view and load the data
18        self.view = QTableWidget()
19        self.view.setColumnCount(4)
20        self.view.setHorizontalHeaderLabels(["ID", "Name", "Job", "Email"])
21        query = QSqlQuery("SELECT id, name, job, email FROM contacts")
22        while query.next():
23            rows = self.view.rowCount()
24            self.view.setRowCount(rows + 1)
25            self.view.setItem(rows, 0, QTableWidgetItem(str(query.value(0))))
26            self.view.setItem(rows, 1, QTableWidgetItem(query.value(1)))
27            self.view.setItem(rows, 2, QTableWidgetItem(query.value(2)))
28            self.view.setItem(rows, 3, QTableWidgetItem(query.value(3)))
29        self.view.resizeColumnsToContents()
30        self.setCentralWidget(self.view)
31
32def createConnection():
33    con = QSqlDatabase.addDatabase("QSQLITE")
34    con.setDatabaseName("contacts.sqlite")
35    if not con.open():
36        QMessageBox.critical(
37            None,
38            "QTableView Example - Error!",
39            "Database Error: %s" % con.lastError().databaseText(),
40        )
41        return False
42    return True
43
44app = QApplication(sys.argv)
45if not createConnection():
46    sys.exit(1)
47win = Contacts()
48win.show()
49sys.exit(app.exec_())
Here’s what’s happening in this example:
- Lines 18 to 20 create a
QTableWidgetobject, set the number of columns to4, and set user-friendly labels for each column’s header. - Line 21 creates and executes a
SELECTSQL query on your database to get all the data in thecontactstable. - Line 22 starts a
whileloop to navigate the records in the query result using.next(). - Line 24 increments the number of rows in the table by
1using.setRowCount(). - Lines 25 to 28 add items of data to your table using
.setItem(). Note that since the values in theidcolumns are integer numbers, you need to convert them into strings to be able to store them in aQTableWidgetItemobject.
.setItem() takes three arguments:
rowholds a zero-based integer that represents the index of a given row in the table.columnholds a zero-based integer that represents the index of a given column in the table.itemholds theQTableWidgetItemobject that you need to place at a given cell in the table.
Finally, you call .resizeColumnsToContents() on your view to adjust the size of the columns to their content and provide a better rendering of the data.
Displaying and editing database tables using standard widgets can become a challenging task. That’s because you’ll have two copies of the same data. In other words you’ll have a copy of the data in two locations:
- Outside the widget, in your database
- Inside the widget, in the widget’s internal containers
You’re responsible for synchronizing both copies of your data manually, which can be an annoying and error-prone operation. Luckily, you can use PyQt’s Model-View architecture to avoid most of these problems, as you’ll see in the following section.
Using View and Model Classes
PyQt’s Model-View classes eliminate the problems of data duplication and synchronization that may occur when you use standard widget classes to build database applications. The Model-View architecture allows you to use several views to display the same data because you can pass one model to many views.
Model classes provide an application programming interface (API) that you can use to manipulate data. View classes provide convenient delegate objects that you can use to edit data in the view directly. To connect a view with a given module, you need to call .setModel() on the view object.
PyQt offers a set of view classes that support the Model-View architecture:
| View Class | Displays |
|---|---|
QListView |
A list of items that take values directly from a model class |
QTreeView |
A hierarchical tree of items that take values directly from a model class |
QTableView |
A table of items that take values directly from a model class |
You can use these view classes along with model classes to create your database applications. This will make your applications more robust, faster to code, and less error-prone.
Here are some of the model classes that PyQt provides for working with SQL databases:
| Model Class | Description |
|---|---|
QSqlQueryModel |
A read-only data model for SQL queries |
QSqlTableModel |
An editable data model for reading and writing records in a single table |
QSqlRelationalTableModel |
An editable data model for reading and writing records in a relational table |
Once you’ve connected one of these models to a physical database table or query, you can use them to populate your views. Views provide delegate objects that allow you to modify the data directly in the view. The model connected to the view will update the data in your database to reflect any change in the view. Note that you don’t have to update the data in the database manually. The model will do that for you.
Here’s an example that shows the basics of how to use a QTableView object and a QSqlTableModel object together to build a database application using PyQt’s Model-View architecture:
To edit the data in a cell of the table, you can double-click the cell. A convenient delegate widget will show in the cell, allowing you to edit its content. Then you can hit Enter to save the changes.
The ability to automatically handle and save changes in the data is one of the more important advantages of using PyQt’s Model-View classes. The Model-View architecture will improve your productivity and reduce the errors that can appear when you have to write data manipulation code by yourself.
Here’s the code to create the application:
 1import sys
 2
 3from PyQt5.QtCore import Qt
 4from PyQt5.QtSql import QSqlDatabase, QSqlTableModel
 5from PyQt5.QtWidgets import (
 6    QApplication,
 7    QMainWindow,
 8    QMessageBox,
 9    QTableView,
10)
11
12class Contacts(QMainWindow):
13    def __init__(self, parent=None):
14        super().__init__(parent)
15        self.setWindowTitle("QTableView Example")
16        self.resize(415, 200)
17        # Set up the model
18        self.model = QSqlTableModel(self)
19        self.model.setTable("contacts")
20        self.model.setEditStrategy(QSqlTableModel.OnFieldChange)
21        self.model.setHeaderData(0, Qt.Horizontal, "ID")
22        self.model.setHeaderData(1, Qt.Horizontal, "Name")
23        self.model.setHeaderData(2, Qt.Horizontal, "Job")
24        self.model.setHeaderData(3, Qt.Horizontal, "Email")
25        self.model.select()
26        # Set up the view
27        self.view = QTableView()
28        self.view.setModel(self.model)
29        self.view.resizeColumnsToContents()
30        self.setCentralWidget(self.view)
31
32def createConnection():
33    con = QSqlDatabase.addDatabase("QSQLITE")
34    con.setDatabaseName("contacts.sqlite")
35    if not con.open():
36        QMessageBox.critical(
37            None,
38            "QTableView Example - Error!",
39            "Database Error: %s" % con.lastError().databaseText(),
40        )
41        return False
42    return True
43
44app = QApplication(sys.argv)
45if not createConnection():
46    sys.exit(1)
47win = Contacts()
48win.show()
49sys.exit(app.exec_())
Here’s what’s happening in this code:
- Line 18 creates an editable
QSqlTableModelobject. - Line 19 connects your model with the
contactstable in your database using.setTable(). - Line 20 sets the edit strategy of the model to
OnFieldChange. This strategy allows the model to automatically update the data in your database if the user modifies any of the data directly in the view. - Lines 21 to 24 set some user-friendly labels to the horizontal headers of the model using
.setHeaderData(). - Line 25 loads the data from your database and populates the model by calling
.select(). - Line 27 creates the table view object to display the data contained in the model.
- Line 28 connects the view with the model by calling
.setModel()on the view with your data model as an argument. - Line 29 calls
.resizeColumnsToContents()on the view object to adjust the table to its content.
That’s it! You now have a fully-functional database application.
Using SQL Databases in PyQt: Best Practices
When it comes to using PyQt’s SQL support effectively, there are some best practices that you might want to use in your applications:
-
Favor PyQt’s SQL support over Python standard library or third-party libraries to take advantage of the natural integration of these classes with the rest of PyQt’s classes and infrastructure, mostly with the Model-View architecture.
-
Use previously prepared dynamic queries with placeholders for parameters and bind values to those parameters using
.addBindValue()and.bindValue(). This will help prevent SQL injection attacks. -
Handle errors that can occur when opening a database connection to avoid unexpected behaviors and application crashes.
-
Close and remove unneeded database connections and queries to free any acquired system resources.
-
Minimize the use of
SELECT *queries to avoid problems when retrieving data with.value(). -
Pass your passwords to
.open()instead of to.setPassword()to avoid the risk of compromising your security. -
Take advantage of PyQt’s Model-View architecture and its integration with PyQt’s SQL support to make your applications more robust.
This list isn’t complete, but it’ll help you make better use of PyQt’s SQL support when developing your database applications.
Conclusion
Using PyQt’s built-in support to work with SQL databases is an important skill for any Python developer who’s creating PyQt GUI applications and needs to connect them to a database. PyQt provides a consistent set of classes for managing SQL databases.
These classes fully integrate with PyQt’s Model-View architecture, allowing you to develop GUI applications that can manage databases in a user-friendly way.
In this tutorial, you’ve learned how to:
- Use PyQt’s SQL support to connect to a database
- Execute SQL queries on a database with PyQt
- Build database applications using PyQt’s Model-View architecture
- Display and edit data from a database using PyQt widgets
With this knowledge, you can improve your productivity when creating nontrivial database applications and make your GUI applications more robust.


