Python has a vast ecosystem of packages, modules, and libraries that you can use to create your application. Some of these packages and modules are included with your Python installation and are collectively known as the standard library.
The standard library consists of modules that provide standardized solutions to common programming problems. They’re great building blocks for applications across many disciplines. However, many developers prefer to use alternative packages, or extensions, that may improve on the usability and usefulness of what’s in the standard library.
In this tutorial, you’ll meet some of the authors at Real Python and learn about packages they like to use in place of more common packages in the standard library.
The packages you’ll learn about in this tutorial are:
pudb: An advanced, text-based visual debuggerrequests: A beautiful API for making HTTP requestsparse: An intuitive, readable text matcherdateutil: An extension for the populardatetimelibrarytyper: An intuitive command-line interface parser
You’ll begin by looking at a visual and powerful alternative to pdb.
Free Download: Get a sample chapter from Python Tricks: The Book that shows you Python’s best practices with simple examples you can apply instantly to write more beautiful + Pythonic code.
pudb for Visual Debugging

Christopher Trudeau is an author and course creator at Real Python. At work he’s a consultant who helps organizations improve their technical teams. At home, he spends his time with board games and photography.
I spend a lot of time working SSHed into remote machines, so I can’t take advantage of most IDEs. My debugger of choice is pudb, which has a text-based user interface. I find its interface intuitive and easy to use.
Python ships with pdb, which was inspired by gdb, which itself was inspired by dbx. While pdb does the job, the strongest thing it has going for it is that it ships with Python. Because it’s based on the command line, you have to remember a lot of shortcut keys and can only see small amounts of the source code at a time.
An alternative Python package for debugging is pudb. It displays a full screen of source code along with useful debugging information. It has the added benefit of making me feel nostalgic for the old days when I coded in Turbo Pascal:
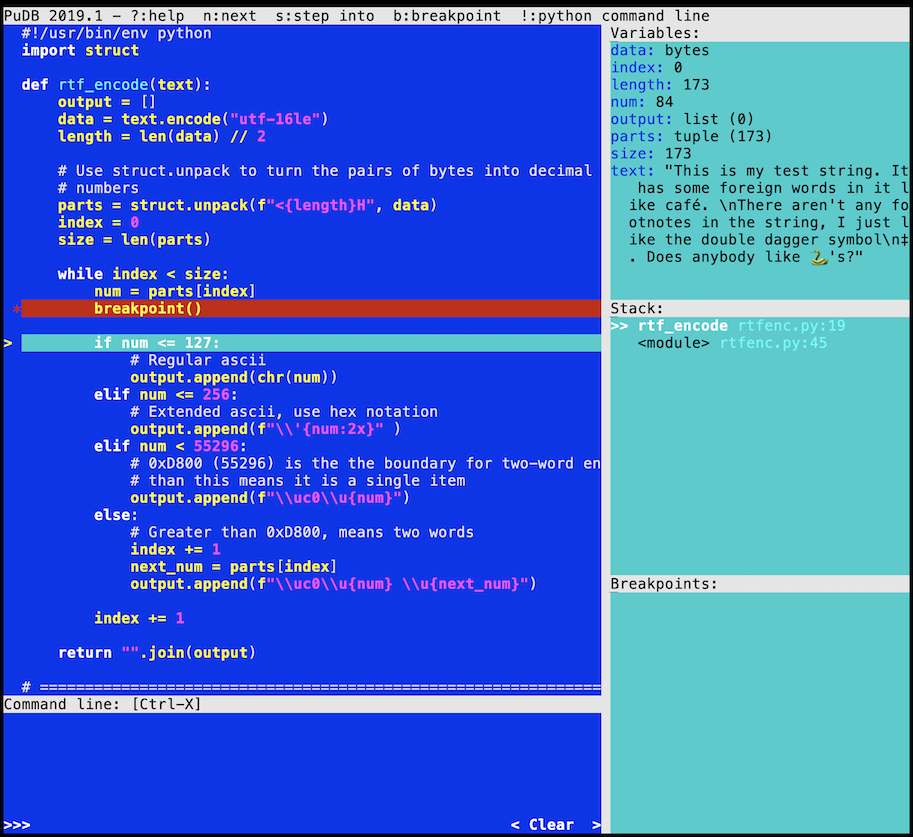
The interface is divided into two main parts. The left panel is for source code, and the right panel is for context information. The right-hand side is subdivided into three sections:
- Variables
- Stack
- Breakpoints
Everything you need in a debugger is available on one screen.
Interacting With pudb
You can install pudb through pip:
$ python -m pip install pudb
If you’re using Python 3.7 or above, then you can take advantage of breakpoint() by setting the PYTHONBREAKPOINT environment variable to pudb.set_trace. If you’re using a Unix-based operating system such as Linux or macOS, then you set the variable as follows:
$ export PYTHONBREAKPOINT=pudb.set_trace
If you’re based in Windows, the command is different:
C:\> set PYTHONBREAKPOINT=pudb.set_trace
Alternatively, you can insert import pudb; pudb.set_trace() directly into your code.
When your running code hits a breakpoint, pudb interrupts execution and shows its interface:
You can navigate and execute the source code with the keyboard:
| Key | Action |
|---|---|
| Up or K | Move code one line up |
| Down or J | Move code one line down |
| Page Up or Ctrl+B | Scroll code page up |
| Page Down or Ctrl+F | Scroll code page down |
| N | Execute the current line |
| S | Step into the current line if it’s a function |
| C | Continue execution to the next breakpoint |
If you restart your code, then pudb remembers breakpoints from the previous session. Right and Left allow you to move between the source code and control area on the right-hand side.
Inside the Variables box, you see all the variables currently in scope:
By default, the view of a variable is shortened, but you can see the full contents by pressing \. Expanding the view will show you the items in a tuple or list, or it will show the complete contents of a binary variable. T and R switch back and forth between repr and type display modes.
Using Watch Expressions and Accessing the REPL
While the Variables area on the right-hand side is focused, you can also add a watch expression. A watch can be any Python expression. It’s useful for examining data buried deep within an object while the object is still in its shortened form or for evaluating complex relationships between variables.
Note: You add a watch expression by pressing N. Since N is also used to execute the current line of code, you have to make sure the right area of the screen is in focus before pressing the key.
Pressing ! escapes you out to a REPL within the context of your currently running program. This mode also shows you any output that was sent to the screen before the debugger triggered. By navigating the interface or using shortcut keys, you can also modify breakpoints, change where you are in the stack frame, and load other source code files.
Why pudb Is Awesome
The pudb interface requires less memorization of shortcut keys than pdb and is designed to display as much code as possible. It has most of the features of debuggers found in IDEs but can be used in a terminal. As the installation of this Python package is only a short call to pip away, you can quickly bring it into any environment. The next time you’re stuck on the command line, check it out!
requests for Interacting With the Web

Martin Breuss is an author and course creator at Real Python. He works as a programming educator at CodingNomads, where he teaches bootcamps and online courses. Outside of work, he likes seatrekking, walking, and recording random sounds.
My number one pick for a Python package from outside the standard library is the popular requests package. It holds a special status on my computer since it’s the only external package that I installed system-wide. All other packages live in their dedicated virtual environments.
I’m not alone in favoring requests as the primary tool for Python web interactions: according to the requests documentation, the package has around 1.6 million downloads per day!
This number is so high because programmatic interactions with the Internet offer many possibilities, whether that’s posting your writing through a web API or fetching data via web scraping. But Python’s standard library already includes the urllib package to help to accomplish these tasks. So why use an external package? What makes requests such a popular choice?
requests Is Readable
The requests library presents a well-developed API that closely follows Python’s aim to be as readable as plain English. The requests developers summarized that idea in their slogan, “HTTP for Humans.”
You can use pip to install requests on your computer:
$ python -m pip install requests
Let’s explore how requests holds up in terms of readability by using it to access the text on a website. When tackling this task with your trusty browser, you’d follow these steps:
- Open the browser.
- Enter the URL.
- Look at the text of the website.
How could you achieve the same outcome with code? First, you lay out the necessary steps in pseudocode:
- Import the tooling you need.
- Get the website’s data.
- Print the text of the website.
After clarifying the logic, you translate the pseudocode to Python using the requests library:
>>> import requests
>>> response = requests.get("http://www.example.com")
>>> response.text
The code reads almost like English and is concise and clear. While this basic example isn’t much more difficult to build with the standard library’s urllib package, requests maintains its straightforward, human-centric syntax even in more complex scenarios.
In the next example, you’ll see that there’s a lot you can achieve with just a few lines of Python code.
requests Is Powerful
Let’s step up the game and challenge requests with a more complex task:
- Log in to your GitHub account.
- Persist that login information to handle multiple requests.
- Create a new repository.
- Create a new file with some content.
- Run the second request only if the first one succeeds.
Challenge accepted and accomplished! The code snippet below does all the above tasks. All you need to do is replace the two strings "YOUR_GITHUB_USERNAME" and "YOUR_GITHUB_TOKEN" with your GitHub username and personal access token, respectively.
Note: To create a personal access token, click on Generate new token and select the repo scope. Copy the generated token and use it alongside your username to authenticate.
Read over the code snippet below, copy and save it to your own Python script, fill in your credentials, and run it to see requests in action:
import requests

session = requests.Session()
session.auth = ("YOUR_GITHUB_USERNAME", "YOUR_GITHUB_TOKEN")
payload = {
    "name": "test-requests",
    "description": "Created with the requests library"
}
api_url ="https://api.github.com/user/repos"
response_1 = session.post(api_url, json=payload)
if response_1:
    data = {
            "message": "Add README via API",
            # The 'content' needs to be a base64 encoded string
            # Python's standard library can help with that
            # You can uncover the secret of this garbled string
            # by uploading it to GitHub with this script :)
            "content": "UmVxdWVzdHMgaXMgYXdlc29tZSE="
    }
    repo_url = response_1.json()["url"]
    readme_url = f"{repo_url}/contents/README.md"
    response_2 = session.put(readme_url, json=data)
else:
    print(response_1.status_code, response_1.json())

html_url = response_2.json()["content"]["html_url"]
print(f"See your repo live at: {html_url}")
session.close()
After you run the code, go ahead and navigate to the link that it prints out at the end. You’ll see that a new repository was created on your GitHub account. The new repository contains a README.md file with some text in it, all generated with this script.
Note: You might have noticed that the code authenticates only once but is still able to send multiple requests. This is possible because the requests.Session object allows you to persist information over multiple requests.
As you can see, the short code snippet above accomplishes a lot and still remains understandable.
Why requests Is Awesome
Python’s request library is one of Python’s most widely used external libraries because it’s a readable, accessible, and powerful tool for interacting with the Web.
To learn more about the many possibilities of working with requests, check out Making HTTP Requests With Python.
parse for Matching Strings

Geir Arne Hjelle is an author and reviewer at Real Python. He works as a data science consultant in Oslo, Norway, and is particularly happy when his analysis involves maps and images. Away from the keyboard, Geir Arne enjoys board games, hammocks, and walking aimlessly into the forest.
I love the power of regular expressions. With a regular expression, or regex, you can search for virtually any pattern in a given string. However, with great power comes great complexity! Constructing a regex can take a lot of trial and error, and understanding the subtleties of a given regex is possibly even harder.
parse is a library that packs much of the power of regular expressions but uses a syntax that is clearer and perhaps more familiar. In short, parse is f-strings in reverse. You can use essentially the same expressions to search and parse strings as you use to format them. Let’s have a look at how that works in practice!
Find Strings That Match a Given Pattern
You need some text that you want to parse. In these examples, we’ll use PEP 498, the original f-strings specification. pepdocs is a small utility that can download the text of Python Enhancement Proposal (PEP) documents.
Install parse and pepdocs from PyPI:
$ python -m pip install parse pepdocs
To get started, download PEP 498:
>>> import pepdocs
>>> pep498 = pepdocs.get(498)
Using parse you can, for example, find the author of PEP 498:
>>> import parse
>>> parse.search("Author: {}\n", pep498)
<Result ('Eric V. Smith <eric@trueblade.com>',) {}>
parse.search() searches for a pattern, in this case "Author: {}\n", anywhere in the given string. You can also use parse.parse(), which matches the pattern to the complete string. Similarly to f-strings, you use curly braces ({}) to indicate variables that you want to parse.
While you can use empty curly braces, most of the time you want to add names to your search patterns. You can split out the name and email address of PEP 498 author Eric V. Smith like this:
>>> parse.search("Author: {name} <{email}>", pep498)
<Result () {'name': 'Eric V. Smith', 'email': 'eric@trueblade.com'}>
This returns a Result object with information about the match. You can access all results of your search with .fixed, .named, and .spans. You can also use [] to get a single value:
>>> result = parse.search("Author: {name} <{email}>", pep498)
>>> result.named
{'name': 'Eric V. Smith', 'email': 'eric@trueblade.com'}

>>> result["name"]
'Eric V. Smith'

>>> result.spans
{'name': (95, 108), 'email': (110, 128)}

>>> pep498[110:128]
'eric@trueblade.com'
.spans gives you the indices in your string that match your pattern.
Use Format Specifiers
You can find all matches of a pattern with parse.findall(). Try to find the other PEPs that are mentioned in PEP 498:
>>> [result["num"] for result in parse.findall("PEP {num}", pep498)]
['p', 'd', '2', '2', '3', 'i', '3', 'r', ..., 't', '4', 'i', '4', '4']
Hmm, that doesn’t look very useful. PEPs are referenced using numbers. You can therefore use the format syntax to specify that you’re looking for numbers:
>>> [result["num"] for result in parse.findall("PEP {num:d}", pep498)]
[215, 215, 3101, 3101, 461, 414, 461]
Adding :d tells parse that you’re looking for an integer. As a bonus, the results are even converted from strings into numbers. In addition to :d, you can use most of the format specifiers used by f-strings.
You can also parse dates using special two-character specifications:
>>> parse.search("Created: {created:tg}\n", pep498)
<Result () {'created': datetime.datetime(2015, 8, 1, 0, 0)}>
:tg looks for dates written as day/month/year. You can use :ti and :ta, as well as several other options, if the order or the format is different.
Access Underlying Regexes
parse is built on top of Python’s regular expressions library, re. Every time you do a search, parse builds the corresponding regex under the hood. If you need to do the same search several times, then you can build the regex once up front with parse.compile.
The following example prints out all the descriptions of references to other documents in PEP 498:
>>> references_pattern = parse.compile(".. [#] {reference}")
>>> for line in pep498.splitlines():
...     if result := references_pattern.parse(line):
...         print(result["reference"])
...
%-formatting
str.format
[ ... ]
PEP 461 rejects bytes.format()
The loop uses the walrus operator, available in Python 3.8 and later, to test each line against the provided template. You can look at the compiled pattern to see the regex lurking behind your newfound parsing capabilities:
>>> references_pattern._expression
'\\.\\. \\[#\\] (?P<reference>.+?)'
The original parse pattern, ".. [#] {reference}", is more straightforward to both read and write.
Why parse Is Awesome
Regular expressions are clearly useful. However, thick books have been written to explain the subtleties of regexes. parse is a small library that provides most of the capabilities of regexes but with a much friendlier syntax.
If you compare ".. [#] {reference}" and "\\.\\. \\[#\\] (?P<reference>.+?)", then you’ll see why I love parse even more than I love the power of regular expressions.
dateutil for Working With Dates and Times

Bryan Weber is an author and reviewer for Real Python and a professor in mechanical engineering. When not writing Python or teaching, he can most likely be found cooking, playing with his family, or going for a hike, and on good days, all three.
If you’ve ever had to do any programming with time, then you know the convoluted knots that it can tie you into. First, you have to deal with time zones, in which two different points on Earth will have a different time at any given instant. Then you have daylight saving time, a twice-yearly event in which an hour either happens twice or doesn’t happen at all, but only in certain countries.
You also have to account for leap years and leap seconds to keep human clocks in sync with the Earth’s revolutions around the Sun. You have to program around the Y2K and Y2038 bugs. The list goes on and on.
Note: If you want to keep going down this rabbit hole, then I highly recommend The Problem with Time & Timezones, a video explanation of some of the ways that time is hard to handle by the wonderful and hilarious Tom Scott.
Fortunately, Python includes a really useful module in the standard library called datetime. Python’s datetime is a nice way to store and access information about dates and times. However, datetime has a few places where the interface isn’t quite so nice.
In response, Python’s awesome community has developed several different libraries and APIs for handling dates and times in a sensible way. Some of these extend the built-in datetime, and some are complete replacements. My favorite library of them all is dateutil.
To follow along with the examples below, install dateutil like this :
$ python -m pip install python-dateutil
Now that you’ve got dateutil installed, the examples in the next few sections will show you how powerful it is. You’ll also see how dateutil interacts with datetime.
Set a Time Zone
dateutil has a couple of things going for it. First, it’s recommended in the Python documentation as a complement to datetime for handling time zones and daylight saving time:
>>> from dateutil import tz
>>> from datetime import datetime
>>> london_now = datetime.now(tz=tz.gettz("Europe/London"))
>>> london_now.tzname()  # 'BST' in summer and 'GMT' in winter
'BST'
But dateutil can do so much more than provide a concrete tzinfo instance. This is really fortunate, because after Python 3.9, the Python standard library will have its own ability to access the IANA database.
Parse Date and Time Strings
dateutil makes it much more straightforward to parse strings into datetime instances using the parser module:
>>> from dateutil import parser
>>> parser.parse("Monday, May 4th at 8am")  # May the 4th be with you!
datetime.datetime(2020, 5, 4, 8, 0)
Notice that dateutil automatically infers the year for this date even though you don’t specify it! You can also control how time zones are interpreted or added using parser or work with ISO-8601 formatted dates. This gives you a lot more flexibility than you’d find in datetime.
Calculate Time Differences
Another excellent feature of dateutil is its ability to handle time arithmetic with the relativedelta module. You can add or subtract arbitrary units of time from a datetime instance or find the difference between two datetime instances:
>>> from dateutil.relativedelta import relativedelta
>>> from dateutil import parser
>>> may_4th = parser.parse("Monday, May 4th at 8:00 AM")
>>> may_4th + relativedelta(days=+1, years=+5, months=-2)
datetime.datetime(2025, 3, 5, 8, 0)
>>> release_day = parser.parse("May 25, 1977 at 8:00 AM")
>>> relativedelta(may_4th, release_day)
relativedelta(years=+42, months=+11, days=+9)
This is more flexible and powerful than datetime.timedelta because you can specify intervals of time larger than a day, such as a month or a year.
Calculate Recurring Events
Last but by no means least, dateutil has a powerful module called rrule for calculating dates into the future according to the iCalendar RFC. Let’s say you want to generate a regular standup schedule for the month of June, occurring at 10:00 a.m. on Mondays and Fridays:
>>> from dateutil import rrule
>>> from dateutil import parser
>>> list(
...     rrule.rrule(
...         rrule.WEEKLY,
...         byweekday=(rrule.MO, rrule.FR),
...         dtstart=parser.parse("June 1, 2020 at 10 AM"),
...         until=parser.parse("June 30, 2020"),
...     )
... )
[datetime.datetime(2020, 6, 1, 10, 0), ..., datetime.datetime(2020, 6, 29, 10, 0)]
Notice that you don’t have to know whether the start or end dates are Mondays or Fridays—dateutil figures that out for you. Another way to use rrule is to find the next time that a particular date will occur. Let’s find the next time that the leap day, February 29th, will happen on a Saturday like it did in 2020:
>>> list(
...     rrule.rrule(
...         rrule.YEARLY,
...         count=1,
...         byweekday=rrule.SA,
...         bymonthday=29,
...         bymonth=2,
...     )
... )
[datetime.datetime(2048, 2, 29, 22, 5, 5)]
The next leap day on a Saturday will happen in 2048. There are a ton more examples in the dateutil documentation as well as a set of exercises to try out.
Why dateutil Is Awesome
You’ve just seen four features of dateutil that make your life easier when you’re dealing with time:
- A convenient way of setting time zones compatible with
datetimeobjects - A useful method for parsing strings into dates
- A powerful interface for doing time arithmetic
- An awesome way of calculating recurring or future dates.
Next time you’re going gray trying to program with time, give dateutil a shot!
typer for Command-Line Interface Parsing

Dane Hillard is a Python book and blog author and a lead web application developer at ITHAKA, a nonprofit organization supporting higher education. In his free time, he does just about anything but likes cooking, music, board games, and ballroom dance in particular.
Python developers often get their start in command-line interface (CLI) parsing using the sys module. You can read sys.argv to obtain the list of arguments a user supplies to your script:
# command.py

import sys

if __name__ == "__main__":
    print(sys.argv)
The name of the script and any arguments a user supplies end up as string values in sys.argv:
$ python command.py one two three
["command.py", "one", "two", "three"]
$ python command.py 1 2 3
["command.py", "1", "2", "3"]
As you add features to your script, though, you may want to parse your script’s arguments in a more informed way. You may need to manage arguments of several different data types or make it more clear to users what options are available.
argparse Is Clunky
Python’s built-in argparse module helps you create named arguments, cast user-supplied values to the proper data types, and automatically create a help menu for your script. If you haven’t used argparse before, then check out How to Build Command Line Interfaces in Python With argparse.
One of the big advantages of argparse is that you can specify your CLI’s arguments in a more declarative manner, reducing what would otherwise be a fair amount of procedural and conditional code.
Consider the following example, which uses sys.argv to print a user-supplied string a user-specified number of times with minimal handling of edge cases:
# string_echo_sys.py

import sys

USAGE = """
USAGE:

python string_echo_sys.py <string> [--times <num>]
"""

if __name__ == "__main__":
    if len(sys.argv) == 1 or (len(sys.argv) == 2 and sys.argv[1] == "--help"):
        sys.exit(USAGE)
    elif len(sys.argv) == 2:
        string = sys.argv[1]  # First argument after script name
        print(string)
    elif len(sys.argv) == 4 and sys.argv[2] == "--times":
        string = sys.argv[1]  # First argument after script name

        try:
            times = int(sys.argv[3])  # Argument after --times
        except ValueError:
            sys.exit(f"Invalid value for --times! {USAGE}")

        print("\n".join([string] * times))
    else:
        sys.exit(USAGE)
This code provides a way for users to see some helpful documentation about using the script:
$ python string_echo_sys.py --help

USAGE:

python string_echo_sys.py <string> [--times <num>]
Users can provide a string and an optional number of times to print the string:
$ python string_echo_sys.py HELLO! --times 5
HELLO!
HELLO!
HELLO!
HELLO!
HELLO!
To achieve a similar interface with argparse, you could write something like this:
# string_echo_argparse.py

import argparse

parser = argparse.ArgumentParser(
    description="Echo a string for as long as you like"
)
parser.add_argument("string", help="The string to echo")
parser.add_argument(
    "--times",
    help="The number of times to echo the string",
    type=int,
    default=1,
)

if __name__ == "__main__":
    args = parser.parse_args()
    print("\n".join([args.string] * args.times))
The argparse code is more descriptive, and argparse also provides full argument parsing and a --help option explaining the usage of your script, all for free.
Although argparse is a big improvement over dealing with sys.argv directly, it still forces you to think quite a bit about CLI parsing. You’re usually trying to write a script that does something useful, so energy spent on CLI parsing is energy wasted!
Why typer Is Awesome
typer provides several of the same features as argparse but uses a very different development paradigm. Instead of writing any declarative, procedural, or conditional logic to parse user input, typer leverages type hinting to introspect your code and generate a CLI so that you don’t have to spend much effort thinking about handling user input.
Start by installing typer from PyPI:
$ python -m pip install typer
Now that you’ve got typer at your disposal, here’s how you could write a script that achieves a result similar to the argparse example:
# string_echo_typer.py

import typer

def echo(
    string: str,
    times: int = typer.Option(1, help="The number of times to echo the string"),
):
    """Echo a string for as long as you like"""

    typer.echo("\n".join([string] * times))

if __name__ == "__main__":
    typer.run(echo)
This approach uses even fewer functional lines, and those lines are mostly focused on the features of your script. The fact that the script echoes a string some number of times is more apparent.
typer even provides the ability for users to generate Tab completion for their shells, so that they can get to using your script’s CLI that much more quickly.
You can check out Comparing Python Command-Line Parsing Libraries – Argparse, Docopt, and Click to see if any of those might be right for you, but I love typer for its brevity and power.
Conclusion: Five Useful Python Packages
The Python community has built so many awesome packages. Throughout this tutorial, you’ve learned about several useful packages that are alternatives, or extensions, to common packages in Python’s standard library.
In this tutorial, you learned:
- Why
pudbmight help you debug your code - How
requestscan improve the way you communicate with web servers - How you can use
parseto simplify your string matching - What features
dateutiloffers for working with dates and times - Why you should use
typerfor parsing command-line arguments
We’ve written dedicated tutorials and sections of tutorials for some of these packages for further reading. We encourage you to dive deeper and share some of your favorite standard library alternatives with us in the comments!
Further Reading
Here are some tutorials and video courses that you can check out to learn more about packages covered in this tutorial: