Watch Now This tutorial has a related video course created by the Real Python team. Watch it together with the written tutorial to deepen your understanding: Working With Linked Lists in Python
Linked lists are like a lesser-known cousin of lists. They’re not as popular or as cool, and you might not even remember them from your algorithms class. But in the right context, they can really shine.
In this article, you’ll learn:
- What linked lists are and when you should use them
- How to use
collections.dequefor all of your linked list needs - How to implement your own linked lists
- What the other types of linked lists are and what they can be used for
If you’re looking to brush up on your coding skills for a job interview, or if you want to learn more about Python data structures besides the usual dictionaries and lists, then you’ve come to the right place!
You can follow along with the examples in this tutorial by downloading the source code available at the link below:
Get the Source Code: Click here to get the source code you’ll use to learn about linked lists in this tutorial.
Understanding Linked Lists
Linked lists are an ordered collection of objects. So what makes them different from normal lists? Linked lists differ from lists in the way that they store elements in memory. While lists use a contiguous memory block to store references to their data, linked lists store references as part of their own elements.
Main Concepts
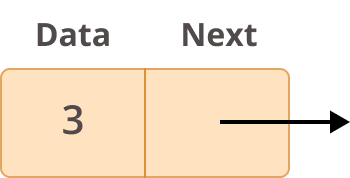
Before going more in depth on what linked lists are and how you can use them, you should first learn how they are structured. Each element of a linked list is called a node, and every node has two different fields:
- Data contains the value to be stored in the node.
- Next contains a reference to the next node on the list.
Here’s what a typical node looks like:
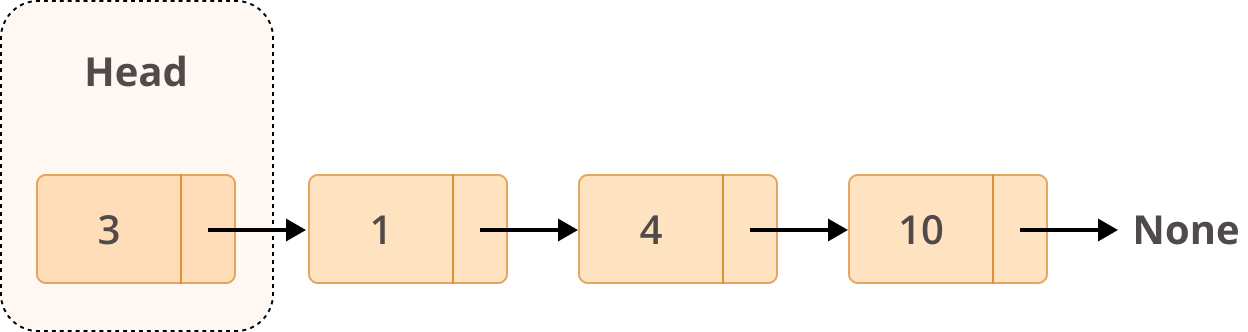
A linked list is a collection of nodes. The first node is called the head, and it’s used as the starting point for any iteration through the list. The last node must have its next reference pointing to None to determine the end of the list. Here’s how it looks:
Now that you know how a linked list is structured, you’re ready to look at some practical use cases for it.
Practical Applications
Linked lists serve a variety of purposes in the real world. They can be used to implement (spoiler alert!) queues or stacks as well as graphs. They’re also useful for much more complex tasks, such as lifecycle management for an operating system application.
Queues or Stacks
Queues and stacks differ only in the way elements are retrieved. For a queue, you use a First-In/First-Out (FIFO) approach. That means that the first element inserted in the list is the first one to be retrieved:

In the diagram above, you can see the front and rear elements of the queue. When you append new elements to the queue, they’ll go to the rear end. When you retrieve elements, they’ll be taken from the front of the queue.
For a stack, you use a Last-In/First-Out (LIFO) approach, meaning that the last element inserted in the list is the first to be retrieved:

In the above diagram you can see that the first element inserted on the stack (index 0) is at the bottom, and the last element inserted is at the top. Since stacks use the LIFO approach, the last element inserted (at the top) will be the first to be retrieved.
Because of the way you insert and retrieve elements from the edges of queues and stacks, linked lists are one of the most convenient ways to implement these data structures. You’ll see examples of these implementations later in the article.
Graphs
Graphs can be used to show relationships between objects or to represent different types of networks. For example, a visual representation of a graph—say a directed acyclic graph (DAG)—might look like this:

There are different ways to implement graphs like the above, but one of the most common is to use an adjacency list. An adjacency list is, in essence, a list of linked lists where each vertex of the graph is stored alongside a collection of connected vertices:
| Vertex | Linked List of Vertices |
|---|---|
| 1 | 2 → 3 → None |
| 2 | 4 → None |
| 3 | None |
| 4 | 5 → 6 → None |
| 5 | 6 → None |
| 6 | None |
In the table above, each vertex of your graph is listed in the left column. The right column contains a series of linked lists storing the other vertices connected with the corresponding vertex in the left column. This adjacency list could also be represented in code using a dict:
>>> graph = {
...     1: [2, 3, None],
...     2: [4, None],
...     3: [None],
...     4: [5, 6, None],
...     5: [6, None],
...     6: [None]
... }
The keys of this dictionary are the source vertices, and the value for each key is a list. This list is usually implemented as a linked list.
Note: In the above example you could avoid storing the None values, but we’ve retained them here for clarity and consistency with later examples.
In terms of both speed and memory, implementing graphs using adjacency lists is very efficient in comparison with, for example, an adjacency matrix. That’s why linked lists are so useful for graph implementation.
Performance Comparison: Lists vs Linked Lists
In most programming languages, there are clear differences in the way linked lists and arrays are stored in memory. In Python, however, lists are dynamic arrays. That means that the memory usage of both lists and linked lists is very similar.
Further reading: Python’s implementation of dynamic arrays is quite interesting and definitely worth reading about. Make sure to have a look and use that knowledge to stand out at your next company party!
Since the difference in memory usage between lists and linked lists is so insignificant, it’s better if you focus on their performance differences when it comes to time complexity.
Insertion and Deletion of Elements
In Python, you can insert elements into a list using .insert() or .append(). For removing elements from a list, you can use their counterparts: .remove() and .pop().
The main difference between these methods is that you use .insert() and .remove() to insert or remove elements at a specific position in a list, but you use .append() and .pop() only to insert or remove elements at the end of a list.
Now, something you need to know about Python lists is that inserting or removing elements that are not at the end of the list requires some element shifting in the background, making the operation more complex in terms of time spent. You can read the article mentioned above on how lists are implemented in Python to better understand how the implementation of .insert(), .remove(), .append() and .pop() affects their performance.
With all this in mind, even though inserting elements at the end of a list using .append() or .insert() will have constant time, O(1), when you try inserting an element closer to or at the beginning of the list, the average time complexity will grow along with the size of the list: O(n).
Linked lists, on the other hand, are much more straightforward when it comes to insertion and deletion of elements at the beginning or end of a list, where their time complexity is always constant: O(1).
For this reason, linked lists have a performance advantage over normal lists when implementing a queue (FIFO), in which elements are continuously inserted and removed at the beginning of the list. But they perform similarly to a list when implementing a stack (LIFO), in which elements are inserted and removed at the end of the list.
Retrieval of Elements
When it comes to element lookup, lists perform much better than linked lists. When you know which element you want to access, lists can perform this operation in O(1) time. Trying to do the same with a linked list would take O(n) because you need to traverse the whole list to find the element.
When searching for a specific element, however, both lists and linked lists perform very similarly, with a time complexity of O(n). In both cases, you need to iterate through the entire list to find the element you’re looking for.
Introducing collections.deque
In Python, there’s a specific object in the collections module that you can use for linked lists called deque (pronounced “deck”), which stands for double-ended queue.
collections.deque uses an implementation of a linked list in which you can access, insert, or remove elements from the beginning or end of a list with constant O(1) performance.
How to Use collections.deque
There are quite a few methods that come, by default, with a deque object. However, in this article you’ll only touch on a few of them, mostly for adding or removing elements.
First, you need to create a linked list. You can use the following piece of code to do that with deque:
>>> from collections import deque
>>> deque()
deque([])
The code above will create an empty linked list. If you want to populate it at creation, then you can give it an iterable as input:
>>> deque(['a','b','c'])
deque(['a', 'b', 'c'])

>>> deque('abc')
deque(['a', 'b', 'c'])

>>> deque([{'data': 'a'}, {'data': 'b'}])
deque([{'data': 'a'}, {'data': 'b'}])
When initializing a deque object, you can pass any iterable as an input, such as a string (also an iterable) or a list of objects.
Now that you know how to create a deque object, you can interact with it by adding or removing elements. You can create an abcde linked list and add a new element f like this:
>>> llist = deque("abcde")
>>> llist
deque(['a', 'b', 'c', 'd', 'e'])

>>> llist.append("f")
>>> llist
deque(['a', 'b', 'c', 'd', 'e', 'f'])

>>> llist.pop()
'f'

>>> llist
deque(['a', 'b', 'c', 'd', 'e'])
Both append() and pop() add or remove elements from the right side of the linked list. However, you can also use deque to quickly add or remove elements from the left side, or head, of the list:
>>> llist.appendleft("z")
>>> llist
deque(['z', 'a', 'b', 'c', 'd', 'e'])

>>> llist.popleft()
'z'

>>> llist
deque(['a', 'b', 'c', 'd', 'e'])
Adding or removing elements from both ends of the list is pretty straightforward using the deque object. Now you’re ready to learn how to use collections.deque to implement a queue or a stack.
How to Implement Queues and Stacks
As you learned above, the main difference between a queue and a stack is the way you retrieve elements from each. Next, you’ll find out how to use collections.deque to implement both data structures.
Queues
With queues, you want to add values to a list (enqueue), and when the timing is right, you want to remove the element that has been on the list the longest (dequeue). For example, imagine a queue at a trendy and fully booked restaurant. If you were trying to implement a fair system for seating guests, then you’d start by creating a queue and adding people as they arrive:
>>> from collections import deque
>>> queue = deque()
>>> queue
deque([])

>>> queue.append("Mary")
>>> queue.append("John")
>>> queue.append("Susan")
>>> queue
deque(['Mary', 'John', 'Susan'])
Now you have Mary, John, and Susan in the queue. Remember that since queues are FIFO, the first person who got into the queue should be the first to get out.
Now imagine some time goes by and a few tables become available. At this stage, you want to remove people from the queue in the correct order. This is how you would do that:
>>> queue.popleft()
'Mary'

>>> queue
deque(['John', 'Susan'])

>>> queue.popleft()
'John'

>>> queue
deque(['Susan'])
Every time you call popleft(), you remove the head element from the linked list, mimicking a real-life queue.
Stacks
What if you wanted to create a stack instead? Well, the idea is more or less the same as with the queue. The only difference is that the stack uses the LIFO approach, meaning that the last element to be inserted in the stack should be the first to be removed.
Imagine you’re creating a web browser’s history functionality in which store every page a user visits so they can go back in time easily. Assume these are the actions a random user takes on their browser:
- Visits Real Python’s website
- Navigates to Pandas: How to Read and Write Files
- Clicks on a link for Reading and Writing CSV Files in Python
If you’d like to map this behavior into a stack, then you could do something like this:
>>> from collections import deque
>>> history = deque()

>>> history.appendleft("https://realpython.com/")
>>> history.appendleft("https://realpython.com/pandas-read-write-files/")
>>> history.appendleft("https://realpython.com/python-csv/")
>>> history
deque(['https://realpython.com/python-csv/',
       'https://realpython.com/pandas-read-write-files/',
       'https://realpython.com/'])
In this example, you created an empty history object, and every time the user visited a new site, you added it to your history variable using appendleft(). Doing so ensured that each new element was added to the head of the linked list.
Now suppose that after the user read both articles, they wanted to go back to the Real Python home page to pick a new article to read. Knowing that you have a stack and want to remove elements using LIFO, you could do the following:
>>> history.popleft()
'https://realpython.com/python-csv/'

>>> history.popleft()
'https://realpython.com/pandas-read-write-files/'

>>> history
deque(['https://realpython.com/'])
There you go! Using popleft(), you removed elements from the head of the linked list until you reached the Real Python home page.
From the examples above, you can see how useful it can be to have collections.deque in your toolbox, so make sure to use it the next time you have a queue- or stack-based challenge to solve.
Implementing Your Own Linked List
Now that you know how to use collections.deque for handling linked lists, you might be wondering why you would ever implement your own linked list in Python. There are a few reasons to do it:
- Practicing your Python algorithm skills
- Learning about data structure theory
- Preparing for job interviews
Feel free to skip this next section if you’re not interested in any of the above, or if you already aced implementing your own linked list in Python. Otherwise, it’s time to implement some linked lists!
How to Create a Linked List
First things first, create a class to represent your linked list:
class LinkedList:
    def __init__(self):
        self.head = None
The only information you need to store for a linked list is where the list starts (the head of the list). Next, create another class to represent each node of the linked list:
class Node:
    def __init__(self, data):
        self.data = data
        self.next = None
In the above class definition, you can see the two main elements of every single node: data and next. You can also add a __repr__ to both classes to have a more helpful representation of the objects:
class Node:
    def __init__(self, data):
        self.data = data
        self.next = None

    def __repr__(self):
        return self.data

class LinkedList:
    def __init__(self):
        self.head = None

    def __repr__(self):
        node = self.head
        nodes = []
        while node is not None:
            nodes.append(node.data)
            node = node.next
        nodes.append("None")
        return " -> ".join(nodes)
Have a look at an example of using the above classes to quickly create a linked list with three nodes:
>>> llist = LinkedList()
>>> llist
None

>>> first_node = Node("a")
>>> llist.head = first_node
>>> llist
a -> None

>>> second_node = Node("b")
>>> third_node = Node("c")
>>> first_node.next = second_node
>>> second_node.next = third_node
>>> llist
a -> b -> c -> None
By defining a node’s data and next values, you can create a linked list quite quickly. These LinkedList and Node classes are the starting points for our implementation. From now on, it’s all about increasing their functionality.
Here’s a slight change to the linked list’s __init__() that allows you to quickly create linked lists with some data:
def __init__(self, nodes=None):
    self.head = None
    if nodes is not None:
        node = Node(data=nodes.pop(0))
        self.head = node
        for elem in nodes:
            node.next = Node(data=elem)
            node = node.next
With the above modification, creating linked lists to use in the examples below will be much faster.
How to Traverse a Linked List
One of the most common things you will do with a linked list is to traverse it. Traversing means going through every single node, starting with the head of the linked list and ending on the node that has a next value of None.
Traversing is just a fancier way to say iterating. So, with that in mind, create an __iter__ to add the same behavior to linked lists that you would expect from a normal list:
def __iter__(self):
    node = self.head
    while node is not None:
        yield node
        node = node.next
The method above goes through the list and yields every single node. The most important thing to remember about this __iter__ is that you need to always validate that the current node is not None. When that condition is True, it means you’ve reached the end of your linked list.
After yielding the current node, you want to move to the next node on the list. That’s why you add node = node.next. Here’s an example of traversing a random list and printing each node:
>>> llist = LinkedList(["a", "b", "c", "d", "e"])
>>> llist
a -> b -> c -> d -> e -> None

>>> for node in llist:
...     print(node)
a
b
c
d
e
In other articles, you might see the traversing defined into a specific method called traverse(). However, using Python’s built-in methods to achieve said behavior makes this linked list implementation a bit more Pythonic.
How to Insert a New Node
There are different ways to insert new nodes into a linked list, each with its own implementation and level of complexity. That’s why you’ll see them split into specific methods for inserting at the beginning, end, or between nodes of a list.
Inserting at the Beginning
Inserting a new node at the beginning of a list is probably the most straightforward insertion since you don’t have to traverse the whole list to do it. It’s all about creating a new node and then pointing the head of the list to it.
Have a look at the following implementation of add_first() for the class LinkedList:
def add_first(self, node):
    node.next = self.head
    self.head = node
In the above example, you’re setting self.head as the next reference of the new node so that the new node points to the old self.head. After that, you need to state that the new head of the list is the inserted node.
Here’s how it behaves with a sample list:
>>> llist = LinkedList()
>>> llist
None

>>> llist.add_first(Node("b"))
>>> llist
b -> None

>>> llist.add_first(Node("a"))
>>> llist
a -> b -> None
As you can see, add_first() always adds the node to the head of the list, even if the list was empty before.
Inserting at the End
Inserting a new node at the end of the list forces you to traverse the whole linked list first and to add the new node when you reach the end. You can’t just append to the end as you would with a normal list because in a linked list you don’t know which node is last.
Here’s an example implementation of a function for inserting a node to the end of a linked list:
def add_last(self, node):
    if self.head is None:
        self.head = node
        return
    for current_node in self:
        pass
    current_node.next = node
First, you want to traverse the whole list until you reach the end (that is, until the for loop raises a StopIteration exception). Next, you want to set the current_node as the last node on the list. Finally, you want to add the new node as the next value of that current_node.
Here’s an example of add_last() in action:
>>> llist = LinkedList(["a", "b", "c", "d"])
>>> llist
a -> b -> c -> d -> None

>>> llist.add_last(Node("e"))
>>> llist
a -> b -> c -> d -> e -> None

>>> llist.add_last(Node("f"))
>>> llist
a -> b -> c -> d -> e -> f -> None
In the code above, you start by creating a list with four values (a, b, c, and d). Then, when you add new nodes using add_last(), you can see that the nodes are always appended to the end of the list.
Inserting Between Two Nodes
Inserting between two nodes adds yet another layer of complexity to the linked list’s already complex insertions because there are two different approaches that you can use:
- Inserting after an existing node
- Inserting before an existing node
It might seem weird to split these into two methods, but linked lists behave differently than normal lists, and you need a different implementation for each case.
Here’s a method that adds a node after an existing node with a specific data value:
def add_after(self, target_node_data, new_node):
    if self.head is None:
        raise Exception("List is empty")

    for node in self:
        if node.data == target_node_data:
            new_node.next = node.next
            node.next = new_node
            return

    raise Exception("Node with data '%s' not found" % target_node_data)
In the above code, you’re traversing the linked list looking for the node with data indicating where you want to insert a new node. When you find the node you’re looking for, you’ll insert the new node immediately after it and rewire the next reference to maintain the consistency of the list.
The only exceptions are if the list is empty, making it impossible to insert a new node after an existing node, or if the list does not contain the value you’re searching for. Here are a few examples of how add_after() behaves:
>>> llist = LinkedList()
>>> llist.add_after("a", Node("b"))
Exception: List is empty

>>> llist = LinkedList(["a", "b", "c", "d"])
>>> llist
a -> b -> c -> d -> None

>>> llist.add_after("c", Node("cc"))
>>> llist
a -> b -> c -> cc -> d -> None

>>> llist.add_after("f", Node("g"))
Exception: Node with data 'f' not found
Trying to use add_after() on an empty list results in an exception. The same happens when you try to add after a nonexistent node. Everything else works as expected.
Now, if you want to implement add_before(), then it will look something like this:
 1def add_before(self, target_node_data, new_node):
 2    if self.head is None:
 3        raise Exception("List is empty")
 4
 5    if self.head.data == target_node_data:
 6        return self.add_first(new_node)
 7
 8    prev_node = self.head
 9    for node in self:
10        if node.data == target_node_data:
11            prev_node.next = new_node
12            new_node.next = node
13            return
14        prev_node = node
15
16    raise Exception("Node with data '%s' not found" % target_node_data)
There are a few things to keep in mind while implementing the above. First, as with add_after(), you want to make sure to raise an exception if the linked list is empty (line 2) or the node you’re looking for is not present (line 16).
Second, if you’re trying to add a new node before the head of the list (line 5), then you can reuse add_first() because the node you’re inserting will be the new head of the list.
Finally, for any other case (line 9), you should keep track of the last-checked node using the prev_node variable. Then, when you find the target node, you can use that prev_node variable to rewire the next values.
Once again, an example is worth a thousand words:
>>> llist = LinkedList()
>>> llist.add_before("a", Node("a"))
Exception: List is empty

>>> llist = LinkedList(["b", "c"])
>>> llist
b -> c -> None

>>> llist.add_before("b", Node("a"))
>>> llist
a -> b -> c -> None

>>> llist.add_before("b", Node("aa"))
>>> llist.add_before("c", Node("bb"))
>>> llist
a -> aa -> b -> bb -> c -> None

>>> llist.add_before("n", Node("m"))
Exception: Node with data 'n' not found
With add_before(), you now have all the methods you need to insert nodes anywhere you’d like in your list.
How to Remove a Node
To remove a node from a linked list, you first need to traverse the list until you find the node you want to remove. Once you find the target, you want to link its previous and next nodes. This re-linking is what removes the target node from the list.
That means you need to keep track of the previous node as you traverse the list. Have a look at an example implementation:
 1def remove_node(self, target_node_data):
 2    if self.head is None:
 3        raise Exception("List is empty")
 4
 5    if self.head.data == target_node_data:
 6        self.head = self.head.next
 7        return
 8
 9    previous_node = self.head
10    for node in self:
11        if node.data == target_node_data:
12            previous_node.next = node.next
13            return
14        previous_node = node
15
16    raise Exception("Node with data '%s' not found" % target_node_data)
In the above code, you first check that your list is not empty (line 2). If it is, then you raise an exception. After that, you check if the node to be removed is the current head of the list (line 5). If it is, then you want the next node in the list to become the new head.
If none of the above happens, then you start traversing the list looking for the node to be removed (line 10). If you find it, then you need to update its previous node to point to its next node, automatically removing the found node from the list. Finally, if you traverse the whole list without finding the node to be removed (line 16), then you raise an exception.
Notice how in the above code you use previous_node to keep track of the, well, previous node. Doing so ensures that the whole process will be much more straightforward when you find the right node to be deleted.
Here’s an example using a list:
>>> llist = LinkedList()
>>> llist.remove_node("a")
Exception: List is empty

>>> llist = LinkedList(["a", "b", "c", "d", "e"])
>>> llist
a -> b -> c -> d -> e -> None

>>> llist.remove_node("a")
>>> llist
b -> c -> d -> e -> None

>>> llist.remove_node("e")
>>> llist
b -> c -> d -> None

>>> llist.remove_node("c")
>>> llist
b -> d -> None

>>> llist.remove_node("a")
Exception: Node with data 'a' not found
That’s it! You now know how to implement a linked list and all of the main methods for traversing, inserting, and removing nodes. If you feel comfortable with what you’ve learned and you’re craving more, then feel free to pick one of the challenges below:
- Create a method to retrieve an element from a specific position:
get(i)or evenllist[i]. - Create a method to reverse the linked list:
llist.reverse(). - Create a
Queue()object inheriting this article’s linked list withenqueue()anddequeue()methods.
Apart from being great practice, doing some extra challenges on your own is an effective way to assimilate all the knowledge you’ve gained. If you want to get a head start by reusing all the source code from this article, then you can download everything you need at the link below:
Get the Source Code: Click here to get the source code you’ll use to learn about linked lists in this tutorial.
Using Advanced Linked Lists
Until now, you’ve been learning about a specific type of linked list called singly linked lists. But there are more types of linked lists that can be used for slightly different purposes.
How to Use Doubly Linked Lists
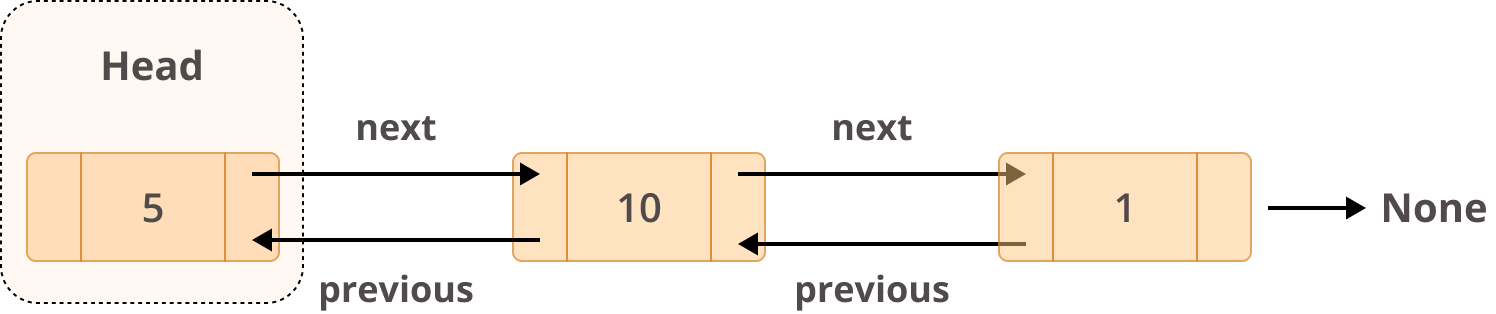
Doubly linked lists are different from singly linked lists in that they have two references:
- The
previousfield references the previous node. - The
nextfield references the next node.
The end result looks like this:

If you wanted to implement the above, then you could make some changes to your existing Node class in order to include a previous field:
class Node:
    def __init__(self, data):
        self.data = data
        self.next = None
        self.previous = None
This kind of implementation would allow you to traverse a list in both directions instead of only traversing using next. You could use next to go forward and previous to go backward.
In terms of structure, this is how a doubly linked list would look:
You learned earlier that collections.deque uses a linked list as part of its data structure. This is the kind of linked list it uses. With doubly linked lists, deque is capable of inserting or deleting elements from both ends of a queue with constant O(1) performance.
How to Use Circular Linked Lists
Circular linked lists are a type of linked list in which the last node points back to the head of the list instead of pointing to None. This is what makes them circular. Circular linked lists have quite a few interesting use cases:
- Going around each player’s turn in a multiplayer game
- Managing the application life cycle of a given operating system
- Implementing a Fibonacci heap
This is what a circular linked list looks like:

One of the advantages of circular linked lists is that you can traverse the whole list starting at any node. Since the last node points to the head of the list, you need to make sure that you stop traversing when you reach the starting point. Otherwise, you’ll end up in an infinite loop.
In terms of implementation, circular linked lists are very similar to singly linked list. The only difference is that you can define the starting point when you traverse the list:
class CircularLinkedList:
    def __init__(self):
        self.head = None

    def traverse(self, starting_point=None):
        if starting_point is None:
            starting_point = self.head
        node = starting_point
        while node is not None and (node.next != starting_point):
            yield node
            node = node.next
        yield node

    def print_list(self, starting_point=None):
        nodes = []
        for node in self.traverse(starting_point):
            nodes.append(str(node))
        print(" -> ".join(nodes))
Traversing the list now receives an additional argument, starting_point, that is used to define the start and (because the list is circular) the end of the iteration process. Apart from that, much of the code is the same as what we had in our LinkedList class.
To wrap up with a final example, have a look at how this new type of list behaves when you give it some data:
>>> circular_llist = CircularLinkedList()
>>> circular_llist.print_list()
None

>>> a = Node("a")
>>> b = Node("b")
>>> c = Node("c")
>>> d = Node("d")
>>> a.next = b
>>> b.next = c
>>> c.next = d
>>> d.next = a
>>> circular_llist.head = a
>>> circular_llist.print_list()
a -> b -> c -> d

>>> circular_llist.print_list(b)
b -> c -> d -> a

>>> circular_llist.print_list(d)
d -> a -> b -> c
There you have it! You’ll notice that you no longer have the None while traversing the list. That’s because there is no specific end to a circular list. You can also see that choosing different starting nodes will render slightly different representations of the same list.
Conclusion
In this article, you learned quite a few things! The most important are:
- What linked lists are and when you should use them
- How to use
collections.dequeto implement queues and stacks - How to implement your own linked list and node classes, plus relevant methods
- What the other types of linked lists are and what they can be used for
If you want to learn more about linked lists, then check out Vaidehi Joshi’s Medium post for a nice visual explanation. If you’re interested in a more in-depth guide, then the Wikipedia article is quite thorough. Finally, if you’re curious about the reasoning behind the current implementation of collections.deque, then check out Raymond Hettinger’s thread.
You can download the source code used throughout this tutorial by clicking on the following link:
Get the Source Code: Click here to get the source code you’ll use to learn about linked lists in this tutorial.
Feel free to leave any questions or comments below. Happy Pythoning!
Watch Now This tutorial has a related video course created by the Real Python team. Watch it together with the written tutorial to deepen your understanding: Working With Linked Lists in Python