Watch Now This tutorial has a related video course created by the Real Python team. Watch it together with the written tutorial to deepen your understanding: Exploring HTTPS and Cryptography in Python
Have you ever wondered why it’s okay for you to send your credit card information over the Internet? You may have noticed the https:// on URLs in your browser, but what is it, and how does it keep your information safe? Or perhaps you want to create a Python HTTPS application, but you’re not exactly sure what that means. How can you be sure that your web application is safe?
It may surprise you to know that you don’t have to be an expert in security to answer these questions! In this tutorial, you’ll get a working knowledge of the various factors that combine to keep communications over the Internet safe. You’ll see concrete examples of how a Python HTTPS application keeps information secure.
In this tutorial, you’ll learn how to:
- Monitor and analyze network traffic
- Apply cryptography to keep data safe
- Describe the core concepts of Public Key Infrastructure (PKI)
- Create your own Certificate Authority
- Build a Python HTTPS application
- Identify common Python HTTPS warnings and errors
Free Bonus: Click here to get access to a free Flask + Python video tutorial that shows you how to build Flask web app, step-by-step.
What Is HTTP?
Before you dive into HTTPS and its use in Python, it’s important to understand its parent, HTTP. This acronym stands for HyperText Transfer Protocol, which underpins most of the communications that go on when you’re surfing your favorite websites. More specifically, HTTP is how a user agent, like your web browser, communicates with a web server, like realpython.com. Here’s a simplified diagram of HTTP communications:

This diagram shows a simplified version of how your computer communicates with a server. Here’s the breakdown of each step:
- You tell your browser to go to
http://someserver.com/link. - Your device and the server set up a TCP connection.
- Your browser sends an HTTP request to the server.
- The server receives the HTTP request and parses it.
- The server responds with an HTTP response.
- Your computer receives, parses, and displays the response.
This breakdown captures the basics of HTTP. You make a request to a server, and the server returns a response. While HTTP doesn’t require TCP, it does require a reliable lower-level protocol. In practice, this is almost always TCP over IP (though Google is trying to create a replacement). If you need a refresher, then check out Socket Programming in Python (Guide).
As protocols go, HTTP is one of the simpler ones. It was designed to send content over the Internet, like HTML, videos, images, and so on. This is done with an HTTP request and response. HTTP requests contain the following elements:
- The method describes what action the client wants to perform. The method for static content is typically
GET, though there are others available, likePOST,HEAD, andDELETE. - The path indicates to the server what web page you would like to request. For example, the path of this page is
/python-https. - The version is one of several HTTP versions, like 1.0, 1.1, or 2.0. The most common is probably 1.1.
- The headers help describe additional information for the server.
- The body provides the server with information from the client. Though this field is not required, it’s typical for some methods to have a body, like a
POST.
These are the tools your browser uses to communicate with a server. The server responds with an HTTP response. The HTTP response contains the following elements:
- The version identifies the HTTP version, which will typically be the same as the request’s version.
- The status code indicates whether a request was completed successfully. There are quite a few status codes.
- The status message provides a human-readable message that helps describe the status code.
- The headers allow the server to respond with additional metadata about the request. These are the same concept as request headers.
- The body carries the content. Technically, this is optional, but typically it contains a useful resource.
These are the building blocks for HTTP. If you’re interested in learning more about HTTP, then you can check out an overview page to learn about the protocol in more depth.
What Is HTTPS?
Now that you understand a bit more about HTTP, what is HTTPS? The good news is, you already know this! HTTPS stands for HyperText Transfer Protocol Secure. Fundamentally, HTTPS is the same protocol as HTTP but with the added implication that the communications are secure.
HTTPS doesn’t rewrite any of the HTTP fundamentals on which it’s built. Instead, HTTPS consists of regular HTTP sent over an encrypted connection. Typically, this encrypted connection is provided by either TLS or SSL, which are cryptographic protocols that encrypt the information before it’s sent over a network.
Note: TLS and SSL are extremely similar protocols, though SSL is on its way out, with TLS to take its place. The differences in these protocols are outside the scope of this tutorial. It’s enough to know that TLS is the newer, better version of SSL.
So, why create this separation? Why not just introduce the complexity into the HTTP protocol itself? The answer is portability. Securing communications is an important and hard problem, but HTTP is only one of many protocols that require security. There are countless others across a wide variety of applications:
- Instant Messaging
- VoIP (Voice over IP)
There are others, as well! If each of these protocols had to create their own security mechanism, then the world would be much less secure and much more confusing. TLS, which is often used by the above protocols, provides a common method to secure communications.
Note: This separation of protocols is a common theme in networking, so much so that it has a name. The OSI Model represents communications from physical medium all the way up to the HTML rendered on this page!
Almost all of the information you’ll learn in this tutorial will be applicable to more than just Python HTTPS applications. You’ll be learning the basics of secure communications along with how it applies specifically to HTTPS.
Why Is HTTPS Important?
Secure communications are critical in providing a safe online environment. As more of the world moves online, including banks and healthcare sites, it’s becoming more and more important for developers to create Python HTTPS applications. Again, HTTPS is just HTTP over TLS or SSL. TLS is designed to provide privacy from eavesdroppers. It can also provide authentication of both the client and the server.
In this section, you’ll explore these concepts in depth by doing the following:
- Creating a Python HTTPS server
- Communicating with your Python HTTPS server
- Capturing these communications
- Analyzing those messages
Let’s get started!
Creating an Example Application
Suppose you’re the leader of a cool Python club called the Secret Squirrels. The Squirrels, being secret, require a secret message to attend their meetings. As the leader, you choose the secret message, which changes for each meeting. Sometimes, though, it’s hard for you to meet with all the members before the meeting to tell them the secret message! You decide to set up a secret server where members can just see the secret message for themselves.
Note: The example code used in this tutorial is not designed for production. It’s designed to help you learn the basics of HTTP and TLS. Please do not use this code for production. Many of the examples below have terrible security practices. In this tutorial, you’ll learn about TLS, and one way it can help you be more secure.
You’ve followed some tutorials on Real Python and decide to use some dependencies you know:
To install all of these dependencies, you can use pip:
$ pip install flask uwsgi requests
With your dependencies installed, you begin to write your application. In a file called server.py, you create a Flask application:
# server.py
from flask import Flask

SECRET_MESSAGE = "fluffy tail"
app = Flask(__name__)

@app.route("/")
def get_secret_message():
    return SECRET_MESSAGE
This Flask application will display the secret message whenever someone visits the / path of your server. With that out of the way, you deploy your application on your secret server and run it:
$ uwsgi --http-socket 127.0.0.1:5683 --mount /=server:app
This command starts up a server using the Flask application above. You start it on a weird port because you don’t want people to be able to find it, and pat yourself on the back for being so sneaky! You can confirm that it’s working by visiting http://localhost:5683 in your browser.
Since everyone in the Secret Squirrels knows Python, you decide to help them out. You write a script called client.py that will help them get the secret message:
# client.py
import os
import requests

def get_secret_message():
    url = os.environ["SECRET_URL"]
    response = requests.get(url)
    print(f"The secret message is: {response.text}")

if __name__ == "__main__":
    get_secret_message()
This code will print out the secret message as long as they have the SECRET_URL environment variable set. In this case, the SECRET_URL is 127.0.0.1:5683. So, your plan is to give each club member the secret URL and tell them to keep it secret and safe.
While this might seem okay, rest assured it’s not! In fact, even if you were to put a username and password on this site, it still wouldn’t be safe. But even if your team somehow did manage to keep the URL safe, your secret message still wouldn’t be secure. To demonstrate why you’ll need to know a little bit about monitoring network traffic. To do this, you’ll be using a tool called Wireshark.
Setting Up Wireshark
Wireshark is a widely used tool for network and protocol analysis. What this means is that it can help you see what’s happening over network connections. Installing and setting up Wireshark is optional for this tutorial, but feel free if you’d like to follow along. The download page has several installers available:
- macOS 10.12 and later
- Windows installer 64-bit
- Windows installer 32-bit
If you’re using Windows or Mac, then you should be able to download the appropriate installer and follow the prompts. In the end, you should have a running Wireshark.
If you’re on a Debian-based Linux environment, then the installation is a bit harder, but still possible. You can install Wireshark with the following commands:
$ sudo add-apt-repository ppa:wireshark-dev/stable
$ sudo apt-get update
$ sudo apt-get install wireshark
$ sudo wireshark
You should be met with a screen that looks something like this:
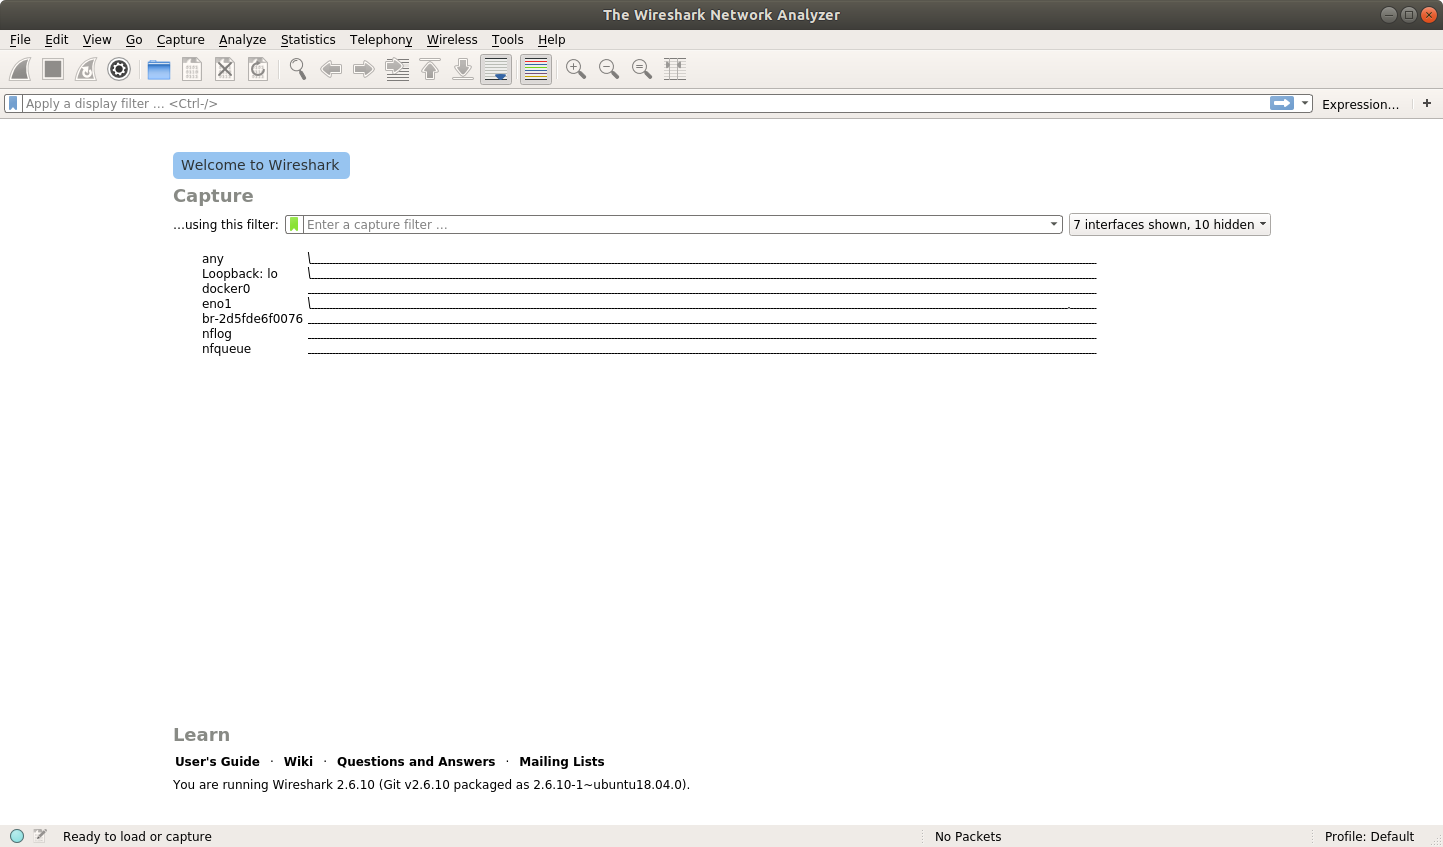
With Wireshark running, it’s time to analyze some traffic!
Seeing That Your Data Is Not Safe
The way your current client and server are running is not secure. HTTP will send everything in the clear for anyone to see. What this means is that even if someone doesn’t have your SECRET_URL, they can still see everything you do as long as they can monitor traffic on any device between you and the server.
This should be relatively scary for you. After all, you don’t want other people showing up for your Secret Squirrel meetings! You can prove that this is happening. First, start up your server if you don’t still have it running:
$ uwsgi --http-socket 127.0.0.1:5683 --mount /=server:app
This will start up your Flask application on port 5683. Next, you’ll start a packet capture in Wireshark. This packet capture will help you see all the traffic going to and from the server. Begin by selecting the Loopback:lo interface on Wireshark:

You can see that the Loopback:lo portion is highlighted. This instructs Wireshark to monitor this port for traffic. You can do better and specify which port and protocol you’d like to capture. You can type port 5683 in the capture filter and http in the display filter:
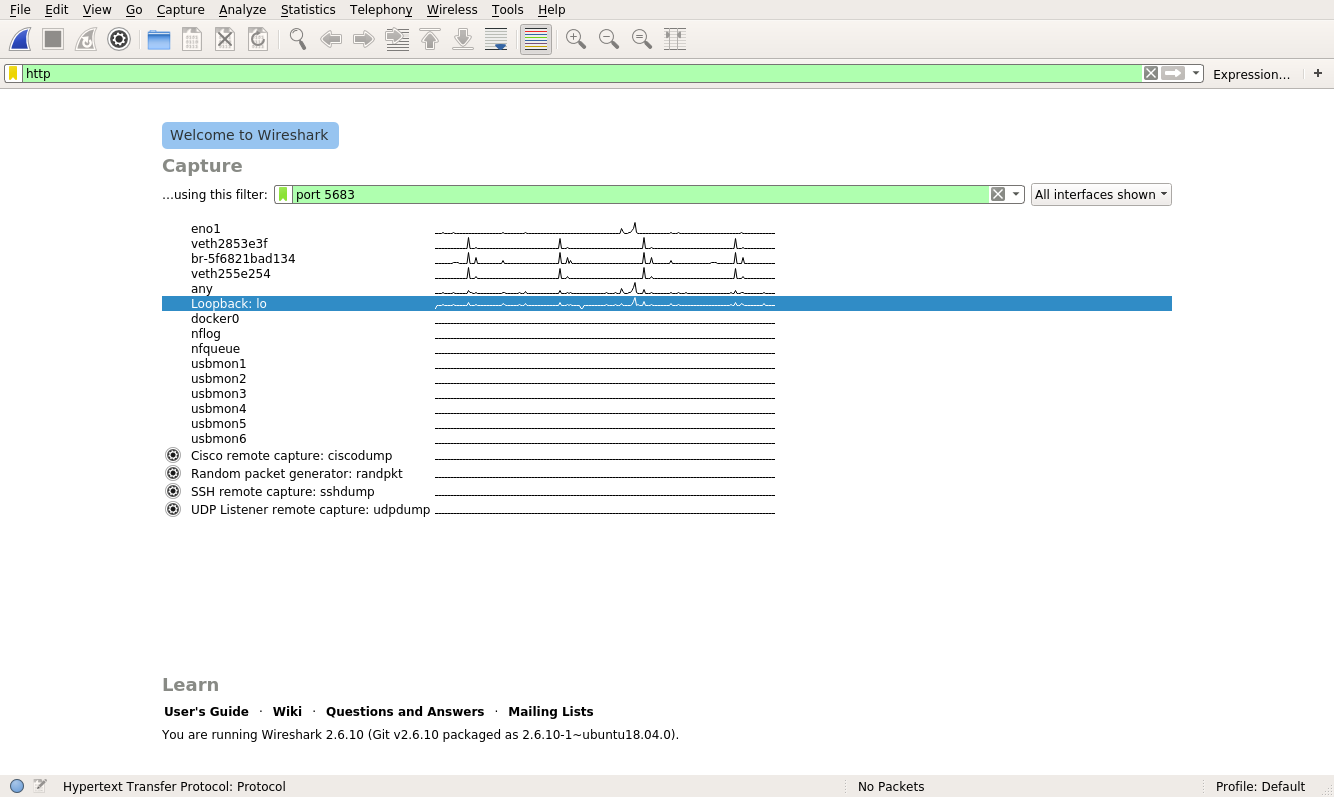
The green box indicates that Wireshark is happy with the filter you typed. Now you can begin the capture by clicking on the fin in the top left:
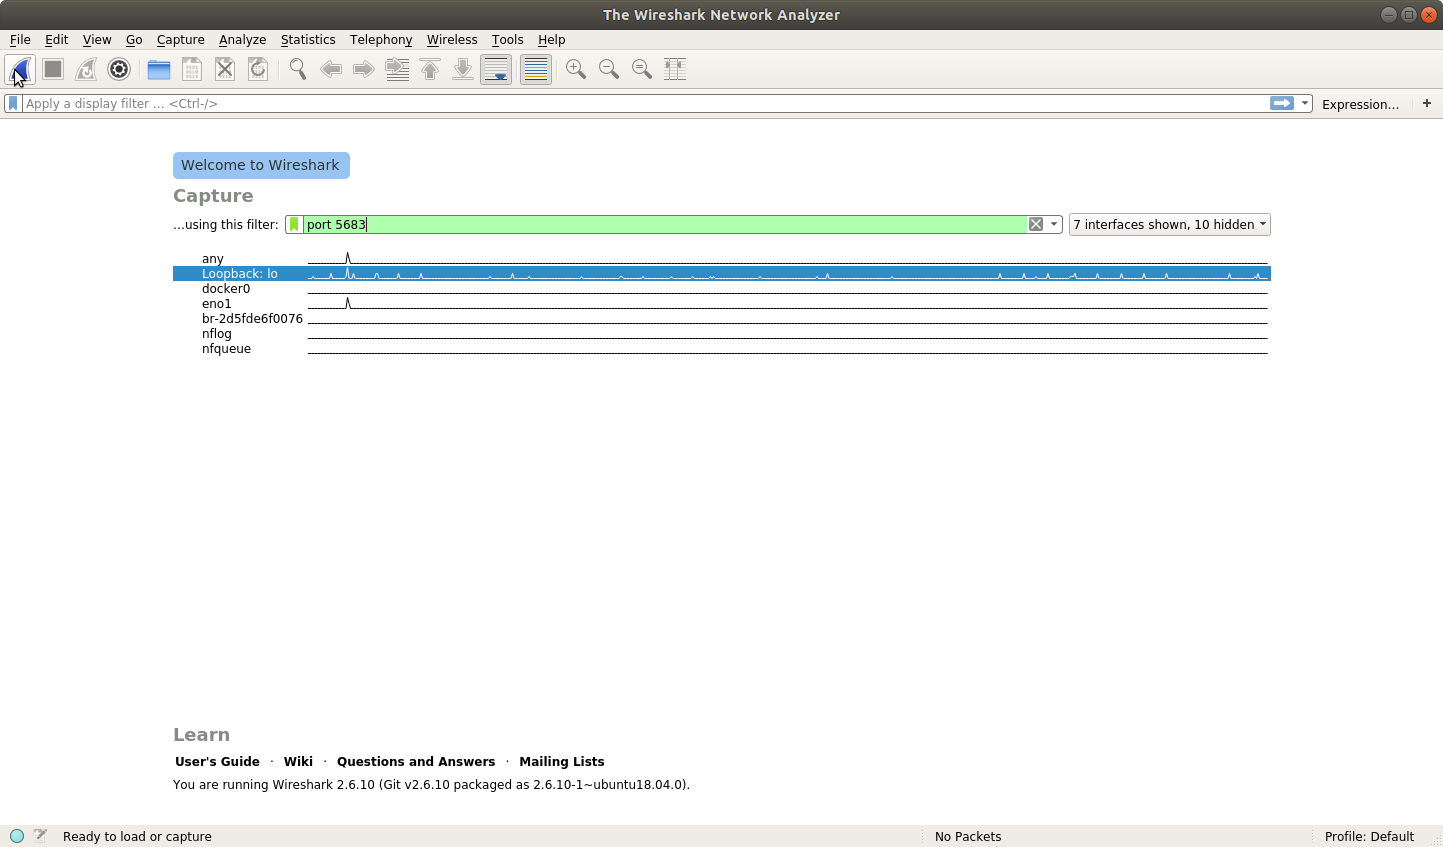
Clicking this button will spawn a new window in Wireshark:

This new window is fairly plain, but the message at the bottom says <live capture in progress>, which indicates that it’s working. Don’t worry that nothing is being displayed, as that’s normal. In order for Wireshark to report anything, there has to be some activity on your server. To get some data, try running your client:
$ SECRET_URL="http://127.0.0.1:5683" python client.py
The secret message is: fluffy tail
After executing the client.py code from above, you should now see some entries in Wireshark. If all has gone well, then you’ll see two entries that look something like this:

These two entries represent the two parts of the communication that occurred. The first one is the client’s request to your server. When you click on the first entry, you’ll see a plethora of information:
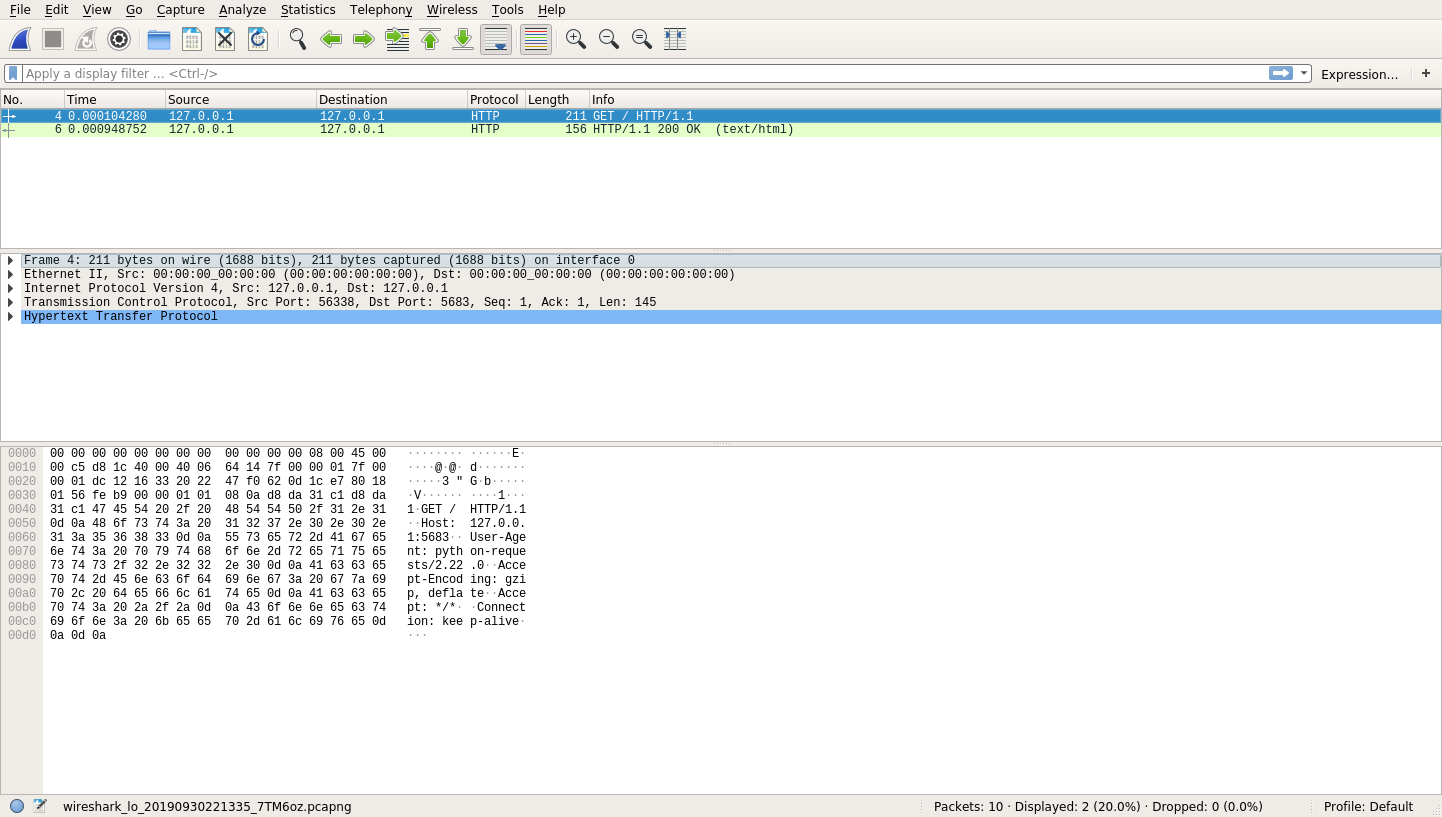
That’s a lot of information! At the top, you still have your HTTP request and response. Once you select one of these entries, you’ll see the middle and bottom row populate with information.
The middle row provides you with a breakdown of the protocols that Wireshark was able to identify for the selected request. This breakdown allows you to explore what actually happened in your HTTP Request. Here’s a quick summary of the information Wireshark describes in the middle row from top to bottom:
- Physical Layer: This row describes the physical interface used to send the request. In your case, this is probably Interface ID 0 (lo) for your loopback interface.
- Ethernet Information: This row shows you the Layer-2 Protocol, which includes source and destination MAC addresses.
- IPv4: This row displays source and destination IP addresses (127.0.0.1).
- TCP: This row includes the required TCP handshake in order to create a reliable pipe of data.
- HTTP: This row displays information about the HTTP request itself.
When you expand the Hypertext Transfer Protocol layer, you can see all the information that makes up an HTTP Request:
This image shows you your script’s HTTP request:
- Method:
GET - Path:
/ - Version:
1.1 - Headers:
Host: 127.0.0.1:5683,Connection: keep-alive, and others - Body: No body
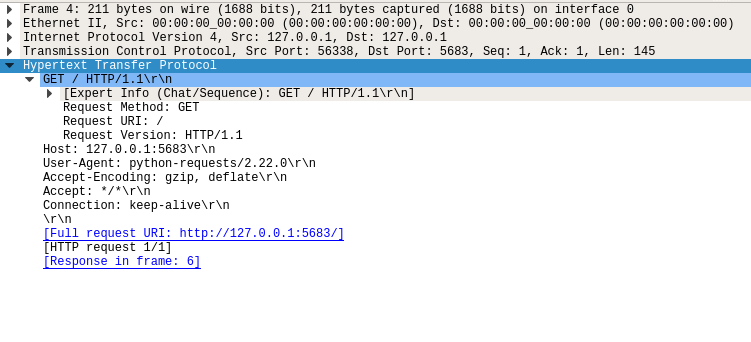
The last row you’ll see is a hex dump of the data. You may notice in this hex dump that you can actually see the parts of your HTTP request. That’s because your HTTP request was sent in the open. But what about the reply? If you click on the HTTP response, then you’ll see a similar view:
Again, you have the same three sections. If you look carefully at the hex dump, then you’ll see the secret message in plain text! This is a big problem for the Secret Squirrels. What this means is that anyone with some technical know-how can very easily see this traffic if they’re interested. So, how do you solve this problem? The answer is cryptography.
How Does Cryptography Help?
In this section, you’ll learn one way to keep your data safe by creating your own cryptography keys and using them on both your server and your client. While this won’t be your final step, it will help you get a solid foundation for how to build Python HTTPS applications.
Understanding Cryptography Basics
Cryptography is a way to secure communications from eavesdroppers, or adversaries. Another way to state this is that you’re taking normal information, called plaintext, and converting it to scrambled text, called ciphertext.
Cryptography can be intimidating at first, but the fundamental concepts are pretty accessible. In fact, you’ve probably already practiced cryptography before. If you’ve ever had a secret language with your friends and used it to pass notes in class, then you’ve practiced cryptography. (If you haven’t done that, then don’t worry—you’re about to.)
Somehow, you need to take the string "fluffy tail" and convert it into something unintelligible. One way to do this is to map certain characters onto different characters. An effective way to do this is to shift the characters back one spot in the alphabet. Doing so would look something like this:

This image shows you how to translate from the original alphabet to the new alphabet and back. So, if you had the message ABC, then you would actually send the message ZAB. If you apply this to "fluffy tail", then assuming that spaces stay the same, you get ekteex szhk. While it’s not perfect, it’ll probably look like gibberish to anyone that sees it.
Congratulations! You’ve created what is known in cryptography as a cipher, which describes how to convert plaintext to ciphertext and back. Your cipher, in this case, is described in English. This particular type of cipher is called a substitution cipher. Fundamentally this is the same type of cipher used in the Enigma Machine, albeit a much simpler version.
Now, if you wanted to get a message out to the Secret Squirrels, then you would first need to tell them how many letters to shift and then give them the encoded message. In Python, this might look something like the following:
CIPHER = {"a": "z", "A": "Z", "b": "a"} # And so on

def encrypt(plaintext: str):
    return "".join(CIPHER.get(letter, letter) for letter in plaintext)
Here, you’ve created a function called encrypt(), which will take plaintext and convert it to ciphertext. Imagine you have a dictionary CIPHER that has all of the characters mapped out. Similarly, you could create a decrypt():
DECIPHER = {v: k for k, v in CIPHER.items()}

def decrypt(ciphertext: str):
    return "".join(DECIPHER.get(letter, letter) for letter in ciphertext)
This function is the opposite of encrypt(). It will take ciphertext and convert it to plaintext. In this form of the cipher, you have a special key that users need to know in order to encrypt and decrypt messages. For the above example, that key is 1. That is, the cipher indicates you should shift each letter back by one character. The key is very important to keep secret because anyone with the key can easily decrypt your message.
Note: While you could use this for your encryption, this still isn’t terribly secure. This cipher is quick to break using frequency analysis and is much too primitive for the Secret Squirrels.
In the modern era, cryptography is a lot more advanced. It relies on complex mathematical theory and computer science to be secure. While the math behind these ciphers is outside of the scope of this tutorial, the underlying concepts are still the same. You have a cipher that describes how to take plaintext and convert it into ciphertext.
The only real difference between your substitution cipher and modern ciphers is that modern ciphers are mathematically proven to be impractical to break by an eavesdropper. Now, let’s see how to use your new ciphers.
Using Cryptography in Python HTTPS Applications
Luckily for you, you don’t have to be an expert in mathematics or computer science to use cryptography. Python also has a secrets module that can help you generate cryptographically-secure random data. In this tutorial, you’ll learn about a Python library that’s aptly named cryptography. It’s available on PyPI, so you can install it with pip:
$ pip install cryptography
This will install cryptography into your virtual environment. With cryptography installed, you can now encrypt and decrypt things in a way that’s mathematically secure by using the Fernet method.
Recall that your secret key in your cipher was 1. In the same vein, you need to create a key for Fernet to work correctly:
>>> from cryptography.fernet import Fernet
>>> key = Fernet.generate_key()
>>> key
b'8jtTR9QcD-k3RO9Pcd5ePgmTu_itJQt9WKQPzqjrcoM='
In this code, you’ve imported Fernet and generated a key. The key is just a bunch of bytes, but it’s incredibly important that you keep this key secret and safe. Just like the substitution example above, anyone with this key can easily decrypt your messages.
Note: In real life, you would keep this key very secure. In these examples, it’s helpful to see the key, but this is bad practice, especially if you’re posting it on a public website! In other words, do not use the exact key you see above for anything you want to be secure.
This key behaves much like the earlier key. It’s required to make the transition to ciphertext and back to plaintext. Now it’s time for the fun part! You can encrypt a message like this:
>>> my_cipher = Fernet(key)
>>> ciphertext = my_cipher.encrypt(b"fluffy tail")
>>> ciphertext
b'gAAAAABdlW033LxsrnmA2P0WzaS-wk1UKXA1IdyDpmHcV6yrE7H_ApmSK8KpCW-6jaODFaeTeDRKJMMsa_526koApx1suJ4_dQ=='
In this code, you’ve created a Fernet object called my_cipher, which you can then use to encrypt your message. Notice that your secret message "fluffy tail" needs to be a bytes object in order to encrypt it. After the encryption, you can see that the ciphertext is a long stream of bytes.
Thanks to Fernet, this ciphertext can’t be manipulated or read without the key! This type of encryption requires that both the server and the client have access to the key. When both sides require the same key, this is called symmetric encryption. In the next section, you’ll see how to put this symmetric encryption to use to keep your data safe.
Seeing That Your Data Is Safe
Now that you understand some of the basics of cryptography in Python, you can apply this knowledge to your server. Create a new file called symmetric_server.py:
# symmetric_server.py
import os
from flask import Flask
from cryptography.fernet import Fernet

SECRET_KEY = os.environb[b"SECRET_KEY"]
SECRET_MESSAGE = b"fluffy tail"
app = Flask(__name__)

my_cipher = Fernet(SECRET_KEY)

@app.route("/")
def get_secret_message():
    return my_cipher.encrypt(SECRET_MESSAGE)
This code combines your original server code with the Fernet object you used in the previous section. The key is now read as a bytes object from the environment using os.environb. With the server out of the way, you can now focus on the client. Paste the following into symmetric_client.py:
# symmetric_client.py
import os
import requests
from cryptography.fernet import Fernet

SECRET_KEY = os.environb[b"SECRET_KEY"]
my_cipher = Fernet(SECRET_KEY)

def get_secret_message():
    response = requests.get("http://127.0.0.1:5683")

    decrypted_message = my_cipher.decrypt(response.content)
    print(f"The codeword is: {decrypted_message}")

if __name__ == "__main__":
    get_secret_message()
Once again, this is modified code to combine your earlier client with the Fernet encryption mechanism. get_secret_message() does the following:
- Make the request to your server.
- Take the raw bytes from the response.
- Attempt to decrypt the raw bytes.
- Print the decrypted message.
If you run both the server and the client, then you’ll see that you’re successfully encrypting and decrypting your secret message:
$ uwsgi --http-socket 127.0.0.1:5683 \
    --env SECRET_KEY="8jtTR9QcD-k3RO9Pcd5ePgmTu_itJQt9WKQPzqjrcoM=" \
    --mount /=symmetric_server:app
In this call, you start the server on port 5683 again. This time, you pass in a SECRET_KEY which must be at least a 32-length base64 encoded string. With your server restarted, you may now query it:
$ SECRET_KEY="8jtTR9QcD-k3RO9Pcd5ePgmTu_itJQt9WKQPzqjrcoM=" python symmetric_client.py
The secret message is: b'fluffy tail'
Woohoo! Your were able to encrypt and decrypt your message. If you try running this with an invalid SECRET_KEY, then you’ll get an error:
$ SECRET_KEY="AAAAAAAAAAAAAAAAAAAAAAAAAAAAAAAAAAAAAAAAAAA=" python symmetric_client.py
Traceback (most recent call last):
  File ".../cryptography/fernet.py", line 104, in _verify_signature
    h.verify(data[-32:])
  File ".../cryptography/hazmat/primitives/hmac.py", line 66, in verify
    ctx.verify(signature)
  File ".../cryptography/hazmat/backends/openssl/hmac.py", line 74, in verify
    raise InvalidSignature("Signature did not match digest.")
cryptography.exceptions.InvalidSignature: Signature did not match digest.

During handling of the above exception, another exception occurred:

Traceback (most recent call last):
  File "symmetric_client.py", line 16, in <module>
    get_secret_message()
  File "symmetric_client.py", line 11, in get_secret_message
    decrypted_message = my_cipher.decrypt(response.content)
  File ".../cryptography/fernet.py", line 75, in decrypt
    return self._decrypt_data(data, timestamp, ttl)
  File ".../cryptography/fernet.py", line 117, in _decrypt_data
    self._verify_signature(data)
  File ".../cryptography/fernet.py", line 106, in _verify_signature
    raise InvalidToken
cryptography.fernet.InvalidToken
So, you know the encryption and decryption are working. But is it secure? Well, yes, it is. To prove this, you can go back to Wireshark and start a new capture with the same filters as before. After you have the capture setup, run the client code again:
$ SECRET_KEY="8jtTR9QcD-k3RO9Pcd5ePgmTu_itJQt9WKQPzqjrcoM=" python symmetric_client.py
The secret message is: b'fluffy tail'
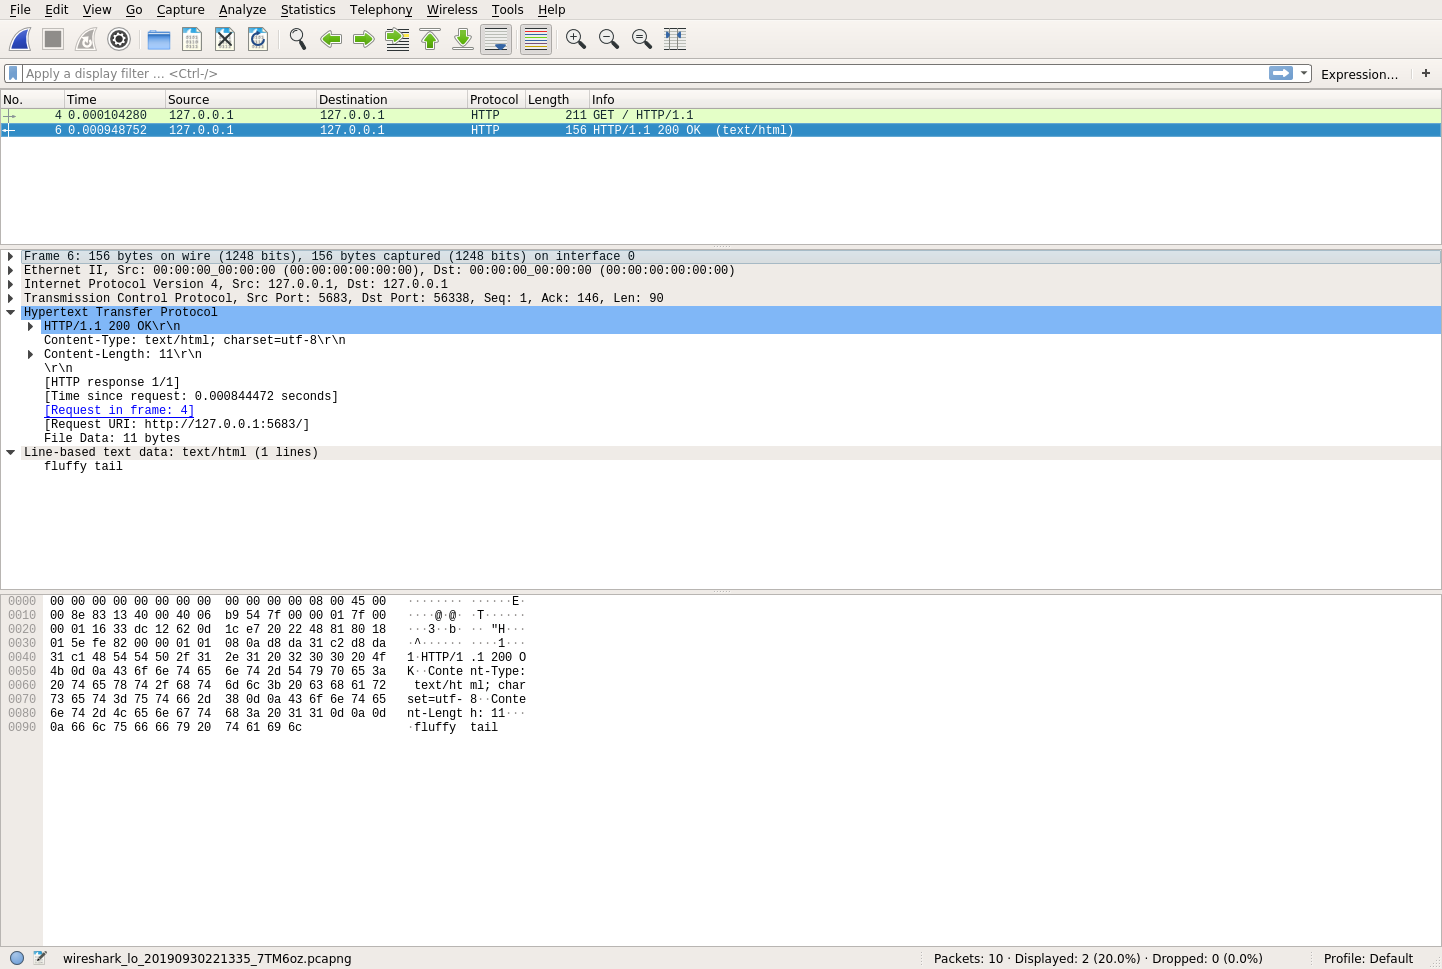
You’ve made another successful HTTP request and response, and once again, you see these messages in Wireshark. Since the secret message only gets transferred in the response, you can click on that to look at the data:
In the middle row of this picture, you can see the data that was actually transferred:
gAAAAABdlXSesekh9LYGDpZE4jkxm4Ai6rZQg2iHaxyDXkPWz1O74AB37V_a4vabF13fEr4kwmCe98Wlr8Zo1XNm-WjAVtSgFQ==
Awesome! This means that the data was encrypted and that eavesdroppers have no clue what the message content actually is. Not only that, but it also means that they could spend an insanely long amount of time trying to brute-force crack this data, and they would almost never be successful.
Your data is safe! But wait a minute—you never had to know anything about a key when you were using Python HTTPS applications before. That’s because HTTPS doesn’t use symmetric encryption exclusively. As it turns out, sharing secrets is a hard problem.
To prove this concept, navigate to http://127.0.0.1:5683 in your browser, and you’ll see the encrypted response text. This is because your browser doesn’t know anything about your secret cipher key. So how do Python HTTPS applications really work? That’s where asymmetric encryption comes into play.
How Are Keys Shared?
In the previous section, you saw how you could use symmetric encryption to keep your data secure as it traverses the Internet. Still, even though symmetric encryption is secure, it isn’t the only encryption technique used by Python HTTPS applications to keep your data safe. Symmetric encryption introduces some fundamental problems that are not so easily solved.
Note: Remember, symmetric encryption requires that you have a shared key between client and server. Unfortunately, security only works as hard as your weakest link, and weak links are especially catastrophic in symmetric encryption. Once one person compromises the key, then every key is compromised. It’s safe to assume that any security system will, at some point, become compromised.
So, how do you change your key? If you only have one server and one client, then this might be a quick task. However, as you get more clients and more servers, there is more and more coordination that needs to happen in order to change the key and keep your secrets safe effectively.
Moreover, you have to choose a new secret every time. In the above example, you saw a randomly generated key. It can be next to impossible for you to try and get people to remember that key. As your client and server numbers grow, you’ll likely use keys that are easier to remember and guess.
If you can deal with changing your key, then you still have one more problem to solve. How do you share your initial key? In the Secret Squirrels example, you solved this problem by having physical access to each of the members. You could give each member the secret in person and tell them to keep it secret, but remember that someone will be the weakest link.
Now, suppose you add a member to the Secret Squirrels from another physical location. How do you share the secret with this member? Do you make them take a plane to you each time the key changes? It would be nice if you could put up the secret key on your server and share it automatically. Unfortunately, this would defeat the whole purpose of encryption, since anyone could get the secret key!
Of course, you could give everyone an initial master key to get the secret message, but now you just have twice as many problems as before. If your head hurts, then don’t worry! You’re not the only one.
What you need is for two parties that have never communicated to have a shared secret. Sounds impossible, right? Luckily, three guys by the names of Ralph Merkle, Whitfield Diffie, and Martin Hellman have your back. They helped demonstrate that public-key cryptography, otherwise known as asymmetric encryption, was possible.
Note: While Whitfield Diffie and Martin Hellman are widely known as the first to discover the scheme, it was revealed in 1997 that three men working for GCHQ named James H. Ellis, Clifford Cocks, and Malcolm J. Williamson had previously demonstrated this capability seven years earlier!
Asymmetric encryption allows for two users who have never communicated before to share a common secret. One of the easiest ways to understand the fundamentals is to use a color analogy. Imagine you have the following scenario:
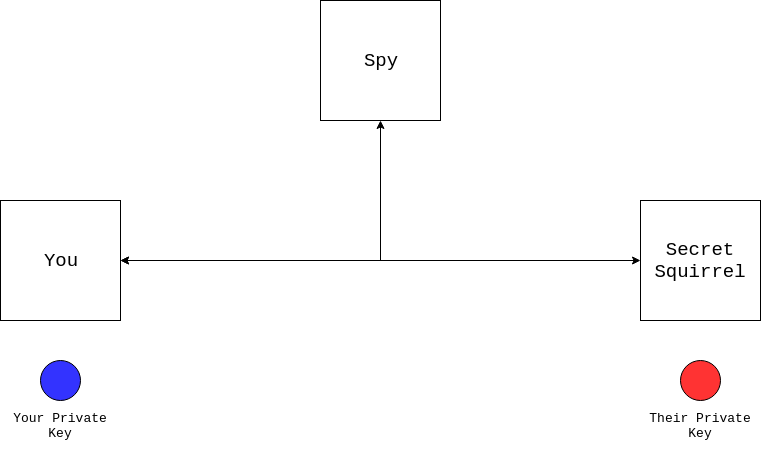
In this diagram, you’re trying to communicate with a Secret Squirrel you’ve never met before, but a spy can see everything you send. You know about symmetric encryption and would like to use it, but you first need to share a secret. Luckily, both of you have a private key. Unfortunately, you can’t send your private key because the spy will see it. So what do you do?
The first thing you need to do is agree with your partner on a color, like yellow:

Notice here that the spy can see the shared color, as can you and the Secret Squirrel. The shared color is effectively public. Now, both you and the Secret Squirrel combine your private keys with the shared color:

Your colors combine to make green, while the Secret Squirrel’s colors combine to make orange. Both of you are done with the shared color, and now you need to share your combined colors with one another:

You now have your private key and the Secret Squirrel’s combined color. Likewise, the Secret Squirrel has their private key and your combined color. It was pretty quick for you and the Secret Squirrel to combine your colors.
The spy, however, only has these combined colors. Trying to figure out your exact original color is very hard, even given the initial shared color. The spy would have to go to the store and buy lots of different blues to try. Even then, it would be hard to know if they were looking at the right shade of green after the combination! In short, your private key is still private.
But what about you and the Secret Squirrel? You still don’t have a combined secret! This is where your private key comes back. If you combine your private key with the combined color you received from the Secret Squirrel, then you’ll both end up with the same color:

Now, you and the Secret Squirrel have the same shared secret color. You have now successfully shared a secure secret with a complete stranger. This is surprisingly accurate to how public-key cryptography works. Another common name for this sequence of events is the Diffie-Hellman key exchange. The key exchange is made up of the following parts:
- The private key is your private color from the examples.
- The public key is the combined color that you shared.
The private key is something you always keep private, while the public key can be shared with anyone. These concepts map directly to the real world of Python HTTPS applications. Now that the server and the client have a shared secret, you can use your old pal symmetric encryption to encrypt all further messages!
Note: Public-key cryptography also relies on some math to do color mixing. The Wikipedia page for the Diffie-Hellman key exchange has a good explanation, but an in-depth explanation is outside the scope of this tutorial.
When you’re communicating over a secure website, like this one, your browser and the server set up a secure communication using these same principles:
- Your browser requests information from the server.
- Your browser and the server exchange public keys.
- Your browser and the server generate a shared private key.
- Your browser and the server encrypt and decrypt messages using this shared key through symmetric encryption.
Luckily for you, you don’t need to implement any of these details. There are lots of built-in and third-party libraries that can help you keep your client and server communications secure.
What Is HTTPS Like in the Real World?
Given all this information about encryption, let’s zoom out a bit and talk about how Python HTTPS applications actually work in the real world. Encryption is only half of the story. When visiting a secure website, there are two major components needed:
- Encryption converts plaintext to ciphertext and back.
- Authentication verifies that a person or thing is who they say they are.
You’ve heard extensively about how encryption works, but what about authentication? To understand authentication in the real world, you’ll need to know about Public Key Infrastructure. PKI introduces another important concept into the security ecosystem, called certificates.
Certificates are like passports for the Internet. Like most things in the computer world, they are just chunks of data in a file. Generally speaking, certificates include the following information:
- Issued To: identifies who owns the certificate
- Issued By: identifies who issued the certificate
- Validity Period: identifies the time frame for which the certificate is valid
Just like passports, certificates are only really useful if they’re generated and recognized by some authority. It’s impractical for your browser to know about every single certificate of every site you visit on the Internet. Instead, PKI relies on a concept known as Certificate Authorities (CA).
Certificate Authorities are responsible for issuing certificates. They are considered a trusted third party (TTP) in PKI. Essentially, these entities act as valid authorities for a certificate. Suppose you’d like to visit another country, and you have a passport with all your information on it. How do the immigration officers in the foreign country know that your passport contains valid information?
If you were to fill out all the information yourself and sign it, then each immigration officer in each country you want to visit would need to know you personally and be able to attest that the information there was indeed correct.
Another way to handle this is to send all your information into a Trusted Third Party (TTP). The TTP would do a thorough investigation of the information you provided, verify your claims, and then sign your passport. This turns out to be much more practical because the immigration officers only need to know the trusted third parties.
The TTP scenario is how certificates are handled in practice. The process goes something like this:
- Create a Certificate Signing Request (CSR): This is like filling out the information for your visa.
- Send the CSR to a Trusted Third Party (TTP): This is like sending your information into a visa application office.
- Verify your information: Somehow, the TTP needs to verify the information you provided. As an example, see how Amazon validates ownership.
- Generate a Public Key: The TTP signs your CSR. This is equivalent to the TTP signing your visa.
- Issue the verified Public Key: This is equivalent to you receiving your visa in the mail.
Note that the CSR is tied cryptographically to your private key. As such, all three pieces of information—public key, private key, and certificate authority—are related in one way or another. This creates what is known as a chain of trust, so you now have a valid certificate that can be used to verify your identity.
Most often, this is only the responsibility of website owners. A website owner will follow all these steps. At the end of this process, their certificate says the following:
From time
Ato timeBI amXaccording toY
This sentence is all that a certificate really tells you. The variables can be filled in as follows:
- A is the valid start date and time.
- B is the valid end date and time.
- X is the name of the server.
- Y is the name of the Certificate Authority.
Fundamentally, this is all a certificate describes. In other words, having a certificate doesn’t necessarily mean that you are who you say you are, just that you got Y to agree that you are who you say you are. This is where the “trusted” part of trusted third parties come in.
TTPs need to be shared between clients and servers in order for everyone to be happy about the HTTPS handshake. Your browser comes with lots of Certificate Authorities automatically installed. To see them, take the following steps:
- Chrome: Go to Settings > Advanced > Privacy and security > Manage certificates > Authorities.
- Firefox: Go to Settings > Preferences > Privacy & Security > View Certificates > Authorities.
This covers the infrastructure required to create Python HTTPS applications in the real world. In the next section, you’ll apply these concepts to your own code. You’ll walk through the most common examples and become your own Certificate Authority for the Secret Squirrels!
What Does a Python HTTPS Application Look Like?
Now that you have an understanding of the basic parts required for a making a Python HTTPS application, it’s time to tie all the pieces together one-by-one to your application from before. This will ensure that your communication between server and client is secure.
It’s possible to set up the entire PKI infrastructure on your own machine, and this is exactly what you’ll be doing in this section. It’s not as hard as it sounds, so don’t worry! Becoming a real Certificate Authority is significantly harder than taking the steps below, but what you’ll read is, more or less, all you’d need to run your own CA.
Becoming a Certificate Authority
A Certificate Authority is nothing more than a very important public and private key pair. To become a CA, you just need to generate a public and private key pair.
Note: Becoming a CA that’s meant for use by the public is a very arduous process, though there are many companies that have followed this process. You won’t be one of those companies by the end of this tutorial, however!
Your initial public and private key pair will be a self-signed certificate. You’re generating the initial secret, so if you’re actually going to become a CA, then it’s incredibly important that this private key is safe. If someone gets access to the CA’s public and private key pair, then they can generate a completely valid certificate, and there’s nothing you can do to detect the problem except to stop trusting your CA.
With that warning out of the way, you can generate the certificate in no time. For starters, you’ll need to generate a private key. Paste the following into a file called pki_helpers.py:
 1# pki_helpers.py
 2from cryptography.hazmat.backends import default_backend
 3from cryptography.hazmat.primitives import serialization
 4from cryptography.hazmat.primitives.asymmetric import rsa
 5
 6def generate_private_key(filename: str, passphrase: str):
 7    private_key = rsa.generate_private_key(
 8        public_exponent=65537, key_size=2048, backend=default_backend()
 9    )
10
11    utf8_pass = passphrase.encode("utf-8")
12    algorithm = serialization.BestAvailableEncryption(utf8_pass)
13
14    with open(filename, "wb") as keyfile:
15        keyfile.write(
16            private_key.private_bytes(
17                encoding=serialization.Encoding.PEM,
18                format=serialization.PrivateFormat.TraditionalOpenSSL,
19                encryption_algorithm=algorithm,
20            )
21        )
22
23    return private_key
generate_private_key() generates a private key using RSA. Here’s a breakdown of the code:
- Lines 2 to 4 import the libraries required for the function to work.
- Lines 7 to 9 use RSA to generate a private key. The magic numbers
65537and2048are just two possible values. You can read more about why or just trust that these numbers are useful. - Lines 11 to 12 set up the encryption algorithm to be used on your private key.
- Lines 14 to 21 write your private key to disk at the specified
filename. This file is encrypted using the password provided.
The next step in becoming your own CA is to generate a self-signed public key. You can bypass the certificate signing request (CSR) and immediately build a public key. Paste the following into pki_helpers.py:
 1# pki_helpers.py
 2from datetime import datetime, timedelta
 3from cryptography import x509
 4from cryptography.x509.oid import NameOID
 5from cryptography.hazmat.primitives import hashes
 6
 7def generate_public_key(private_key, filename, **kwargs):
 8    subject = x509.Name(
 9        [
10            x509.NameAttribute(NameOID.COUNTRY_NAME, kwargs["country"]),
11            x509.NameAttribute(
12                NameOID.STATE_OR_PROVINCE_NAME, kwargs["state"]
13            ),
14            x509.NameAttribute(NameOID.LOCALITY_NAME, kwargs["locality"]),
15            x509.NameAttribute(NameOID.ORGANIZATION_NAME, kwargs["org"]),
16            x509.NameAttribute(NameOID.COMMON_NAME, kwargs["hostname"]),
17        ]
18    )
19
20    # Because this is self signed, the issuer is always the subject
21    issuer = subject
22
23    # This certificate is valid from now until 30 days
24    valid_from = datetime.utcnow()
25    valid_to = valid_from + timedelta(days=30)
26
27    # Used to build the certificate
28    builder = (
29        x509.CertificateBuilder()
30        .subject_name(subject)
31        .issuer_name(issuer)
32        .public_key(private_key.public_key())
33        .serial_number(x509.random_serial_number())
34        .not_valid_before(valid_from)
35        .not_valid_after(valid_to)
36        .add_extension(x509.BasicConstraints(ca=True,
37            path_length=None), critical=True)
38    )
39
40    # Sign the certificate with the private key
41    public_key = builder.sign(
42        private_key, hashes.SHA256(), default_backend()
43    )
44
45    with open(filename, "wb") as certfile:
46        certfile.write(public_key.public_bytes(serialization.Encoding.PEM))
47
48    return public_key
Here you have a new function generate_public_key() that will generate a self-signed public key. Here’s how this code works:
- Lines 2 to 5 are imports required for the function to work.
- Lines 8 to 18 build up information about the subject of the certificate.
- Line 21 uses the same issuer and subject since this is a self-signed certificate.
- Lines 24 to 25 indicate the time range during which this public key is valid. In this case, it’s 30 days.
- Lines 28 to 38 add all required information to a public key builder object, which then needs to be signed.
- Lines 41 to 43 sign the public key with the private key.
- Lines 45 to 46 write the public key out to
filename.
Using these two functions, you can generate your private and public key pair quite quickly in Python:
>>> from pki_helpers import generate_private_key, generate_public_key
>>> private_key = generate_private_key("ca-private-key.pem", "secret_password")
>>> private_key
<cryptography.hazmat.backends.openssl.rsa._RSAPrivateKey object at 0x7ffbb292bf90>
>>> generate_public_key(
...   private_key,
...   filename="ca-public-key.pem",
...   country="US",
...   state="Maryland",
...   locality="Baltimore",
...   org="My CA Company",
...   hostname="my-ca.com",
... )
<Certificate(subject=<Name(C=US,ST=Maryland,L=Baltimore,O=My CA Company,CN=logan-ca.com)>, ...)>
After importing your helper functions from pki_helpers, you first generate your private key and save it to the file ca-private-key.pem. You then pass that private key into generate_public_key() to generate your public key. In your directory you should now have two files:
$ ls ca*
ca-private-key.pem ca-public-key.pem
Congratulations! You now have the ability to be a Certificate Authority.
Trusting Your Server
The first step to your server becoming trusted is for you to generate a Certificate Signing Request (CSR). In the real world, the CSR would be sent to an actual Certificate Authority like Verisign or Let’s Encrypt. In this example, you’ll use the CA you just created.
Paste the code for generating a CSR into the pki_helpers.py file from above:
 1# pki_helpers.py
 2def generate_csr(private_key, filename, **kwargs):
 3    subject = x509.Name(
 4        [
 5            x509.NameAttribute(NameOID.COUNTRY_NAME, kwargs["country"]),
 6            x509.NameAttribute(
 7                NameOID.STATE_OR_PROVINCE_NAME, kwargs["state"]
 8            ),
 9            x509.NameAttribute(NameOID.LOCALITY_NAME, kwargs["locality"]),
10            x509.NameAttribute(NameOID.ORGANIZATION_NAME, kwargs["org"]),
11            x509.NameAttribute(NameOID.COMMON_NAME, kwargs["hostname"]),
12        ]
13    )
14
15    # Generate any alternative dns names
16    alt_names = []
17    for name in kwargs.get("alt_names", []):
18        alt_names.append(x509.DNSName(name))
19    san = x509.SubjectAlternativeName(alt_names)
20
21    builder = (
22        x509.CertificateSigningRequestBuilder()
23        .subject_name(subject)
24        .add_extension(san, critical=False)
25    )
26
27    csr = builder.sign(private_key, hashes.SHA256(), default_backend())
28
29    with open(filename, "wb") as csrfile:
30        csrfile.write(csr.public_bytes(serialization.Encoding.PEM))
31
32    return csr
For the most part this code is identical to how you generated your original public key. The main differences are outlined below:
- Lines 16 to 19 set up alternate DNS names, which will be valid for your certificate.
- Lines 21 to 25 generate a different builder object, but the same fundamental principle applies as before. You’re building all the required attributes for your CSR.
- Line 27 signs your CSR with a private key.
- Lines 29 to 30 write your CSR to disk in PEM format.
You’ll notice that, in order to create a CSR, you’ll need a private key first. Luckily, you can use the same generate_private_key() from when you created your CA’s private key. Using the above function and the previous methods defined, you can do the following:
>>> from pki_helpers import generate_csr, generate_private_key
>>> server_private_key = generate_private_key(
...   "server-private-key.pem", "serverpassword"
... )
>>> server_private_key
<cryptography.hazmat.backends.openssl.rsa._RSAPrivateKey object at 0x7f6adafa3050>
>>> generate_csr(
...   server_private_key,
...   filename="server-csr.pem",
...   country="US",
...   state="Maryland",
...   locality="Baltimore",
...   org="My Company",
...   alt_names=["localhost"],
...   hostname="my-site.com",
... )
<cryptography.hazmat.backends.openssl.x509._CertificateSigningRequest object at 0x7f6ad5372210>
After you run these steps in a console, you should end up with two new files:
server-private-key.pem: your server’s private keyserver-csr.pem: your server’s CSR
You can view your new CSR and private key from the console:
$ ls server*.pem
server-csr.pem  server-private-key.pem
With these two documents in hand, you can now begin the process of signing your keys. Typically, lots of verification would happen in this step. In the real world, the CA would make sure that you owned my-site.com and ask you to prove it in various ways.
Since you are the CA in this case, you can forego that headache and create your very own verified public key. To do that, you’ll add another function to your pki_helpers.py file:
 1# pki_helpers.py
 2def sign_csr(csr, ca_public_key, ca_private_key, new_filename):
 3    valid_from = datetime.utcnow()
 4    valid_until = valid_from + timedelta(days=30)
 5
 6    builder = (
 7        x509.CertificateBuilder()
 8        .subject_name(csr.subject)
 9        .issuer_name(ca_public_key.subject)
10        .public_key(csr.public_key())
11        .serial_number(x509.random_serial_number())
12        .not_valid_before(valid_from)
13        .not_valid_after(valid_until)
14    )
15
16    for extension in csr.extensions:
17        builder = builder.add_extension(extension.value, extension.critical)
18
19    public_key = builder.sign(
20        private_key=ca_private_key,
21        algorithm=hashes.SHA256(),
22        backend=default_backend(),
23    )
24
25    with open(new_filename, "wb") as keyfile:
26        keyfile.write(public_key.public_bytes(serialization.Encoding.PEM))
This code looks very similar to generate_public_key() from the generate_ca.py file. In fact, they’re nearly identical. The major differences are as follows:
- Lines 8 to 9 base the subject name on the CSR, while the issuer is based on the Certificate Authority.
- Line 10 gets the public key from the CSR this time. The line in
generate_public_key()that specifies this is a CA, at the end of thebuilderdefinition, has been removed. - Lines 16 to 17 copy any extensions that were set on the CSR.
- Line 20 signs the public key with the CA’s private key.
The next step is to fire up the Python console and use sign_csr(). You’ll need to load your CSR and your CA’s private and public key. Begin by loading your CSR:
>>> from cryptography import x509
>>> from cryptography.hazmat.backends import default_backend
>>> csr_file = open("server-csr.pem", "rb")
>>> csr = x509.load_pem_x509_csr(csr_file.read(), default_backend())
>>> csr
<cryptography.hazmat.backends.openssl.x509._CertificateSigningRequest object at 0x7f68ae289150>
In this section of code, you’re opening up your server-csr.pem file and using x509.load_pem_x509_csr() to create your csr object. Next up, you’ll need to load your CA’s public key:
>>> ca_public_key_file = open("ca-public-key.pem", "rb")
>>> ca_public_key = x509.load_pem_x509_certificate(
...   ca_public_key_file.read(), default_backend()
... )
>>> ca_public_key
<Certificate(subject=<Name(C=US,ST=Maryland,L=Baltimore,O=My CA Company,CN=logan-ca.com)>, ...)>
Once again, you’ve created a ca_public_key object which can be used by sign_csr(). The x509 module had the handy load_pem_x509_certificate() to help. The final step is to load your CA’s private key:
>>> from getpass import getpass
>>> from cryptography.hazmat.primitives import serialization
>>> ca_private_key_file = open("ca-private-key.pem", "rb")
>>> ca_private_key = serialization.load_pem_private_key(
...   ca_private_key_file.read(),
...   getpass().encode("utf-8"),
...   default_backend(),
... )
Password:
>>> private_key
<cryptography.hazmat.backends.openssl.rsa._RSAPrivateKey object at 0x7f68a85ade50>
This code will load up your private key. Recall from earlier that your private key was encrypted using the password you specified. With these three components, you can now sign your CSR and generate a verified public key:
>>> from pki_helpers import sign_csr
>>> sign_csr(csr, ca_public_key, ca_private_key, "server-public-key.pem")
After running this, you should have three server key files in your directory:
$ ls server*.pem
server-csr.pem  server-private-key.pem  server-public-key.pem
Whew! That was quite a lot of work. The good news is that now that you have your private and public key pair, you don’t have to change any server code to start using it.
Using your original server.py file, run the following command to start your brand new Python HTTPS application:
$ uwsgi \
    --master \
    --https localhost:5683,\
            logan-site.com-public-key.pem,\
            logan-site.com-private-key.pem \
    --mount /=server:app
Congratulations! You now have a Python HTTPS-enabled server running with your very own private-public key pair, which was signed by your very own Certificate Authority!
Note: There is another side to the Python HTTPS authentication equation, and that’s the client. It’s possible to set up certificate verification for a client certificate as well. This requires a bit more work and isn’t really seen outside of enterprises. However, client authentication can be a very powerful tool.
Now, all that’s left to do is query your server. First, you’ll need to make some changes to the client.py code:
# client.py
import os
import requests

def get_secret_message():
    response = requests.get("https://localhost:5683")
    print(f"The secret message is {response.text}")

if __name__ == "__main__":
    get_secret_message()
The only change from the previous code is from http to https. If you try to run this code, then you’ll be met with an error:
$ python client.py
...
requests.exceptions.SSLError: \
    HTTPSConnectionPool(host='localhost', port=5683): \
    Max retries exceeded with url: / (Caused by \
    SSLError(SSLCertVerificationError(1, \
    '[SSL: CERTIFICATE_VERIFY_FAILED] \
    certificate verify failed: unable to get local issuer \
    certificate (_ssl.c:1076)')))
That’s quite the nasty error message! The important part here is the message certificate verify failed: unable to get local issuer. These words should be more familiar to you now. Essentially, it’s saying the following:
localhost:5683 gave me a certificate. I checked the issuer of the certificate it gave me, and according to all the Certificate Authorities I know about, that issuer is not one of them.
If you attempt to navigate to your website with your browser, then you’ll get a similar message:

If you want to avoid this message, then you have to tell requests about your Certificate Authority! All you need to do is point requests at the ca-public-key.pem file that you generated earlier:
# client.py
def get_secret_message():
    response = requests.get("http://localhost:5683", verify="ca-public-key.pem")
    print(f"The secret message is {response.text}")
After doing that, you should be able to run the following successfully:
$ python client.py
The secret message is fluffy tail
Nice! You’ve made a fully-functioning Python HTTPS server and queried it successfully. You and the Secret Squirrels now have messages that you can trade back and forth happily and securely!
Conclusion
In this tutorial, you’ve learned some of the core underpinnings of secure communications on the Internet today. Now that you understand these building blocks, you’ll become a better and more secure developer.
Throughout this tutorial, you’ve gained an understanding of several topics:
- Cryptography
- HTTPS and TLS
- Public Key Infrastructure
- Certificates
If this information has you interested, then you’re in luck! You’ve barely scratched the surface of all the nuances involved in every layer. The security world is constantly evolving, and new techniques and vulnerabilities are always being discovered. If you still have questions, then feel free to reach out in the comments section below or on Twitter.
Watch Now This tutorial has a related video course created by the Real Python team. Watch it together with the written tutorial to deepen your understanding: Exploring HTTPS and Cryptography in Python


