
Watch Now This tutorial has a related video course created by the Real Python team. Watch it together with the written tutorial to deepen your understanding: Continuous Integration With Python
When writing code on your own, the only priority is making it work. However, working in a team of professional software developers brings a plethora of challenges. One of those challenges is coordinating many people working on the same code.
How do professional teams make dozens of changes per day while making sure everyone is coordinated and nothing is broken? Enter continuous integration!
In this tutorial you’ll:
- Learn the core concepts behind continuous integration
- Understand the benefits of continuous integration
- Set up a basic continuous integration system
- Create a simple Python example and connect it to the continuous integration system
Free Bonus: 5 Thoughts On Python Mastery, a free course for Python developers that shows you the roadmap and the mindset you’ll need to take your Python skills to the next level.
What Is Continuous Integration?
Continuous integration (CI) is the practice of frequently building and testing each change done to your code automatically and as early as possible. Prolific developer and author Martin Fowler defines CI as follows:
“Continuous Integration is a software development practice where members of a team integrate their work frequently, usually each person integrates at least daily - leading to multiple integrations per day. Each integration is verified by an automated build (including test) to detect integration errors as quickly as possible.” (Source)
Let’s unpack this.
Programming is iterative. The source code lives in a repository that is shared by all members of the team. If you want to work on that product, you must obtain a copy. You will make changes, test them, and integrate them back into the main repo. Rinse and repeat.
Not so long ago, these integrations were big and weeks (or months) apart, causing headaches, wasting time, and losing money. Armed with experience, developers started making minor changes and integrating them more frequently. This reduces the chances of introducing conflicts that you need to resolve later.
After every integration, you need to build the source code. Building means transforming your high-level code into a format your computer knows how to run. Finally, the result is systematically tested to ensure your changes did not introduce errors.
Why Should I Care?
On a personal level, continuous integration is really about how you and your colleagues spend your time.
Using CI, you’ll spend less time:
- Worrying about introducing a bug every time you make changes
- Fixing the mess someone else made so you can integrate your code
- Making sure the code works on every machine, operating system, and browser
Conversely, you’ll spend more time:
- Solving interesting problems
- Writing awesome code with your team
- Co-creating amazing products that provide value to users
How does that sound?
On a team level, it allows for a better engineering culture, where you deliver value early and often. Collaboration is encouraged, and bugs are caught much sooner. Continuous integration will:
- Make you and your team faster
- Give you confidence that you’re building stable software with fewer bugs
- Ensure that your product works on other machines, not just your laptop
- Eliminate a lot of tedious overhead and let you focus on what matters
- Reduce the time spent resolving conflicts (when different people modify the same code)
Core Concepts
There are several key ideas and practices that you need to understand to work effectively with continuous integration. Also, there might be some words and phrases you aren’t familiar with but are used often when you’re talking about CI. This chapter will introduce you to these concepts and the jargon that comes with them.
Single Source Repository
If you are collaborating with others on a single code base, it’s typical to have a shared repository of source code. Every developer working on the project creates a local copy and makes changes. Once they are satisfied with the changes, they merge them back into the central repository.
It has become a standard to use version control systems (VCS) like Git to handle this workflow for you. Teams typically use an external service to host their source code and handle all the moving parts. The most popular are GitHub, BitBucket, and GitLab.
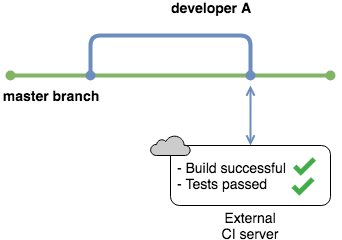
Git allows you to create multiple branches of a repository. Each branch is an independent copy of the source code and can be modified without affecting other branches. This is an essential feature, and most teams have a mainline branch (often called a master branch) that represents the current state of the project.
If you want to add or modify code, you should create a copy of the main branch and work in your new, development branch. Once you are done, merge those changes back into the master branch.

Version control holds more than just code. Documentation and test scripts are usually stored along with the source code. Some programs look for external files used to configure their parameters and initial settings. Other applications need a database schema. All these files should go into your repository.
If you have never used Git or need a refresher, check out our Introduction to Git and GitHub for Python Developers.
Automating the Build
As previously mentioned, building your code means taking the raw source code, and everything necessary for its execution, and translating it into a format that computers can run directly. Python is an interpreted language, so its “build” mainly revolves around test execution rather than compilation.
Running those steps manually after every small change is tedious and takes valuable time and attention from the actual problem-solving you’re trying to do. A big part of continuous integration is automating that process and moving it out of sight (and out of mind).
What does that mean for Python? Think about a more complicated piece of code you have written. If you used a library, package, or framework that doesn’t come with the Python standard library (think anything you needed to install with pip or conda), Python needs to know about that, so the program knows where to look when it finds commands that it doesn’t recognize.
You store a list of those packages in requirements.txt or a Pipfile. These are the dependencies of your code and are necessary for a successful build.
You will often hear the phrase “breaking the build.” When you break the build, it means you introduced a change that rendered the final product unusable. Don’t worry. It happens to everyone, even battle-hardened senior developers. You want to avoid this primarily because it will block everyone else from working.
The whole point of CI is to have everyone working on a known stable base. If they clone a repository that is breaking the build, they will work with a broken version of the code and won’t be able to introduce or test their changes. When you break the build, the top priority is fixing it so everyone can resume work.

When the build is automated, you are encouraged to commit frequently, usually multiple times per day. It allows people to quickly find out about changes and notice if there’s a conflict between two developers. If there are numerous small changes instead of a few massive updates, it’s much easier to locate where the error originated. It will also encourage you to break your work down into smaller chunks, which is easier to track and test.
Automated Testing
Since everyone is committing changes multiple times per day, it’s important to know that your change didn’t break anything else in the code or introduce bugs. In many companies, testing is now a responsibility of every developer. If you write code, you should write tests. At a bare minimum, you should cover every new function with a unit test.
Running tests automatically, with every change committed, is a great way to catch bugs. A failing test automatically causes the build to fail. It will draw your attention to the problems revealed by testing, and the failed build will make you fix the bug you introduced. Tests don’t guarantee that your code is free of bugs, but it does guard against a lot of careless changes.
Automating test execution gives you some peace of mind because you know the server will test your code every time you commit, even if you forgot to do it locally.
Using an External Continuous Integration Service
If something works on your computer, will it work on every computer? Probably not. It’s a cliché excuse and a sort of inside joke among developers to say, “Well, it worked on my machine!” Making the code work locally is not the end of your responsibility.
To tackle this problem, most companies use an external service to handle integration, much like using GitHub for hosting your source code repository. External services have servers where they build code and run tests. They act as monitors for your repository and stop anyone from merging to the master branch if their changes break the build.
There are many such services out there, with various features and pricing. Most have a free tier so that you can experiment with one of your repositories. You will use a service called CircleCI in an example later in the tutorial.
Testing in a Staging Environment
A production environment is where your software will ultimately run. Even after successfully building and testing your application, you can’t be sure that your code will work on the target computer. That’s why teams deploy the final product in an environment that mimics the production environment. Once you are sure everything works, the application is deployed in the production environment.
Note: This step is more relevant to application code than library code. Any Python libraries you write still need to be tested on a build server, to ensure they work in environments different from your local computer.
You will hear people talking about this clone of the production environment using terms like development environment, staging environment, or testing environment. It’s common to use abbreviations like DEV for the development environment and PROD for the production environment.
The development environment should replicate production conditions as closely as possible. This setup is often called DEV/PROD parity. Keep the environment on your local computer as similar as possible to the DEV and PROD environments to minimize anomalies when deploying applications.

We mention this to introduce you to the vocabulary, but continuously deploying software to DEV and PROD is a whole other topic. The process is called, unsurprisingly, continuous deployment (CD). You can find more resources about it in the Next Steps section of this article.
Your Turn!
The best way to learn is by doing. You now understand all the essential practices of continuous integration, so it’s time to get your hands dirty and create the whole chain of steps necessary to use CI. This chain is often called a CI pipeline.
This is a hands-on tutorial, so fire up your editor and get ready to work through these steps as you read!
We assume that you know the basics of Python and Git. We will use Github as our hosting service and CircleCI as our external continuous integration service. If you don’t have accounts with these services, go ahead and register. Both of these have free tiers!
Problem Definition
Remember, your focus here is adding a new tool to your utility belt, continuous integration. For this example, the Python code itself will be straightforward. You want to spend the bulk of your time internalizing the steps of building a pipeline, instead of writing complicated code.
Imagine your team is working on a simple calculator app. Your task is to write a library of basic mathematical functions: addition, subtraction, multiplication, and division. You don’t care about the actual application, because that’s what your peers will be developing, using functions from your library.
Create a Repo
Log in to your GitHub account, create a new repository and call it CalculatorLibrary. Add a README and .gitignore, then clone the repository to your local machine. If you need more help with this process, have a look at GitHub’s walkthrough on creating a new repository.
Set Up a Working Environment
For others (and the CI server) to replicate your working conditions, you need to set up an environment. Create a virtual environment somewhere outside your repo and activate it:
$ # Create virtual environment
$ python3 -m venv calculator

$ # Activate virtual environment (Mac and Linux)
$ . calculator/bin/activate
The previous commands work on macOS and Linux. If you are a Windows user, check the Platforms table in the official documentation. This will create a directory that contains a Python installation and tell the interpreter to use it. Now we can install packages knowing that it will not influence your system’s default Python installation.
Write a Simple Python Example
Create a new file called calculator.py in the top-level directory of your repository, and copy the following code:
"""
Calculator library containing basic math operations.
"""

def add(first_term, second_term):
    return first_term + second_term

def subtract(first_term, second_term):
    return first_term - second_term
This is a bare-bones example containing two of the four functions we will be writing. Once we have our CI pipeline up and running, you will add the remaining two functions.
Go ahead and commit those changes:
$ # Make sure you are in the correct directory
$ cd CalculatorLibrary
$ git add calculator.py
$ git commit -m "Add functions for addition and subtraction"
Your CalculatorLibrary folder should have the following files right now:
CalculatorLibrary/
|
├── .git
├── .gitignore
├── README.md
└── calculator.py
Great, you have completed one part of the required functionality. The next step is adding tests to make sure your code works the way it’s supposed to.
Write Unit Tests
You will test your code in two steps.
The first step involves linting—running a program, called a linter, to analyze code for potential errors. flake8 is commonly used to check if your code conforms to the standard Python coding style. Linting makes sure your code is easy to read for the rest of the Python community.
The second step is unit testing. A unit test is designed to check a single function, or unit, of code. Python comes with a standard unit testing library, but other libraries exist and are very popular. This example uses pytest.
A standard practice that goes hand in hand with testing is calculating code coverage. Code coverage is the percentage of source code that is “covered” by your tests. pytest has an extension, pytest-cov, that helps you understand your code coverage.
These are external dependencies, and you need to install them:
$ pip install flake8 pytest pytest-cov
These are the only external packages you will use. Make sure to store those dependencies in a requirements.txt file so others can replicate your environment:
$ pip freeze > requirements.txt
To run your linter, execute the following:
$ flake8 --statistics
./calculator.py:3:1: E302 expected 2 blank lines, found 1
./calculator.py:6:1: E302 expected 2 blank lines, found 1
2     E302 expected 2 blank lines, found 1
The --statistics option gives you an overview of how many times a particular error happened. Here we have two PEP 8 violations, because flake8 expects two blank lines before a function definition instead of one. Go ahead and add an empty line before each functions definition. Run flake8 again to check that the error messages no longer appear.
Now it’s time to write the tests. Create a file called test_calculator.py in the top-level directory of your repository and copy the following code:
"""
Unit tests for the calculator library
"""

import calculator


class TestCalculator:

    def test_addition(self):
        assert 4 == calculator.add(2, 2)

    def test_subtraction(self):
        assert 2 == calculator.subtract(4, 2)
These tests make sure that our code works as expected. It is far from extensive because you haven’t tested for potential misuse of your code, but keep it simple for now.
The following command runs your test:
$ pytest -v --cov
collected 2 items

test_calculator.py::TestCalculator::test_addition PASSED [50%]

test_calculator.py::TestCalculator::test_subtraction PASSED [100%]

---------- coverage: platform darwin, python 3.6.6-final-0 -----------
Name                                              Stmts   Miss  Cover
---------------------------------------------------------------------
calculator.py                                         4      0   100%
test_calculator.py                                    6      0   100%
/Users/kristijan.ivancic/code/learn/__init__.py       0      0   100%
---------------------------------------------------------------------
TOTAL                                                10      0   100%
pytest is excellent at test discovery. Because you have a file with the prefix test, pytest knows it will contain unit tests for it to run. The same principles apply to the class and method names inside the file.
The -v flag gives you a nicer output, telling you which tests passed and which failed. In our case, both tests passed. The --cov flag makes sure pytest-cov runs and gives you a code coverage report for calculator.py.
You have completed the preparations. Commit the test file and push all those changes to the master branch:
$ git add test_calculator.py
$ git commit -m "Add unit tests for calculator"
$ git push
At the end of this section, your CalculatorLibrary folder should have the following files:
CalculatorLibrary/
|
├── .git
├── .gitignore
├── README.md
├── calculator.py
├── requirements.txt
└── test_calculator.py
Excellent, both your functions are tested and work correctly.
Connect to CircleCI
At last, you are ready to set up your continuous integration pipeline!
CircleCI needs to know how to run your build and expects that information to be supplied in a particular format. It requires a .circleci folder within your repo and a configuration file inside it. A configuration file contains instructions for all the steps that the build server needs to execute. CircleCI expects this file to be called config.yml.
A .yml file uses a data serialization language, YAML, and it has its own specification. The goal of YAML is to be human readable and to work well with modern programming languages for common, everyday tasks.
In a YAML file, there are three basic ways to represent data:
- Mappings (key-value pairs)
- Sequences (lists)
- Scalars (strings or numbers)
It is very simple to read:
- Indentation may be used for structure.
- Colons separate key-value pairs.
- Dashes are used to create lists.
Create the .circleci folder in your repo and a config.yml file with the following content:
# Python CircleCI 2.0 configuration file
version: 2
jobs:
  build:
    docker:
      - image: circleci/python:3.7

    working_directory: ~/repo

    steps:
      # Step 1: obtain repo from GitHub
      - checkout
      # Step 2: create virtual env and install dependencies
      - run:
          name: install dependencies
          command: |
            python3 -m venv venv
            . venv/bin/activate
            pip install -r requirements.txt
      # Step 3: run linter and tests
      - run:
          name: run tests
          command: |
            . venv/bin/activate
            flake8 --exclude=venv* --statistics
            pytest -v --cov=calculator
Some of these words and concepts might be unfamiliar to you. For example, what is Docker, and what are images? Let’s go back in time a bit.
Remember the problem programmers face when something works on their laptop but nowhere else? Before, developers used to create a program that isolates a part of the computer’s physical resources (memory, hard drive, and so on) and turns them into a virtual machine.
A virtual machine pretends to be a whole computer on its own. It would even have its own operating system. On that operating system, you deploy your application or install your library and test it.
Virtual machines take up a lot of resources, which sparked the invention of containers. The idea is analogous to shipping containers. Before shipping containers were invented, manufacturers had to ship goods in a wide variety of sizes, packaging, and modes (trucks, trains, ships).
By standardizing the shipping container, these goods could be transferred between different shipping methods without any modification. The same idea applies to software containers.
Containers are a lightweight unit of code and its runtime dependencies, packaged in a standardized way, so they can quickly be plugged in and run on the Linux OS. You don’t need to create a whole virtual operating system, as you would with a virtual machine.
Containers only replicate parts of the operating system they need in order to work. This reduces their size and gives them a big performance boost.
Docker is currently the leading container platform, and it’s even able to run Linux containers on Windows and macOS. To create a Docker container, you need a Docker image. Images provide blueprints for containers much like classes provide blueprints for objects. You can read more about Docker in their Get Started guide.
CircleCI maintains pre-built Docker images for several programming languages. In the above configuration file, you have specified a Linux image that has Python already installed. That image will create a container in which everything else happens.
Let’s look at each line of the configuration file in turn:
-
version: Everyconfig.ymlstarts with the CircleCI version number, used to issue warnings about breaking changes. -
jobs: Jobs represent a single execution of the build and are defined by a collection of steps. If you have only one job, it must be calledbuild. -
build: As mentioned before,buildis the name of your job. You can have multiple jobs, in which case they need to have unique names. -
docker: The steps of a job occur in an environment called an executor. The common executor in CircleCI is a Docker container. It is a cloud-hosted execution environment but other options exist, like a macOS environment. -
image: A Docker image is a file used to create a running Docker container. We are using an image that has Python 3.7 preinstalled. -
working_directory: Your repository has to be checked out somewhere on the build server. The working directory represents the file path where the repository will be stored. -
steps: This key marks the start of a list of steps to be performed by the build server. -
checkout: The first step the server needs to do is check the source code out to the working directory. This is performed by a special step calledcheckout. -
run: Executing command-line programs or commands is done inside thecommandkey. The actual shell commands will be nested within. -
name: The CircleCI user interface shows you every build step in the form of an expandable section. The title of the section is taken from the value associated with thenamekey. -
command: This key represents the command to run via the shell. The|symbol specifices that what follows is a literal set of commands, one per line, exactly like you’d see in a shell/bash script.
You can read the CircleCI configuration reference document for more information.
Our pipeline is very simple and consists of 3 steps:
- Checking out the repository
- Installing the dependencies in a virtual environment
- Running the linter and tests while inside the virtual environment
We now have everything we need to start our pipeline. Log in to your CircleCI account and click on Add Projects. Find your CalculatorLibrary repo and click Set Up Project. Select Python as your language. Since we already have a config.yml, we can skip the next steps and click Start building.
CircleCI will take you to the execution dashboard for your job. If you followed all the steps correctly, you should see your job succeed.
The final version of your CalculatorLibrary folder should look like this:
CalculatorRepository/
|
├── .circleci
├── .git
├── .gitignore
├── README.md
├── calculator.py
├── requirements.txt
└── test_calculator.py
Congratulations! You have created your first continuous integration pipeline. Now, every time you push to the master branch, a job will be triggered. You can see a list of your current and past jobs by clicking on Jobs in the CircleCI sidebar.
Make Changes
Time to add multiplication to our calculator library.
This time, we will first add a unit test without writing the function. Without the code, the test will fail, which will also fail the CircleCI job. Add the following code to the end of your test_calculator.py:
def test_multiplication(self):
    assert 100 == calculator.multiply(10, 10)
Push the code to the master branch and see the job fail in CircleCI. This shows that continuous integration works and watches your back if you make a mistake.
Now add the code to calculator.py that will make the test pass:
def multiply(first_term, second_term):
    return first_term * second_term
Make sure there are two empty spaces between the multiplication function and the previous one, or else your code will fail the linter check.
The job should be successful this time. This workflow of writing a failing test first and then adding the code to pass the test is called test driven development (TDD). It’s a great way to work because it makes you think about your code structure in advance.
Now try it on your own. Add a test for the division function, see it fail, and write the function to make the test pass.
Notifications
When working on big applications that have a lot of moving parts, it can take a while for the continuous integration job to run. Most teams set up a notification procedure to let them know if one of their jobs fail. They can continue working while waiting for the job to run.
The most popular options are:
- Sending an email for each failed build
- Sending failure notifications to a Slack channel
- Displaying failures on a dashboard visible to everyone
By default, CircleCI should send you an email when a job fails.
Next Steps
You have understood the basics of continuous integration and practiced setting up a pipeline for a simple Python program. This is a big step forward in your journey as a developer. You might be asking yourself, “What now?”
To keep things simple, this tutorial skimmed over some big topics. You can grow your skill set immensely by spending some time going more in-depth into each subject. Here are some topics you can look into further.
Git Workflows
There is much more to Git than what you used here. Each developer team has a workflow tailored to their specific needs. Most of them include branching strategies and something called peer review. They make changes on branches separate from the master branch. When you want to merge those changes with master, other developers must first look at your changes and approve them before you’re allowed to merge.
Note: If you want to learn more about different workflows teams use, have a look at the tutorials on GitHub and BitBucket.
If you want to sharpen your Git skills, we have an article called Advanced Git Tips for Python Developers.
Dependency Management and Virtual Environments
Apart from virtualenv, there are other popular package and environment managers. Some of them deal with just virtual environments, while some handle both package installation and environment management. One of them is Conda:
“Conda is an open source package management system and environment management system that runs on Windows, macOS, and Linux. Conda quickly installs, runs and updates packages and their dependencies. Conda easily creates, saves, loads and switches between environments on your local computer. It was designed for Python programs, but it can package and distribute software for any language.” (Source)
Another option is Pipenv, a younger contender that is rising in popularity among application developers. Pipenv brings together pip and virtualenv into a single tool and uses a Pipfile instead of requirements.txt. Pipfiles offer deterministic environments and more security. This introduction doesn’t do it justice, so check out Pipenv: A Guide to the New Python Packaging Tool.
Testing
Simple unit tests with pytest are only the tip of the iceberg. There’s a whole world out there to explore! Software can be tested on many levels, including integration testing, acceptance testing, regression testing, and so forth. To take your knowledge of testing Python code to the next level, head over to Getting Started With Testing in Python.
Packaging
In this tutorial, you started to build a library of functions for other developers to use in their project. You need to package that library into a format that is easy to distribute and install using, for example pip.
Creating an installable package requires a different layout and some additional files like __init__.py and setup.py. Read Python Application Layouts: A Reference for more information on structuring your code.
To learn how to turn your repository into an installable Python package, read Packaging Python Projects by the Python Packaging Authority.
Continuous Integration
You covered all the basics of CI in this tutorial, using a simple example of Python code. It’s common for the final step of a CI pipeline to create a deployable artifact. An artifact represents a finished, packaged unit of work that is ready to be deployed to users or included in complex products.
For example, to turn your calculator library into a deployable artifact, you would organize it into an installable package. Finally, you would add a step in CircleCI to package the library and store that artifact where other processes can pick it up.
For more complex applications, you can create a workflow to schedule and connect multiple CI jobs into a single execution. Feel free to explore the CircleCI documentation.
Continuous Deployment
You can think of continuous deployment as an extension of CI. Once your code is tested and built into a deployable artifact, it is deployed to production, meaning the live application is updated with your changes. One of the goals is to minimize lead time, the time elapsed between writing a new line of code and putting it in front of users.
Note: To add a bit of confusion to the mix, the acronym CD is not unique. It can also mean Continuous Delivery, which is almost the same as continuous deployment but has a manual verification step between integration and deployment. You can integrate your code at any time but have to push a button to release it to the live application.
Most companies use CI/CD in tandem, so it’s worth your time to learn more about Continuous Delivery/Deployment.
Overview of Continuous Integration Services
You have used CircleCI, one of the most popular continuous integration services. However, this is a big market with a lot of strong contenders. CI products fall into two basic categories: remote and self-hosted services.
Jenkins is the most popular self-hosted solution. It is open-source and flexible, and the community has developed a lot of extensions.
In terms of remote services, there are many popular options like TravisCI, CodeShip, and Semaphore. Big enterprises often have their custom solutions, and they sell them as a service, such as AWS CodePipeline, Microsoft Team Foundation Server, and Oracle’s Hudson.
Which option you choose depends on the platform and features you and your team need. For a more detailed breakdown, have a look at Best CI Software by G2Crowd.
Conclusion
With the knowledge from this tutorial under your belt, you can now answer the following questions:
- What is continuous integration?
- Why is continuous integration important?
- What are the core practices of continuous integration?
- How can I set up continuous integration for my Python project?
You have acquired a programming superpower! Understanding the philosophy and practice of continuous integration will make you a valuable member of any team. Awesome work!
Watch Now This tutorial has a related video course created by the Real Python team. Watch it together with the written tutorial to deepen your understanding: Continuous Integration With Python


