Watch Now This tutorial has a related video course created by the Real Python team. Watch it together with the written tutorial to deepen your understanding: Using NumPy's np.arange() Effectively
NumPy is the fundamental Python library for numerical computing. Its most important type is an array type called ndarray. NumPy offers a lot of array creation routines for different circumstances. arange() is one such function based on numerical ranges. It’s often referred to as np.arange() because np is a widely used abbreviation for NumPy.
Creating NumPy arrays is important when you’re working with other Python libraries that rely on them, like SciPy, Pandas, Matplotlib, scikit-learn, and more. NumPy is suitable for creating and working with arrays because it offers useful routines, enables performance boosts, and allows you to write concise code.
By the end of this article, you’ll know:
- What
np.arange()is - How to use
np.arange() - How
np.arange()compares to the Python built-in classrange - Which routines are similar to
np.arange()
Let’s see np.arange() in action!
Free Bonus: Click here to get access to a free NumPy Resources Guide that points you to the best tutorials, videos, and books for improving your NumPy skills.
Return Value and Parameters of np.arange()
NumPy arange() is one of the array creation routines based on numerical ranges. It creates an instance of ndarray with evenly spaced values and returns the reference to it.
You can define the interval of the values contained in an array, space between them, and their type with four parameters of arange():
numpy.arange([start, ]stop, [step, ], dtype=None) -> numpy.ndarray
The first three parameters determine the range of the values, while the fourth specifies the type of the elements:
startis the number (integer or decimal) that defines the first value in the array.stopis the number that defines the end of the array and isn’t included in the array.stepis the number that defines the spacing (difference) between each two consecutive values in the array and defaults to1.dtypeis the type of the elements of the output array and defaults toNone.
step can’t be zero. Otherwise, you’ll get a ZeroDivisionError. You can’t move away anywhere from start if the increment or decrement is 0.
If dtype is omitted, arange() will try to deduce the type of the array elements from the types of start, stop, and step.
You can find more information on the parameters and the return value of arange() in the official documentation.
Range Arguments of np.arange()
The arguments of NumPy arange() that define the values contained in the array correspond to the numeric parameters start, stop, and step. You have to pass at least one of them.
The following examples will show you how arange() behaves depending on the number of arguments and their values.
Providing All Range Arguments
When working with NumPy routines, you have to import NumPy first:
>>> import numpy as np
Now, you have NumPy imported and you’re ready to apply arange().
Let’s see a first example of how to use NumPy arange():
>>> np.arange(start=1, stop=10, step=3)
array([1, 4, 7])
In this example, start is 1. Therefore, the first element of the obtained array is 1. step is 3, which is why your second value is 1+3, that is 4, while the third value in the array is 4+3, which equals 7.
Following this pattern, the next value would be 10 (7+3), but counting must be ended before stop is reached, so this one is not included.
You can pass start, stop, and step as positional arguments as well:
>>> np.arange(1, 10, 3)
array([1, 4, 7])
This code sample is equivalent to, but more concise than the previous one.
The value of stop is not included in an array. That’s why you can obtain identical results with different stop values:
>>> np.arange(1, 8, 3)
array([1, 4, 7])
This code sample returns the array with the same values as the previous two. You can get the same result with any value of stop strictly greater than 7 and less than or equal to 10.
However, if you make stop greater than 10, then counting is going to end after 10 is reached:
>>> np.arange(1, 10.1, 3)
array([ 1.,  4.,  7., 10.])
In this case, you get the array with four elements that includes 10.
Notice that this example creates an array of floating-point numbers, unlike the previous one. That’s because you haven’t defined dtype, and arange() deduced it for you. You’ll learn more about this later in the article.
You can see the graphical representations of these three examples in the figure below:
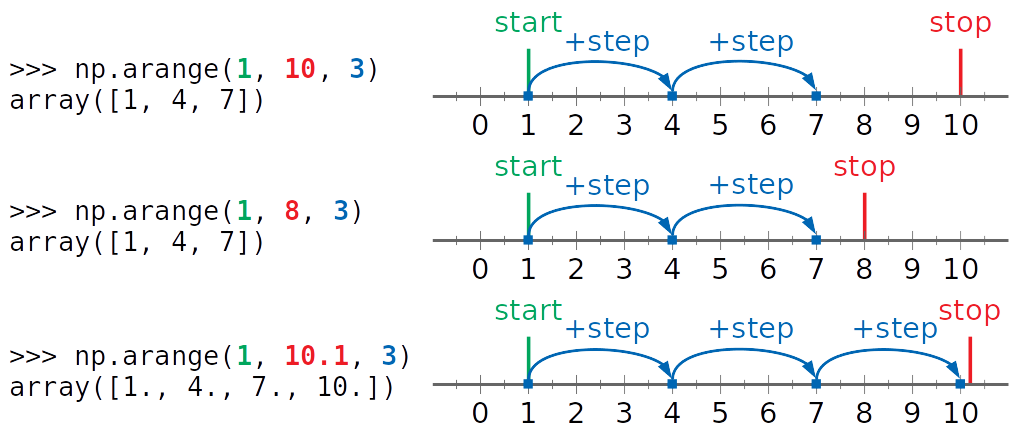
start is shown in green, stop in red, while step and the values contained in the arrays are blue.
As you can see from the figure above, the first two examples have three values (1, 4, and 7) counted. They don’t allow 10 to be included. In the third example, stop is larger than 10, and it is contained in the resulting array.
Providing Two Range Arguments
You can omit step. In this case, arange() uses its default value of 1. The following two statements are equivalent:
>>> np.arange(start=1, stop=10, step=1)
array([1, 2, 3, 4, 5, 6, 7, 8, 9])
>>> np.arange(start=1, stop=10)
array([1, 2, 3, 4, 5, 6, 7, 8, 9])
The second statement is shorter. step, which defaults to 1, is what’s usually intuitively expected.
Using arange() with the increment 1 is a very common case in practice. Again, you can write the previous example more concisely with the positional arguments start and stop:
>>> np.arange(1, 10)
array([1, 2, 3, 4, 5, 6, 7, 8, 9])
This is an intuitive and concise way to invoke arange(). Using the keyword arguments in this example doesn’t really improve readability.
Note: If you provide two positional arguments, then the first one is start and the second is stop.
Providing One Range Argument
You have to provide at least one argument to arange(). To be more precise, you have to provide start.
But what happens if you omit stop? How does arange() knows when to stop counting? In this case, the array starts at 0 and ends before the value of start is reached! Again, the default value of step is 1.
In other words, arange() assumes that you’ve provided stop (instead of start) and that start is 0 and step is 1.
Let’s see an example where you want to start an array with 0, increasing the values by 1, and stop before 10:
>>> np.arange(start=0, stop=10, step=1)
array([0, 1, 2, 3, 4, 5, 6, 7, 8, 9])
>>> np.arange(0, 10, 1)
array([0, 1, 2, 3, 4, 5, 6, 7, 8, 9])
>>> np.arange(start=0, stop=10)
array([0, 1, 2, 3, 4, 5, 6, 7, 8, 9])
>>> np.arange(0, 10)
array([0, 1, 2, 3, 4, 5, 6, 7, 8, 9])
These code samples are okay. They work as shown in the previous examples. There’s an even shorter and cleaner, but still intuitive, way to do the same thing. You can just provide a single positional argument:
>>> np.arange(10)  # Stop is 10, start is 0, and step is 1!
array([0, 1, 2, 3, 4, 5, 6, 7, 8, 9])
This is the most usual way to create a NumPy array that starts at zero and has an increment of one.
Note: The single argument defines where the counting stops. The output array starts at 0 and has an increment of 1.
If you try to explicitly provide stop without start, then you’ll get a TypeError:
>>> np.arange(stop=10)
Traceback (most recent call last):
  File "<stdin>", line 1, in <module>
TypeError: arange() missing required argument 'start' (pos 1)
You got the error because arange() doesn’t allow you to explicitly avoid the first argument that corresponds to start. If you provide a single argument, then it has to be start, but arange() will use it to define where the counting stops.
Providing Negative Arguments
If you provide negative values for start or both start and stop, and have a positive step, then arange() will work the same way as with all positive arguments:
>>> np.arange(-5, -1)
array([-5, -4, -3, -2])
>>> np.arange(-8, -2, 2)
array([-8, -6, -4])
>>> np.arange(-5, 6, 4)
array([-5, -1,  3])
This behavior is fully consistent with the previous examples. The counting begins with the value of start, incrementing repeatedly by step, and ending before stop is reached.
Counting Backwards
Sometimes you’ll want an array with the values decrementing from left to right. In such cases, you can use arange() with a negative value for step, and with a start greater than stop:
>>> np.arange(5, 1, -1)
array([5, 4, 3, 2])
>>> np.arange(7, 0, -3)
array([7, 4, 1])
In this example, notice the following pattern: the obtained array starts with the value of the first argument and decrements for step towards the value of the second argument.
In the last statement, start is 7, and the resulting array begins with this value. step is -3 so the second value is 7+(−3), that is 4. The third value is 4+(−3), or 1. Counting stops here since stop (0) is reached before the next value (-2).
You can see the graphical representations of this example in the figure below:

Again, start is shown in green, stop in red, while step and the values contained in the array are blue.
This time, the arrows show the direction from right to left. That’s because start is greater than stop, step is negative, and you’re basically counting backwards.
The previous example produces the same result as the following:
>>> np.arange(1, 8, 3)[::-1]
array([7, 4, 1])
>>> np.flip(np.arange(1, 8, 3))
array([7, 4, 1])
However, the variant with the negative value of step is more elegant and concise.
Getting Empty Arrays
There are several edge cases where you can obtain empty NumPy arrays with arange(). These are regular instances of numpy.ndarray without any elements.
If you provide equal values for start and stop, then you’ll get an empty array:
>>> np.arange(2, 2)
array([], dtype=int64)
This is because counting ends before the value of stop is reached. Since the value of start is equal to stop, it can’t be reached and included in the resulting array as well.
One of the unusual cases is when start is greater than stop and step is positive, or when start is less than stop and step is negative:
>>> np.arange(8, 2, 1)
array([], dtype=int64)
>>> np.arange(2, 8, -1)
array([], dtype=int64)
As you can see, these examples result with empty arrays, not with errors.
Data Types of np.arange()
The types of the elements in NumPy arrays are an important aspect of using them. When working with arange(), you can specify the type of elements with the parameter dtype.
Note: Here are a few important points about the types of the elements contained in NumPy arrays:
- All elements in a NumPy array are of the same type called dtype (short for data type).
- NumPy dtypes allow for more granularity than Python’s built-in numeric types.
- In some cases, NumPy dtypes have aliases that correspond to the names of Python built-in types.
- Usually, NumPy routines can accept Python numeric types and vice versa.
- Some NumPy dtypes have platform-dependent definitions.
If you want to learn more about the dtypes of NumPy arrays, then please read the official documentation.
You are free to omit dtype. In this case, arange() will try to deduce the dtype of the resulting array. It depends on the types of start, stop, and step, as you can see in the following example:
>>> x = np.arange(5)
>>> x
array([0, 1, 2, 3, 4])
>>> x.dtype
dtype('int64')
>>> x.itemsize  # In bytes
8
Here, there is one argument (5) that defines the range of values. Its type is int. That’s why the dtype of the array x will be one of the integer types provided by NumPy. In this case, NumPy chooses the int64 dtype by default. This is a 64-bit (8-bytes) integer type.
The array in the previous example is equivalent to this one:
>>> x = np.arange(5, dtype=int)
>>> x
array([0, 1, 2, 3, 4])
>>> x.dtype
dtype('int64')
The argument dtype=int doesn’t refer to Python int. It translates to NumPy int64 or simply np.int.
NumPy offers you several integer fixed-sized dtypes that differ in memory and limits:
np.int8: 8-bit signed integer (from-128to127)np.uint8: 8-bit unsigned integer (from0to255)np.int16: 16-bit signed integer (from-32768to32767)np.uint16: 16-bit unsigned integer (from0to65535)np.int32: 32-bit signed integer (from-2**31to2**31-1)np.uint32: 32-bit unsigned integer (from0to2**32-1)np.int64: 64-bit signed integer (from-2**63to2**63-1)np.uint64: 64-bit unsigned integer (from0to2**64-1)
If you want other integer types for the elements of your array, then just specify dtype:
>>> x = np.arange(5, dtype=np.int32)
>>> x
array([0, 1, 2, 3, 4], dtype=int32)
>>> x.dtype
dtype('int32')
>>> x.itemsize  # In bytes
4
Now the resulting array has the same values as in the previous case, but the types and sizes of the elements differ. The argument dtype=np.int32 (or dtype='int32') forces the size of each element of x to be 32 bits (4 bytes).
When your argument is a decimal number instead of integer, the dtype will be some NumPy floating-point type, in this case float64:
>>> y = np.arange(5.0)
>>> y
array([0., 1., 2., 3., 4.])
>>> y.dtype
dtype('float64')
The values of the elements are the same in the last four examples, but the dtypes differ.
Generally, when you provide at least one floating-point argument to arange(), the resulting array will have floating-point elements, even when other arguments are integers:
>>> np.arange(1, 5.1)
array([1., 2., 3., 4., 5.])
>>> np.arange(1, 5.1).dtype
dtype('float64')
>>> np.arange(0, 9, 1.5)
array([0. , 1.5, 3. , 4.5, 6. , 7.5])
>>> np.arange(0, 9, 1.5).dtype
dtype('float64')
In the examples above, start is an integer, but the dtype is np.float64 because stop or step are floating-point numbers.
If you specify dtype, then arange() will try to produce an array with the elements of the provided data type:
>>> y = np.arange(5, dtype=float)
>>> y
array([0., 1., 2., 3., 4.])
>>> y.dtype
dtype('float64')
The argument dtype=float here translates to NumPy float64, that is np.float. It doesn’t refer to Python float. Fixed-size aliases for float64 are np.float64 and np.float_.
When you need a floating-point dtype with lower precision and size (in bytes), you can explicitly specify that:
>>> z = np.arange(5, dtype=np.float32)
>>> z
array([0., 1., 2., 3., 4.], dtype=float32)
>>> z.dtype
dtype('float32')
Using dtype=np.float32 (or dtype='float32') makes each element of the array z 32 bits (4 bytes) large. The size of each element of y is 64 bits (8 bytes):
>>> y.itemsize  # In bytes
8
>>> z.itemsize  # In bytes
4
The difference between the elements of y and z, and generally between np.float64 and np.float32, is the memory used and the precision: the first is larger and more precise than the latter.
In many cases, you won’t notice this difference. However, sometimes it’s important. For example, TensorFlow uses float32 and int32. Similarly, when you’re working with images, even smaller types like uint8 are used.
When step is not an integer, the results might be inconsistent due to the limitations of floating-point arithmetic.
Beyond Simple Ranges With np.arange()
You can conveniently combine arange() with operators (like +, -, *, /, **, and so on) and other NumPy routines (such as abs() or sin()) to produce the ranges of output values:
>>> x = np.arange(5)
>>> x
array([0, 1, 2, 3, 4])
>>> 2**x
array([ 1,  2,  4,  8, 16])
>>> y = np.arange(-1, 1.1, 0.5)
>>> y
array([-1. , -0.5,  0. ,  0.5,  1. ])
>>> np.abs(y)
array([1. , 0.5, 0. , 0.5, 1. ])
>>> z = np.arange(10)
>>> np.sin(z)
array([ 0.        ,  0.84147098,  0.90929743,  0.14112001, -0.7568025 ,
       -0.95892427, -0.2794155 ,  0.6569866 ,  0.98935825,  0.41211849])
This is particularly suitable when you want to create a plot in Matplotlib.
If you need a multidimensional array, then you can combine arange() with .reshape() or similar functions and methods:
>>> a = np.arange(6).reshape((2, 3))
>>> a
array([[0, 1, 2],
       [3, 4, 5]])
>>> a.shape
(2, 3)
>>> a.ndim
2
That’s how you can obtain the ndarray instance with the elements [0, 1, 2, 3, 4, 5] and reshape it to a two-dimensional array.
Comparison of range and np.arange()
Python has a built-in class range, similar to NumPy arange() to some extent. range and np.arange() have important distinctions related to application and performance. You’ll see their differences and similarities.
The main difference between the two is that range is a built-in Python class, while arange() is a function that belongs to a third-party library (NumPy).
In addition, their purposes are different! Generally, range is more suitable when you need to iterate using the Python for loop. If you want to create a NumPy array, and apply fast loops under the hood, then arange() is a much better solution.
Parameters and Outputs
Both range and arange() have the same parameters that define the ranges of the obtained numbers:
startstopstep
You apply these parameters similarly, even in the cases when start and stop are equal.
However, when working with range:
- You have to provide integer arguments. Otherwise, you’ll get a
TypeError. - You can’t specify the type of the yielded numbers. It’s always
int.
range and arange() also differ in their return types:
rangecreates an instance of this class that has the same features as other sequences (likelistandtuple), such as membership, concatenation, repetition, slicing, comparison, length check, and more.arange()returns an instance of NumPyndarray.
Creating Sequences
You can apply range to create an instance of list or tuple with evenly spaced numbers within a predefined range. You might find comprehensions particularly suitable for this purpose.
However, creating and manipulating NumPy arrays is often faster and more elegant than working with lists or tuples.
Let’s compare the performance of creating a list using the comprehension against an equivalent NumPy ndarray with arange():
>>> import timeit
>>> n = 1
>>> timeit.timeit(f'x = [i**2 for i in range({n})]')
>>> timeit.timeit(f'x = np.arange({n})**2', setup='import numpy as np')
Repeating this code for varying values of n yielded the following results on my machine:
Size: n |
Time Per Loop: range |
Time Per Loop: arange() |
Ratio |
|---|---|---|---|
| 1 | 497 ns | 1.14 µs | 0.41 |
| 10 | 2.24 µs | 1.28 µs | 1.74 |
| 100 | 20.0 µs | 1.37 µs | 14.6 |
| 1,000 | 211 µs | 2.92 µs | 72.3 |
These results might vary, but clearly you can create a NumPy array much faster than a list, except for sequences of very small lengths. (The application often brings additional performance benefits!)
This is because NumPy performs many operations, including looping, on the C-level. In addition, NumPy is optimized for working with vectors and avoids some Python-related overhead.
Python for Loops
If you need values to iterate over in a Python for loop, then range is usually a better solution. According to the official Python documentation:
The advantage of the
rangetype over a regularlistortupleis that arangeobject will always take the same (small) amount of memory, no matter the size of the range it represents (as it only stores thestart,stopandstepvalues calculating individual items and subranges as needed). (Source)
range is often faster than arange() when used in Python for loops, especially when there’s a possibility to break out of a loop soon. This is because range generates numbers in the lazy fashion, as they are required, one at a time.
In contrast, arange() generates all the numbers at the beginning.
For more information about range, you can check The Python range() Function (Guide) and the official documentation.
Other Routines Based on Numerical Ranges
In addition to arange(), you can apply other NumPy array creation routines based on numerical ranges:
linspace()is similar toarange()in that it returns evenly spaced numbers. But you can specify the number of values to generate as well as whether to include the endpoint and whether to create multiple arrays at once.logspace()andgeomspace()are similar tolinspace(), except the returned numbers are spaced evenly on the logarithmic scale.meshgrid(),ogrid(), andmgrid()return grids of points represented as arrays.
All these functions have their specifics and use cases. You can choose the appropriate one according to your needs.
As you already saw, NumPy contains more routines to create instances of ndarray.
Quick Summary
To use NumPy arange(), you need to import numpy first:
>>> import numpy as np
Here’s a table with a few examples that summarize how to use NumPy arange(). It could be helpful to memorize various uses:
| Example | Result |
|---|---|
np.arange(start=1, stop=10, step=3) |
array([1, 4, 7]) |
np.arange(1, 10, 3) |
array([1, 4, 7]) |
np.arange(1, 10, 3, dtype=float) |
array([1., 4., 7.]) |
np.arange(1.0, 10, 3) |
array([1., 4., 7.]) |
np.arange(0, 1.1, 0.5) |
array([0. , 0.5, 1. ]) |
np.arange(2, 6) |
array([2, 3, 4, 5]) |
np.arange(5) |
array([0, 1, 2, 3, 4]) |
np.arange(-8, -2, 2) |
array([-8, -6, -4]) |
np.arange(7, 0, -3) |
array([7, 4, 1]) |
np.arange(8, 2) |
array([]) |
Don’t forget that you can also influence the memory used for your arrays by specifying NumPy dtypes with the parameter dtype.
Conclusion
You now know how to use NumPy arange(). The function np.arange() is one of the fundamental NumPy routines often used to create instances of NumPy ndarray. It has four arguments:
start: the first value of the arraystop: where the array endsstep: the increment or decrementdtype: the type of the elements of the array
You also learned how NumPy arange() compares with the Python built-in class range when you’re creating sequences and generating values to iterate over.
You saw that there are other NumPy array creation routines based on numerical ranges, such as linspace(), logspace(), meshgrid(), and so on.
If you have questions or comments, please put them in the comment section below.
Watch Now This tutorial has a related video course created by the Real Python team. Watch it together with the written tutorial to deepen your understanding: Using NumPy's np.arange() Effectively