How to Set Up Pre-Commit Hooks
A step-by-step guide to installing and configuring pre-commit hooks on your project.

Maintaining code quality can be challenging no matter the size of your project or the number of contributors. You need to agree on a set of standards for the codebase, and then you have to enforce them consistently. This is a challenge for humans: we make mistakes, forget things, and have differences in opinion. Computers, however, can help both the developer and the reviewer efficiently enforce many of these standards:
- Pre-commit hooks give the developer near-instant feedback on the code locally.
- Continuous integration (CI) tools give the reviewer feedback on the code without having to pull it down locally. Evaluation of the code with a CI tool is often more thorough (e.g., running tests, confirming that documentation can be built, etc.), and therefore, takes much longer.
Both tools have their place and provide valuable feedback to the developer. In this article, I will walk you step-by-step through the process of selecting and installing pre-commit hooks on your projects. I will also provide information on configuring individual hooks, as well as some usage tips. I will cover using GitHub Actions as a CI tool for code quality checks in a future article. Let’s get started.
What are pre-commit hooks?
Pre-commit hooks are code checks that run as part of the “pre-commit” stage of the git commit process. If any of these checks fail, git aborts the commit, at which point you can address the cause(s) of the failure and then retry the commit.
If you aren’t familiar with git, take a moment to learn more about it before continuing with this article.
Setting up and installing pre-commit hooks
In this tutorial, we will be using the pre-commit Python package to set up our hooks. This does not mean that we can only use pre-commit with Python projects: we can use it in any project as long as there is a Python interpreter available on the machine. We can even use hooks written in languages other than Python and perform checks on any file type (e.g., JavaScript, Markdown, PNG, etc.).
The pre-commit hooks that we will use in this tutorial run checks on configuration files (like YAML and TOML) and Python files. To make it easier to follow along, I have created a small GitHub template repository at stefmolin/pre-commit-example with a Python package skeleton for a dummy package called example, but you can also use a Python project of your own.
Once you have selected the repository you plan to work with, clone it locally, and then create and activate a virtual environment for testing. With the virtual environment activated, we install the pre-commit package:
python3 -m pip install pre-commit
Here, we installed pre-commit with pip; however, it can also be installed via conda.
Next, we need to create a configuration file called .pre-commit-config.yaml. This file specifies which hooks to run and how to run them. Here’s a minimal configuration to get you started:
repos:
  - repo: https://github.com/pre-commit/pre-commit-hooks
    rev: v4.5.0  # the release, git tag, or commit you want to use
    hooks:
      - id: check-toml
      - id: check-yaml
      - id: end-of-file-fixer
      - id: trailing-whitespace
Minimal .pre-commit-config.yaml file that runs file validation checks for TOML and YAML files, ensures that any non-empty files end in a new line, and removes trailing whitespaces in your code.
Note that the repos key is structured as a list in YAML even though we have only one hook repository at the moment. Each repository that can be used with pre-commit exposes one or more hooks (also a list) that we can enable by specifying their unique identifiers (id). The pre-commit/pre-commit-hooks repository used above has many more hooks than we have enabled here, so be sure to take a look at what else is available.
To include additional hooks from a different repository, we simply add another repo section to the repos list, minding the indentation. Below, we add the pre-commit hooks provided by the popular ruff tool (written in Rust and known for its speed) to lint our code and format it. Note that we are providing command line arguments to the ruff hook via the args key to customize its behavior when run as a pre-commit hook:
- repo: https://github.com/astral-sh/ruff-pre-commit
    rev: v0.1.5
    hooks:
      - id: ruff
        args: [--fix, --exit-non-zero-on-fix, --show-fixes]
      - id: ruff-format
Example setup for the ruff and ruff-format pre-commit hooks.
Let’s also add validation for our docstrings. In this snippet, we enable the numpydoc-validation hook to ensure that our docstrings conform to the numpydoc standard. There are other docstring formats, but since I wrote this hook, I’ll feature it here 😊 For this section, we use the exclude key to instruct pre-commit not to run this hook on any files in the tests/ or docs/ directories:
- repo: https://github.com/numpy/numpydoc
    rev: v1.6.0
    hooks:
      - id: numpydoc-validation
        exclude: (tests|docs)/.*
Example setup for the numpydoc-validation pre-commit hook.
Our minimal .pre-commit-config.yaml file looks like this:
repos:
  - repo: https://github.com/pre-commit/pre-commit-hooks
    rev: v4.5.0
    hooks:
      - id: check-toml
      - id: check-yaml
      - id: end-of-file-fixer
      - id: trailing-whitespace

  - repo: https://github.com/astral-sh/ruff-pre-commit
    rev: v0.1.5
    hooks:
      - id: ruff
        args: [--fix, --exit-non-zero-on-fix, --show-fixes]
      - id: ruff-format

  - repo: https://github.com/numpy/numpydoc
    rev: v1.6.0
    hooks:
      - id: numpydoc-validation
        exclude: (tests|docs)/.*
Minimal .pre-commit-config.yaml file adapted from stefmolin/data-morph on November 19, 2023 at 6:27 PM EST.
Now that we have our .pre-commit-config.yaml file, we need to use pre-commit to install the hooks on the git side. Run this at the root of the repository:
pre-commit install
Now that we have our .pre-commit-config.yaml file, we need to instruct git to use our hooks. Every git repository supports hooks at a variety of stages in the git process. Hooks can be written in any language available on your the machine, and they must be placed in the .git/hooks directory to be triggered — pre-commit install does this for us. The executable that will run our pre-commit-stage hooks has been installed as .git/hooks/pre-commit:
pre-commit-example
├── .git
│   └── hooks
│       ├── commit-msg.sample
|       ├── pre-commit
|       ├── pre-commit.sample
|       ├── pre-merge-commit.sample
|       ├── pre-push.sample
|       ├── pre-rebase.sample
|       ├── prepare-commit-msg.sample
|       ├── push-to-checkout.sample
|       └── [...]
├── .gitignore
├── .pre-commit-config.yaml
├── LICENSE
├── README.md
├── pyproject.toml
└── src
    └── example
        └── __init__.py
Abbreviated view of the files in the repository at this point.
All git repositories come with some hook examples in .sample files (like the .git/hooks/pre-push.sample file shown above). Most of the time the pre-commit stage is what we want for checking code quality, but pre-commit does support other stages. If you want to use a hook not supported by pre-commit, create an executable file and save it at .git/hooks/<hook-name>. Consult the pre-commit documentation for more information on supported hooks and configuring hooks to run at different stages.
Configuring pre-commit hooks
In many cases, we will want to customize the configuration of our pre-commit hooks to select the appropriate settings for our project. In some cases, this may be necessary to ensure that the hooks play nice with each other (i.e., order shouldn’t matter and hooks shouldn’t undo each other’s changes). We have two options:
- Specify a list of command line arguments to call a given hook with in our
.pre-commit-config.yamlfile (see theargssection underruff), or - Maintain our configuration in a separate file like
pyproject.toml.
The decision of which to use goes beyond the hooks themselves: some of the tools we are using are also helpful additions to code editors/IDEs; some may be used directly on the command line, which we may choose to incorporate into our CI workflow. In order to have consistent configuration across our CI workflow, pre-commit hooks, and in-editor checks/extensions, we must use a configuration file instead of args.
Let’s go ahead and add the following to our pyproject.toml file. This will configure the ruff, ruff-format, and numpydoc-validation hooks. You will need to consult the documentation for each tool to figure out which configuration files are supported and which settings you want:
[tool.ruff]
line-length = 88
select = [
    "C",  # mccabe rules
    "F",  # pyflakes rules
    "E",  # pycodestyle error rules
    "W",  # pycodestyle warning rules
    "B",  # flake8-bugbear rules
    "I",  # isort rules
]
ignore = [
    "C901",  # max-complexity-10
    "E501",  # line-too-long
]

[tool.ruff.format]
indent-style = "space"
quote-style = "single"

[tool.numpydoc_validation]
checks = [
    "all",  # report on all checks
    "ES01", # but don't require an extended summary
    "EX01", # or examples
    "SA01", # or a see also section
    "SS06", # and don't require the summary to fit on one line
]
exclude = [  # don't report on checks for these
    '\\.__init__$',
    '\\.__repr__$',
    '\\.__str__$',
]
override_SS05 = [  # allow docstrings to start with these words
    '^Process ',
    '^Assess ',
    '^Access ',
]
Example configuration for ruff (lines 1-14), ruff-format (lines 15-18), and numpydoc-validation (lines 20-37) pre-commit hooks in the pyproject.toml file. Excerpt taken from stefmolin/data-morph on November 19, 2023 at 6:33 PM EST.
There’s also another big advantage to using a configuration file: tools may expose only a subset of their configuration options as command line arguments. This means that it might not be possible to fully configure your hooks using just the .pre-commit-config.yaml file. This isn’t necessarily a drawback, though, as it helps us follow the DRY principle (Don’t Repeat Yourself): we keep configuration that is strictly-related to the pre-commit hook’s usage of the tool in the .pre-commit-config.yaml file and put configuration for the tool’s logic itself in configuration file(s), such as the pyproject.toml file.
Using pre-commit hooks
Once we have installed and configured our selected pre-commit hooks, we can use our git workflow as usual. To test out our setup here, add this new file to your repository. I will save it as src/example/utils.py, but you can name it whatever you like:
import re

def my_function(a):
    """My function."""
    pass
When we try to commit our changes, the pre-commit hooks run. The first time will take longer since pre-commit is creating a virtual environment to run the hooks in. This virtual environment will be reused until you add/remove a hook or change its rev value, at which point it will be rebuilt:
git add src/example/utils.py
git commit -m "Add utils.py"
[INFO] Initializing environment for [...]github.com/astral-sh/ruff-pre-commit.
[INFO] Initializing environment for [...]github.com/numpy/numpydoc.
[INFO] Installing environment for [...]github.com/astral-sh/ruff-pre-commit.
[INFO] Once installed this environment will be reused.
[INFO] This may take a few minutes...
[INFO] Installing environment for [...]github.com/numpy/numpydoc.
[INFO] Once installed this environment will be reused.
[INFO] This may take a few minutes...
Some of the hooks fail, which causes git to abort the commit. The output tells us what we need to fix. Note that the first two checks were skipped because they don’t run on Python files:
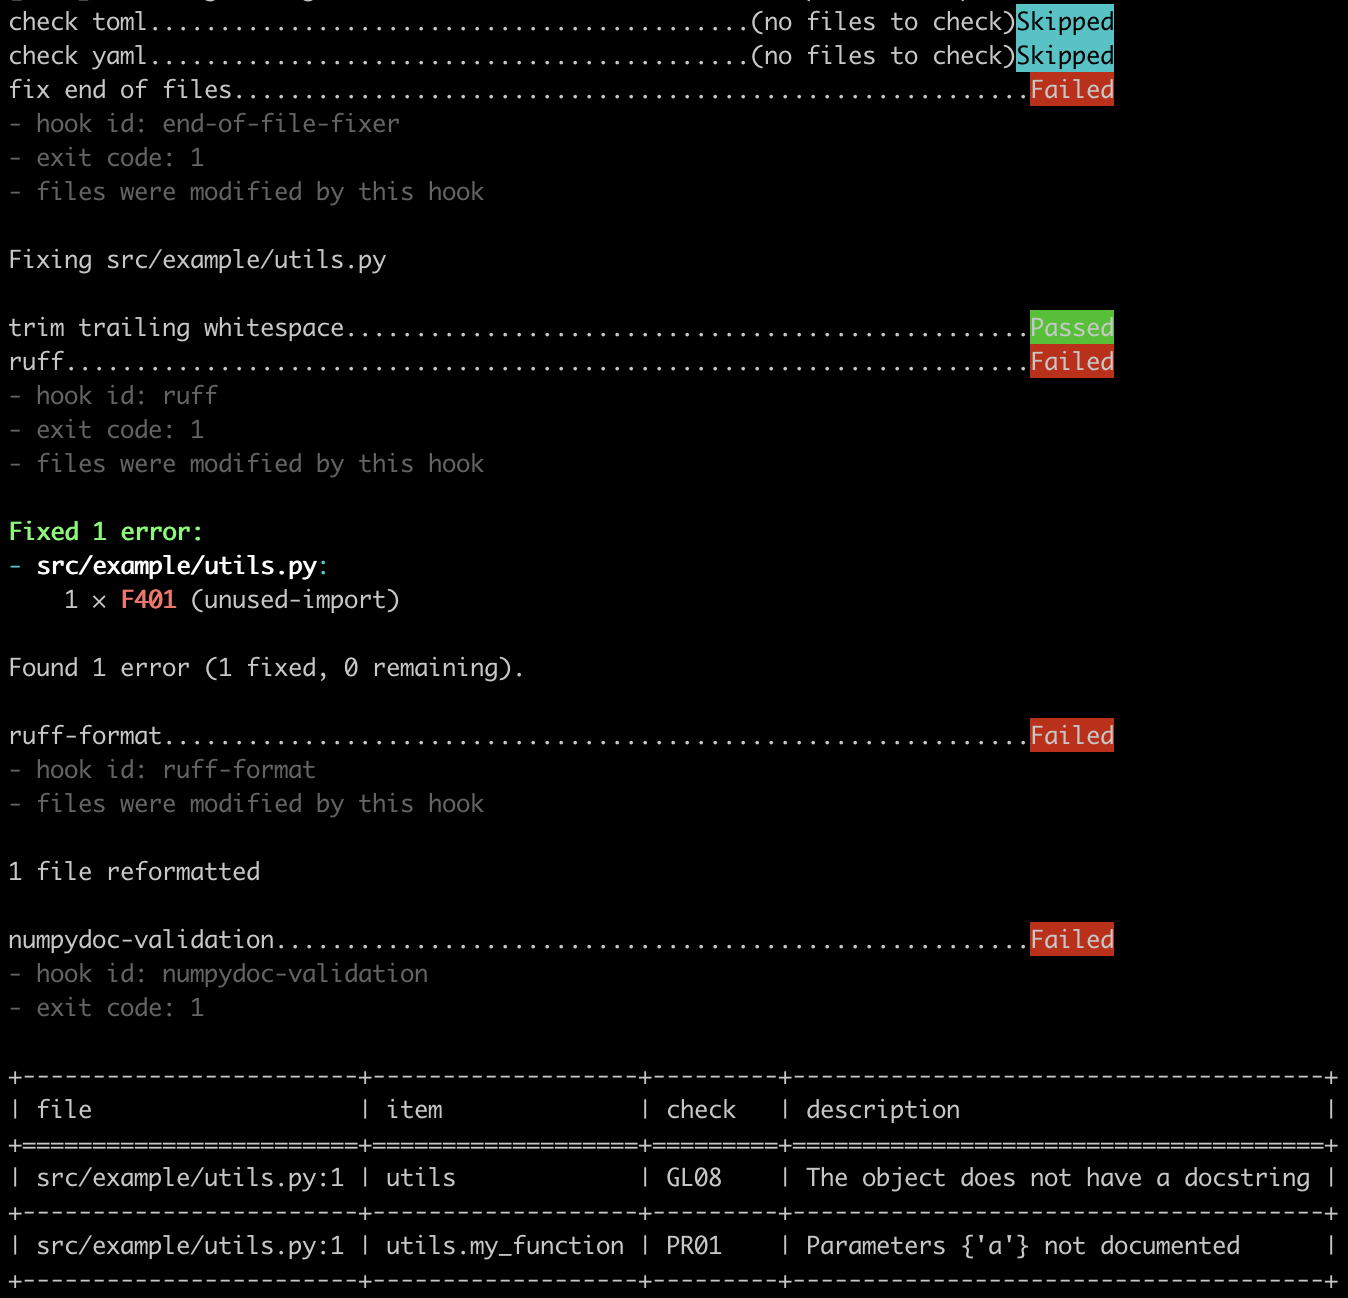
Violations triggered using the accompanying GitHub repository as of November 21, 2023 at 2:11 PM EST. Screenshot taken by Stefanie Molin.
Some hooks are able to automatically fix issues in the code (straightforward things like formatting). The end-of-file-fixer and ruff-format hooks fixed some issues in the file for us (notice the files were modified by this hook text under them in the screenshot above). The re import was unused, so the ruff hook removed it. These will be unstaged changes so that we can review them with git diff:
@@ -1,5 +1,3 @@
-import re
-
 def my_function(a):
     """My function."""
-     pass
\ No newline at end of file
+     pass
Docstrings are more complicated, so, instead, the numpydoc-validation hook points out what we need to fix. Here, it indicates that we are missing a module docstring and also need to document the parameter a. Replace the file contents with the below to address the issues:
"""Utility functions."""

def my_function(a):
    """
    My function.

    Parameters
    ----------
    a : int
        The value to use.
    """
    pass
Stage these new changes, and try to commit again. Since we addressed all the findings, our commit is successful this time:
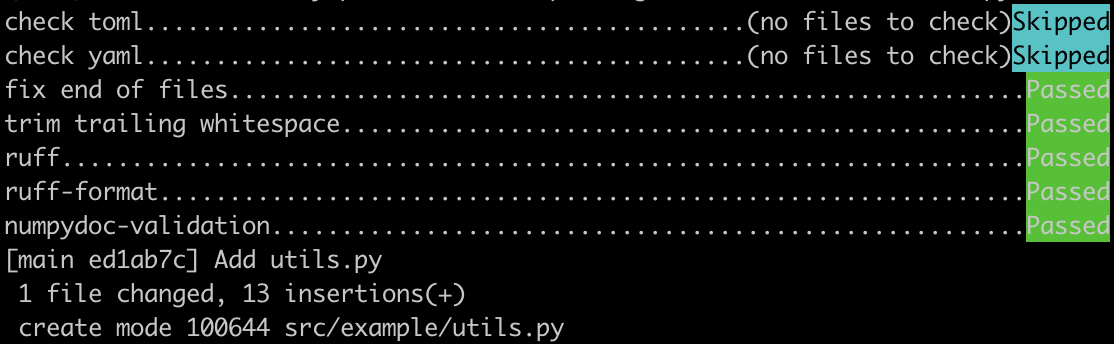
A successful commit that passes all pre-commit hooks configured in the accompanying GitHub repository as of November 21, 2023 at 2:16 PM EST. Screenshot taken by Stefanie Molin.
Note that you will always need to stage and commit any changes that the hooks make for you – this gives you final say on what makes it into your codebase.
Usage tips
So far, we have covered basic usage of pre-commit hooks. There are a few more things for you to keep in mind to get the most out of them.
Bypassing hooks and running on demand
Sometimes, we need to bypass the hooks temporarily. For these instances, we can pass the --no-verify option when we run git commit:
git commit -m "I promise I will fix everything later." --no-verify
Once we are ready to address any findings, we can run the hooks on demand:
pre-commit run– runs all hooks on staged files (i.e., after runninggit add <file>)pre-commit run --files <file1> <file2>– runs all hooks on<file1>and<file2>pre-commit run <hook_id> --all-files– run the hook namedhook_idon all files
Be sure to check out the documentation (pre-commit run --help) for more information.
Versioning hooks
Since we have to specify versions for each hook repository in our configuration file, we should periodically update them to the latest versions. All you have to do is run pre-commit autoupdate. Alternatively, you can do this with pre-commit.ci. Be advised that both of these update to the latest version of everything, which may be incompatible with your setup. You can run pre-commit run --all-files to make sure things are still working before you commit the changes.
Keeping an open mind
There will be cases (at least in the beginning) where a hook changes something or presents you with an issue that you don’t agree with (it’s a feature, not a bug, right?). Fight the urge to accept the change without thinking, and resist the temptation to immediately ignore it with git commit --no-verify. Instead, carefully consider whether you should update the hook’s configuration, switch to a different hook, or reevaluate your views on the finding all together.
This article walked you through the process of installing and configuring pre-commit hooks to help maintain a high level of code quality for projects of any size. Take some time to explore the other hooks that can be used with pre-commit listed on their documentation here and customize your setup. If the checks you want don’t exist yet, consider making your own hook (planned follow-up article). Now would also be a great time to update your CI workflow (or create one) to run the same checks on your PRs.
Let me know in the comments below or on social media (LinkedIn or X) what you end up doing with all the time you save by using pre-commit hooks – happy coding! 😊
Never miss a post: sign up for my newsletter.

