
How to Improve Performance in Git: The Complete Guide
Table of Contents
When you start working on a new project, performance is rarely a concern. You begin with a couple of files and commits, so there's not much to worry about. The problem is that repositories never get smaller! As times goes by, people join, commits keep being added, and your repository is no longer a baby. Simple actions, like running git status or adding new commits, start taking longer than before. Now what? 😨
This is usually the reality if you're working on a big monorepo — just ask Microsoft, a company that had a 300 GB repository in 2017, Canva and their 60 million lines of code, or Dropbox's huge monolith.
Luckily, there are a few things we can do to improve performance in Git... and we'll cover all of them here!
Why Speed Matters
Speeding up a large Git repository is important for two main reasons:
-
It improves the overall performance of your development workflow, allowing you to work more efficiently. This is especially important when working with large organizations and open source projects, where multiple developers are constantly committing changes to the same repository. A faster repository means less time waiting for Git commands such as
git cloneorgit pushto finish. -
It helps to optimize the storage space, as large files are replaced by pointers which take up less space. This can help avoid storage issues, especially when working with remote servers.
Ready to speed up your Git repository? Read on 🚀
The Problem
Let's start by understanding the cause of this issue. There are two main reasons responsible for Git's poor performance with large repositories:
- The huge number of files. Git needs to compare every file — if there are tens of thousands of files in the repository, operations like retrieving the Git status, staging files, or checking out branches on the CLI can take several seconds.
- The huge number of commits – If any sorting is involved when viewing the history of a branch or tag (e.g. ordering by date), displaying the History on the CLI can take several seconds as Git needs to sort all commits first. If you disable all sortings in the history (no graph, no topo-order, no date-order), history will be much faster.
Thankfully, with more and more large companies migrating to Git over the years, many efforts have been made to mitigate these issues. If you haven't upgraded Git in a long time, we suggest you do so, as some of the features mentioned here have been implemented rather recently.
Now that we know what's at stake, let's have a look at what can be done.
We'll start with the basics: a quick introduction to the important .gitignore file and Git LFS. Then, we'll move on to more advanced fixes.
We make Tower, the best Git client.
Not a Tower user yet?
Download our 30-day free trial and experience a better way to work with Git!
The Importance of .gitignore
We should keep in mind that not every file needs to be version controlled. A properly configured .gitignore file can take you a long way!
Generated files, like cache or build files, should be ignored, not only to save space, but more importantly because they will be modified at each different generation — and there's no need to keep track of those changes.
The same goes for third-party libraries, which should also be ignored. Instead, aim for a list of the required dependencies (and the correct version) so that everyone can download and install them whenever the repo is cloned. For example, with a package.json file for JavaScript projects you can (and should) exclude the /node_modules folder.
While many developers are aware of this already, the reality is that a quick search for the "node_modules" folder on GitHub returns more than 2 BILLION results!
The infamous .DS_Store files (which are automatically created by macOS) are another good candidate for your .gitignore file.
Git Large File Storage (LFS)
Git LFS was designed specifically to handle large file versioning. LFS saves your local repositories from becoming unnecessarily big, preventing you from downloading unnessary data.
Please note that this is an extension to the standard Git feature set, so you will need to make sure that your code hosting provider supports it (all the popular ones do). You will also need to download and install the CLI extension on your machine before installing it in your repository.
After installation, working with Git LFS is very simple. Here's an example of how you would set it up in one of your repositories:
$ git lfs install
$ git lfs track "*.wav"
$ git lfs track "images/*.psd"
$ git lfs track "videos"
$ git add .gitattributes
That's it! All you need to do is tell Git LFS which file extensions it should manage.
You may have noticed that we also added a new file: .gitattributes. Git notes the file names and patterns in this text file and, just like any other change, it should be staged and committed to the repository.
You're ready to go! You can now add files and commit as normal 🥳
To list the file types currently being tracked by Git LFS, you'll just need to type:
$ git lfs trackTo confirm which files Git LFS is managing, run:
$ git lfs ls-filesWhen pushing your changes to a remote, Git LFS intercepts any large files and sends them to a separate server, leaving a smaller pointer file in the repository that links to the actual asset on the Git LFS server.
Git LFS and Tower
Tower, our Git client for Mac and Windows, comes with built-in support for Git LFS, which means that you don't have to install the extension manually on your local computer. You will just need to enable it in the "Settings" view of the repository you'll be working on.
Once enabled, you will need to tell Tower which files (or file types) you want to track, by right-clicking the file in the "Working Copy" view and selecting one of the options in the LFS submenu.
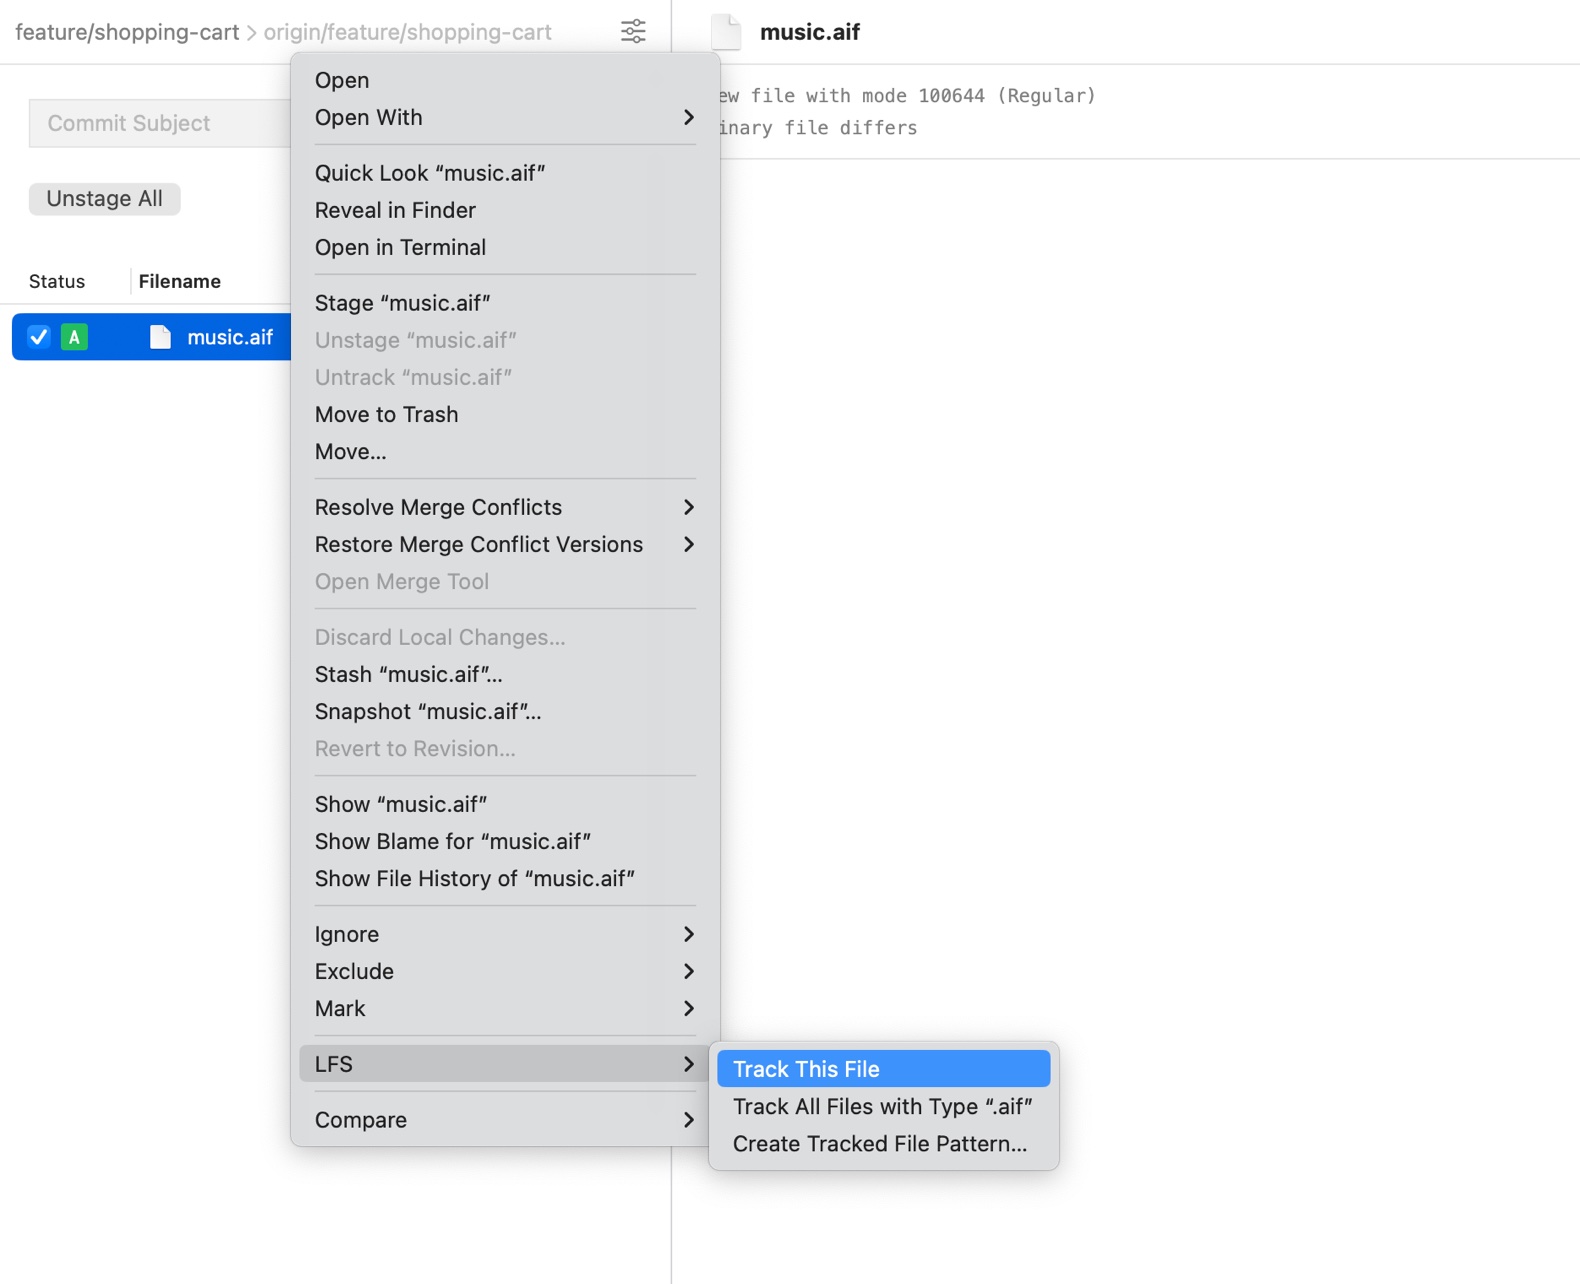
Have a look at our documentation to learn more about Tower's Git LFS support.
OK, now that we've cleared the basics, time to learn some more advanced Git features and commands. Let's divide this into two parts:
- How to Speed Up the Working Tree
- How to Speed Up the History
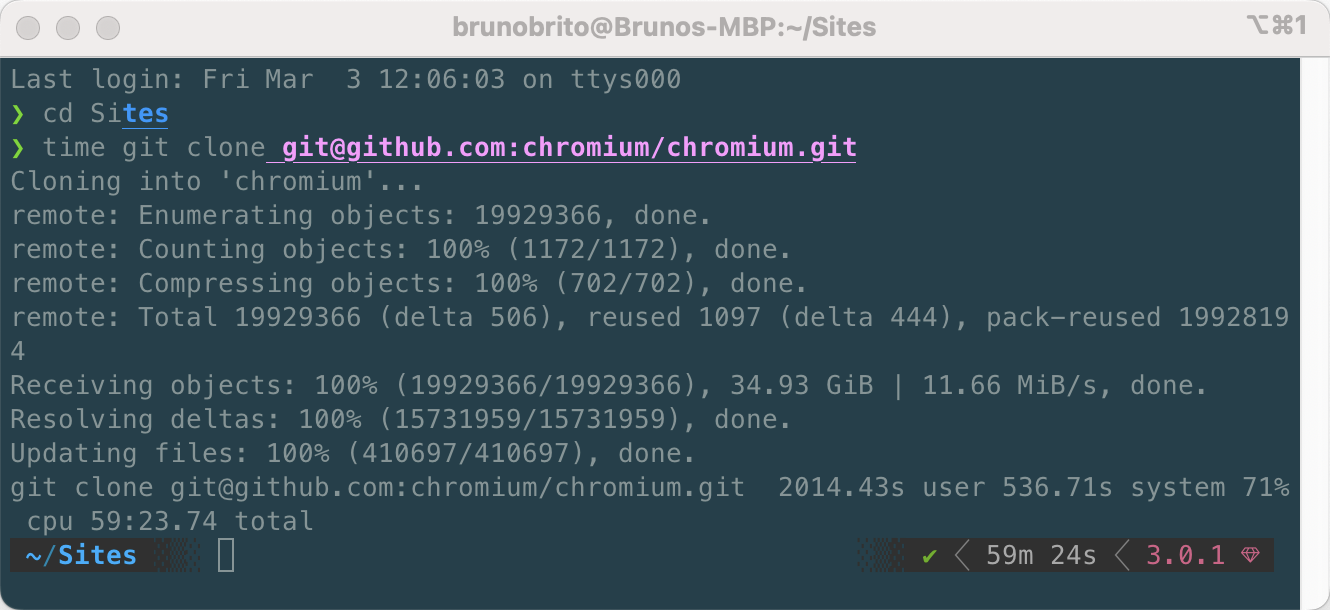
We'll be using the Chromium repository to run our benchmarks. Feel free to follow along, but be prepared to wait for about an hour to clone this project.
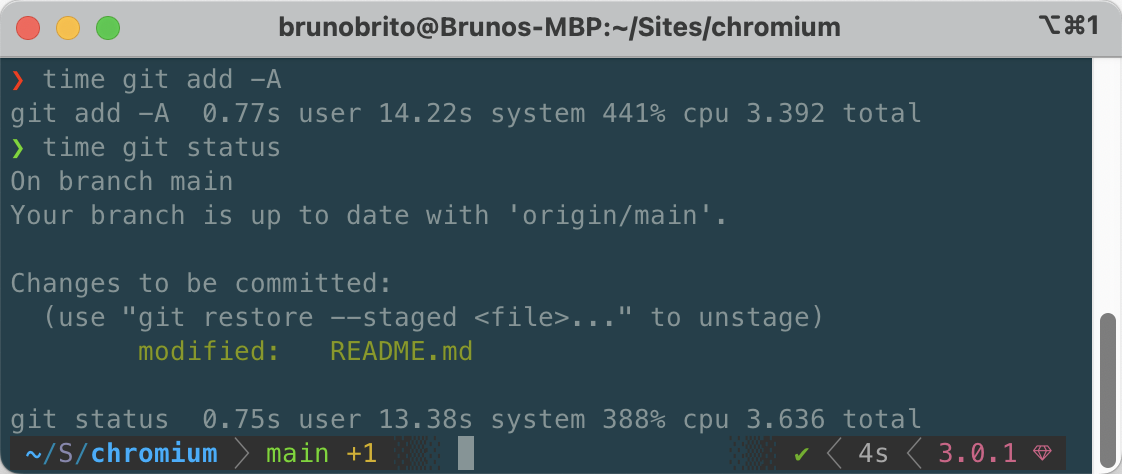
After editing the README.md file, we can see that staging it takes about 3.4 seconds. The git status command took 3.6 seconds as well.
Let's see if we can improve these numbers!
How to Speed Up the Working Tree
1. The feature.manyFiles true config setting
$ git config feature.manyFiles trueBy using this configuration option, you can inform Git that it is managing a large repository.
This setting will enable a newer index file version that is smaller in size and thus gets rewritten faster after modifying files in the index. It will also enable an untracked files cache. Consequently, commands like git add should feel snappier after enabling this option.
Keep in mind that, after making this change, the index file will need to be updated to version 4, which performs a simple pathname compression that reduces index size by 30%-50% on large repositories.
$ git update-index --index-version 4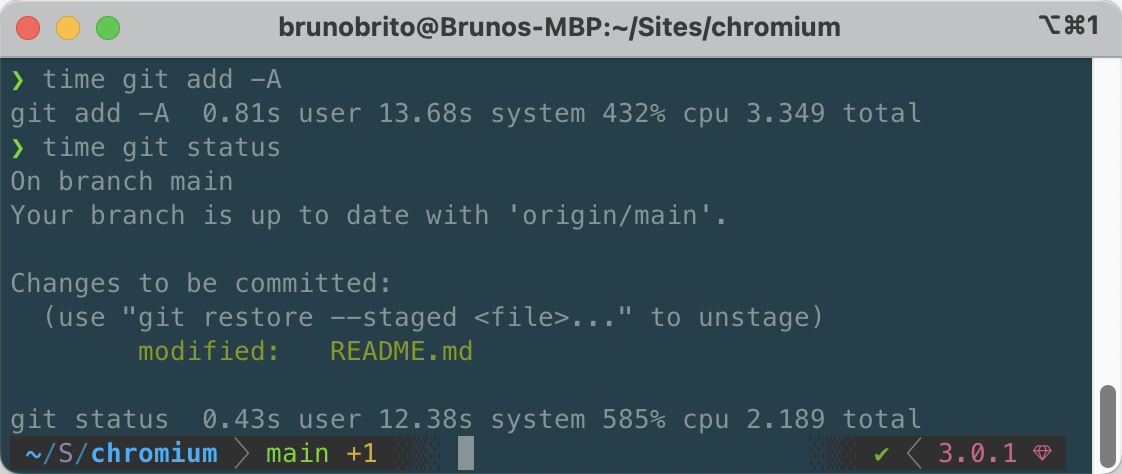
In our case, the improvement on the git add command was very subtle. But don't worry — the next command will definitely demonstrate a more significant enhancement!
2. The core.fsmonitor config setting
$ git config core.fsmonitor trueAdded in Git 2.37.0, this config setting will enable FSMonitor, Git's built-in file system monitor daemon.
Git performance can suffer when managing large repositories because it needs to look for changes throughout the entire working tree. Every time a command such as git status or git add is run, Git must compare the current state of the repository with the index. This process becomes increasingly time-consuming as the number of files and folders in the repository increases, as is often the case with monorepos that can contain millions of files.
By limiting the scope of the search, Git commands that update the index will perform faster. The initial run may not show a significant improvement (as it will need to sync with the index), but subsequent runs should yield a noticeable boost in performance.
After enabling it, you can confirm that the daemon is running by entering the following command:
$ git fsmonitor--daemon status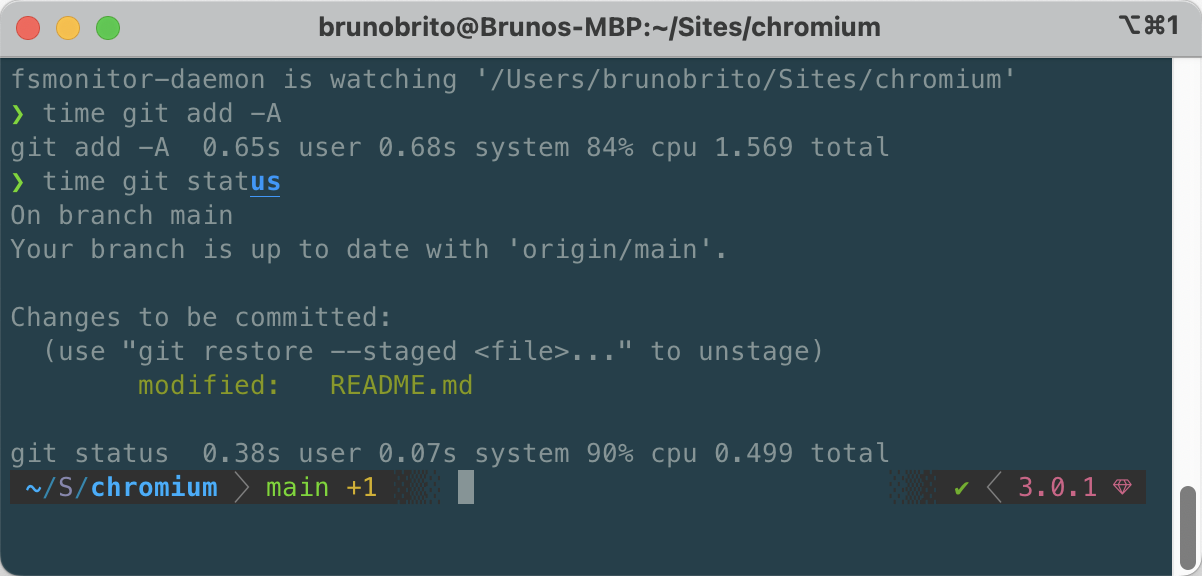
From the above image, it is evident that enabling FSMonitor resulted in a significant improvement in both operations. The time taken to stage a file was halved, and the git status command was completed in just 25% of the original time! 🔥
The untracked-cache feature
The untracked-cache feature works well in conjunction with FSMonitor and, in most cases, it should also be enabled by running the following command:
$ git config core.untrackedcache trueThis feature adds an extension to the index that remembers the results of the untracked search. With both features enabled, you should notice a significant improvement in Git's performance.
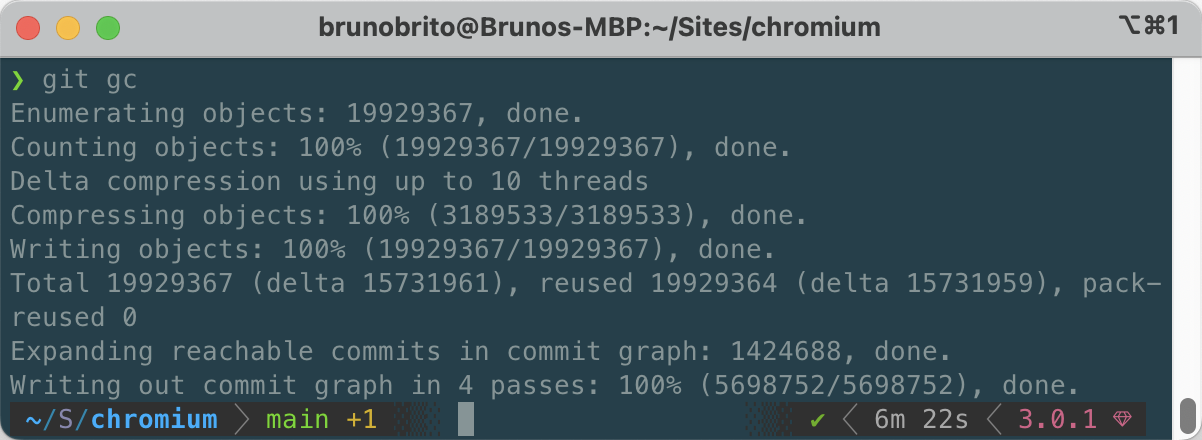
3. Git Garbage Collection
$ git gcGit periodically performs an internal garbage collection operation, which includes a number of housekeeping tasks to store all the objects and files that are not actively in use in a compressed pack file.
Have you ever seen the message “Auto packing the repository for optimum performance"? That's the garbace collection process running in the background, cleaning up unreachable objects (i.e., objects that are not part of any branch or tag).
You can trigger this operation any time by running the command listed above.
Git also allows you to restrict which objects get permanently deleted based on the last time they were written. To do this, you can add the --prune flag to the command.
Here's an example:
$ git gc --prune=2022/01/014. Git Sparse Checkout
$ git sparse-checkout init --cone
$ git sparse-checkout set <dir1> <dir2> ...
The sparse-checkout command was introduced as an experimental feature in Git 2.25.0. Its purpose is to offer the best of both worlds: the blazing fast of a small repository and the benefits of a monorepo. How?
After initializing it (by typing the first command), you will only have access to the files available in the root and in the .git directory.
You will then need to set the directories that you want to use. This effectively restricts your working directory to only the files that you really need. For intance, a front-end web developer probably does not need to work on the backend folder or the Android app.
If something goes wrong, you can run git sparse-checkout disable to return to a full working directory.
The examples above assume you're getting started with the sparse-checkout feature in your existing repositories. When cloning a new repository, you can type git clone --no-checkout [REPO] to avoid clogging the working directory with all the files.
Partial Clone
As the name suggests, this feature allows you to selectively clone a subset of a repository's objects, instead of the entire repository. It is enabled by adding a --filter flag in your git clone command and is often combined with a sparse-checkout.
Partial clone allows us to avoid downloading objects we don't need, reducing download times and HDD usage. Missing objects can later be fetched on demand if needed, so Git can function without having a complete copy of the repository.
A partial clone limits the number of blobs and trees downloaded. While there are blobless and treeless clones, the former is a much more popular option. By creating a blobless clone, you can clone the repository without downloading any of the files (just the branches and commits):
$ git clone --filter=blob:none <url>Git will only get the objects it needs to populate your cone of the working directory. You will have a copy of every blob at HEAD, but the blobs in the history are not present until a subsequent git checkout. Git will trigger a blob download whenever you need the actual content of a file.
It's also good to know that you can modify this command to simply sidestep large files. For example, to skip downloading files larger than 5 MB, you would enter:
$ git clone --filter=blob:limit=5mThis is a great way to avoid transferring unnecessary large binary files (that you probably don't need anyway)!
We make Tower, the best Git client.
Not a Tower user yet?
Download our 30-day free trial and experience a better way to work with Git!
How to Speed Up the History
1. The core.commitgraph true config setting
$ git config core.commitgraph trueThis config setting will use a commit history cache to significantly speed up history operations, such as git log with the --graph option, because the sorting is the time-consuming action of this command. This should be noticeable for repos with a history of more than 50,000 commits.
While this setting is enabled by default in newer Git versions, it does not speed up the history in itself. We will need to look into the next setting to actually benefit from this.
2. The fetch.writeCommitGraph true config setting
$ git config fetch.writeCommitGraph trueThis configuration tells the git gc command (mentioned previously) to update the commit-graph file during non-trivial garbage collection, which is much less demanding than a full GC operation.
The commit-graph info is stored under .git/objects/info/commit-graph. For it to be updated regularly, we would need to perform one of the following actions:
- Enable
gc.writeCommitGraphand rungit gc(without the-autooption, as it will otherwise only update the commit-graph ifgit gcfinds anything to clean up). - Enable
fetch.writeCommitGraphfollowed bygit commit-graph write --reachableto write the cache immediately.
We recommend the latter, as it is the fastest one — it will update the cache incrementally and periodically run a merge of increments.
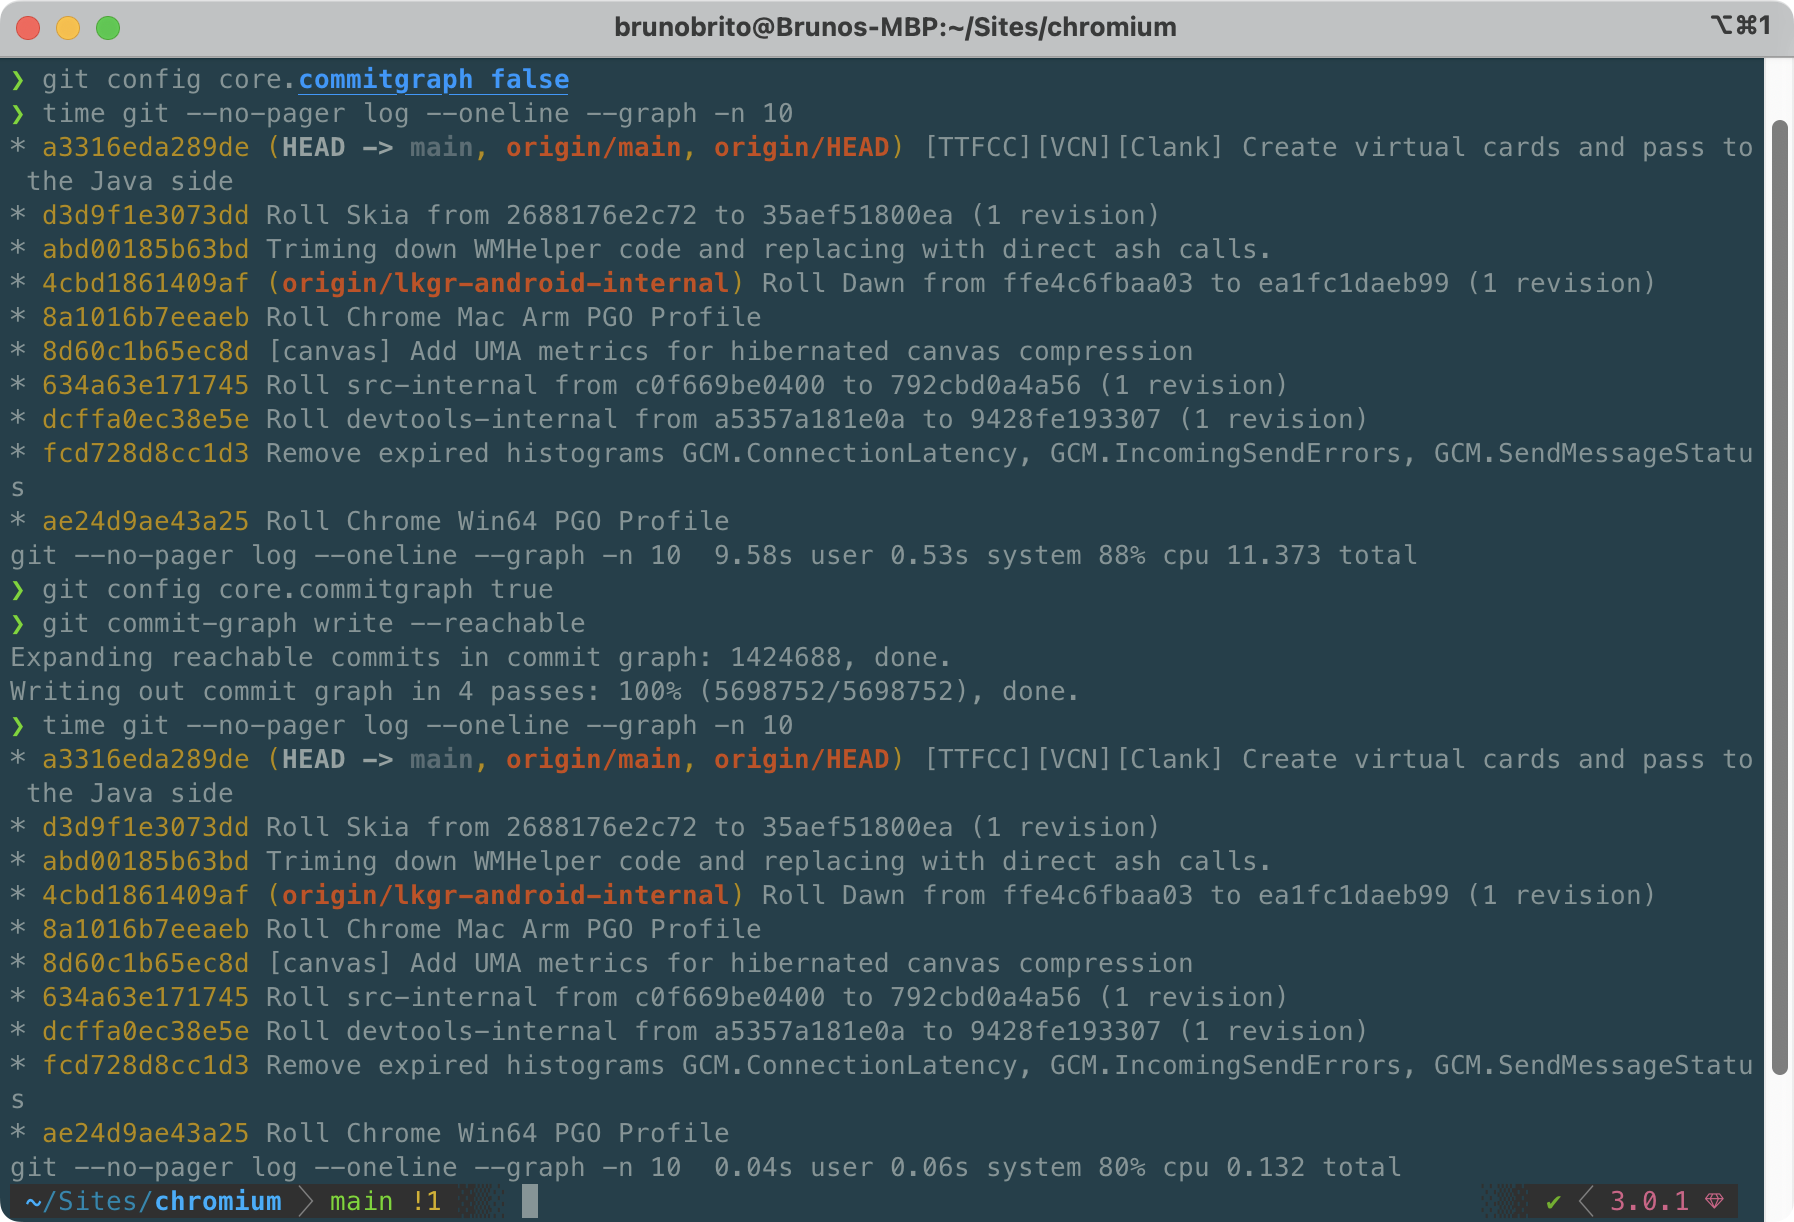
In the image above, you can see a before/after comparison. Initially, the git --no-pager log --oneline --graph -n 10 command took about 11 seconds to complete. After running these two commands, it took only 0.13 seconds (!) to finish.
That's an insane performance boost!
3. Git Sparse Index
$ git sparse-checkout init --cone --sparse-indexWe previously discussed the sparse-checkout command. Another recent feature that complements it is the sparse-index, which aims to improve the speed of the Git index.
By using the sparse-index, the size of the index will depend on the number of files within your chosen directories, rather than the full size of the repository. This leads to much better performance.
You can enable the sparse-index in repositories that support sparse-checkout by adding the --sparse-index flag.
4. Shallow Clone
git clone --depth 10
git clone --shallow-since=2023/01/01
In some cases, you don't need access to the entire Git history of a project; just the latest commits. A shallow clone allows you to retrieve only a portion of the history, saving time and disk space.
It is important to note that shallow clones are not recommended for development work, as they limit access to the complete history of a project. However, they can be useful in situations where the repository is only needed for a single build, such as with CI machines that simply need to clone, compile, and discard the repository.
For example, if you type git clone --depth 10, you will only have access to the last 10 commits of the current branch.
How Does Tower Perform with Large Repositories?
Tower is well-suited for working with large repositories. On the first run, it builds caches, so the initial run may take longer to display very large sets of data, such as 10,000 tags.
That said, Tower's performance relies on Git's speed. Therefore, if you run any of the commands listed here in the command line, you will also see their impact reflected while using Tower.
Tower is designed to remain responsive even when performing various operations, and all commands run asynchronously, allowing you to, for example, push a branch and immediately checkout another branch simultaneously.
Final Words
It is important for developers to be aware of the potential performance issues that can arise with large Git monorepos and to take steps to address them.
By following the tips and concepts outlined in this article, we can ensure that our project is running at optimal performance and that we can focus on what brought us to the dance: developing and delivering quality software!
We hope that you found these commands useful. For more programming tips, don't forget to sign up for our newsletter below and follow Tower on Twitter and LinkedIn! ✌️
Join Over 100,000 Developers & Designers
Be the first to know about new content from the Tower blog as well as giveaways and freebies via email.