Watch Now This tutorial has a related video course created by the Real Python team. Watch it together with the written tutorial to deepen your understanding: Getting the Most Out of the Python Standard REPL
The Python standard shell, or REPL (Read-Eval-Print Loop), allows you to run Python code interactively while working on a project or learning the language. This tool is available in every Python installation, so you can use it at any moment.
As a Python developer, you’ll spend a considerable part of your coding time in a REPL session because this tool allows you to test new ideas, explore and experiment with new tools and libraries, refactor and debug your code, and try out examples.
In this tutorial, you’ll learn how to:
- Run the Python standard REPL, or interactive shell
- Write and execute Python code in an interactive session
- Quickly edit, modify, and reuse code in a REPL session
- Get help and introspect your code in an interactive session
- Tweak some features of the standard REPL
- Identify the standard REPL’s missing features
You’ll also learn about available feature-rich REPLs, such as IDLE, IPython, bpython, and ptpython.
To get the most out of this tutorial, you should be familiar with your operating system’s command line, or terminal. You should also know the basics of using the python command to run your code.
Free Sample Code: Click here to download the free sample code that you’ll use to explore the capabilities of Python’s standard REPL.
Getting to Know the Python Standard REPL
In computer programming, you’ll find two kinds of programming languages: compiled and interpreted languages. Compiled programming languages like C and C++ will have a compiler program, which takes care of translating the language’s code into machine code.
This machine code is typically saved into an executable file. Once you have an executable file, you can run your program on any compatible computer system without needing the compiler or the source code.
In contrast, interpreted languages like Python need an interpreter program. This means that you need to have a Python interpreter installed to run Python code on your computer. Some may consider this characteristic a drawback because it can make your code distribution process much more difficult.
However, in Python, having an interpreter offers one significant advantage that comes in handy during your development and testing process. The Python interpreter allows for what’s known as an interactive REPL (Read-Eval-Print Loop), or shell, which reads a piece of code, evaluates it, and then prints the result to the console in a loop.
Note: In this tutorial, you’ll learn about the CPython standard REPL, which is available in all the installers of this Python distribution. If you don’t have CPython yet, then check out Python 3 Installation & Setup Guide for detailed instructions.
The Python interpreter can execute Python code in two modes:
- Script, or program
- Interactive, or REPL
In script mode, you use the interpreter to run a source file as an executable program. In this case, Python loads the file content and runs the code line by line, following the script or program’s execution flow. Alternatively, interactive mode is when you launch the interpreter and use it as a platform to run code that you type in directly.
Note: The name Python is commonly used to denote two different things: the language itself, and the interpreter. In this tutorial, you’ll find the explicit term Python interpreter only in situations where ambiguity can arise.
In this tutorial, you’ll learn how to use the Python standard REPL to run code interactively, which allows you to try ideas and test concepts when using and learning Python. Are you ready to take a closer look at the Python REPL? Keep reading!
What Is Python’s Interactive Shell or REPL?
When you run the Python interpreter in interactive mode, you open an interactive shell, also known as an interactive or a REPL session. In this shell, your keyboard is the input source, and your screen is the output destination.
Note: In this tutorial, you’ll find the terms interactive shell, interactive session, interpreter session, and REPL session used interchangeably.
The input consists of Python code, which the interpreter parses and evaluates. After that’s done, the interpreter automatically displays the result on your screen, and the process starts again as a loop.
So, Python’s REPL is an interactive way to talk to your computer using the Python language. It’s like live chat. The whole process is known as a REPL because it goes through four steps that run under the hood:
- Reading your input, which consists of Python code as expressions and statements
- Evaluating your Python code, which generates a result or causes side effects
- Printing any output so that you can check your code’s results and get immediate feedback
- Looping back to step one to continue the interaction
This feature of Python is a powerful tool that you’ll wind up needing in your Python coding adventure, especially when you’re learning the language or when you’re in the early stages of a development process. That’s because the REPL offers several benefits, which you’ll learn about next.
Why Use a Python REPL?
As a Python programmer, you’ll spend considerable time in interactive mode. This mode provides a quick way to try out ideas and code snippets. In a REPL session, you can do some or all of the following tasks:
- Explore and learn Python syntax
- Try out and prove ideas, concepts, and implementations
- Quickly evaluate code snippets
- Dive into the language behaviors
- Edit and refactor your code for later use in script mode
- Perform code and type introspection
- Get interactive help on how to use the language
- Run basic code debugging
- Explore standard-library and third-party modules, libraries, and APIs
- Inspect the implementation of classes, functions, and other objects
Clearly, as a Python developer, you’ll have many reasons to spend a lot of your time in REPL sessions, working interactively with the interpreter. Getting immediate feedback on how your code works is the most relevant benefit of using a REPL session.
Interactive mode is one of the best features of Python. It allows you to test solutions and experiment with the language in real time. If you want to know how something works, then just try it in an interactive shell.
You should definitely consider the interactive shell a powerful learning tool, especially if your previous programming experience has been with compiled languages that don’t provide a REPL.
While learning Python or exploring new features and concepts, you’ll note that many examples in the Python documentation, online tutorials, manuals, and courses are copied and pasted from an interactive session. You’ll recognize them because of the REPL’s characteristic prompts, which you’ll get to know in the Running the python Command section.
With this introduction to interpreters and REPLs under your belt, you’re ready to get into action. In the following session, you’ll learn how to start and end a Python interactive session.
Starting and Ending REPL Interactive Sessions
The Python standard REPL is available in every Python installation. To start a new REPL or interactive session, you just need to run the Python interpreter in interactive mode from your command line. This mode will put you into a shell environment where you can execute Python code. Learning how the input code works is basically a way of getting immediate feedback on it.
In the following sections, you’ll learn how to start a new Python interactive shell using the python command and some of its command-line options.
You’ll also learn about the standard look and feel of a Python interactive shell and about some of its core characteristics and features. Finally, you’ll learn how to terminate a Python interactive session.
Running the python Command
Once you’ve installed Python on your computer, then you can immediately start benefiting from this amazing tool. To start a Python interactive shell or session, open a command-line window and run the python command without arguments:
$ python
This command makes Python enter its interactive mode. The interpreter will run, and you’ll get an output that’ll look something like this:
Python 3.11.0 (main, Nov  6 2022, 13:27:29) ... on darwin
Type "help", "copyright", "credits" or "license" for more information.
>>>
The first line of this output shows information about your current Python version and the platform on which you’re running the interpreter. The second line shows a message with commands that you can run to get additional information about Python in general.
The last line, which is highlighted in the output, shows the primary prompt of a standard Python interactive session or shell. By default, this prompt consists of three greater-than signs (>>>), also known as chevrons. Its purpose is to communicate that the interpreter is ready to accept input.
Note: The Python standard REPL doesn’t support syntax highlighting. However, in this tutorial, you’ll find that the examples are rendered using a syntax highlighter. Keep this detail in mind because you won’t get syntax highlighting when you run the examples on your computer.
The interpreter also has a secondary prompt represented by three dots (...). This prompt appears when you’re entering compound statements or line continuations. You’ll learn more about this prompt in the Running Compound Statements and Dealing With Explicit and Implicit Line Continuations sections.
Passing Command-Line Options to the python Command
The python command can take a bunch of command-line options. A few of them can be useful when working in a REPL session. One of the most relevant options in this context is the -i flag. This option makes the interpreter enter the interactive mode after running a script or executing a piece of code using the -c option.
Note: The -c command-line option allows you to quickly run a Python statement or expression that you provide as a string on your command line. Try out the command python -c "print('Hello, World!')" to see this option in action.
You can use the -i option to check the current global variables in your script or to inspect the stack trace when your program raises an exception.
To try this option out, say that you have the following sample script:
# sample.py

def read_data():
    # Read data from a file or database...
    return [1, 2, 3, 4, 5, 6, 7, 8, 9, 10]

sample = read_data()

def mean(data):
    return sum(data) / len(data)

average = mean(sample)
This script reads some sample data for a file or database and provides a function to compute the mean, or average, of the data.
Go ahead and run the script with the following command:
$ python -i sample.py
Once you press Enter, this command runs the code in sample.py and takes you directly to an interactive session. You’ll recognize this session because your screen will present the REPL’s primary prompt (>>>).
From this point on, you can inspect, test, and debug the code in sample.py as needed:
>>> globals()
{
    '__name__': '__main__',
    ...
    'read_data': <function read_data at 0x104dd4860>,
    'sample': [1, 2, 3, 4, 5, 6, 7, 8, 9, 10],
    'mean': <function mean at 0x104fe3ec0>,
    'average': 5.5
}

>>> mean([2, 3, 3, 2])
2.5

>>> mean([])
Traceback (most recent call last):
  File "<stdin>", line 1, in <module>
  File ".../sample.py", line 10, in mean
    return sum(data) / len(data)
           ~~~~~~~~~~^~~~~~~~~~~
ZeroDivisionError: division by zero
In these examples, you first call the built-in globals() function to inspect the global names defined in your script. This function returns a dictionary that maps names to their corresponding objects. The second example calls mean() with a new sample of data.
Note: When you run a piece of code in an interactive session, you typically get immediate feedback as an output on your screen. You’ll recognize the code’s output because it won’t have any leading prompt.
The final example calls mean() with an empty list as an argument. In this case, the function fails with a ZeroDivisionError because calling len() with an empty list returns 0.
Note: When you use the -i command-line option with the python command, keep in mind that the PYTHONSTARTUP environment variable won’t be read. You’ll learn more about this environment variable in the Providing a Startup File section.
The -b flag is another command-line option to consider when you run Python in interactive mode. This option comes in handy when you’re running code that compares bytes objects, and you want to get a warning if a string or integer value gets in the middle of a comparison:
>>> # Run python with the -b option
>>> b = b"Hello"
>>> s = "Hello"
>>> b == s
<stdin>:1: BytesWarning: Comparison between bytes and string
False
The -b option in the second example makes the interpreter display a warning when it finds operations that compare bytes with either strings or int values. If you don’t use this option, then no warning is shown:
>>> # Run python without the -b option
>>> b = b"Hello"
>>> s = "Hello"
>>> b == s
False
As in the previous example, the comparison returns False because the values are of different data types. However, in this final example, you don’t get any warning that helps you understand why you’re getting this result.
This is just a sampling of the options that may come in handy when you’re using Python in interactive mode. For a complete list of command-line options, check out Python Command-Line Arguments.
Exiting the Current Python REPL Session
If you’re used to working on your command line or terminal, then you probably don’t like closing and opening terminal windows all the time. Your regular workflow may go through executing CLI tools, closing them when the work is done, and returning to your current shell session.
This may be the case when you’re using Python in interactive mode. Once inside the REPL, you can’t run normal shell commands because you’re inside a different environment. To get back to your normal shell, you need to terminate the REPL session.
There are a few ways to exit an interactive session. You can use either of the following Python functions:
These two functions are built into Python. Therefore, they’re available to you at any moment in an interactive session. Both functions allow you to exit the current session by implicitly raising a SystemExit exception.
Alternatively, you can explicitly raise the SystemExit exception manually with an exit code of 0. You’ll get the same result, and your current REPL session will terminate.
Any of these tools will get you out of your current Python interactive session and take you back to the operating system (OS) shell. After this, you can run regular shell commands again.
Another option for terminating a REPL session is to use one of the following keyboard shortcuts, depending on your current operating system:
- Ctrl+D on Unix systems, such as Linux or macOS
- Ctrl+Z and then Enter on Windows systems
These key combinations represent the end-of-file character (EOF) in the corresponding OS. They allow you to exit the current interactive session because the interpreter runs in a special file called __main__, as you can confirm by inspecting the __name__ attribute:
>>> __name__
'__main__'
All the Python code in an interactive session will be contained in the __main__ file, which runs until an EOF character is read. This means that when the interpreter finds this character, it immediately terminates the current REPL session.
Running Code in a REPL Session
Up to this point, you’ve learned what a Python REPL is and why Python developers love it. You’ve also learned how to start a REPL session using the python command and some of its command-line options. Additionally, you’ve learned how to terminate a Python interactive session, jumping back to the operating system shell.
In the following sections, you’ll learn how to enter and execute Python code in an interactive session.
Evaluating Expressions and Simple Statements
Once you’ve launched a Python interactive session from your command line, you can start entering and executing Python code immediately. To do this, get back to your command-line window and run the python command.
When the REPL’s primary prompt (>>>) appears on your screen, type in the following expressions, pressing the Enter key after each of them:
>>> 5 - 2
3

>>> sum([1, 2, 3, 4])
10

>>> 42 > 7
True

>>> number = 42

>>> 7 / 0
Traceback (most recent call last):
    ...
ZeroDivisionError: division by zero
The first expression subtracts two numbers and displays the result. The second expression is a call to the built-in sum() function, which takes a series of values and returns its total sum. In the third example, you execute a Boolean expression that compares two numbers.
The fourth example uses an assignment statement to define and initialize a variable called number. Because assignments don’t return any value, the Python interpreter doesn’t display any output on your screen. Instead, it falls back to the primary prompt immediately. The final example shows how Python displays an error when your code has issues.
While running these examples, note how after executing each expression, the interpreter loops back to the primary prompt (>>>), which lets you introduce a new expression. Now you’ve seen the REPL cycle in action. The Python interpreter has read your expressions, executed them, and printed their corresponding result to finally loop back to the primary prompt.
Running Compound Statements
With the examples in the previous section, you’ve executed simple statements in a Python interactive session. These expressions are known as simple statements because they don’t have an indented code block.
Python also has compound statements, such as conditionals, loops, and with statements. Compound statements require an indented code block. The Python interpreter has a secondary prompt that lets you enter the code block of compound statements.
Consider the following example of a conditional statement:
>>> number = -42

>>> if number < 0:
...     print("negative")
... elif number > 0:
...     print("positive")
... else:
...     print("equal to 0")
...
negative
In this code snippet, you first define a variable to hold a number. Next up, you start a conditional statement.
Once you type the colon character (:) and press Enter, you get three dots (...) on your screen. These dots represent the REPL’s secondary prompt. This prompt on your screen means that you can enter the required indented blocks of your current compound statement.
Note: To break out of the REPL’s secondary prompt, you must press Enter twice. This action will take you back to the primary prompt.
When it comes to entering indented code blocks, keep in mind that the standard REPL doesn’t support auto-indentation:
>>> if number < 0:
... print("negative")
  File "<stdin>", line 2
    print("negative")
    ^
IndentationError: expected an indented block after 'if' statement on line 1
In the Python standard REPL, you must provide the appropriate indentation manually for any indented code block that you need to enter. Otherwise, you’ll get an IndentationError, like in the example above.
Dealing With Explicit and Implicit Line Continuations
Another situation where the REPL’s secondary prompt appears is when you need to use line continuations. A line continuation occurs when you explicitly join multiple physical lines into a single logical line using the backslash (\) character:
>>> number = 42

>>> assert isinstance(number, int) and number > 0, \
...     f"number greater than 0 expected, got: {number}"
...
This assert statement performs two checks on number. First, it uses the built-in isinstance() function to check if the value is an integer number. Then it checks if the input value is greater than 0. If either of these conditions fails, then the statement raises an AssertionError with the provided message as an argument.
Line continuations also happen when you use several physical lines to write an expression delimited by a pair of brackets—for example, when you define a list, tuple, or dictionary:
>>> fruits = [
... "apple",
... "banana",
... "orange",
... "grape",
... "lemon",
... ]

>>> inventory = {
... "mouse": 120,
... "keyboard": 50,
... "laptop": 200,
... "headphones": 240,
... }
Once you open a bracket, such as [], (), or {}, and press Enter, you get the REPL’s secondary prompt. This is known as implicit line joining.
You can also use implicit line joining in other contexts, such as math and Boolean expressions, function definitions and calls, list comprehensions, and generator expressions. In short, implicit line continuation will appear in all those Python constructs that accept some type of brackets, including [], (), or {}.
Printing vs Evaluating
When you run Python in interactive mode, you’ll note that the interpreter immediately displays the resulting value of evaluating or executing any expression or statement. This is true for all the statements and expressions that generate a return value.
The interpreter doesn’t display anything for statements that don’t generate return values. That’s the case with assignment statements, as you already learned.
The Python interpreter behaves that way because its primary goal is to provide immediate feedback on how your code works. This behavior makes using the built-in print() function almost unnecessary when you’re working interactively.
However, there’s at least one use case for print() in REPL sessions. You need to use print() when you want to display the result of an expression or statement that can or will return None.
For example, a common error that some Python beginners make when they start to learn about lists is to expect new lists from calls to list methods, such as .append(), .sort(), and the like:
>>> numbers = [2, 4, 1, 3]

>>> numbers.sort()
>>> numbers.append(5)
Because these method calls don’t issue any output to the screen, it may seem that they didn’t perform any real action. However, they did.
Most list methods run their intended transformation or computation in place. In other words, list methods often modify the underlying list object instead of creating a new one. Because of this, most list methods return None, which the REPL automatically ignores. As a result, nothing shows up on your screen.
If you ever need to display None in a REPL session, then you must use the print() function:
>>> print(numbers.append(6))
None

>>> numbers
[1, 2, 3, 4, 5, 6]

>>> value = None
>>> value
>>> print(value)
None
In this code snippet, you use print() to show the return value of .append(), which is None, as you can see.
Note that you can always access the content of a given variable by typing the variable’s name and pressing Enter after it, as you did with numbers. However, if the variable is currently set to None, then you won’t get anything on your screen. You’ll have to use print(), as you did with value.
Flagging and Understanding Errors
When an error occurs in a REPL session, the interpreter automatically prints the corresponding error message and traceback. Then, it loops back to the REPL’s primary prompt. In the following examples, you’ll see this behavior in action:
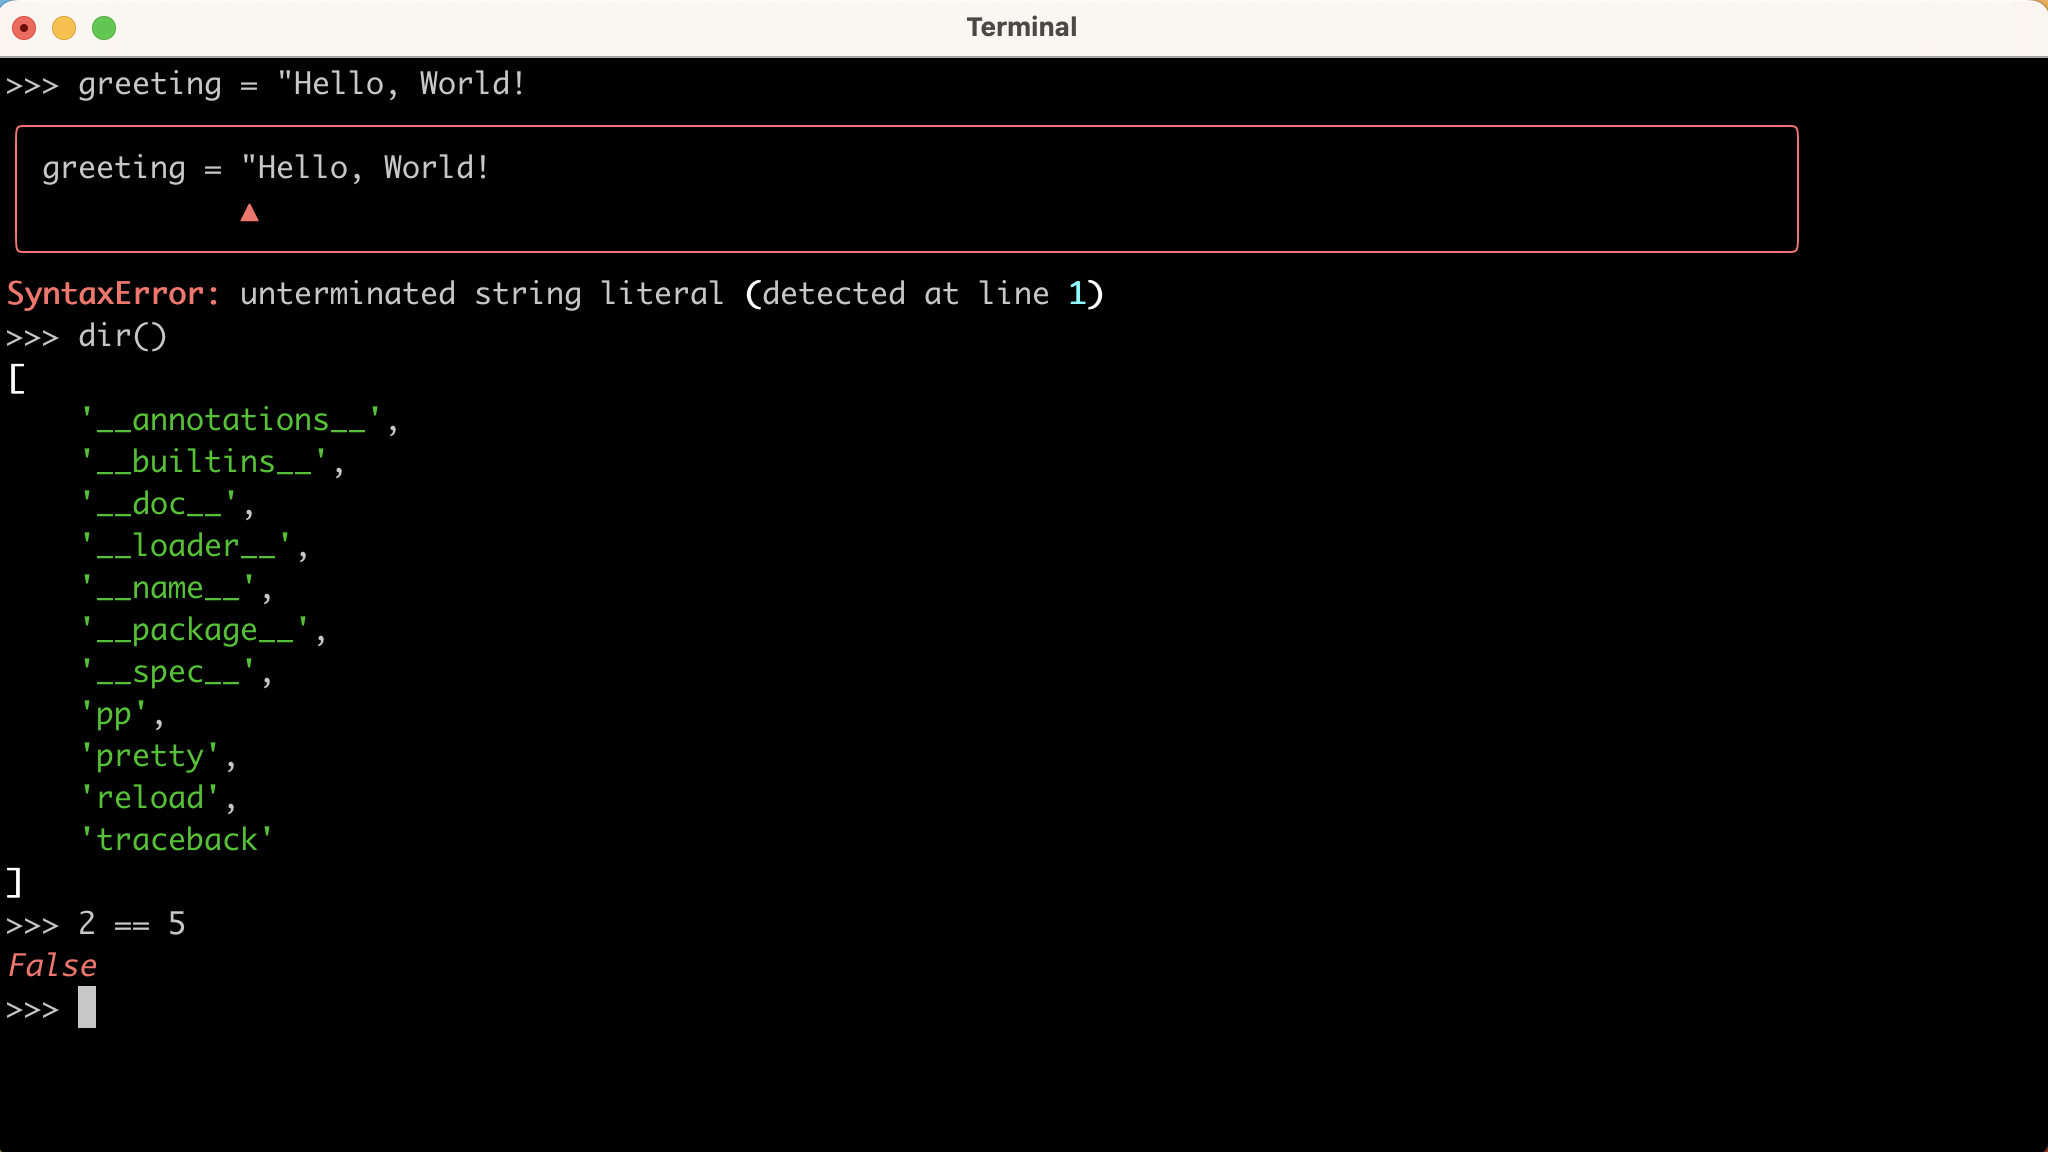
>>> greeting = "Hello, World!
  File "<stdin>", line 1
    greeting = "Hello, World!
               ^
SyntaxError: unterminated string literal (detected at line 1)

>>> 42 / 0
Traceback (most recent call last):
  File "<stdin>", line 1, in <module>
ZeroDivisionError: division by zero

>>> sum()
Traceback (most recent call last):
  File "<stdin>", line 1, in <module>
TypeError: sum() takes at least 1 positional argument (0 given)
In the first example, the string literal isn’t properly closed with a double quote ("). This raises a SyntaxError. The second example raises a ZeroDivisionError exception because you’re trying to divide 42 by 0. In the final example, you call the built-in sum() function without arguments, which raises a TypeError.
All these errors are immediately printed on the screen. This behavior allows you to quickly and carefully inspect the error message and traceback in order to track the underlying issue and fix your code.
Using the _ Special Variable
Every time you run a statement that returns a value, the interpreter internally stores that value in a special variable named with a single underscore (_). You can access and use this variable like any other variable in Python.
Here are a couple of examples that show the implicit _ variable in action when you work with expressions:
>>> 42 < 7
False
>>> _
False

>>> 12 + 30
42
>>> _
42
In these examples, you’re evaluating expressions. Expressions always have a return value, which is automatically assigned to the _ variable every time.
When it comes to function calls, if the target function returns a value different from None, then _ will hold that value. In contrast, if the function returns None, then the _ variable will keep the value of the preceding operation:
>>> pow(4, 2)
16
>>> _
16

>>> print("Hello, World!")
Hello, World!
>>> _
16
The built-in pow() function computes the power of a number to a given exponent, returning the result. Because the function’s result differs from None, the _ variable is automatically reassigned. In contrast, if you call a function that returns None, like print(), then the _ variable remains unchanged.
In the example below, you use an assignment statement to create and initialize a counter variable:
>>> counter = 0
>>> _
16

>>> counter
0
>>> _
0
Assignments don’t return any value. Instead, they store a reference to a value in a variable. In this case, the _ variable isn’t updated after running the statement. That’s why the variable still contains the number 16 from the previous examples.
Note that accessing a variable in an interactive session returns the value referenced by the variable. In this case, that value is also assigned to the _ variable.
Because _ is a regular Python variable, you can use it in expressions and statements:
>>> numbers = [1, 2, 3, 4]

>>> len(numbers)
4

>>> sum(numbers) / _
2.5
In this example, you first create a list of values. Then you call len() to get the number of values in the list. Python automatically stores this value in the _ variable. Finally, you use _ to compute the mean of your list of values.
When using the _ variable in a REPL session, keep in mind that this variable only appears in interactive mode. If you run your code in script mode, then you won’t get this implicit behavior.
Reloading Imported Modules
Say that you’re writing a Python module with some functions for one of your projects. At the same time, you’re using Python in interactive mode to test the module’s code in real time. For example, say that you have the following module:
# greeting.py

def greet(name="World"):
    print(f"Hello, {name}!")
In this file, you define a greet() function that prints a greeting message on the screen. Here’s how to load and use this code from a REPL session:
>>> import greeting

>>> greeting.greet()
'Hello, World!'
>>> greeting.greet("Pythonista")
'Hello, Pythonista!'
Now say that you want to add a new argument to your function. The argument will be a Boolean flag that allows printing the greeting message in uppercase letters. To do this, you modify the function to look something like this:
# greeting.py

def greet(name="World", upper=False):
    greeting = f"Hello, {name}!"
    if upper:
        greeting = greeting.upper()
    print(greeting)
This update allows you to call greet() with an upper argument. If you set the argument to True, then the message will be in uppercase letters. Now you’re eager to try your changes in your current REPL session. So, you import the module again, hoping to run the new version of greet() as follows:
>>> import greeting

>>> greeting.greet("Pythonista", upper=True)
Traceback (most recent call last):
  File "<input>", line 1, in <module>
    greeting.greet("Pythonista", upper=True)
     ^^^^^^^^^^^^^^^^^^^^^^^^^^^^^^^^^^^^^^^
TypeError: greet() got an unexpected keyword argument 'upper'
What? You have an unexpected argument? For efficiency reasons, running the import again after updating something in greeting.py doesn’t reload the module. Python doesn’t load imported modules again when you rerun the import.
If you want to work around this behavior without closing your current REPL session and opening a new one, then you can use the reload() function from importlib:
>>> import importlib
>>> importlib.reload(greeting)
<module 'greeting' from '.../greeting.py'>

>>> greeting.greet("Pythonista", upper=True)
HELLO, PYTHONISTA!
Now your function works! The reload() function has taken care of loading the new version of your greeting module. You can use this trick whenever you’re working in a module on your code editor and testing your changes in a REPL session.
Now that you’ve learned the basics of entering and executing code in a Python interactive shell, it’s time to explore and learn about a few editing features that the standard REPL provides.
Editing Code in the Standard REPL
Most versions of the Python interpreter support code editing when running in interactive mode. These editing features include code history and basic code completion. If you usually work on Unix-like systems, such as Linux and macOS, then you may be familiar with some of these features, which are present in the Bash and Korn shells.
These editing features are implemented using the GNU Readline library, which supports several useful styles of editing.
Note: A quick way to check whether you have code editing features available in your current setup is to press Ctrl+P in the REPL’s prompt. This shortcut should show the last code instruction in your history. If nothing happens or ^P appears on the screen, then the code editing features aren’t available. Otherwise, you’re ready to go!
In the following sections, you’ll learn how to use code history and code completion in a Python interactive session when you’re using the standard REPL.
Code History
The standard REPL logs a complete history of all the code that you’ve typed and run while working in interactive mode. This history is saved to a file called .python_history, typically located in your home directory.
While in interactive mode, you can browse this history by using the arrow keys on your keyboard. With the Up key, you can go back in history. With Down, you can go forward in history.
Once you find the desired line of code, you can press Enter to confirm your selection and reuse the target instruction:
Note how the code in your REPL’s history immediately becomes available for reuse. To navigate the code history, use the Up and Down keys until you find the desired snippet.
The navigation starts from the end of the history file and goes up. Every time you press the Up key, you jump to the previous line of code in your history.
Once you find the line of code that you want to reuse or modify, press Enter to accept it. Remember that every line in your code history keeps the original indentation that you used when you first typed the code, which is convenient and saves time.
Code Completion
The standard REPL provides basic completion capabilities for variable, object, and module names. This feature is automatically enabled when you start an interactive session. To invoke the available code completions, you can type the starting characters of a given name and press the Tab key. This action triggers the completion search.
If the search finds a match, then the name will automatically be completed for you. If the search finds more than one match, then you’ll have to press Tab again to get the entire list of matching names. If nothing appears after pressing Tab twice, then your search didn’t find any result.
The code completion system looks at the following objects when running its search:
- Python keywords
- Built-in function, class, and object names
- Currently defined names, such as variables, functions, and classes
- Imported module and package names
Here’s an example of how the REPL’s code completion system works in practice:
When you type the first character or characters of your target name and press Enter, you get an automatic completion if the REPL finds a unique match. When the completion system finds more than one name that matches your search, you need to press Tab again to get the list of matching names.
You can type a few more characters and press Tab again, or you can just type the complete name or keyword.
When it comes to accessing attributes with dot notation, like in obj.attr, the code completion system will suggest completions from the target object’s attributes and methods:
Once you type the name of an object followed by a dot, you can press Tab to quickly inspect the list of attributes and methods of that object. Then you can start typing the name of your target attribute or method and press Tab again for completion.
The standard REPL provides a rather limited set of code editing features. However, they can be pretty useful when you need to use an interactive session and don’t have a more advanced REPL. These code editing features can improve your productivity and make your coding experience more pleasant.
Useful Keyboard Shortcuts
Leaning useful keyboard shortcuts can significantly boost your productivity and efficiency when you’re working in a REPL session. For example, pressing Ctrl+C on the REPL’s primary or secondary prompt cancels the input and returns to the primary prompt:
>>> print(
KeyboardInterrupt

>>> if True:
...
KeyboardInterrupt
When you press Ctrl+C on the primary or secondary prompt, the interpreter raises a KeyboardInterrupt exception and immediately returns to the primary prompt.
If you press Ctrl+C while some piece of code is running, then the interpreter raises a KeyboardInterrupt exception, interrupting the code’s execution and returning to the primary prompt.
This latter behavior is useful when you launch a long-running task that you’re not willing to complete or when you accidentally run into an infinite loop:
>>> while True:
...     print("Hello!")
...
Hello!
Hello!
Hello!
^CTraceback (most recent call last):
  File "<stdin>", line 2, in <module>
KeyboardInterrupt
Hello!
This example presents an infinite while loop. You can break the loop by pressing Ctrl+C on your keyboard. After this key combination, you’re again back to the primary prompt, and your REPL session is ready for new input.
The standard REPL provides many other interesting and useful keyboard shortcuts. The table below shows some of them:
| Keyboard Shortcut | Description |
|---|---|
| Ctrl+L | Clears the screen, reprinting the current line at the top |
| Ctrl+D | Exits the current REPL session |
| Ctrl+C | Raises a KeyboardInterrupt exception and loops back to the primary prompt |
| Ctrl+B | Moves the cursor back one character |
| Ctrl+F | Moves the cursor forward one character |
| Del or Backspace | Deletes the character to the right or left of the cursor, respectively |
| Ctrl+D | Deletes the character underneath the cursor |
| Ctrl+A | Moves the cursor to the start of the line |
| Ctrl+E | Moves the cursor to the end of the line |
| Ctrl+K | Kills, or deletes, the text from the current cursor position to the end of the line |
| Ctrl+W | Kills from the cursor to the previous whitespace |
These keyboard shortcuts will help you be more proficient when typing and editing code in an interactive session. You’ll find a few more keyboard shortcuts in the official documentation of the GNU Readline library.
Getting Help and Introspecting Code in the REPL
An important feature of any coding environment like an IDE (or integrated development environment), editor, or REPL is the possibility of getting quick help and guidance about using the language, libraries, and tools that you’re working with.
If you’re working on the standard REPL, then you’ll have a few tools that allow you to get help and introspect your code depending on your needs and specific context.
Using Python’s Built-in Help System
The built-in help() function gives you access to Python’s built-in help system. You can use this function by calling it in two ways:
- With an object or a string as an argument, which gives you access to the object’s help page
- With no arguments, which enters Python’s help system
The help page of an object typically contains information from the object’s docstrings. It may also include a list of methods and attributes. For example, here’s a fragment from the page of the str class that you can access by typing help(str) in your REPL session:
>>> help(str)

Help on class str in module builtins:

class str(object)
 |  str(object='') -> str
 |  str(bytes_or_buffer[, encoding[, errors]]) -> str
 |
 |  Create a new string object from the given object. If encoding or
 |  errors is specified, then the object must expose a data buffer
 |  that will be decoded using the given encoding and error handler.
 |  Otherwise, returns the result of object.__str__() (if defined)
 |  or repr(object).
 |  encoding defaults to sys.getdefaultencoding().
 |  errors defaults to 'strict'.
 |
 |  Methods defined here:
 |
 |  __add__(self, value, /)
 |      Return self+value.
 |
 |  __contains__(self, key, /)
 |      Return key in self.
...
In this example, you use the str class object as an argument to help(). This way, you access the class’s help page. You can use the Up and Down keys to move through the page. When you get the desired information, you can press the Q key to exit the help viewer.
If you use a string as an argument to help(), then the help system looks for it as the name of a module, function, class, method, keyword, or documentation topic. The corresponding help page is printed on the screen. This way to call help() comes in handy when the target object isn’t available in your current namespace.
For example, say that you want to get help on the pathlib module, but you haven’t imported it yet. Then you can run help() with the string "pathlib" as an argument. You’ll get something like the following:
>>> help("pathlib")

Help on module pathlib:

NAME
    pathlib

MODULE REFERENCE
    https://docs.python.org/3.11/library/pathlib.html

    The following documentation is automatically generated from the Python
    source files.  It may be incomplete, incorrect or include features that
    are considered implementation detail and may vary between Python
    implementations.  When in doubt, consult the module reference at the
    location listed above.
...
The call to help() with "pathlib" as an argument displays the module’s help page. Note that if you call help() with the pathlib name as an argument, then you’ll get a NameError because you haven’t imported the module to your current namespace.
The second way to use help() is to call the function without arguments. This way, you enter the built-in help system:
>>> help()
This call allows you to enter help mode. Once you run it, you’ll immediately note that the prompt changes from >>> to help>. This new prompt reminds you that you’re in the interactive help mode.
In help mode, you can enter keywords, module names, function names, or any other name. The help system will search for the target name and present the associated documentation page. To try this functionality out, go ahead and type sys on the help> prompt, then press Enter. You’ll get the following page on your screen:
help> sys

Help on built-in module sys:

NAME
    sys

MODULE REFERENCE
    https://docs.python.org/3.11/library/sys.html

    The following documentation is automatically generated from the Python
    source files.  It may be incomplete, incorrect or include features that
    are considered implementation detail and may vary between Python
    implementations.  When in doubt, consult the module reference at the
    location listed above.
...
Again, to exit the page, you can press the Q key on your keyboard. The help system allows you to search for different topics. Just type the desired topic and press Enter. If the topic has a documentation page, then you’ll get it on your screen. Otherwise, you’ll get an ImportError that’ll bring you back to the primary prompt:
help> keywords

Here is a list of the Python keywords.  Enter any keyword to get more help.

False               class               from                or
None                continue            global              pass
True                def                 if                  raise
and                 del                 import              return
as                  elif                in                  try
assert              else                is                  while
async               except              lambda              with
await               finally             nonlocal            yield
break               for                 not

help> iterable
Traceback (most recent call last):
    ...
ImportError: No Python documentation found for 'iterable'.
Use help() to get the interactive help utility.
Use help(str) for help on the str class.
In this example, you first search for the term keywords. This search finds and shows the page on Python keywords. Then, you search for the term iterable. Unfortunately, this topic doesn’t have a documentation page, so you get an ImportError that takes you out of the help system.
Once you’ve found the required information, then you can exit the help system by typing q or quit and then pressing Enter. This way, you’ll be back to your REPL session.
Introspecting Your Code Dynamically
When you’re working in a REPL session, you have direct access to some cool Python built-in tools that you can use to introspect your code and obtain more information and context on the objects that you’re working with.
Some of these built-in tools include the following:
| Function | Description |
|---|---|
dir() |
Returns the list of names in the current local scope when you call it with no argument. Attempts to return a list of valid attributes for the object passed as an argument. |
vars() |
Returns the .__dict__ attribute for a module, class, instance, or any other object with this attribute. The .__dict__ attribute holds a list of names pertaining to the underlying object. |
locals() |
Returns a dictionary representing the names in the current local scope. |
globals() |
Returns the dictionary representing the current module namespace. |
type() |
Returns the type of an object when you call it with one argument. |
You can use any of these built-in functions to introspect your code and retrieve useful information that you can later use in your coding process.
For example, say that you’re working with dictionaries and want to get a list of all the methods and attributes in this class. You can do something like this:
>>> dir(dict)
['__class__', ..., 'popitem', 'setdefault', 'update', 'values']
The output in this example shows a list of names as strings. This list will include the attributes and methods defined in the dict class. You can use this built-in function with any Python object.
The vars() function works similarly to dir() but returns a dictionary of name-object pairs instead of a list.
The locals() and globals() functions can also be useful when you want to know the names defined in a given scope in your code. Finally, the type() function helps you determine the data type or class of a given object in your code.
Customizing the Standard REPL
The Python interpreter lets you customize some of its behaviors and features in interactive mode. To customize your REPL, you can use a so-called startup file, a Python file that the interpreter reads and executes when you start an interactive session.
You can also use the Rich third-party library to customize the output of any code that you run in a REPL session.
In the following sections, you’ll learn the basics of how to use these tools to enhance your user experience while working in the Python standard REPL.
Providing a Startup File
The standard REPL accepts a startup file that you can use to tweak some current features or add new features to your interactive sessions. This file only runs for interactive sessions. It doesn’t run when you execute a program with the python command. So, you don’t have to worry about corrupting important programs.
The startup file may contain any Python code. This code will execute before the first prompt is displayed in interactive mode.
It’s important to highlight that the startup file runs in the same namespace where you’ll be running your interactive code. So, objects defined or imported in this file will be available in your interactive session. This behavior is useful when you want to load tools and customize the features of your interactive shell.
Before doing some cool stuff with a startup file, you need to learn how to tell the interpreter which file you want to use as your startup file. You do this by setting the PYTHONSTARTUP environment variable in your system’s shell.
If you’re on Linux or macOS, then you can go to your home folder and open your shell’s configuration file. Once you’ve opened that file, add the following line at the end of it:
Linux and macOS shells automatically load their corresponding configuration file whenever you fire up a terminal or command-line window. This way, you ensure that the PYTHONSTARTUP variable is always available on your system.
In this example, you set the PYTHONSTARTUP variable to ~/.pythonstartup, which is the path to your target startup file. In this case, the file will live in your home directory, and its filename will be .pythonstartup.
Note that the filename isn’t important. You can name it whatever you want. You can also put the file in whatever directory you want. Just make sure that your PYTHONSTARTUP environment variable holds the right file path.
If you’re on Windows, then check out the Configuring Environment Variables section in Your Python Coding Environment on Windows: Setup Guide for a complete guide to creating system variables. Follow the instructions and add a PYTHONSTARTUP system variable with a suitable path.
Once you’ve set the PYTHONSTARTUP variable, go ahead and create the file in the desired folder. Open the file in a text editor and get ready to add some code. To kick things off with your custom startup file, you’ll start by adding some imports:
# .pythonstartup

from importlib import reload
from pprint import pp
As you already learned, the reload() function allows you to reload modules when you modify their content so that you can test your changes. Having this function always available in your interactive sessions will be great. It’ll prevent repetitive work and save you time.
The pp() function from the pprint module allows you to print pretty-formatted data structures, such as lists and dictionaries.
To try these new additions, go ahead and open a new terminal or command-line window. Then run Python in interactive mode. Once there, run the following code:
>>> pp(globals())
{'__name__': '__main__',
 ...
 '__builtins__': <module 'builtins' (built-in)>,
 'reload': <function reload at 0x101455c60>,
 'pp': <function pp at 0x1014f3380>}
Cool! The pp() function is already available for use. Note that reload() also appears as an entry in your current global namespace.
You can add whatever imports you need in your REPL’s startup file. This is a nice and quick way to have useful tools at your disposal whenever you run an interactive session.
Another interesting customization that you make in your REPL’s startup file is to change the characters used to identify the primary (>>>) and secondary (...) prompts. To do this, you can change the sys.ps1 and sys.ps2 variables.
Go ahead and add the following code to your startup file:
# .pythonstartup

import sys
from importlib import reload
from pprint import pp

sys.ps1 = "py$ "
sys.ps2 = "py> "
In this case, you’re telling the interpreter to use "py$ " as the primary prompt and "py> " as the secondary prompt. To try this new look and feel, launch a new REPL session. Your shell will look something like this:
py$ numbers = [
py> 1,
py> 2,
py> 3,
py> ]
py$
Changing the REPL’s prompts may be an exciting trick to explore. However, in practice, using different prompts may confuse other Python developers looking at your screen. So, you’re better off sticking to the standard prompts.
You’ll find many other interesting tweaks and customizations to add to your REPL’s startup file. Don’t be shy! Go ahead and experiment to improve your user experience and your productivity when you work in interactive mode.
Colorizing REPL Output With Rich
The Rich library allows you to use rich text and pretty formatting in the terminal. Rich 5.1.0 included highlighted pretty printing. You can use this feature to colorize the standard REPL’s output. However, you first need to pip install Rich from PyPI, the Python package index, with the following command:
$ python -m pip install rich
Once you’ve run this command, then you’re ready to colorize your REPL’s output. Here’s how you do it in an interactive session:
>>> from rich import pretty, traceback
>>> pretty.install()
>>> traceback.install(show_locals=False)
From this point on, every time you get an output in your current REPL session, that output will be colorized and formatted:
Note that this added capability is temporary. It only applies to the interactive session where you ran the code above. If you want this feature to be available in every section, then use your startup file:
# .pythonstartup

import sys
from importlib import reload
from pprint import pp

try:
    from rich import pretty, traceback
except ModuleNotFoundError:
    pass
else:
    pretty.install()
    traceback.install(show_locals=False)

# ...
With this update to your REPL’s startup file, you replicate the output colorizing and formatting behavior in all the interactive sessions with access to the Rich library. The try … except … else blocks guarantee that your startup file won’t throw an error if Rich isn’t available in the Python environment that you’re using.
Uncovering Missing Features in the Standard REPL
Compared to a full-featured code editor, IDE, or REPL, the standard REPL is relatively minimal and doesn’t provide many features to help you code and make you more productive. This lack of features is probably due to the existence of IDLE, which also comes in the standard Python installation and provides a feature-rich REPL.
Here’s a non-exhaustive list of IDE-like features that the standard REPL doesn’t support:
- Automatic indentation
- Syntax highlighting
- Contextual code or command history
- Bracket matching
- Rich code completion and code suggestions
- Dynamic code and type introspection
- Session sharing capabilities
- Dynamic help, source code, and documentation access
The standard REPL is a great tool that you can use to try out your code and get immediate feedback. It can come in handy when you don’t have access to more advanced tools. However, you need to be aware of its limitations.
Having all the features listed above at your disposal in a REPL session would improve your user experience when interacting with Python. They would increase your productivity and reduce the number of errors and typos that you’d make in your code.
Fortunately, the Python standard shell can be easily extended and customized. Therefore, you’ll find a few alternative REPLs that implement most of the above features and more. In the following section, you’ll learn about some alternative REPLs available for Python.
Using an Alternative REPL
As a Python developer, you’ll spend much of your coding time in the interactive mode because it provides a great tool for testing ideas, proving concepts, and debugging code. When you spend a significant part of your time working with a given tool, you’d love for it to implement a rich set of features that make your life more pleasant with a great user experience.
The CPython implementation includes IDLE, which provides an enhanced alternative to the standard REPL out of the box. IDLE is a great tool that you can use without installing anything from a third-party source.
In the Python ecosystem, you’ll find other feature-rich REPLs, though. For example, IPython has been around for quite some time. This REPL provides code completion, object exploration, advanced history management, and many other features. This tool is popular in the data science ecosystem.
Another enhanced REPL is bpython, which also offers several IDE-like features that’ll highly improve your user experience and productivity.
The ptpython REPL is another good alternative to the standard one. It includes features like syntax highlighting, multiline editing, auto-completion, mouse support, and more.
If you prefer to use an online REPL, then you also have a few options available:
| Online REPL | Description |
|---|---|
| Python.org shell | An online interface for the standard REPL, available on the official Python website |
| Replit | An online coding platform that, among other features, allows you to start and use a Python REPL |
| Python Morsels REPL | An online Python REPL that allows you to copy or save your coding session |
If you run your own search on the Internet, then you’ll find a few other online Python REPLs with different features. Give them a shot and choose the tool that best suits your needs. Then, tell your fellow programmers about your experience in the comments below!
Conclusion
You’ve learned how to work with Python in interactive mode using the standard shell, or REPL (Read-Eval-Print Loop). This tool comes in every Python installation so that you can use it at any moment to test new ideas, explore and experiment with new tools and libraries, refactor and debug your code, try out examples, and more.
In this tutorial, you’ve learned how to:
- Start the Python standard REPL from your command line
- Use the REPL to write and execute Python code
- Edit, modify, and reuse code in an interactive session
- Access Python’s built-in help system and introspect your code
- Fine-tune some features of the Python standard REPL
- Understand the REPL’s missing features
You’ve also learned about alternative and feature-rich REPLs, such as IDLE, IPython, bpython, and ptpython, which provide IDE-like features that can highly improve your user experience and productivity while working in interactive mode.
Free Sample Code: Click here to download the free sample code that you’ll use to explore the capabilities of Python’s standard REPL.
Watch Now This tutorial has a related video course created by the Real Python team. Watch it together with the written tutorial to deepen your understanding: Getting the Most Out of the Python Standard REPL


